Minen
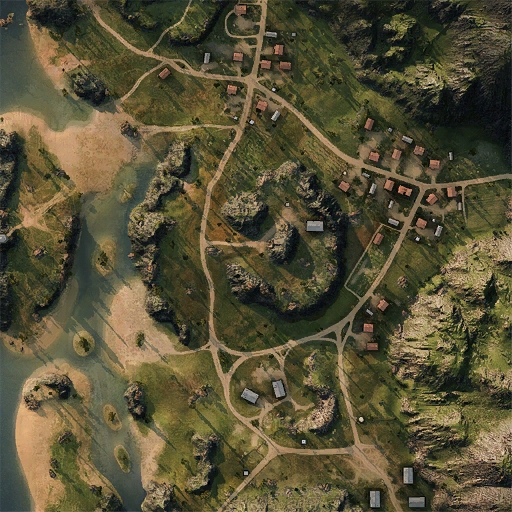
A flat hilltop in the center of this map provides an excellent firing position, but the short drive from either starting position makes climbing the hill a dangerous endeavor. Nestled in the canyon northeast of the hill is the small village of Pagorki; offering a tempting route with plenty of cover, but one that is exposed if the enemy controls the hill. West of the hill, surrounded by shallow water, is a small island which offers good cover while providing a large fire zone. While the island is protected from the hill, it is, for the most part, vulnerable to flanking attacks or fire from multiple angles. The island cover is solid, but not particularly large.
Camo Type: Summer
Because of the layout of the map, each force must choose to attack and defend three major avenues: the islands (C1-K2), the hill (D4-F7), and the town (D8-E9).
The Islands: Maneuverability
There are a series of islands along the west end of the town - all accessible through shallow water. Be aware that tanks maneuver VERY slowly while in water and are limited on the sandy beaches. All approaches should be done as straight shots at full speed to limit the risk of getting caught in the open. The western island is a straight shot from the starting positions of the northern team while the southwestern island requires a more circuitous route from the southern team's initial rally point.
The Islands: Cover
Each island is elevated and protected by rocks and some brush for cover. Because they are located along the edge of the map, it is difficult to flank entrenched defenders on either island, but the central island is easier to take and defend than the southwest island. A platoon of three tanks is usually sufficient to defend either, but both positions are vulnerable to fire coming from the rear if the center hill gets overwhelmed. Defenders must also take care to watch the gaps in the center landscape for potential snipers from the hill area.
The Islands: Keys to winning this position
The first to occupy each island gains the advantage of cover and position. A minimum of 3 tanks should be used to provide sufficient support to prevent getting overwhelmed by superior forces. Keep in mind that while the water is fordable, it severely hampers movement - especially turning - and makes you an easy target.
The Hill: Maneuverability
All tanks are slowed somewhat on the incline leading up to the entrance to the mine proper. The elevation change is gradual, but enough to make sniping problematic for all combatants: most action is close-quarters frontal fighting. Due to the rocks on the west bordering the water and the rocks on the east surrounding the mine proper, this area funnels all combatants into a single conflict area at the entrance to the mine.
The Hill: Cover
There are a few large boulders in the very center which are large enough for 1-2 tanks, but due to the proximity of the fighting, cover is very limited until one is able to gain access to the mine proper.
The Hill: Keys to winning this position
Speed is everything. Gaining the mine entrance grants access to the entire hilltop, commanding all areas of the map save for the island. Similarly, even light tanks can gain enough of a positional edge at the mine to defeat individual attackers. This area is a death trap if one side is outnumbered by 2+, however, as the concentrated fire in such limited area tends to knock out combatants quickly. Taking the hill is a team effort in every way. A minimum of 4 FAST tanks as scouts/skirmishers and 2-4 more tanks for immediate support is usually necessary to take and hold this position.
The Town: Maneuverability
Buildings are spaced close enough to provide hit-and-run support, but far enough apart for easy maneuvering.
The Town: Cover
There are plenty of buildings and a few clumps of bushes large enough for a camouflaged light tank to hide in temporarily. Keep in mind that the town is largely a hit-and-move area, as it is easy for combatants to use the interposing structures in flanking maneuvers. Beware also of enemy fire from the mine complex on the hill.
The Town: Keys to winning this position
Attack from the edges. Use the hill in the center or the bordering hills along the outside to protect your flanks. While even single scout tanks can be effective in the initial skirmish, a minimum of 3-4 tanks operating together is necessary for success.
| |
Dieser Artikel ist ein Stub Du kannst dem Wargaming-Wiki helfen, indem du ihn erweiterst. |
