Difference between revisions of "Airfield"
| Revision as of 20:40, 20 June 2012 Created page with "{{MapData|map=Airfield|template=Map Detail}} {{Panel Gallery|Aerial Photography| }} {{To Do}} category:maps" | Revision as of 03:42, 28 January 2015 moved tactics over | |||
| Line 1: | Line 1: | |||
| {{MapData|map=Airfield|template=Map Detail}} | {{MapData|map=Airfield|template=Map Detail}} | |||
| + | = Tactics = | |||
| + | The only game mode on Airfield is Standard Battles. | |||
| + | ||||
| + | Light tanks tend to scout the hill in the lower center of the map, counting on the combined support of the tank destroyers that camp back at the bases. Alternatively, an effective spotting area in the North can be found at B5-B6, where tanks advancing through the upper center of the map can be spotted. | |||
| + | ||||
| + | There are many different options for medium tanks on this map. Medium tanks can choose to go to the southern hill, get to the small pocket at E7 (east base only), go to the B line, skulk at the low path next to the hill at F5-F6, or support the heavies at the chokepoint at E6. | |||
| + | ||||
| + | Heavy tanks tend to attack the valley at E6 and flank around at D6 Those at E6 benefit from supporting fire from the tank on the South hill, as well as artillery support. Heavies advancing past these chokepoints must be wary of tank destroyers hiding at B9 and D9, as well as enemy artillery, but their success at these chokepoints is crucial to winning the map. | |||
| + | ||||
| + | Tank destroyers tend to camp at various locations at the front of the base, D2 and D9 to provide support for the tanks in the center or northern part of the map, or support the south coast at D2-D3 or D8-D9. | |||
| + | ||||
| + | SPGs traditionally go in/behind the base or head to the TD sniping spots in the north or south. | |||
| + | ||||
| {{Panel Gallery|Aerial Photography| | {{Panel Gallery|Aerial Photography| | |||
Revision as of 03:42, 28 January 2015
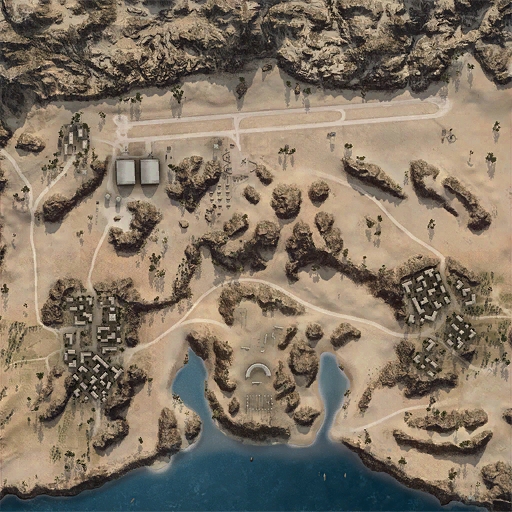
This map offers many great ambush spots, as well as possibilities for maneuvers and breakthroughs. A large airfield in the upper part of the map and a rocky highland in the center offer a major tactical challenge. Occupy the highland to get a perfect view of the surrounding terrain and dominate routes to the enemy base.
Camo Type: Desert
Tactics
The only game mode on Airfield is Standard Battles.
Light tanks tend to scout the hill in the lower center of the map, counting on the combined support of the tank destroyers that camp back at the bases. Alternatively, an effective spotting area in the North can be found at B5-B6, where tanks advancing through the upper center of the map can be spotted.
There are many different options for medium tanks on this map. Medium tanks can choose to go to the southern hill, get to the small pocket at E7 (east base only), go to the B line, skulk at the low path next to the hill at F5-F6, or support the heavies at the chokepoint at E6.
Heavy tanks tend to attack the valley at E6 and flank around at D6 Those at E6 benefit from supporting fire from the tank on the South hill, as well as artillery support. Heavies advancing past these chokepoints must be wary of tank destroyers hiding at B9 and D9, as well as enemy artillery, but their success at these chokepoints is crucial to winning the map.
Tank destroyers tend to camp at various locations at the front of the base, D2 and D9 to provide support for the tanks in the center or northern part of the map, or support the south coast at D2-D3 or D8-D9.
SPGs traditionally go in/behind the base or head to the TD sniping spots in the north or south.
| |
This article is a stub. You can help the Wargaming wiki by expanding it. |
