Difference between revisions of "Battle Mechanics"
| Revision as of 13:31, 8 February 2012 | Revision as of 13:17, 15 February 2012 added info on SPG aiming, adjusted info on dispersion & aiming circle based on Overlord post | |||
| Line 1: | Line 1: | |||
| ? | {{wip|3=[[User:Snib|Snib]] |5= | + | {{wip|3=[[User:Snib|Snib]] |5=13:17, 15 February 2012 (UTC) }} | |
| {{panel title|icon=[[image:BattleMechanicsIcon.png|72px|left|link=]]|content= | {{panel title|icon=[[image:BattleMechanicsIcon.png|72px|left|link=]]|content= | |||
| [[image:WoTBanner.png|200px|right]] | [[image:WoTBanner.png|200px|right]] | |||
| ? | This WIKI page is to provide you, the player, with as many details as possible of the core Game Mechanics, so that you need not search through the forums for this valuable information. The details of some Game Mechanics are being held "close to the vest" over at Wargaming.net. To the maximum extent possible, we have provided all the data we know about Game Mechanics. | + | : This WIKI page is to provide you, the player, with as many details as possible of the core Game Mechanics, so that you need not search through the forums for this valuable information. The details of some Game Mechanics are being held "close to the vest" over at Wargaming.net. To the maximum extent possible, we have provided all the data we know about Game Mechanics. | |
| __TOC__ | __TOC__ | |||
| Line 18: | Line 18: | |||
| Battles can take place in thirteen possible different battle tiers. Each vehicle, depending on its performance, is assigned a certain subset of these battle tiers that it is supposed to fight in. | Battles can take place in thirteen possible different battle tiers. Each vehicle, depending on its performance, is assigned a certain subset of these battle tiers that it is supposed to fight in. | |||
| ? | The official matchmaking chart shows which vehicle belongs to which battle tier. An English version can always be found | + | The official matchmaking chart shows which vehicle belongs to which battle tier. An English version can always be found [https://forum.worldoftanks.eu/index.php?/topic/10168-/ here]. It sometimes takes Wargaming a while to update it after patches, in this case you can refer to the [https://forum.worldoftanks.ru/index.php?/topic/41221- Russian version], which is usually updated much faster. | |
| Players often confuse battle tiers and their vehicle's tier. The two are unrelated. Vehicle tiers are irrelevant for matchmaking. The match maker does not try to match vehicles by vehicle tier. For example, a T92 SPG may be vehicle tier 8, but it is assigned to battle tiers 12 and 13 only, which is out of reach of tier 8 mediums, despite being of the same vehicle tier. | Players often confuse battle tiers and their vehicle's tier. The two are unrelated. Vehicle tiers are irrelevant for matchmaking. The match maker does not try to match vehicles by vehicle tier. For example, a T92 SPG may be vehicle tier 8, but it is assigned to battle tiers 12 and 13 only, which is out of reach of tier 8 mediums, despite being of the same vehicle tier. | |||
| Line 268: | Line 268: | |||
| </tr> | </tr> | |||
| </table> | </table> | |||
| ? | ||||
| '''''You will NOT get experience for:''''' | '''''You will NOT get experience for:''''' | |||
| Line 274: | Line 273: | |||
| # Damaging an ally's tank, even if said ally is "blue" | # Damaging an ally's tank, even if said ally is "blue" | |||
| # Team killing. But you can always get a free ticket to ban land if you do it on purpose. | # Team killing. But you can always get a free ticket to ban land if you do it on purpose. | |||
| ? | # Shots that deal no hull damage, destroy no module or kill no crew member | + | # Shots that deal no hull damage, destroy no module or kill no crew member. | |
| # Shots that destroy a module that had already been destroyed before (except when a repair pack has been used on it). | # Shots that destroy a module that had already been destroyed before (except when a repair pack has been used on it). | |||
| # For receiving damage without fighting back. As stated above, your shells have to damage your attacker. | # For receiving damage without fighting back. As stated above, your shells have to damage your attacker. | |||
| Line 297: | Line 296: | |||
| If you leave the cap circle before capture is completed, all capture points earned by you are lost and the capture bar progress is reduced accordingly. The same happens each time you get damaged while within the cap circle before capture is complete. Both hull damage and critical damage (e.g. tracks) have the same effect, as does damage inflicted by the enemy or your own team. | If you leave the cap circle before capture is completed, all capture points earned by you are lost and the capture bar progress is reduced accordingly. The same happens each time you get damaged while within the cap circle before capture is complete. Both hull damage and critical damage (e.g. tracks) have the same effect, as does damage inflicted by the enemy or your own team. | |||
| ? | Once capture is complete, the round does not end immediately. There is a delay of at least 5 seconds before victory is yours. According to Overlord this delay gets extended each time a vehicle is destroyed. The following outcomes are possible: | + | Once capture is complete, the round does not end immediately. There is a delay of at least 5 seconds before victory is yours (unless the battle timer runs out earlier). According to Overlord this delay gets extended each time a vehicle is destroyed. The following outcomes are possible: | |
| * All friendly vehicles are destroyed within the delay: Enemy team wins. | * All friendly vehicles are destroyed within the delay: Enemy team wins. | |||
| Line 325: | Line 324: | |||
| ;Minimap | ;Minimap | |||
| ? | The minimap is not part of the 3D world and thus unaffected by the limitations discussed in this section. What you see on the minimap is however influenced by [[ | + | The minimap is not part of the 3D world and thus unaffected by the limitations discussed in this section. What you see on the minimap is however influenced by [[#Radio_Range|Radio Range]] discussed below. | |
| === Shell Tracers === | === Shell Tracers === | |||
| Line 332: | Line 331: | |||
| *Tracers from spotted enemy vehicles are always shown (subject to the above limitations to draw distance). | *Tracers from spotted enemy vehicles are always shown (subject to the above limitations to draw distance). | |||
| *Tracers from unspotted enemy vehicles: | *Tracers from unspotted enemy vehicles: | |||
| ? | **In '''arcade view''' and '''sniper view''', tracers are only shown if they originate from within +/- 25° of the direction you are looking at and from within maximum spotting range [https://overlord-wot.blogspot.com/2011/10/thoughts-on-upcoming-70.html] | + | **In '''arcade view''' and '''sniper view''', tracers are only shown if they originate from within +/- 25° of the direction you are looking at and from within maximum spotting range. [https://overlord-wot.blogspot.com/2011/10/thoughts-on-upcoming-70.html] In the following illustration, you will only be able to see the red tracer in the first two cases: <br />[[image:Tracers_arcage.jpg|link=]] | |
| **In '''strategic view''', all tracers are shown that originate from within your strategic view port. | **In '''strategic view''', all tracers are shown that originate from within your strategic view port. | |||
| === View Range === | === View Range === | |||
| ? | View Range is the theoretical maximum distance that your vehicle's [[Crew#Roles|commander]] (not you!) can see, and depends on the vehicle's [[turret]], the commander's [[Crew#Effective_Skill_Level|effective skill level]] as well as the usage of view range [[ | + | View Range is the theoretical maximum distance that your vehicle's [[Crew#Roles|commander]] (not you!) can see, and depends on the vehicle's [[turret]], the commander's [[Crew#Effective_Skill_Level|effective skill level]] as well as the usage of view range [[#Tank_Stats|stat]] enhancing [[equipment]] like Coated Optics or Binoculars. View Range has no relevance of its own, its only purpose is to server as a factor for calculating the [[#Spotting_Range|spotting range]]. | |
| ? | Note that unlike what the in game description of the view range enhancing [[equipment]] indicated, '''view range is unlimited'''. The better your view range, the better your [[ | + | Note that unlike what the in game description of the view range enhancing [[equipment]] indicated, '''view range is unlimited'''. The better your view range, the better your [[#Spotting_Range|spotting range]], at any range. | |
| The maximum possible view range you can currently (v0.7.1) achieve in game is 558.75m with a Patton and 100% commander, Improved Ventilation [[equipment]], Binoculars [[equipment]] and Case of Cola [[Consumables|premium consumable]]. | The maximum possible view range you can currently (v0.7.1) achieve in game is 558.75m with a Patton and 100% commander, Improved Ventilation [[equipment]], Binoculars [[equipment]] and Case of Cola [[Consumables|premium consumable]]. | |||
| Line 346: | Line 345: | |||
| ===== Minimum Spotting Range ===== | ===== Minimum Spotting Range ===== | |||
| ? | You will always spot any vehicle that comes within 50m of you, regardless of line of sight. | + | You will always spot any vehicle that comes within 50m of you, regardless of line of sight. Because you do not need line of sight, this is also called ''proximity spotting'', and can be used on certain maps to spot enemies going past a choke-point without actually being being exposed to them. | |
| ===== Maximum Spotting Range ===== | ===== Maximum Spotting Range ===== | |||
| Line 356: | Line 355: | |||
| Spotting Range is not a fixed value particular to your tank, but depends on the target you are spotting, its current position and situation. In other words, as many different individual spotting ranges are calculated by the server for your tank as there are targets within the minimum and maximum spotting ranges to you. For each target Spotting Range is calculated invidiually according to the following formula: | Spotting Range is not a fixed value particular to your tank, but depends on the target you are spotting, its current position and situation. In other words, as many different individual spotting ranges are calculated by the server for your tank as there are targets within the minimum and maximum spotting ranges to you. For each target Spotting Range is calculated invidiually according to the following formula: | |||
| ? | [[image:Equation_spottingRange.png| | + | [[image:Equation_spottingRange.png|link=]] | |
| ? | If your spotting range to a vehicle equals or exceeds your distance to that vehicle, and you have line of sight, or if the vehicle is within the minimum spotting range, you will spot it. Otherwise it remains hidden unless spotted by another vehicle on your team that you are in [[ | + | If your spotting range to a vehicle equals or exceeds your distance to that vehicle, and you have line of sight, or if the vehicle is within the minimum spotting range, you will spot it. Otherwise it remains hidden unless spotted by another vehicle on your team that you are in [[#Radio_Range|radio communication]] with. | |
| ? | See [[ | + | See [[#How_tank_stats_are_calculated|above]] for how effective view range can be calculated. Camouflage mechanics are explained [[#Camouflage|below]], as far as they are known. | |
| === Spotting Mechanics === | === Spotting Mechanics === | |||
| ? | To determine whether you have line of sight to a vehicle within your [[ | + | To determine whether you have line of sight to a vehicle within your [[#Spotting_Range|spotting range]] and will thus spot it, the server calculates a virtual vision ray extending from one of two '''view range ports''' on your vehicle to each of the six '''visiblility checkpoints''' of the target vehicle. If a vision ray gets obstructed by non-transparent objects like houses, terrain, or even just a lamp post, this ray ends there and does not reach the target vehicle. If only one of the six rays reaches the target, you will spot it (and it will ''light up'' if it was previously hidden). | |
| ==== View Range Ports ==== | ==== View Range Ports ==== | |||
| Line 428: | Line 427: | |||
| [[image:RadioRanges.jpg|400px|right|{name}]] | [[image:RadioRanges.jpg|400px|right|{name}]] | |||
| ? | Each vehicle comes equipped with a [[radio]] that allows your [[Crew#Roles|radioman]] to communicate with other vehicles on your team. Two friendly vehicles can communicate if they are no further away from each other than the sum of their respective radio ranges. For example, a tank with 300m [[ | + | Each vehicle comes equipped with a [[radio]] that allows your [[Crew#Roles|radioman]] to communicate with other vehicles on your team. Two friendly vehicles can communicate if they are no further away from each other than the sum of their respective radio ranges. For example, a tank with 300m [[#How_tank_stats_are_calculated|effective radio range]] and a tank with 500m [[#How_tank_stats_are_calculated|effective radio range]] stay in communication up to a distance of 800m. Your effective radio range depends on your vehicle's [[radio]] and on the [[Crew#Effective_Skill_Level|effective skill level]] of those crew members responsible for the [[Crew#Roles|Radio Operator role]]. | |
| If you are in communicaton with a friendly vehicle, then you will share information about the position and health of all enemy vehicles either of you are currently spotting. You will not relay any information received from other friendly vehicles via radio communication, however, nor will it be relayed to you. In other words, you will know the location of; | If you are in communicaton with a friendly vehicle, then you will share information about the position and health of all enemy vehicles either of you are currently spotting. You will not relay any information received from other friendly vehicles via radio communication, however, nor will it be relayed to you. In other words, you will know the location of; | |||
| Line 436: | Line 435: | |||
| '''Example:''' | '''Example:''' | |||
| ? | :You are looking down a long street from your tank destroyer and do not see any enemies, because they are outside your own [[ | + | :You are looking down a long street from your tank destroyer and do not see any enemies, because they are outside your own [[#Spotting_Range|spotting range]]. However, when a friendly tank moves down the street, it spots an enemy tank that was there all along. As long as you are within radio range of that friendly tank, you will see that enemy tank just as if you were spotting it yourself. | |
| :See the illustration to the right for a more complex situation. | :See the illustration to the right for a more complex situation. | |||
| }} | }} | |||
| {{panel content toc|title=Movement, Acceleration, Top Speed|content= | {{panel content toc|title=Movement, Acceleration, Top Speed|content= | |||
| + | [[image:Ico_engine_alpha.png|left|{name}|link=]] | |||
| Movement of your tank in World of Tanks is critical to survival. Whether you’re trying to out-race the enemy to a favored covering location or trying to get away from trouble, top speed and acceleration are very important factors. Acceleration can be important for moving out from behind cover to take a quick shot and then getting back to cover. | Movement of your tank in World of Tanks is critical to survival. Whether you’re trying to out-race the enemy to a favored covering location or trying to get away from trouble, top speed and acceleration are very important factors. Acceleration can be important for moving out from behind cover to take a quick shot and then getting back to cover. | |||
| Line 461: | Line 461: | |||
| }} | }} | |||
| {{panel content toc|title=Aiming|content= | {{panel content toc|title=Aiming|content= | |||
| ? | [[image: | + | [[image:Ico_gun_alpha.png|left|{name}|link=]] | |
| All about pointing your gun at the enemy and hitting them. | All about pointing your gun at the enemy and hitting them. | |||
| Make sure to read the section about [[#Accuracy_and_Dispersion|Accuracy and Dispersion]] as well. | Make sure to read the section about [[#Accuracy_and_Dispersion|Accuracy and Dispersion]] as well. | |||
| Line 472: | Line 472: | |||
| === Manual Aiming === | === Manual Aiming === | |||
| In most cases it is better to aim your gun manually rather than rely on auto-aim, but there are a few factors to consider. Every shell in the game has its own trajectory and flight speed, and you often need to consider them while manually aiming, but since the game does not tell you these parameters, they are best learned from experience. | In most cases it is better to aim your gun manually rather than rely on auto-aim, but there are a few factors to consider. Every shell in the game has its own trajectory and flight speed, and you often need to consider them while manually aiming, but since the game does not tell you these parameters, they are best learned from experience. | |||
| ? | ||||
| ? | ||||
| ? | ||||
| ==== Leading the Target ==== | ==== Leading the Target ==== | |||
| [[image:Tactics_movingTarget.png|thumb|400px|Leading the Target|right|link=]] | [[image:Tactics_movingTarget.png|thumb|400px|Leading the Target|right|link=]] | |||
| ? | If your target is moving perpendicular to you, you always have to adjust your aim manually. This is also called leading the target. | + | If your target is moving perpendicular to you, you always have to adjust your aim manually. This is also called leading the target. Factoring in your shell's flight speed, you have to aim where you estimate the target your shell's trajectory intersects with with the target's movement. For example, if your shell flies 1000 m/s on a flat trajectory (e.g. AP shells fired from the 8,8 cm KwK 43 L/71 "long 88" of the [[PzKpfw VI Tiger]]), and your target is 500m away, your shell takes little more than half a second to reach it. If your target is a [[T-50-2]] moving perpendicular to you at 72 km/h, i.e. 20m/s, theoretically you need to aim 10m in front of it to hit it. | |
| + | ||||
| + | However, since this is an online game and not reality, you also have to account for network latency, i.e. your ''ping''. If you were playing with 500ms ping (an extremely high ping), then you would have to lead the target by an additional 0.5 seconds of movement. In the example that means you would have to double your lead and aim 20m in front of the target (see also [[#Latency Correction|Latency Correction]] below). | |||
| While all that is easy enough with a high velocity gun, it becomes much harder with a low velocity gun like the 105 mm AT Howitzer M3 of the aforementioned [[T82]]. It fires HE shells which fly at a velocity of 311 m/s on a very high trajectory, i.e. they can take several seconds to reach a far away target. The amount you need to lead your target by with such a gun increases accordingly. Naturally, the more you need to lead the more will your aim be off if your target changes its course even slightly. That is something to keep in mind when trying to avoid incoming shots: never be predictable. | While all that is easy enough with a high velocity gun, it becomes much harder with a low velocity gun like the 105 mm AT Howitzer M3 of the aforementioned [[T82]]. It fires HE shells which fly at a velocity of 311 m/s on a very high trajectory, i.e. they can take several seconds to reach a far away target. The amount you need to lead your target by with such a gun increases accordingly. Naturally, the more you need to lead the more will your aim be off if your target changes its course even slightly. That is something to keep in mind when trying to avoid incoming shots: never be predictable. | |||
| + | ||||
| + | ==== Ballistic Trajectory ==== | |||
| + | The reticle takes the ballistic trajectory into account, so it will automatically aim a little higher while you hover over a visible target (red outline). However, as soon as you move your aim away from the target, this automatic correction goes away. This is important to consider when leading a moving target as described avove, because then you will have to correct your aim for the trajectory yourself. An easy way to know by how much to correct is to first hover the reticle over the target, note how high it aims, and then aim to the same elevation while you lead. While doing that the reticle may adjust to terrain or objects your aim passes over, so you might need to compensate for that as well if the situation arises. | |||
| ==== Aiming and Line of Sight ==== | ==== Aiming and Line of Sight ==== | |||
| Line 492: | Line 494: | |||
| Regardless of elevation there can also be situations where you do have line of sight on the target and can place a shot, but you cannot see the target's red outline. This usually happens if another object is closer to you than the target and your reticle prioritizes the other target instead of the tank you clearly see and want to aim at. You can take the shot regardless, but aiming can be tricky if your reticle also tries to adjust the aim for the closer object. Be particularly careful if the closer object is a friendly tank - many have accidentally been shot in the back by their team mates in such situations. | Regardless of elevation there can also be situations where you do have line of sight on the target and can place a shot, but you cannot see the target's red outline. This usually happens if another object is closer to you than the target and your reticle prioritizes the other target instead of the tank you clearly see and want to aim at. You can take the shot regardless, but aiming can be tricky if your reticle also tries to adjust the aim for the closer object. Be particularly careful if the closer object is a friendly tank - many have accidentally been shot in the back by their team mates in such situations. | |||
| ? | === | + | === Strategic Aiming (SPG) === | |
| + | [[image:Strategic_aiming_101.jpg|thumb|400px|Strategic Aiming Basics|right|link=]] | |||
| + | If your vehicle is a [[Self_Propelled_Guns|self-propelled gun]], then you have a third aiming mode available in addition to the two modes discussed above. By default it is accessed by pressing the Shift key. This view mode is called the Strategic Mode. It gives you a top down view onto a section of the battlefield. You can use your mouse or the cursor keys to move the view around. You can also place the strategic view directly onto a certain battlefield area by holding Ctrl and right clicking the desired location on the minimap. | |||
| + | ||||
| + | Unlike in the other view modes, in strategic mode the aiming circle does adjust to terrain elevation and ballistic trajectory. Thus it will usually not be a perfect circle but an oval shape. This helps you judge both the angle of the terrain your target is positioned on and your shell trajectory to the target. The little dot within the aiming circle/oval represents the height adjusted center of your aim. | |||
| + | ||||
| + | It takes a little getting used to perfect aiming with self-propelled guns, see the illustration to the right for the basics to get you started. | |||
| + | ||||
| + | === Client vs Server === | |||
| Shots that fall outside of your aim or go into a completely different direction are usually caused by network or server lag. This can happen because every movement of your aim on your client has to be transmitted to the server first and executed there as well. So regardless of your latency the server aim will always lag slightly behind your aiming on the client. If you press CapsLock + 0 during a battle, your client will show an additional blue reticle which shows the last information the client has received about where the server is currently placing your aim, as well as the size of the aiming circle on the server. Since this is subject to latency as well, it is not entirely accurate either, but if you are having latency related problems it can be a good idea to use the server reticle and wait until server and client reticles match before you fire a shot. | Shots that fall outside of your aim or go into a completely different direction are usually caused by network or server lag. This can happen because every movement of your aim on your client has to be transmitted to the server first and executed there as well. So regardless of your latency the server aim will always lag slightly behind your aiming on the client. If you press CapsLock + 0 during a battle, your client will show an additional blue reticle which shows the last information the client has received about where the server is currently placing your aim, as well as the size of the aiming circle on the server. Since this is subject to latency as well, it is not entirely accurate either, but if you are having latency related problems it can be a good idea to use the server reticle and wait until server and client reticles match before you fire a shot. | |||
| === Where to aim === | === Where to aim === | |||
| ? | A tank's [[#Armor|armor]] is not uniform. When shooting at an enemy tank, it is always useful to aim for areas with less armor, so called weak spots. Often it | + | A tank's [[#Armor|armor]] is not uniform. When shooting at an enemy tank, it is always useful to aim for areas with less armor, so called weak spots. Often it can be helpful to inflict critical [[#Damage|damage]], e.g. by destroying the tank's tracks and thus immobilizing it, by shooting it's fuel tank to set it on fire, etc. Follow the links for more details. | |
| }} | }} | |||
| {{panel content toc|title=Accuracy and Dispersion|content= | {{panel content toc|title=Accuracy and Dispersion|content= | |||
| ? | [[image:BattleMechanicsIcon.png|90px|left|{name}]] | + | [[image:BattleMechanicsIcon.png|90px|left|{name}|link=]] | |
| [[image:Standard_deviation_diagram.png|thumb|400px|Standard Deviation Diagram|right|link=]] | [[image:Standard_deviation_diagram.png|thumb|400px|Standard Deviation Diagram|right|link=]] | |||
| Every shot you take is dispersed randomly around the center of your aiming reticle, i.e. you will not necessarily hit exactly where you aimed. The actual dispersion amount is based on a Gaussian (normal) distribution curve and depends on your gun and the turret it is mounted to. | Every shot you take is dispersed randomly around the center of your aiming reticle, i.e. you will not necessarily hit exactly where you aimed. The actual dispersion amount is based on a Gaussian (normal) distribution curve and depends on your gun and the turret it is mounted to. | |||
| === Gun Accuracy === | === Gun Accuracy === | |||
| ? | The accuracy value for a gun is given in meters at a range of 100m. The value describes | + | The accuracy value for a gun is given in meters at a range of 100m. The value describes 2 standard deviations σ from the center of your aim. In other words, for a gun with 0.32m [[#How_tank_stats_are_calculated|effective accuracy]] at 100m, 95.45% of all shots will land within 0.32m of the center of your aim at that distance. Dispersion amount increases linearly with distance, i.e. 0.32m effective accuracy at 100m translates to 0.64m at 200m and 1.28m at 400m | |
| === Aiming Circle === | === Aiming Circle === | |||
| ? | The | + | The aiming circle is 1.5 times bigger and describes an area of 3 standard deviations σ from the aim point. That means for 0.32m effective accuracy at 100m your aiming circle's outer diameter is 0.96m at 100m, or 3.84m at 400m. | |
| ? | Based on a purely normal distribution that would mean that a small percentage of your shots would fall outside of the aiming circle. However, | + | Based on a purely normal distribution that would mean that a very small percentage of your shots would fall outside of the aiming circle. However, in game dispersion is effectively limited to 3 standard deviations, i.e. the size of the aiming circle, and no shots can fall outside of that area. | |
| ? | + | |||
| ? | + | |||
| === Client vs Server === | === Client vs Server === | |||
Revision as of 13:17, 15 February 2012
 |
This page is a work in progress, Snib was editing it and left halfway through so please do not edit it until it is marked as complete before you contact the user or enough time as passed for the page to be considered abandoned. Use the Discussion page for any relevant input you might have please. |
This warning was posted at: 13:17, 15 February 2012 (UTC)


- This WIKI page is to provide you, the player, with as many details as possible of the core Game Mechanics, so that you need not search through the forums for this valuable information. The details of some Game Mechanics are being held "close to the vest" over at Wargaming.net. To the maximum extent possible, we have provided all the data we know about Game Mechanics.
Matchmaking
Battle Tiers
Battles can take place in thirteen possible different battle tiers. Each vehicle, depending on its performance, is assigned a certain subset of these battle tiers that it is supposed to fight in.
The official matchmaking chart shows which vehicle belongs to which battle tier. An English version can always be found here. It sometimes takes Wargaming a while to update it after patches, in this case you can refer to the Russian version, which is usually updated much faster.
Players often confuse battle tiers and their vehicle's tier. The two are unrelated. Vehicle tiers are irrelevant for matchmaking. The match maker does not try to match vehicles by vehicle tier. For example, a T92 SPG may be vehicle tier 8, but it is assigned to battle tiers 12 and 13 only, which is out of reach of tier 8 mediums, despite being of the same vehicle tier.
To see which battle tiers a vehicle can fight in, find it on the left side of the chart. If it is not listed as an exception at the bottom left, the default rules above apply. Take, for example, an MS-1. No special rule, thus we go find the row for Vehicle Tier 1, Light Tank, and see to the right that this vehicle can fight in battle tiers 1 and 2. Scrolling down, we see that nothing except tier 1 light tanks can fight in battle tier 1. For battle tier 2, we see that the MS-1 can meet tier 2 light and medium tanks as well as the T2 light tank listed at the bottom.
Vehicle Weight
Once enough candidates for a certain battle tier are found, the matchmaker tries two form two teams from them. For this purpose each vehicle is assigned a certain weight, and the maker-maker tries to keep the weight of both teams as equal as possible. Weighting is performed by vehicle tier and vehicle type, some vehicles are individually weighted, and for some vehicles there are special restrictions.
Below are the rules for game version v0.7.1:
- Weight by Vehicle Tier is applied as follows:
- Tier 10: 100
- Tier 9: 60
- Tier 8: 40
- Tier 7: 27
- Tier 6: 18
- Tier 5: 12
- Tier 4: 8
- Tier 3: 5
- Tier 2: 3
- Tier 1: 2
- Weight by Vehicle Type is applied as follows:
- All heavy tanks receive 45% extra weight.
- All SPGs receive 20% extra weight.
- Individual Weights:
- Tier 9 medium tanks receive 45% extra weight.
- Tier 8 and 9 tank destroyers receive 45% extra weight.
- The AMX 13 90 is weighted like a tier 8 tank.
- T-50-2, VK2801 and Chaffee are weighted like tier 6 tanks.
- The PzKpfw 38H735 (f) "Hotchkiss" is a tier 2 tank with 233% extra weight, with 7 points it is weighted close to a tier 4 tank, but it is in the same battle tier as other tier 2 light tanks.
- Special Restrictions
- The number of SPGs in both teams cannot differ by more than 1. This includes the possibility of one team having no SPG and the other having 1.
- Currently there are no other restrictions in effect.
Vehicle Tier
Vehicle tier is NOT taken into consideration when balancing teams. This is a common misconception among players. For example, under the current rules a Type 59 tier 8 medium can be matched against a tier 7 heavy tank. The Type 59 has a matchmaking weight of 40 and the tier 7 heavy tank has a matchmaking weight of 39.15, i.e. nearly the same.
Platoons
IMPORTANT: If you are in a platoon, the entire platoon is placed into battles according to the platoon member in the vehicle with the highest battle tier. This can produce unwanted results in particular for new players at the lower tiers. For example, a tier 3 SPG can join battles up to battle tier 8, where you will meet up to tier 7 tanks, whereas a tier 3 medium tank on its own can only join battles up to battle tier 6, which includes at most tier 5 tanks. If those two platoon together the SPG will pull the medium tank up into its battle tier, where there tier 3 medium will be hopelessly outclassed. Please take this into account when forming platoons.
A special case of this is when you see a top tier tank platooned with one or two tier 1 tank. This is sometimes done on purpose. If you look above, a tier 10 heavy tank weighs 145 points, whereas a tier 1 tank weighs only 2. Thus the platoon's team a priori has a massive point deficit, which the match-maker will balance out by either dragging more lower tier tanks into the enemy team or by dragging more high tier tanks into the platoon's team. The tactic is frowned upon but permissible. It has become rare these days, likely because the success chances are mediocre. With two tier 1 tanks the team is missing 13.3% of its team that could play a useful role during the battle, whereas the only useful contribution the tier 1 tanks can make is sneak into the enemy cap.
Apart from these considerations, platoons play no role in matchmaking, the matchmaker does not balance the number of platoons nor do platooned tanks receive special weight anymore.Tank Stats

The performance of your tank depends directly on the qualification of its crew. Each crew member is fulfilling one or several roles in your tank and the performance of your tank in those areas depends on their effective primary skill levels. For example, reload time depends on the loader's skill. Since the commander provides 10% of his own skill level as a bonus to each crew member he is also relevant for every stat of your tank. If you have more than one crew member responsible for the same stat (e.g. two loaders), then the average of their effective skill levels will be used to calculate the effective stat. For more details about the areas of responsibility of your crew see here).
How tank stats are calculated
The stats of your tank as they are shown in the garage or in the tech trees, i.e. the nominal stats do not represent your tank's actual performance. They are calculated based on a hypothetical 133.33% effective primary crew skill, which cannot be reached in game. You tank's actual performance for each stat can be calculated based on the effective skill levels of those crew members which are responsible for the operation of that part of the tank, using one of the following two formulae:

Degressive stats are, for example, your aiming time, which becomes shorter as your gunner's skill level increases. Progressive stats are, for example, your view range, which increases as your commander's skill level increases.
Note that only stats that depend on actual crew interaction are affected by crew skill. Your tank will not get thicker armor or become heavier with more experienced crew. Also while a better loader will make your gun reload faster, he will not influence the speed with which automatic cannons or automatic loading guns fire the shells in their magazines, because, as the name indicates, that part of the process is automatic. Reloading those magazines is where the loader comes back into play, however.
Increasing Stats past 100% crew skill
Apart from advancing your crew's primary qualification to 100% skill level, you can advance your tank's performance further as follows:
- Bonus to Tank Stats
- You can buy equipment for credits that gives a direct bonus to specific tank stats. For example, coated optics provide a 10% bonus to view range, and a gun rammer provides 10% bonus to reload time.
- There are also credit or gold bought consumables that provide a bonus to engine power and turret traverse.
- Bonus to Crew Skills
- Improved Ventilation is a credit bought equipment for closed-topped tanks only that increases every skill level (that includes secondary qualifications) of every crew member by 5, i.e. effectively +5 for the commander and +5.5 for his crew. This bonus is displayed in your garage screen when you mouse over each crew member, but the displayed numbers are rounded to integers.
- Chocolate/Rations/Cola/Coffee are gold bought consumables that equally increase every skill level of every crew member, but by 10, i.e. effectively +10 for the commander and +11 for his crew. This bonus is not displayed in your garage screen.
- Reaching Garage Stats
Note that, as pointed out above, you need 133.33% effective skill level to reach the garage stats, but this is impossible to achieve. Even making use of all bonuses for crew skills listed above the highest obtainable effective skill level remains lower. That means that to reach the garage stats it is always necessary to make use of equipment and/or consumables providing bonuses to tank stats, in some cases in combination with equipment and/or consumables providing bonuses to crew skills. Since for many stats such equipment consumables bonuses are unavailable, their listed values can never be reached.
Examples
Let's go through a few examples to make it clearer or confuse you more, as the case may be. Hopefully you like math!
- Easy example
The entire crew of your stock Leichttraktor is at 50% primary skill level. What is your view range?
- The garage stat shown for view range is 300m.
- Responsible for view range is the commander. He has an effective skill level of 50%.
- View range is a progressive stat. Thus we calculate 300m * (0.00375 * 50 + 0.5).
- We obtain as a result your effective view range of 206.25m.
- That means your commander cannot see any tank further away than 206.25m even if it is right in front of you and shooting at you. Keep that in mind and make sure you train those crews!
- You decide to remedy the situation immediately by equipping Binoculars equipment that you had available and which give a 25% bonus to view range. You calculate 206.25m * 1.25 = 257.81m. There you go, marked improvement, but only while your hull does not move for at least 3 seconds.
- Advanced example
You just bought your stock Marder II with a 75% crew and want to know how fast it reloads.
- The garage stat shown for rate of fire is 30 rounds per minute. Since you want the actual reload time, you calculate 60s/30 = 2s reload time for every shot.
- Responsible for that is the loader. The Marder II does not have a separate loader, instead the gunner is loading the gun himself. What is his effective skill level? His primary skill level is 75%. But we must not forget the commander's bonus. The commander's skill level is also 75%. So we calculate 75% (loader) + 75% (commander) * 0.1 (in a case like this where commander and crew have the same skill level you can also simply calculate 75% * 1.1) and obtain the effective skill level of our loader at 82.5%.
- Reload time is a degressive stat. Thus we calculate 2s / (0.00375 * 82.5 + 0.5). We obtain as a result our effective (rounded) reload time of 2.47s.
- We can also calculate rate of fire. Since that is progressive we go 30 * (0.00375 * 82.5 + 0.5), i.e. our stock Marder II has a (rounded) rate of fire of 24.28 with a 75% crew.
- Difficult example
You have advanced in World of Tanks and bought a shiny new AMX 50B. It is still stock, but you invested some gold into training your crew immediately to 100% skill level. But you ran out of gold so only your Commander and your Gunner got trained to 100%, while you trained the rest of your new crew to 75% with credits. You also installed Improved Ventilation equipment. What is your rate of fire?
- The garage stat shown for rate of fire for all auto-loaders and automatic guns is incorrect, because Wargaming made a mistake writing their formula. Since we do not want to work with incorrect data and also make the example a bit more complicated, let's look at the stats not shown in game. The vehicle's gun has an automatic loader and can fire 4 shells every 2.5 seconds until the magazine needs to be reloaded, which nominally takes 25 seconds.
- Responsible for that is the loader. The AMX 50B has three crew members assigned to that role, the Commander, the Gunner and the Radioman. The Commander and the Gunner are at 100% primary skill level, the Radioman is at 75%. So what is the effective skill level for our calculation? As explained above, we take the average of each crew member's effective skill level, so we need to calculate it for each of them first, add them and then divide by their number: 100+5=105% (commander) + 100+5+105*0.1=115.5% (gunner) + 75+5+105*0.1=90.5% (radioman) / 3. As you can see, it becomes a bit more complicated here, we need to take into account equipment, which crew member receives the commander's bonus and which doesn't. Our calculated effective skill level is thus 103.67%
- Now back to our formula to calculate the actual tank stats. If you paid attention above, you'll know that the 2.5s for revolving the magazine while firing are automatically performed by the tank and not influenced by crew skill. Reloading the magazine, however, depends on the crew. Knowing that, we take the 2.5s as a constant and calculate 25s / (0.00375 * 103.67 + 0.5) = 28.13s as the time it takes to reload a magazine. But we wanted to know rate of fire, i.e. the average amount of shells the tank can shoot every minute. We know the tank takes 28.13s to load and fire the first of four shells and then fires the remaining 3 shells with a 2.5s delay between each shot. Thus we calculate 60/((28.13s + (4 - 1) * 2.5s)/4 and finally obtain our answer, our crew allows our tank to fire 6.74 rounds per minute.
Crew Skills
Experience and Credits
Tank Experience and Credits
Experience and credits are gained in all battle types except training battles for the following actions:
| XP awarded? | Credits awarded? | |
|---|---|---|
| During the battle: | ||
| Joining a battle | No |
Fixed amount scaling with player's tank tier |
| Spotting an enemy tank for the first time | Flat bonus per detected tank, double per detected SPG |
Flat bonus per detected tank, double per detected SPG |
| Damaging enemies you are spotting yourself | Per point of damage, modified by victim's tank type and tank tier compared to your own (damaging higher tiers pays more). All damage counts, whether caused by direct hits, splash damage, ramming, fire or ammo-rack explosion. |
Per point of damage |
| Damaging enemies that are not lit up at all | Per point of damage |
|
| Damaging enemies that your team is spotting, but not yourself | 50% of the above |
|
| Damage done to targets you are spotting yourself, by tanks who are not spotting them themselves | 50% of what your team member doing the damage earned, divided by the number of team members spotting the target |
Same reward as the team member doing the damage earned, divided by number of tanks spotting the target |
| Inflicting critical (module/crew) damage | This means destroying an enemy tank's module (only damaging it is not enough), or killing their crew. Flat bonus depending on the tier of the target compared to yours, whether caused by direct hits, splash damage, ramming, fire or ammo-rack explosion. Light tanks receive a bonus for critical damage inflicted to heavy tanks. In all cases, only the first critical destruction counts (or second, in case a repair/first aid consumable was used) |
No |
| Disabling an enemy vehicle (killing all crew) | Same reward as inflicting damage for the remaining hitpoints |
Same reward as inflicting damage for the remaining hitpoints |
| Killing blow | Very small bonus modified by the tier of the killed enemy compared to yours |
No |
| Close combat bonus | Damaging enemy tanks at under 200m range gives a very small bonus |
No |
| Scoring base capture points | Per point scored, up to 100 points, if the base was captured successfully |
No |
| Scoring base defense points | Per point scored, up to 100 points |
No |
| Completed base capture | Flat bonus |
Flat amount paid to everyone who is in the capture circle at the moment of completed base capture, independent of individual contribution |
| After the battle: | ||
| Survival | Very small flat bonus |
No |
| Team performance factor | Coefficient based on the total damage inflicted to the enemy team by your team |
No |
| Loss | No |
No |
| Draw | No |
No |
| Win | Coefficient of 1.5 |
Basic "joining a battle" reward multiplied by 1.85. |
| Win in a tank company or clan wars battle | In addition to the normal bonus for winning, 50% of the XP gain of the loser as a bonus. |
In addition to the normal bonus for winning, 50% of the credits gain of the loser as a bonus. |
| Tank specific balancing factor | Tank specific coefficient, assumed to be 1 for all non-premium tanks |
Tank specific coefficient, generally higher for premium tanks |
| Active premium account | Coefficient of 1.5 |
Coefficient of 1.5 |
| First daily victory with the vehicle | Coefficient of 2 |
No |
| Exiting Battle during load/countdown | All rewards set to 0 |
All rewards set to 0 |
| Exiting Battle later | XP as earned, there is no penalty |
Credits as earned, there is no penalty |
You will NOT get experience for:
- Damaging an ally's tank, even if said ally is "blue"
- Team killing. But you can always get a free ticket to ban land if you do it on purpose.
- Shots that deal no hull damage, destroy no module or kill no crew member.
- Shots that destroy a module that had already been destroyed before (except when a repair pack has been used on it).
- For receiving damage without fighting back. As stated above, your shells have to damage your attacker.
- For receiving titles in the "hero of the battle" window.
- For receiving medals or completing achievements.
- No bonus experience for a draw or a lost battle.
- A specific bonus for "killing all enemy tanks" does not exist, but as listed above, the entire team receives more XP the more more damage to enemy tanks is inflicted by the team.
Free Experience
Free experience can be used in the research of any vehicle instead of just the vehicle it was earned with.
You always gain 5% of the amount of experience earned in a battle as free experience. This is a bonus and is not subtracted from the vehicle's experience.
Additionally, you can use gold to convert tank specific experience to free experience. The tank must be elite, i.e. fully researched.
Crew Experience
Each crew member receives experience equal to the experience the vehicle earned in a battle, possibly modified by experience bonuses and penalties.Capturing the Base
If you leave the cap circle before capture is completed, all capture points earned by you are lost and the capture bar progress is reduced accordingly. The same happens each time you get damaged while within the cap circle before capture is complete. Both hull damage and critical damage (e.g. tracks) have the same effect, as does damage inflicted by the enemy or your own team.
Once capture is complete, the round does not end immediately. There is a delay of at least 5 seconds before victory is yours (unless the battle timer runs out earlier). According to Overlord this delay gets extended each time a vehicle is destroyed. The following outcomes are possible:
- All friendly vehicles are destroyed within the delay: Enemy team wins.
- All vehicles of both teams are destroyed within the delay: Draw
- Enemy completes base capture of their own within the delay: Draw.
- All other cases: Your team wins.
Visibility

Not everything that happens in the game world will be visible to you at all times. Game mechanics and technical limitations alike limit what you can see at any given moment.
Draw Distance
Draw Distance is the maximum distance at which objects are drawn on your screen by the rendering engine. The bigger the draw distance, the more computing power is required both for client and server. The rendering engine used by World of Tanks sees the world as cubes. The map itself is a cube, and every object within that map cube is drawn within an invisible cube centered on and aligned to your view point. Everything near the boundaries of this cube starts to fade into a distance fog and everything outside of the boundaries is entirely invisible to you. This cube is your draw distance.
- Draw Distance Setting
Draw distance can be limited in Game Settings->Graphics via the "Draw Distance" parameter that allows you to choose from the following three options:
- High: Maximum allowable draw distance (this is defined separately for each map, usually 800m x 800m x 800m)
- Medium: 600m x 600m x 600m
- Low: 500m x 500m x 500m
Needless to say, there is absolutely no good reason to limit draw distance via this option, always set this to high!
- Server Horizon
- Even with your draw distance set to high, dynamic objects (i.e. spotted enemy vehicles, terrain destruction, tracers) may remain invisible to you. This is because the server decides whether to send information about dynamic objects to you based on whether they are within the boundaries of a separate 1000m x 1000m x 1000m cube centered on your tank but aligned to the map boundaries regardless of your view point. Every vehicle outside of that server cube will always be invisible to you in the default Arcade View or in Sniper View regardless of your draw distance setting.
- If a tank would be visible for you on the server, but you lowered your draw distance such that you cannot actually see it, the user interface will nevertheless draw the respective vehicle marker, it will appear above the invisible vehicle when you press Alt (using the default UI; using UI Modifications can make it constantly visible).
- Self-Propelled Guns have another view mode available to them, the so called Strategic View, giving them a top down view on the battlefield. The server will also send information about all dynamic objects to your client that lie within that view port.
- Minimap
The minimap is not part of the 3D world and thus unaffected by the limitations discussed in this section. What you see on the minimap is however influenced by Radio Range discussed below.
Shell Tracers
For the visibility of shell tracers there are some special rules:
- Tracers from friendly vehicles are always shown (subject to the above limitations to draw distance).
- Tracers from spotted enemy vehicles are always shown (subject to the above limitations to draw distance).
- Tracers from unspotted enemy vehicles:
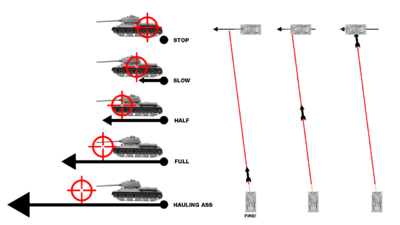
- In arcade view and sniper view, tracers are only shown if they originate from within +/- 25° of the direction you are looking at and from within maximum spotting range. [1] In the following illustration, you will only be able to see the red tracer in the first two cases:

- In strategic view, all tracers are shown that originate from within your strategic view port.
- In arcade view and sniper view, tracers are only shown if they originate from within +/- 25° of the direction you are looking at and from within maximum spotting range. [1] In the following illustration, you will only be able to see the red tracer in the first two cases:
View Range
View Range is the theoretical maximum distance that your vehicle's commander (not you!) can see, and depends on the vehicle's turret, the commander's effective skill level as well as the usage of view range stat enhancing equipment like Coated Optics or Binoculars. View Range has no relevance of its own, its only purpose is to server as a factor for calculating the spotting range.
Note that unlike what the in game description of the view range enhancing equipment indicated, view range is unlimited. The better your view range, the better your spotting range, at any range.
The maximum possible view range you can currently (v0.7.1) achieve in game is 558.75m with a Patton and 100% commander, Improved Ventilation equipment, Binoculars equipment and Case of Cola premium consumable.
Spotting Range
Spotting Range is the maximum distance at which you will detect/spot an enemy tank if you have line of sight.
Minimum Spotting Range
You will always spot any vehicle that comes within 50m of you, regardless of line of sight. Because you do not need line of sight, this is also called proximity spotting, and can be used on certain maps to spot enemies going past a choke-point without actually being being exposed to them.
Maximum Spotting Range
You will never spot a vehicle further away than 445m.
Note that unlike draw distance limits, spotting range limits are the same in all directions (think of a virtual bubble instead of a cube).
Calculating Spotting Range
Spotting Range is not a fixed value particular to your tank, but depends on the target you are spotting, its current position and situation. In other words, as many different individual spotting ranges are calculated by the server for your tank as there are targets within the minimum and maximum spotting ranges to you. For each target Spotting Range is calculated invidiually according to the following formula:
![]()
If your spotting range to a vehicle equals or exceeds your distance to that vehicle, and you have line of sight, or if the vehicle is within the minimum spotting range, you will spot it. Otherwise it remains hidden unless spotted by another vehicle on your team that you are in radio communication with.
See above for how effective view range can be calculated. Camouflage mechanics are explained below, as far as they are known.
Spotting Mechanics
To determine whether you have line of sight to a vehicle within your spotting range and will thus spot it, the server calculates a virtual vision ray extending from one of two view range ports on your vehicle to each of the six visiblility checkpoints of the target vehicle. If a vision ray gets obstructed by non-transparent objects like houses, terrain, or even just a lamp post, this ray ends there and does not reach the target vehicle. If only one of the six rays reaches the target, you will spot it (and it will light up if it was previously hidden).
View Range Ports
Each tank has two View Range Ports as shown in this illustration:

- Static View Range Port: A static location on the tank model, placed on its highest elevation and centered there.
- Dynamic View Range Port: Located where gun is mounted to the turret, dynamically moves along with the turret.
In general, the two view range ports take turns every 2 seconds, i.e. every 2 seconds visibility checks are performed using the respective other view range port.
Visibility Checkpoints
Each tank has six Visibility Checkpoints distributed across the tank as shown in this illustration :

- Top, Middle of Turret (same location as Static View Range Port)
- Gun Mount (same location as Dynamic View Range Port)
- Front, Center of Hull
- Rear, Center of Hull
- Right Side, Middle of Turret
- Left Side, Middle of Turret
Rate of Visibility Checks
You will not necessarily spot an enemy tank as soon as you have line of sight on it. The rate of visibility checks is limited as follows:
- within 50 m range - every 0.1 sec
- within 150 m range - every 0.5 sec
- within 270 m range - every 1.0 sec
- within 445 m range (maximum indirect visibility range) - every 2.0 sec
NOTE: While Overlord confirmed the above as still correct for 0.7.1, US community manager Vallther claimed on 23 January 2012 that the frequency of the visibility checks depends "a lot on the map" and that he "requested a total check from Q&A regarding the matter". [2]
The rate limitation on visibility checks means that it is entirely possible that a hidden tank moves out of cover right after a visibility check, shoots you, and returns back into cover right before the next visibility check, thus never getting spotted and staying hidden. This can also lead to fast tanks getting spotted only closer to you than your spotting range would normally allow - at a maximum speed of 72 km/h a tank can cross 40m between spotting checks past 270m range.
Camouflage


Camouflage is the art of hiding (or, in a way, reducing the enemy's view range). In World of Tanks, the chance of being spotted depends on vehicle size and engine specs. In terms of camouflage, bushes are more significant than vehicle size and engine specs.
The following things affect your vehicle's ability to hide;
- While a vehicle's size plays the major role in determining the base camouflage coefficients, there is also an unknown balancing factor involved (yes, Wargaming is working on the messed-up German TD values).
- Tank-Destroyer bonus (varies depending on the TD and it's size, but in general, for equally-sized TDs and Tanks, TDs are the hardest to spot, even after they fire a round).
- Bushes (approximately a 15% camouflage bonus), but the tank must be FULLY hidden -- see graphic to the right). Bushes have no effect if the enemy is closer than 50 meters, except for TDs. Possible exception: TDs may have a lower chance of being detected vs auto-detected below 50 meters. A bushes' hiding-effect begins after 3 seconds of non-movement.
- Moving (+20% increase to being spotted): moving faster or slower has no effect on the range you are detected at. Either you’re moving or you’re not moving.
- Firing your gun makes you between 5%-40% easier to detect for 5 seconds -- possibly, depending on the installed gun. NOTE: if a bush is more than 15 meters from you, and between you and all enemy spotters, then you will not be sighted because your muzzle flash is blocked by the bush. A bush next to you or that you are in will not hide you in the case of shooting (OK, it helps after 5 seconds). HINT: Behind the bush is better than inside it. It not only allows you to shoot and stay well-hidden, but also because enemy SPG will try to find you by first shooting inside the bush.
- Many higher-tier vehicles have tiny camouflage bonuses making crew camouflage skill and equipment bonuses nearly worthless, since they are percentage-based.
Turning the hull of the tank counts as moving and breaks both the Binocular Telescope and the Camouflage Net bonuses. Turning the turret or moving the gun does not count as moving (it does not break either the Binocular Telescope view range bonus or the Camouflage Net bonus). That's why, despite TD's bonus for camouflage is bigger, LTs, MTs and HTs are better for ambushing an enemy outside of your base.
The link above has charts of the camouflage bonuses of various tanks. These numbers are given in percentages (might be the percentage that enemy view range is reduced).
Table Labels
- Tarnwert = Camouflage
- Fahrend = Driving
- Stehend = Standing (stationary)
- mit tarnnetz = With camouflage net
Radio Range

Each vehicle comes equipped with a radio that allows your radioman to communicate with other vehicles on your team. Two friendly vehicles can communicate if they are no further away from each other than the sum of their respective radio ranges. For example, a tank with 300m effective radio range and a tank with 500m effective radio range stay in communication up to a distance of 800m. Your effective radio range depends on your vehicle's radio and on the effective skill level of those crew members responsible for the Radio Operator role.
If you are in communicaton with a friendly vehicle, then you will share information about the position and health of all enemy vehicles either of you are currently spotting. You will not relay any information received from other friendly vehicles via radio communication, however, nor will it be relayed to you. In other words, you will know the location of;
- Any friendly vehicle within your combined radio ranges.
- Any vehicles (friend or foe) spotted by you.
- Any vehicles (friend or foe) spotted by a friendly vehicle that is within your combined radio ranges .
Example:
- You are looking down a long street from your tank destroyer and do not see any enemies, because they are outside your own spotting range. However, when a friendly tank moves down the street, it spots an enemy tank that was there all along. As long as you are within radio range of that friendly tank, you will see that enemy tank just as if you were spotting it yourself.
- See the illustration to the right for a more complex situation.
Movement, Acceleration, Top Speed

Movement of your tank in World of Tanks is critical to survival. Whether you’re trying to out-race the enemy to a favored covering location or trying to get away from trouble, top speed and acceleration are very important factors. Acceleration can be important for moving out from behind cover to take a quick shot and then getting back to cover.
Top Speed
A common misconception is that the listed forward/reverse speed for your tank is an indication of the speed your tank should drive at. That is not the case. Instead, this stat indicated the speed limit of your tank's transmission system. It is a hard limit on the speed you can achieve and even driving down a steep hill will not allow you to exceed it. While there are some tanks which can reach their speed limit on flat ground, other tanks can only reach it on a downhill slope and some may never reach theirs at all.
Acceleration
Various tanks have different abilities to accelerate. Acceleration is based on tank weight and engine power: More engine power, better acceleration; more weight, less acceleration. So, adding Spall liners (very heavy) will reduce your acceleration ability. Acceleration is based on your engine power-per-ton (tank weight). NOTE: Enhanced Torsion Bars (+10% suspension load capacity) and Enhanced Candle Suspension, and any other such equipment that increases load capacity does NOT increase acceleration, top speed, or passability. In fact, because the module has weight, it slightly reduces acceleration, but it does allow you to support more weight on your tank.
Engine Power
Engine Power is very important to acceleration. Certain consumables and Premium consumables increase engine power.
Terrain Resistance
The game distinguishes three types of terrain: Hard (Roads, Pavement), Average (Dirt, Sand, Grass, Shallow Water), and Soft (Swamps, Deep Water).
Driving performance of your tank (top speed, acceleration) degrades the softer the ground becomes. The exact amount of this degradation is a property of the suspension installed to your tank, but is not displayed in game. Wider tracks do not necessarily provide better handling on soft ground, e.g. the Chaffee has the best performance there by far despite also having the narrowest tracks of the dedicated tier 5 light scout tanks.
Most ground types are easily recognizable, but swamps can be difficult. On Karelia and the aptly named map Swamp it is quite easy, but on Lakeville in the valley the grass texture looks like any other, when in fact the underlying ground is soft.Aiming

All about pointing your gun at the enemy and hitting them. Make sure to read the section about Accuracy and Dispersion as well.
Automatic Aiming
Automatic Aiming, or auto-aim, aims to the center of the tank: often the most armored part. It does not lead your target at all. It is only useful for aiming at weaker armored tanks very far from you or when you are both at close range and you need to focus on dodging incoming shots rather than carefully aiming at the enemy. In these occasions, auto-aim can save you some worry. By default, auto-aim is engaged by right-clicking on a target, and disengaged by pressing E.
Note that auto-aim will keep aiming at the target as long as it remains visible to you, even if it is behind a rock, a house, or a friendly tank. That does not mean you should actually shoot at it in these situations - sounds like a stating the obvious, but it happens all the time, in particular with newer players.
Manual Aiming
In most cases it is better to aim your gun manually rather than rely on auto-aim, but there are a few factors to consider. Every shell in the game has its own trajectory and flight speed, and you often need to consider them while manually aiming, but since the game does not tell you these parameters, they are best learned from experience.
Leading the Target
If your target is moving perpendicular to you, you always have to adjust your aim manually. This is also called leading the target. Factoring in your shell's flight speed, you have to aim where you estimate the target your shell's trajectory intersects with with the target's movement. For example, if your shell flies 1000 m/s on a flat trajectory (e.g. AP shells fired from the 8,8 cm KwK 43 L/71 "long 88" of the PzKpfw VI Tiger), and your target is 500m away, your shell takes little more than half a second to reach it. If your target is a T-50-2 moving perpendicular to you at 72 km/h, i.e. 20m/s, theoretically you need to aim 10m in front of it to hit it.
However, since this is an online game and not reality, you also have to account for network latency, i.e. your ping. If you were playing with 500ms ping (an extremely high ping), then you would have to lead the target by an additional 0.5 seconds of movement. In the example that means you would have to double your lead and aim 20m in front of the target (see also Latency Correction below).
While all that is easy enough with a high velocity gun, it becomes much harder with a low velocity gun like the 105 mm AT Howitzer M3 of the aforementioned T82. It fires HE shells which fly at a velocity of 311 m/s on a very high trajectory, i.e. they can take several seconds to reach a far away target. The amount you need to lead your target by with such a gun increases accordingly. Naturally, the more you need to lead the more will your aim be off if your target changes its course even slightly. That is something to keep in mind when trying to avoid incoming shots: never be predictable.
Ballistic Trajectory
The reticle takes the ballistic trajectory into account, so it will automatically aim a little higher while you hover over a visible target (red outline). However, as soon as you move your aim away from the target, this automatic correction goes away. This is important to consider when leading a moving target as described avove, because then you will have to correct your aim for the trajectory yourself. An easy way to know by how much to correct is to first hover the reticle over the target, note how high it aims, and then aim to the same elevation while you lead. While doing that the reticle may adjust to terrain or objects your aim passes over, so you might need to compensate for that as well if the situation arises.
Aiming and Line of Sight
Despite shells following a ballistic trajectory, aiming is strictly line of sight. That can lead to situations where you cannot place your reticle on a target, because it is hidden by a terrain feature, although the ballistic trajectory of your gun would actually allow you to hit the target. This is particularly pronounced with howitzer guns with high arcing trajectories, for example that on the T82. Due to the automatic correction of your aim it can be quite tricky to shoot the target in such situations, but there are a few considerations that can help you with:
- Sniper view has the lowest view point (gun mount), so do not use it if your target is behind an elevation and you have trouble placing your reticle on it.
- Arcade view has a higher view point for aiming purposes (commander's cupola), so you may be able to aim at the target in this mode.
- Auto-aim does not actually rely on line of sight, so in situations where manual aiming fails, you can try to right click the target in arcade mode and see your reticle drop a little bit further, possibly just enough.
- If all of these fail, and if the target is far enough away, you can try to simply aim above the elevation, and hope for the best. It takes a lot of experience to get these fully manual howitzer shots right, however.
Regardless of elevation there can also be situations where you do have line of sight on the target and can place a shot, but you cannot see the target's red outline. This usually happens if another object is closer to you than the target and your reticle prioritizes the other target instead of the tank you clearly see and want to aim at. You can take the shot regardless, but aiming can be tricky if your reticle also tries to adjust the aim for the closer object. Be particularly careful if the closer object is a friendly tank - many have accidentally been shot in the back by their team mates in such situations.
Strategic Aiming (SPG)
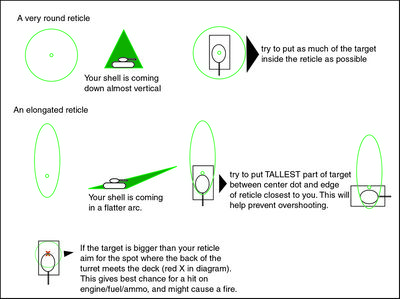
If your vehicle is a self-propelled gun, then you have a third aiming mode available in addition to the two modes discussed above. By default it is accessed by pressing the Shift key. This view mode is called the Strategic Mode. It gives you a top down view onto a section of the battlefield. You can use your mouse or the cursor keys to move the view around. You can also place the strategic view directly onto a certain battlefield area by holding Ctrl and right clicking the desired location on the minimap.
Unlike in the other view modes, in strategic mode the aiming circle does adjust to terrain elevation and ballistic trajectory. Thus it will usually not be a perfect circle but an oval shape. This helps you judge both the angle of the terrain your target is positioned on and your shell trajectory to the target. The little dot within the aiming circle/oval represents the height adjusted center of your aim.
It takes a little getting used to perfect aiming with self-propelled guns, see the illustration to the right for the basics to get you started.
Client vs Server
Shots that fall outside of your aim or go into a completely different direction are usually caused by network or server lag. This can happen because every movement of your aim on your client has to be transmitted to the server first and executed there as well. So regardless of your latency the server aim will always lag slightly behind your aiming on the client. If you press CapsLock + 0 during a battle, your client will show an additional blue reticle which shows the last information the client has received about where the server is currently placing your aim, as well as the size of the aiming circle on the server. Since this is subject to latency as well, it is not entirely accurate either, but if you are having latency related problems it can be a good idea to use the server reticle and wait until server and client reticles match before you fire a shot.
Where to aim
A tank's armor is not uniform. When shooting at an enemy tank, it is always useful to aim for areas with less armor, so called weak spots. Often it can be helpful to inflict critical damage, e.g. by destroying the tank's tracks and thus immobilizing it, by shooting it's fuel tank to set it on fire, etc. Follow the links for more details.Accuracy and Dispersion

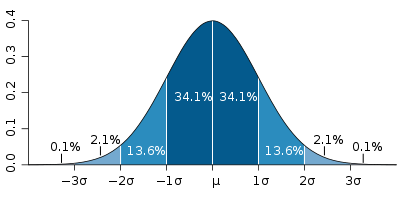
Every shot you take is dispersed randomly around the center of your aiming reticle, i.e. you will not necessarily hit exactly where you aimed. The actual dispersion amount is based on a Gaussian (normal) distribution curve and depends on your gun and the turret it is mounted to.
Gun Accuracy
The accuracy value for a gun is given in meters at a range of 100m. The value describes 2 standard deviations σ from the center of your aim. In other words, for a gun with 0.32m effective accuracy at 100m, 95.45% of all shots will land within 0.32m of the center of your aim at that distance. Dispersion amount increases linearly with distance, i.e. 0.32m effective accuracy at 100m translates to 0.64m at 200m and 1.28m at 400m
Aiming Circle
The aiming circle is 1.5 times bigger and describes an area of 3 standard deviations σ from the aim point. That means for 0.32m effective accuracy at 100m your aiming circle's outer diameter is 0.96m at 100m, or 3.84m at 400m.
Based on a purely normal distribution that would mean that a very small percentage of your shots would fall outside of the aiming circle. However, in game dispersion is effectively limited to 3 standard deviations, i.e. the size of the aiming circle, and no shots can fall outside of that area.
Client vs Server
When you fire a shot, your shell trajectory is first calculated based on the data the client has. It is later updated with the data confirmed by the server. If the difference was big, then you may see shell tracers leave your barrel at an angle or change flight path mid-trajectory.
It is unclear whether only the aiming point or also the dispersion of the trajectory around this center point is corrected based on server data. At least in v0.7.1, if you watch a replay, you can notice that each time you play it, your trajectory will be slightly different. This indicates that either dispersion is not synchronized between client and server, or that it is during a battle but that data is missing in the replay files. In any case, currently replays cannot be used to find out where your shot went exactly.Ammunition
Ammunition Types
The game has 2 main types of ammunition; AP or Armor Piercing ammunition and HE or High Explosive ammunition.
Armor Piercing ammunition (and the premium version which just has a higher penetration number) must first penetrate the armor to cause damage. Once the armor is penetrated, the AP shell will cause damage and may damage/destroy modules and kill crew.
High Explosive ammunition can either penetrate the armor or strike the outside of a tank and detonate: causing damage without penetration. If an HE shell does manage to penetrate, it typically does a LOT more damage than an AP shell. But, typically you have to be firing at much-weaker armor. HE is also good for causing module damage to a tank just by exploding on the outside of the tank.

How HE ammunition Works
How HE damage works. Brief description:
1. If the HE shell managed to penetrate the armor:
- Similar to AP shells, it goes inside the vehicle and explodes there.
- Full damage according to the specs is inflicted, plus HE deals additional damage to internal modules and/or crew. Apart from it's basic damage value, each shell has an additional value that determines possible damage to crew/internal modules if penetration was successful.
2. If the HE shell didn't manage to penetrate or exploded near the tank (eg SPG shot):
- If the explosion took place directly on the armor, the damage is reduced by 50%.
- If the explosion took place near the tank (SPG shots typically,) the damage is reduced by 50% plus it gets some extra reduction depending on distance to vehicle.
- The heat wave of an HE shell "seeks" soft spots on the armor, where it is possible to penetrate. Heat-waves makes a cone-shaped aperture in the armor with approx. a 45 deg cone angle.
- A vehicle's armor partly absorbs heat-damage (each tank has it's own value), including installed spall liner.
- A heat-wave damages crew and decreases the vehicle's hit points. Modules are not damaged.
A recent post by a Moderator has shed some light on HE Damage.
- Final Damage = (Shell Damage l / 2) * (1 - Distance / Splash Radius) - Armor Thickness * 1.3 * Spall Coefficient.
Coefficient = 1.00 if no spall liner is installed, or 1.15 if the spall liner module is installed
Bounce and Ricochet
HE and AP shells have almost equal basic bounce probability. Shells can bounce with no damage inflicted, bounce and then penetrate another part of the tank, penetrate the tank going straight inside it, etc. However, the chance of a shell bounce, for AP shots, increase with distance, while HE bounce chances remain unaltered. HINT: For long-range shots, prefer HE. For close-range fights, prefer AP.Penetration
- ”{Abbreviations expanded and spelling corrected}
- "In-game, we use the Soviet penetration system with 0 (90) degree armor slope and 75% guaranteed shell penetration (which is more than the 50% guaranteed penetration used in German penetration system). That's why German guns have, as you say, deflated stats in-game.”
75% guaranteed shell penetration is defined as “75% of shell splinters behind the test target”.
- “The way we calculate pen data for German guns is the following:”
- German penetration data - 30 degree penetration data (the most common) is converted into 0 degree German penetration data.
- 0 degree German penetration data is converted into Soviet 0 degree data.
- the outcome is usually quite close to 30 degree German penetration data.
This means: in general, German 30 degree armor slope penetration data is equal to 0 degree Soviet penetration data (because of guaranteed penetration gap).
- The main difference lies in guaranteed penetration coefficients, which are lower in German systems.
NOTE: There are also a few minor game balancing tweaks, so not every conversion is perfect.
NOTE: The collision model to calculate hits is a simplified version of the tank, so it's possible there are some superficial areas where a shell can pass right through without hitting anything.
Update: Wargaming should breakdown how they converted from other nation's penetration tests to the game standard on the forums at some point.
Penetration Mechanics
Once you have hit the enemy, the game then calculates where the shot hit the enemy, at what angle you struck the armor, the effective thickness of the armor (based on the angle), speed, width, and weight of the shell, whether you penetrated the armor, and if so, what was in the path of your shell after striking the armor. A shell can indeed pass clean through a tank.
Note that shell speed falls with distance traveled and thus, AP ammunition can get significant reductions in penetration when firing at distant targets. HE ammunition penetration is not affected by distance.
- At 100m - gun has 100% penetration (+/- 25% random)
- At 500m - approx -20% to -25% to it's penetration value (varies based on the exit velocity of the shell from the gun).
- With distance, from 100m to 500m, penetration degrades linearly.
If all the above was not enough to calculate, Penetration value varies every time you fire your gun. This variation can be up to a 25% plus or minus penetration value and is based on a Gaussian (normal) distribution curve. Shell Damage also varies in the same manner.
Shell Normalization
When a shell hits armor, and if it does not bounce/ricochet, it will dig in and try to penetrate at a 90 degree angle. Typically, it only increases the angle of attack by about 10 degrees.
Overmatch -- Shell Size
In WOT, overmatch is currently modeled so that when the caliber of the weapon is 3 times greater than the thickness of the armor, than overmatch (no chance to ricochet) occurs.
Overmatch -- Penetration
Wot adds an additional version over overmatch based upon when the shell's penetration is more than 2 times greater than the thickness of the armor. When this occurs, shell normalization is increased by an undisclosed amount.
Chewie, on the WoT forums, made a good post about penetration.
Penetration is such a huge aspect to World of Tanks, that I think there needs to be a little more light shed on the topic. From what I understand (and is confirmed by Overlord), these are the six variables that are included in calculating penetration:
- - Shell penetration statistic
- - Shell penetration variation
- - Shell normalization
- - Distance to target (range reduced penetration)
- - Thickness of target's armor
- - Angle of incidence to target's armor
So, every time you fire a Shell at a target, the server does the following five calculations: Angle of incidence Angle of incidence can also be written as 90 - angle to the horizontal. Since few of us are math majors, I'm going to reverse the calculations so that 90 degrees is a T angle penetration (90 degrees is thus the best angle and 0 is the worst). I will call this the attack angle.
Ricochet Simplification The projectiles and the angles of impact are idealised, to make calculations less complex. Every angle of impact lower than 20 degrees counts as a ricochet! (10 degrees plus the 10 degree shell normalization). With one exception: If caliber of the projectile is three times greater than the armor and the angle is greater than 8 degrees, the shot will penetrate. All shells have a ricochet value and an idealization value. These are 20 and 8 degrees, for the most part, of the shells.
1. Check for ricochet. If your attack angle is lower than 10 degrees (or, in other words, almost parallels the armor), your Shell will ricochet and you will not penetrate. If your Shell size (in mm) is at least three times the amount of armor (in mm) you are attacking, your Shell will not ricochet (unless angle is less than 8 degrees). If your Shell's penetration (in mm) is at least two times the amount of armor (in mm) you are attacking, your Shell will not ricochet (unless angle is less than 8 degrees).
2. The Shell is normalized to the center line. When a Shell first comes in contact with armor, it will screw itself somewhat into the armor. This action increases the angle of attack, as the Shell tends to "right" itself towards a right angle (90 degrees) to the armor. Each Shell has a different value of normalization, but it normally increases the attack angle by 10 degrees.
3. Calculate thickness of armor. The minimum armor thickness is the tank's section of armor that you are hitting. If there is an attack angle to the shell, due to armor slope and/or angle from which you fired at the target, this increases the armor thickness that your Shell has to penetrate. For a more thorough explanation (and very helpful picture), see here.
- The basic formula for LOS (line of sight) armor is: LOS armor = base thickness / cos(angle of incidence){ed note: this formula not reversed}.
- Remember that for an attack angle shot (where 90 degrees is a straight side shot), the formula is effective armor = base thickness / sin (attack angle).
- Also note that in Excel (which uses radians, not degrees), the formula would be effective armor = base thickness / sin(Radians(attack angle).
- Armor with with a 30 degree slope would be effective armor = base thickness / cos(sloop angle) {Slope angles are typically not reversed. Thus, a 30 degree slope provides better protection than a 60 sloop}
4. Calculate penetration value of the shell. The base stat of your tank's gun and Shell are used as the basis for this calculation. The distance between you and the target is also considered. At 100m, you will have 100% of your Shell penetration, but this decreases linearly down to 80% at 500m. Next, the penetration value is modified by Gaussian distribution with an upper limit of +25% and a lower limit of -25%. In other words, your Shell may have an actual penetration value of 75% - 125% of the displayed value (without range figured).
5. Compare the calculated penetration value to the calculated thickness of the armor. If the penetration value is larger than the thickness value, you penetrate and deal damage.
| Penetration Multipliers | |
|---|---|
| 90 | 1x |
| 80 | 1.02x |
| 70 | 1.06x |
| 60 | 1.15x |
| 50 | 1.31x |
| 40 | 1.56x |
| 30 | 2.00x |
| 20 | 2.92x |
| 10 | 5.76x |
| 5 | 11.47x |
The table to the right gives the effective armor increase multiplier for the Attack Angle and the armor slope (the angle from the flat horizontal), so straight up and down armor would be 90 degrees and a multiple of 1, and thus no increase in the effective armor.
EXAMPLE 1:
You fire a Shell with 100mm of penetration at a target 500m away. The target is at a 90 degree attack angle to you, and his armor is not sloped with a thickness of 75mm. Let's go through the steps.
- Check for ricochet. You are at more than an 10 degree attack angle. No ricochet.
- Shell is normalized. The target is at a 90 degree angle to you, so the Shell does not need to normalize.
- Calculate thickness of armor. The target is at a 90 degree angle to you, so 75mm / cos(0) = 75mm
- Calculate penetration. Your base penetration stat is 100mm. You are at a distance of 500m. So, our adjustment for distance leaves us at 100 * 80% = 80mm penetration. With the Gaussian distribution, our Shell may have a penetration value of 60mm to 100mm.
- Compare penetration to thickness. Our penetration value lies within 60mm - 100mm versus 75mm armor. We have a very-high chance of penetrating.
EXAMPLE 2:
You fire a Shell with 100mm of penetration at a target 300m away. The target is at a 45 degree angle to you, and his armor is not sloped with a thickness of 75mm. Let's go through the steps.
- Check for ricochet. You are at more than a 10 degree attack angle. No ricochet.
- Shell is normalized. The attack angles is increased by 10. Target is at a virtual 55 degree angle to you.
- Calculate thickness of armor. Virtual armor = 75mm / cos(35 degrees). The 35 degree is the angle of incidence calculated from the angle of attack in step 2 (90o - 55o = 35o). The result is 91.5mm.
- Calculate penetration. Your base penetration stat is 100mm. You are at a distance of 300m, which is halfway between 100m (full penetration) and 500m (80% penetration). So, our adjustment for distance leaves us at 100 * 90% = 90mm penetration. With the Gaussian distribution, our Shell may have a penetration value of 67.5mm to 112.5mm.
- Compare penetration to thickness. Our penetration value lies within 67.5mm - 112.5mm versus 91.5mm. We have a slightly-less than average chance of penetrating.
EXAMPLE 3:
You fire a Shell with 100mm of penetration at a target 100m away. The target is at a 45 degree attack angle to you, and his armor has a slope of 30 degrees from the vertical with a thickness of 75mm. Let's go through the steps.
- Check for ricochet. You are at more than a 10 degree attack angle. No ricochet.
- Shell is normalized. The attack angle is increased by 10. Target is at a virtual 55 degree attack angle to you and a slope of 20 degrees.
- Calculate thickness of armor. Virtual armor = 75mm / cos(35 degrees) / cos(20 degrees). The 35 degree is the angle of incidence calculated from the angle of attack in step 2 (90 - 55 = 35 degrees). The result is 97.4mm.
- Calculate penetration. Your base penetration stat is 100mm. You are at a distance of 100m, so our adjustment for distance leaves us with full 100mm penetration. With the Gaussian distribution, our Shell may have a penetration value of 75mm to 125mm.
- Compare penetration to thickness. Our penetration value lies within 75mm - 125mm versus 97.4. We have a more than average chance of penetrating.
I hope that clears up any questions you may have about penetration. If not, post away!
By Chewie
Thanks Chewie, that is sure to help a lot of people!
Example:
- We have 100mm armor. And let's say the projectile with an armor-penetration of 120mm on a given distance can get through 110mm of armor. Let's say because of the impact angle, the armor got "thicker" to 121mm. We roll the dice (distribution) and with some probability, the penetration capability of the projectile might change to 110+/-33mm. If it changed to 121 and above - we get penetration. If below - ding.
On top tanks are covered by "thin armor"
Due to limitations of the game engine, tanks "grow" from the ground, so there is no armor on the bottom.
According to the update notes. - Increased normalization effect when shell penetration value is twice as much as armor thickness value or more.Armor
It is also important to remember that the armor thickness given in the game does NOT account for armor slope. Thus the T-54s frontal armor (120mm) which sits at a 30 degree slope is effectively about 1.56x thicker (remember the shell normalization) or 187.2mm effectiveness 1/cos(20 degrees) = 1,064x thicker or 127,7mm effectiveness (remember that shell normalization reduces slope angle from 30 to 20 degrees). That armor, however, is also sloped to the side as well, so effective armor can be as high as 220mm. If you're not hitting the T-54 at a 90 degree angle, or you're suffering a range penetration penalty, the front armor on a T-54's hull is very difficult to get through (just switch to HE and pray to take out his gun or turret ring).
Each tank has "weak spots" like visor, tracks, connection between turret and hull, etc. If you hit them, you can get critical damage. The HE round "spreads" on impact over some area, hence it's the best way to damage such weak spots. Also; the ammo rack, fuel tank, and obviously the crew, have some HP points so if you hit strong-enough, the spot on the tank behind which the ammo rack is located, you can damage or even blow it up. You can kill crew members, set fuel tanks on fire, etc. There aren't, however, precise numbers regarding such damage chances. There is "ward-save" for modules and crew: a 60%-70% chance that the tank will take-on the damage instead of the crew or modules.
On top, tanks are covered by "thin armor": if an artillery gets a direct hit on your top armor, you're likely to die.
Learning your enemy is important. Knowing the weak points will help you kill it quicker, as well as knowing how tough his armor is.Damage
Tank Hit Boxes
The Hit Boxes for tanks are hidden from the player, but you can research a tank and pretty much figure them out as they are based on the historical model. For example: the ammo rack hit box is in the same location(s) as they were stored in the historical tank.
The 3D model of the hitboxes, [posted at the forum], leads to the assumption that WoT uses a quite plain system of calculating the hits. Fuel tanks, ammo rack, gear box, transmission, turret ring, gun mantlet, tracks, and obviously the crew. Here are the explanations for the most common strange damages.
- Frontal hit, engine down, engine located in the back of the tank -> Engine was not hit, but gear box or transmission were.
- Hit once, three modules down -> The shot went straight through the tank/turret.
- Hit enemy tank, got a critical, but caused no HP damage: Possibilities
- Shot went through an external module(s) (Tracks, view finder, range finder, etc) and then missed the rest of the tank.
- Shot went through an external module(s) and then bounced off the armor.
- Shot penetrated and went into a module/crew member and caused no damage. This can happen because Maus tracks can fully absorb a 75mm shell. Exact values for this are unknown but the concept that a shell can "lose" damage by hitting a crew member or a module should be remembered.
- Shot did less damaged than expected. A shell can also strike a module/crew member and continue on (at a reduced speed and reduced damage). Reduced shell speed will reduce the shell's penetration values (possibly causing a bounce).
- Shot hit a tank and you got a message from the group "armor_pierced_by_player" but the shot did no damage. This can happen when the shot re-damages tracks or a module (thus, no critical). It should reset the repair time (unconfirmed).
Module Damage
When a module is hit, it effectively gets a "saving throw". If it makes the "saving throw", it takes no damage. If it fails the "saving throw", it takes damage. If the damage is large enough, the module becomes damaged. If it is larger still (more than the modules HP), the module is destroyed. Damaging a module does not reduce the HP of the tank.
The chances for the loss of a module:
- Engine: 45%
- Ammo rack: 27%
- Fuel tank: 45%
- Optics: 45%
- Radio: 45%
- Gun: 33%
- Turret ring: 45%
- Crew: 33%
The amount of ammo you are carrying does NOT affect the chance of taking an ammo rack hit.
Crew Damage
Crew are either alive or dead (knocked out, injured, etc.), effectively speaking. A Crew damage does not weight too much against your tank. Crew may be healed with a health kit, during which they function at full effectiveness.Firefighting

Fire is the bane of all tanks. If you are set on fire, it takes very little time to take massive crew and module damage, resulting in an ineffectual tank. And that doesn't mention the chance to burn to death. Hit the engine to set the tank on fire. Automatic Fire Extinguishers reduce the chance to be set on fire by 10%.
The ratios are between 10 and 120 HP and 20% to be set on fire. Higher tier equals higher burning ratio. Except TDs, which have lower ratios due their lower HP. The chance of putting out a fire is a base of 20% for most vehicles (checked each second?), not counting Crew's firefighting skills.Repair
Crew Voice sounds and their meaning
- Friendly vehicle knocked out!
- One of our vehicles destroyed!
- They destroyed one of our tanks!
- ally_killed_by_player
- That was one of ours!
- We've killed a friendly!
- We've destroyed one of our own vehicles!
- We've hit one of our own vehicles!
- ammo_bay_damaged
- Our ammunition rack was hit!
- Ammo hit! We're lucky it didn't blow!
- We've lost some ammo, but at least it didn’t explode.
- armor_not_pierced_by_player
- We didn't even scratch them!
- That one didn't go through!
- We didn't penetrate their armor!
- Not… go through.
- armor_pierced_by_player
- Punched right through their armor!
- We've hit them hard!
- They're hit!
- Another one like that should finish them!
- We got 'em!
- Nice shot!
- Enemy is hit.
- Enemy armor is damaged.
- Penetration.
- We've got them.
- armor_ricochet_by_player
- It bounced off!
- That one ricocheted!
- Ricochet.
- We've just dinged them.
- commander_killed
- The Commander is knocked out!
- The Commander is hit!
- crew_deactivated
- We're done for!
- Crew is knocked out!
- Crew members are killed!
- Bail out!
- We've lost all of our men!
- damage_by_near_explosion_by_player
- That was close!
- They're right outside!
- They almost got us that time!
- driver_killed
- Our Driver is dead We can barely move!
- The Driver is hit! We can't go very fast!
- The Drivers a goner! The controls aren't responding!
- enemy_fire_started_by_player
- Enemy on fire!
- Enemy fuel tank is hit!
- We've torched him!
- We lit that one up good!
- Enemy brewed up!
- enemy_killed
- Enemy destroyed!
- Another one down!
- Enemy vehicle eliminated!
- Scratch another bad guy!
- enemy_killed_by_player
- Gotcha!
- Enemy vehicle knocked out!
- Got'em!
- We finished him off!
- Hes gone - find us another target!
- They're knocked out.
- Enemy armor is destroyed.
- Enemy vehicle destroyed!
- enemy_sighted
- Enemy detected!
- Target spotted!
- Enemy exposed!
- There's one!
- I see one of them!
- engine_damaged
- The engine is damaged! We've slowed down!
- We're losing power!
- The engine is cutting out!
- They hit the engine! We're losing speed!
- We've lost half of our engine power.
- The engine is smoking.
- engine_destroyed
- Engine stalled, we can't move!
- Critical engine damage - we're stopped!
- They hit the engine! We can't move!
- They've taken out our engine - we're stuck!
- Critical engine damage - we're stuck here.
- Our engine is knocked out.
- engine_functional
- Engine fixed. Let's move on!
- We've fixed the engine, but we can't go too fast!
- The engine is holding together for now - don't push it!
- The engine is fixed, but it's not going to hold up the speed.
- We've repaired the engine, but we can't go very fast.
- fire_started
- We're on fire! Put it out!
- Put out the fire!
- Grab a fire extinguisher and put that out!
- Smother those flames!
- Fire, put it out quickly!
- We're on fire!
- fire_stopped
- The fire is out!
- We've put out the fire!
- The fire is extinguished!
- We've put out the flames!
- fuel_tank_damaged
- Fuel tank hit!
- Our gas tank is hit!
- We've been hit in the fuel tank!
- Our fuel is hit! We've lost half our gas.
- Our gas tanks corrupted
- gun_damaged
- Main gun hit!
- Main gun damaged! We've lost accuracy!
- Our cannon was hit!
- Our main gun is damaged. It's working but not very well.
- The main gun is damaged. We cant fire accurately.
- gun_destroyed
- Main gun destroyed We can't shoot!
- Main gun knocked out!
- They've knocked out our cannon!
- Our cannon is destroyed!
- The main gun is destroyed.
- They took out our gun.
- The main gun is knocked out!
- gun_functional
- Main gun repaired but it's not going to shoot straight anymore!
- The cannon is up but the sights are still off!
- The main gun is working but not very well.
- The main gun is up, but accuracy is off.
- We've fixed the main gun, but it's still not very accurate.
- gun_reloaded
- Ammo up!
- Locked and loaded!
- Ready to fire!
- Loaded and ready!
- gunner_killed
- Gunner is dead! We're shooting blind!
- The Gunner bought the farm! Our accuracy will suffer!
- Gunners gone - somebody get on the gun!
- loader_killed
- The Loader is dead! Our rate of fire is slow!
- Our Loader is gone! We can't fire as fast!
- They got our Loader!
- radio_damaged
- Radio hit! We can only talk locally.
- Radio is hit! Radio range decreased
- The Radio is damaged! See if you can raise anyone!
- The Radio was hit. We cannot raise anyone outside this area.
- The antenna is damaged! We can only talk locally.
- radioman_killed
- The Radioman is dead! Our Radio range is reduced!
- Our Radioman is hit! Radio range has dropped!
- They got the Radioman! Stay close to other vehicles!
- surveying_devices_damaged
- Optics hit! Spotting range reduced!
- The periscope is damaged! It's hard to see!
- Vision devices damaged - visibility decreased!
- The rangefinder is hit.
- surveying_devices_destroyed
- Spotting range reduced to 50 meters.
- Viewfinder knocked out! We can hardly see anything!
- They've hit our viewports! Can't see anything!
- We can barely see through the scope, nothing pass 50 meters.
- The range finder took a hit, we can only shoot close targets.
- surveying_devices_functional
- Optics repaired!
- Viewfinder back up - visibility increased!
- We've cleared the viewports! Keep your eyes open!
- We've got the range finder working, but it's fragile.
- The periscope is fixed, but it's still fragile.
- target_captured
- Target acquired!
- Target locked!
- Ready to fire on target!
- Permission to engage!
- Ready to fire
- target_lost
- I can't see them anymore!
- We've lost the target!
- Target has moved away!
- Where did the target go?
- Target lost
- I don’t see the target
- track_damaged
- Our track is hit! It could break any minute!
- A track is damaged!
- One of our tracks was hit!
- One of ours tracks is damaged.
- Track hit
- track_destroyed
- One of our tracks is gone! We can't move!
- We've lost a track! We're immobilized!
- They blew off our track! We're stuck!
- We're immobilized!
- We've lost a track!
- track_functional
- Track fixed, let's roll!
- Track repaired, drive on!
- We fixed the track! Get going!
- Tracks up, let's roll!
- We fixed the track, let's roll!
- turret_rotator_damaged
- Turret hit, rotating speed decreased.
- Turret ring hit - it's moving slowly!
- They hit the turret controls!
- The turret ring is damaged, we can barely turn it.
- turret_rotator_destroyed
- Turret jammed!
- They destroyed the turret controls!
- The turret is stuck!
- The turret controls are busted, we can't turn it.
- turret_rotator_functional
- The turret is fixed, but it's still not turning quickly!
- The turret works now, but be gentle with it!
- You can turn the turret slowly now.
- We've fixed the turret, but it still not turning very fast.
- Try rotating the turret slowly, it should be working now.
- vehicle_destroyed
- Vehicle destroyed!
- We're done for! Get out!
- Bail out! We're finished!
- We've had it! Let's get out of here!
- armor_pierced_crit_by_player
- Critical hit!
- We nailed them bad!
- That's gotta hurt!
- Looks like that one went right through!
- start_battle
- Let's go!
- Time to roll out!
- Move out!
- Let's get this show on the road!
- victory
- We've won!
- Victory is ours!
- Great job, men!
- Mission accomplished!
- defeat
- Nothing more we can do here…
- Fall back, men - this mission is over…
- We can't hold on
- We may have lost this one, but we'll be back!