Battle Mechanics (Blitz)
Battle Mechanics
This game, like most others, relies on a rigid system of rules as to how your tank can perform in a battle. These rules are known as Battle Mechanics. They control things such as where your shot goes when you pull the trigger and how easily your tank can turn on the pavement of Himmelsdorf vs. in the swamp at Winter Malinovka. It is important as a Tanker to know these mechanics, and if you use them to your advantage, you will see positive results in your service record.
For ease of browsing, these will be broken down into three sections:
- Shot Mechanics: Information on how the aim reticle works, autoaim, aim time, penetration, and more.
- Visibility Mechanics: Information on spotting, camouflage, bushes, etc.
- Environment Mechanics: Information on base capture, terrain resistance, drowning, and fall damage.
Shot Mechanics
Shooting is an important part of this game, and is probably the most complicated system in the game. It boils down to two sub-sections: Shooting and Penetration.
Shooting
Shooting is a term used for the group of actions that go into effect when you pull the trigger. The first mechanic to affect you, before you even shoot, is the aiming system.
Aiming
The aiming system looks like a circle of green dots around an upside-down V. However, upon closer inspection, one can see that there are actually TWO upside-down V's, one atop the other. This is because the more faded V that stays centered on the screen is where you are currently aiming and the more vibrant V that moves is where the gun is currently pointing. When the trigger is pulled, it will always shoot in the direction the gun is pointed (the V that is surrounded by dots) regardless of where you are aiming. Therefore, you should only shoot when these two V's line up. After these two V's line up and your tank is stopped, the dots appear to shrink around them. This ring of dots is called the 'aiming circle'. The aiming circle represents the area where your shot could possibly go. The more accurate guns tend to have smaller aiming circles, whereas less accurate guns have larger ones. Beware though, as moving forwards/backwards or turning either your hull or turret all increase the size of this circle. The math behind this circle makes it that when you fire, the shell tends to shoot more towards the middle of the circle, and the probability of the shell going to a certain point on the aiming circle falls as you move towards the edges. Aiming Time is a statistic of a tank found in game, and shows the amount of time it takes for the aiming circle to go from its largest to its smallest. Dispersion at 100m is another tank statistic showing the radius of the aiming circle at its smallest while aiming at a target 100 meters away.
After you wait until the two reticles line up, and the aiming circle shrinks, you fire.
Penetration
Assuming you hit, a complicated series of equations go into effect to determine if it does damage.
Effective armor is defined as the thickness of an armor plate at a certain angle. Your tank is armoured with plates of varying thicknesses. The game only provides you with the nominal armour strength of the three main armour plates of your tank's hull and turret, respectively. However, the tanks are actually modeled in much greater detail. The penetration indicator can help you discover the actual nominal armour thickness of your target.
However, the nominal thickness of an armour plate is just the minimal amount of armour a shell impacting it must penetrate. As soon as the impact angle deviates from the normal, i.e. is not perfectly perpendicular to the armour plate's surface, the effective armour thickness that the shell needs to penetrate will be higher than the nominal armour thickness:
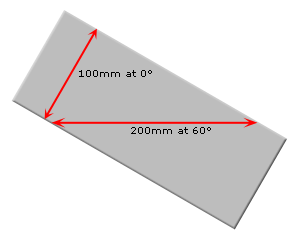
The effective armour thickness is calculated by dividing the nominal armour thickness with the cosine of the nominal impact angle. For example, in the diagram above we have a nominal armour thickness of 100mm and an impact angle of 30°, thus we have an effective armour thickness of 100mm/cos(30°) = 115.47mm that the shell needs to be able to penetrate. In other words, at an impact angle of 30° the armour is effectively over 115.47% stronger than its nominal value.
As you can see, the effective armour thickness increases exponentially with the impact angle. For shells impacting you at 60° your armour is effectively twice as thick and at 70° nearly three times as thick. As explained above, for angles higher than 70° all AP and APCR shells will ricochet regardless of armour thickness.
The same applies to your targets, of course, so always take that into account when deciding if and where to shoot them. Reducing the impact angle to your target only slightly will exponentially reduce its effective armour thickness and a target that was previously impossible for you to penetrate may suddenly become easy prey. This is also the reason why you should always attack from two different angles at once. A target can only maximize their effective armour in one direction, as soon as they try to accommodate two possible impact angles they suffer an exponential loss in effective armour thickness towards both of them (thus if you are the one getting flanked while in a strongly armoured tank it is best to maximize your effective armour towards one opponent while shooting the other one).
Penetration is a shell statistic shown in game next to the ammunition type. It shows the maximum amount of armor the shell can penetrate on average. This value is subject to the +/- 25% RNG, similar to shell damage.
Ricochet is a condition that exists when an AP or APCR shell hits at an extreme angle (70 degrees or more) and skips off. The shell still has the ability to damage an enemy vehicle after the ricochet. Penetration loss will occur if the angle is greater than 70 degrees but less than 85 degrees, and if it is greater than 85 degrees it will not lose penetration at all.
Each type of ammunition also adds its own special characteristics:
AP: Armor Piercing

Armor piercing, often referred to as AP, is the basic ammo of the game, and is what it says on the box: goes into enemy tank. However, AP gets a hidden characteristic known as normalization, which is a value subtracted from the angle at which your shell hits the enemy tank. This is a real effect caused by the shape of the head of the round, and in the case of AP is 5 degrees. Like with all shells if your penetration value is lower than thickness of the armor you are trying to penetrate it will bounce. This round type loses a certain amount of penetration over distance.
APCR: Armor Piercing Composite Rigid

Armor piercing composite rigid also known as APCR is the basic gold ammo the game. This ammunition has a higher muzzle velocity meaning that it flies faster than most other shells. The shell has 3 degrees less normalization than armor piercing, meaning that it will bounce at higher angles. This round type loses a certain amount of penetration over distance, slightly more than armor piercing.
AS OF UPDATE 3.9: If the APCR shell is considered "premium ammo" on a tank, it will do roughly 15% less damage on average as compared to the standard round. Also, premium APCR can be alternately purchased for 400x the gold price by tapping the price in the ammunition loading screen.
HEAT: High Explosive Anti-Tank
High explosive anti tank rounds, though having higher penetration, have no normalization. HEAT rounds do not lose penetration over distance but have low shell velocity, meaning they travel much slower. HEAT also struggles to penetrate tracks and other forms of spaced armor.
AS OF UPDATE 3.9: If the HEAT shell is considered "premium ammo" on a tank, it will do roughly 15% less damage on average as compared to the standard round. Also, premium HEAT can be alternately purchased for 400x the gold price by tapping the price in the ammunition loading screen.
Spaced armor: Spaced armor is a layer of armor that is over the top of another layer of armor with a gap in between. This armor may be actual armor plates, tracks, or objects mounted on the outside of the vehicle. Shells that penetrate one layer of spaced armor have lower penetration than their original values, making it harder for them to penetrate the layer underneath. Spaced armor is most commonly found in the form of tracks, gun mantlets, and on the side of Russian heavy tanks, but can also include observation devices and sometimes track pieces mounted on the tank.
HE/HESH: High Explosive or High Explosive Squash Head

High explosive ammunition explodes on contact and therefore will do damage even if it does not penetrate the armor. High explosive will not bounce and therefore is good for targets that some premium ammo will not penetrate. Explosive does do higher module damage even if it does not penetrate, meaning that it will be easier to track targets with explosive. However, high explosive cannot penetrate spaced armor very easily, which is a weakness when shooting at certain high tier Russian tanks and tracks. In addition, the amount of damage an HE shell is directly related to the ratio of armor to shell penetration.
Assuming penetration is higher than effective armor, the shell goes to the damage roll calculations.
The game then randomizes damage, which gives a value between +/- 25% of the shell's stated damage. Example: A Russian KV-1S with the 122mm D-2-5T has an average damage of 400 hitpoints with armor piercing rounds, therefore it will always do between 300 and 500 hitpoints worth of damage.
Two Calibers Rule
If the shell does not pass this first check, and is an AP or an APCR shell, it then checks the Two Calibers Rule. The Two Calibers Rule states that if the armor the shell hits is less than half of the caliber of the shell, normalization is increased by the following formula: basic normalization * 1.4 * shell caliber / nominal armour thickness. If the shell penetrates due to this rule, it moves on to the damage roll. This rule does not apply to HEAT/HE/HESH.
Three Caliber Rule
If not, the shell goes on to the Three Calibers Rule or Triple Overmatch, both terms for the same thing. This rule states that if an AP or APCR shell caliber is three times the thickness of the armor it is trying to penetrate, it will penetrate regardless of angle and moves on to the damage roll. This rule does not apply to HEAT, HE, or HESH.
Official Wargaming Video
While it is important to note that the following video is for World of Tanks PC, the penetration mechanics are identical.
Visibility Mechanics
The Spotting System in this game relies on many things, most of which can be boiled down to Camo Rating, View Range, and Terrain Bonuses.
Camo Rating
Camo Rating is the arbitrary number assigned to each tank that rates its stealthiness, and is usually expressed as a percentage. Typically this number gets smaller as the tank gets shorter, which makes sense when you look at the AMX 50B versus an IS-7: The IS-7 will have a slightly higher camo rating due to its lower profile. Camo Rating has three states in order of decreasing effectiveness: Stationary, On the Move, and Firing. Light tanks have a special ability that allow them to have the same camo rating while on the move as they would while stationary. Tank destroyers have a slight bonus to camo while firing as well.
In short, what this Camo Rating does is decrease the effective view range of the enemy vehicle, which we'll get to in a moment.
View Range
View range is an imaginary circle that surrounds each tank, the radius of which is the stated value in the vehicle characteristics page under "Turret". This number usually ranges between 200-270 without equipment or crew skills, but can be enhanced with provisions and equipment. The current maximum view range in the game is tied between the M46 Patton, the M60, and the STB-1, which can be maxed out with equipment to 363.6 meters.
The Spotting Circle acts similarly to Sonar in that it isn't instantaneous. It continuously sends out "Spotting Checks" which decrease in frequency the farther out a target is.
View Range and Camo Rating combine to form something called an effective spotting range, which is calculated by spottingRange = effectiveViewRange - (effectiveViewRange - 50) x camoRating
Terrain
Bushes and Trees both affect camo as well, based on the density of the bush/tree. Both have reduced effectiveness immediately after firing, but only if you are within 15 meters of the bush. If a player pulls back behind a bush far enough for the bush to go opaque, the bush retains its camo bonus.
Official Wargaming Video
While it is important to note that the following video is for World of Tanks PC, the spotting system in Blitz is nearly identical, albeit trimmed down slightly.
Environment Mechanics
Mobility
Hull Traverse
Hull traverse is a number in degrees per second that shows how quickly the hull would traverse on paper. It is affected by engine horsepower, fuel provisions, the engine equipment pieces, the active suspension module, and more.
Horsepower
The basic metric of engine power, can be improved with premium fuel or either engine equipment piece.
Weight
Typically measured in tons, the weight of the tank changes with what modules are mounted. Provisions, consumables, ammo, and crew are considered weightless in this calculation. As of update 3.8, equipment is now weightless as well.
Top Speed
This is the maximum speed a tank can reach on flat ground.
Horsepower per Ton (hp/t)
This number is simply the horsepower divided by the weight in tons, and helps determine the acceleration of a tank.
Terrain Resistance
This number is hidden in the game client, and factors into the EFFECTIVE horsepower per ton. There are three conditions of terrain resistance, and each one is meant to simulate the effects of real-life terrain in the game. These are:
Hard terrain:
This is something like concrete or a hard dirt road, and allows the tank to accelerate and turn much easier than the other two. Typically is a number between .7 and 1.2.
Medium terrain:
This is meant to show the effects of terrain such as an empty cornfield or a grass field, where the acceleration and turning speed are mildly slowed. Usually is a number between 1 and 1.5.
Soft terrain:
This type of terrain is meant to show the effects of swampy ground or riverbeds, and vastly reduces the tank's mobility. This value is usually quite high, and can be higher than 2.
The equation of effective horsepower per ton is simply (horsepower ÷ ton) ÷ (terrain resistance).