| Revision as of 02:07, 10 April 2018 expanded on pros and cons, modified in game performance | | Revision as of 17:16, 20 September 2018 |
| Line 2: | | Line 2: |
| | | | | |
| | |InTheGame_pros= | | | |InTheGame_pros= |
| ? | * Best turn time in the game at seven seconds. | | + | * One of the best turn times in the game, Ties with the Tier V Ki-43-II at 8 seconds. |
| ? | * Good guns | | + | * Great guns for its tier. The first non-premium 'nasty' armament of the game once fully upgraded. |
| ? | * Good stall speed, can stay behind slow targets without overshooting or having to turn away. | | + | * Surprisingly low stall speed and good airbrake, can most of the time stay behind slow targets without overshooting or having to turn away. |
| ? | * Great for defending a central sector | | + | * Great for clearing out 'furballs' over contested points, as agility and firepower combine to allow it to gracefully switch from one target to another with ease. |
| | | + | * Fear factor: New or inexperienced player opponents will often hesitate standing toe-to-toe with a Player-piloted Zero this early on in the tech trees. Can Rip tier 3's to shreds in mere moments. |
| | | + | |
| | | | | |
| | |InTheGame_cons= | | | |InTheGame_cons= |
| ? | * Rather low speed | | + | * Rather low speed, will struggle to get to where the action is in a hurry. |
| | * Very low HP | | | * Very low HP |
| ? | * Autocannons overheat fairly quickly | | + | * Autocannons overheat fairly quickly. Makes taking down aircraft with high health or good dodging skills frustrating at times. |
| ? | * Light as a feather: Will often be the only loser in a head-on collision. | | + | * Light as a feather: Will often take fatal or near-fatal amounts of damage from head on collisions. |
| | * Poor service ceiling. | | | * Poor service ceiling. |
| | | | | |
| | |InTheGame_performance= | | | |InTheGame_performance= |
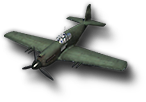
| ? | The first representative of the legendary "Zero" fighter. A Low-altitude fighter good for shredding low level attack aircraft without a tail gunner. The weapons are powerful enough to destroy heavier fighters, but don't use head on attacks. The A6M1s turn radius is unchanged from as its predecessors. As a result, this is the second best aircraft for cornering fights. Avoid frontal attacks in all situations. As it's HP is very low, it is necessary to monitor the surrounding area and not let the enemy dive on you or to attack from behind, because every health point is worth its weight in gold. | | + | The first representative of the legendary "Zero" fighter. A Low-altitude fighter good for shredding low level attack aircraft without a tail gunner, or any other fighter craft in general that gives an opening. The weapons are even powerful enough to destroy heavier fighters that decide to be careless of your guns. Do not rely entirely head on attacks, as this plane ''cannot'' take a head collision with practically for the life of it. The A6M1s turn radius is unchanged from as its predecessors. As a result, it is the best aircraft for cornering fights for its tier. The only other aircraft at tier IV that comes close to the A6M1's reputation for being an imposing opponent in a dogfight being the British Bristol 146, the two almost go hand-in-hand aside from turn radius, where the Zero can turn around almost an entire second sooner. |
| | | + | |
| | | + | Because the A6M1 has poor HP, it is necessary to monitor your surroundings constantly and not let the enemy dive on you or to attack from behind as much as possible, because every health point is worth its weight in gold. Be difficult to hit, and when you are given the chance to hit the enemy, hit them hard, try to finish off opponents quickly if you can when in a furball. If unable to finish them off, it is recommended to switch to another target to better prevent anyone getting on your tail easily - even then, continually check behind your aircraft for anyone even appearing to be trying to line up on your six o' clock. |
| | | + | |
| | | + | Avoid climbing battles at all possible, while the Zero ''can'' climb straight up for a brief while (especially with a full boost) to snap at enemies its guns can still reach, it can leave a zero pilot hanging in the air like meat on a string, which can prove a fatal venture. Only pursue this option if there are no low-altitude enemy fighters or lurking heavy fighters about. |
| | | + | |
| | | + | When bottom tiered, the A6M1 can prove an underestimated underdog, but its lack of HP will make it vulnerable to armaments the likes of the Bf-109E, FW-190A1, Spitfire, and even the A6M1's immediate successor, the A6M2. |
| | | + | |
| | | + | Overall the A6M1 is a blast to play at tier 4, especially when it is top tier, where it can simply wreak havoc. If you Fight aggressively, fly smart and dictate your battles, and you will do well with this aircraft. |
| | | | | |
| | |InTheGame_research= | | | |InTheGame_research= |
| ? | *Engine first to increase speed, then go from there | | + | * Research the Engine first to increase speed if its agility bothers you. |
| | | + | OR |
| | | + | * Research the guns first to give the A6M1 its notorious bite. |
| | |History= | | | |History= |
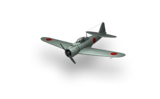
| | The first A6M1 prototype was completed in March 1939, powered by the 580 kW (780 hp) Mitsubishi Zuisei 13 engine with a two-blade propeller. It first flew on 1 April, and passed testing in a remarkably short period of time. By September, it had already been accepted for Navy testing as the A6M1 Type 0 Carrier Fighter, with the only notable change being a switch to a three-bladed propeller to cure a vibration problem. | | | The first A6M1 prototype was completed in March 1939, powered by the 580 kW (780 hp) Mitsubishi Zuisei 13 engine with a two-blade propeller. It first flew on 1 April, and passed testing in a remarkably short period of time. By September, it had already been accepted for Navy testing as the A6M1 Type 0 Carrier Fighter, with the only notable change being a switch to a three-bladed propeller to cure a vibration problem. |

 IV
IV
 III
III III
III