Hipper
| Revision as of 20:56, 27 February 2017 Expanded Historical section to include remainder of the class. | Revision as of 05:34, 28 February 2017 Added additional Historical Gallery photos. | |||
| Line 178: | Line 178: | |||
| Disappointed by the failure to sink merchant ships in that battle, Adolf Hitler ordered the majority of the surface warships scrapped, though Admiral Karl Dönitz was able to convince Hitler to retain the surface fleet. As a result, ''Admiral Hipper'' was returned to Germany and decommissioned for repairs. The ship was never restored to operational status, however, and on 3 May 1945, Royal Air Force bombers severely damaged her while she was in Kiel. Her crew scuttled the ship at her moorings, and in July 1945 she was raised and towed to Heikendorfer Bay. She was ultimately broken up for scrap in 1948–1952; her bell resides in the [https://www.rmg.co.uk/national-maritime-museum National Maritime Museum] in Greenwich, England. | Disappointed by the failure to sink merchant ships in that battle, Adolf Hitler ordered the majority of the surface warships scrapped, though Admiral Karl Dönitz was able to convince Hitler to retain the surface fleet. As a result, ''Admiral Hipper'' was returned to Germany and decommissioned for repairs. The ship was never restored to operational status, however, and on 3 May 1945, Royal Air Force bombers severely damaged her while she was in Kiel. Her crew scuttled the ship at her moorings, and in July 1945 she was raised and towed to Heikendorfer Bay. She was ultimately broken up for scrap in 1948–1952; her bell resides in the [https://www.rmg.co.uk/national-maritime-museum National Maritime Museum] in Greenwich, England. | |||
| ? | ''Blücher''’s career in the Kriegsmarine was much shorter and far less distinguished. Commissioned in the fall of 1939, her first combat assignment was Operation Weserübung in April 1940, loaded with combat troops as the flagship of the force assigned to capture Oslo. While proceeding up the Oslofjord in the pre-dawn hours of 9 April, she was struck by both Norweigan coastal defense batteries and torpedoes. She sank with the loss of nearly 400 men, and the flotilla she was commanding failed to reach Oslo. | + | ''Blücher''’s career in the Kriegsmarine was much shorter and far less distinguished. Commissioned in the fall of 1939, her first combat assignment was Operation Weserübung in April 1940, loaded with combat troops as the flagship of the force assigned to capture Oslo. While proceeding up the Oslofjord in the pre-dawn hours of 9 April, she was struck by both Norweigan coastal defense batteries and torpedoes. She sank with the loss of nearly 400 men, and the flotilla she was commanding failed to reach Oslo. The Norwegians salvaged both of her anchors; they are on display today in separate locations: one in Oslo, Norway and the other near Drøbak. | |
| ? | ''[[Prinz Eugen]]'', conversely, was the lone ship of the class to survive the war afloat and intact. She | + | ''[[Prinz Eugen]]'', conversely, was the lone ship of the class to survive the war afloat and intact. She acquitted herself well throughout the war, participating successfully in Operation Rheinübung and the Battle of the Denmark Strait, Operation Cerberus (also known as the "Channel Dash"), and various gunnery support missions in the North and Baltic Seas. Surrendered to the Royal Navy on 7 May 1945, she became a war prize of the United States Navy and was subsequently sailed to the Philadelphia Navy Yard and stripped of some of her equipment — notably her radar and two of her forward gun barrels — before being transferred to the Pacific for Operation Crossroads. ''Prinz Eugen'' survived both atomic detonations but was severely irradiated. After being towed to Kwajalein Atoll, the ship began to take on water and list heavily. Attempts were made to keep the vessel afloat, but all were unsuccessful. On 22 December 1946, the ship capsized in the shallow waters of the atoll where she remains visible today. | |
| ? | A | + | A handful of artifacts from ''Prinz Eugen'' have survived into the modern era. The US Navy salvaged one of her propellers in 1977, and presented it to the German Navy League in the summer of 1979. It is on display at the [https://deutscher-marinebund.de/ German Naval Memorial] in Laboe, Germany. The ship's bell was removed before she was sent to the Pacific to participate in Operation Crossroads; it resides in the collection of the [https://www.history.navy.mil/content/history/museums/nmusn.html National Museum of the United States Navy] and can be viewed in the Washington Navy Yard in Washington, DC. One of the guns removed from turret "Anton" prior to the ship being sent to the Pacific for Operation Crossroads remains in the archives of the Naval Surface Warfare Center ballistic testing facility in Dahlgren, Virginia. | |
| ? | ''Seydlitz'' was laid down in 1936 and launched in January 1939, but fitting out work on her was halted upon the outbreak of war on 1 September 1939. She was estimated to be 95% complete at the time. She languished close to completion until early 1942, when the Kriegsmarine — having come to appreciate the importance of aircraft carriers after the loss of ''[[Bismarck]]'' and the near-loss of ''[[Tirpitz]]'' in March | + | ''Seydlitz'' was laid down in 1936 and launched in January 1939, but fitting out work on her was halted upon the outbreak of war on 1 September 1939. She was estimated to be 95% complete at the time. She languished close to completion until early 1942, when the Kriegsmarine — having come to appreciate the importance of aircraft carriers after the loss of ''[[Bismarck]]'' in May 1941 and the near-loss of ''[[Tirpitz]]'' in March 1942 — elected to resume work on ''Graf Zepplin'' and convert ''Seydlitz'' into a light aircraft carrier. With a complement of ten (10) Bf109 fighters and ten (10) Ju87 dive bombers, she would have fulfilled a role similar to that of the Royal Navy's HMS ''Hermes'' or the US Navy's ''[[Independence]]'' class. Work was halted on this conversion in June 1943 and never completed. ''Seydlitz'' was transferred to Königsberg, Germany, where she was scuttled on 29 January 1945 to prevent her capture by Soviet forces. The Soviets eventually re-floated her for salvage; she was broken up for scrap in the late 1940's. | |
| ? | ''Lützow'' was the last ''Hipper''-class cruiser to be ordered. Originally designed as a light cruiser variant of the ''Admiral Hipper'' armed with twelve (12) 150mm guns, the German admiralty made the decision to match her main battery to that of her sister ships in November 1936. Her keel was laid at Deschimag in Bremen on 2 August 1937 and she was launched on 1 July 1939. In October of that year, the Soviet Union approached Germany with a proposal to purchase ''Lützow'' in her current (unfinished) state, along with all of her technical specifications, trial and testing data, and spare parts. The sale was concluded in February 1940, and ''Lützow'' was towed to Leningrad on 15 April. On 25 September 1940, the Soviet Navy re-christened her ''Petropavlovsk'' and | + | ''Lützow'' was the last ''Hipper''-class cruiser to be ordered. Originally designed as a light cruiser variant of the ''Admiral Hipper'' armed with twelve (12) 150mm guns, the German admiralty made the decision to match her main battery to that of her sister ships in November 1936. Her keel was laid at Deschimag in Bremen on 2 August 1937 and she was launched on 1 July 1939. In October of that year, the Soviet Union approached Germany with a proposal to purchase ''Lützow'' in her current (unfinished) state, along with all of her technical specifications, trial and testing data, and spare parts. The sale was concluded in February 1940, and ''Lützow'' was towed to Leningrad on 15 April. On 25 September 1940, the Soviet Navy re-christened her ''Petropavlovsk'' and began work to finish her outfitting. Language barriers and other issues hampered efforts, and arrangements were made for Soviet and German officers to train together aboard sister ship ''Seydlitz'' as she worked up towards commissioning in the fall of 1941. The German invasion of the Soviet Union in June 1941 put an end to such collaborative efforts. | |
| ''Petrapavlovsk'' participated in the defense of Leningrad in August 1941 as a floating battery, but took so many return hits from Wehrmacht heavy artillery that she was forced to beach herself on 17 September to avoid sinking outright. She was re-floated a year later, repaired, renamed ''Tallinn'', and assisted in breaking the Siege of Leningrad in 1944. She was never fully completed, serving as a floating barracks and a stationary training ship before she was scrapped sometime during the 1950's. | ''Petrapavlovsk'' participated in the defense of Leningrad in August 1941 as a floating battery, but took so many return hits from Wehrmacht heavy artillery that she was forced to beach herself on 17 September to avoid sinking outright. She was re-floated a year later, repaired, renamed ''Tallinn'', and assisted in breaking the Siege of Leningrad in 1944. She was never fully completed, serving as a floating barracks and a stationary training ship before she was scrapped sometime during the 1950's. | |||
| Line 192: | Line 192: | |||
| |HistoricalGallery=<!-- write below list of files without tags. description (if necessary) for each should be separated with | --><gallery> | |HistoricalGallery=<!-- write below list of files without tags. description (if necessary) for each should be separated with | --><gallery> | |||
| File:Hipper_crest.jpg|The crest of ''Admiral Hipper''. | File:Hipper_crest.jpg|The crest of ''Admiral Hipper''. | |||
| + | File:Blucher_crest.jpg|The crest of ''Blücher''. | |||
| + | File:Prinz_Eugen_crest.jpg|The crest of ''Prinz Eugen''. | |||
| + | File:Launch_of_Blucher_2.jpg|The launch of ''Blücher'', 15 August 1936. | |||
| File:Gallhipperfittingout03.jpg|''Admiral Hipper'' fitting out at Blohm & Voss, 1937. | File:Gallhipperfittingout03.jpg|''Admiral Hipper'' fitting out at Blohm & Voss, 1937. | |||
| ? | File:Seydlitz_-_спуск_на_воду.jpg|The | + | File:Prinz_Eugen_launch.jpg|The launch of ''Prinz Eugen'', 22 August 1938. | |
| ? | File:Gallhippercommis01.jpg| | + | File:Seydlitz_-_спуск_на_воду.jpg|The launch of ''Seydlitz'', 19 January 1939. | |
| + | File:Gallhippercommis01.jpg|Commissioning ceremonies aboard ''Admiral Hipper'', 29 April 1939. | |||
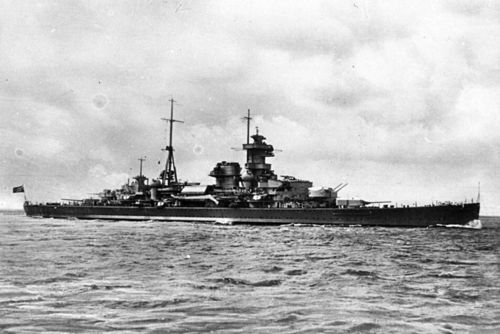
| File:Admiral Hipper (1937).jpg|''Admiral Hipper'' underway in 1939, location unknown. | File:Admiral Hipper (1937).jpg|''Admiral Hipper'' underway in 1939, location unknown. | |||
| ? | File:Hipper_in_Kanal.jpg|''Admiral Hipper'' with original bow and crest seen in the Kaiser Wilhelm Kanal during November 1939 while transiting from | + | File:Hipper_in_Kanal.jpg|''Admiral Hipper'' with original bow and crest seen in the Kaiser Wilhelm Kanal during November 1939 while transiting from Brunsbuttel to Kiel after departing Blohm & Voss in Hamburg. | |
| ? | File:Bundesarchiv Bild 101II-MW-5607-32, Unternehmen "Weserübung", "Admiral Hipper".jpg|''Admiral Hipper'' loading mountain troops in Cuxhaven, Germany, April 1940. | + | File:Bundesarchiv Bild 101II-MW-5607-32, Unternehmen "Weserübung", "Admiral Hipper".jpg|''Admiral Hipper'' loading mountain troops in Cuxhaven, Germany in preparation for Operation Weserübung, April 1940. | |
| + | File:Blucher_sinking_1.jpg|The loss of ''Blücher'' during Operation Weserübung, 9 April 1940. | |||
| File:Prinz_Eugen_at_Kiel.jpg|''Prinz Eugen'' moored at the Krupp Germaniawerft yards in Kiel, autumn 1940. | File:Prinz_Eugen_at_Kiel.jpg|''Prinz Eugen'' moored at the Krupp Germaniawerft yards in Kiel, autumn 1940. | |||
| ? | ||||
| File:Hipper_in_Brest.jpg|''Admiral Hipper'' in drydock in Brest, France, circa 1941. | File:Hipper_in_Brest.jpg|''Admiral Hipper'' in drydock in Brest, France, circa 1941. | |||
| File:German cruiser Admiral Hipper off Norway 1942.jpg|''Admiral Hipper'' in Norwegian waters, circa 1942. | File:German cruiser Admiral Hipper off Norway 1942.jpg|''Admiral Hipper'' in Norwegian waters, circa 1942. | |||
| File:Admiral Hipper cruiser in dry dock Kiel 1945.jpg|The bombed out remains of ''Admiral Hipper'' in dry dock at Kiel, 3 May 1945. | File:Admiral Hipper cruiser in dry dock Kiel 1945.jpg|The bombed out remains of ''Admiral Hipper'' in dry dock at Kiel, 3 May 1945. | |||
| File:Hipper%27s_bell.jpg|The ship's bell of ''Admiral Hipper'' resides in the collection of the [https://www.rmg.co.uk/national-maritime-museum National Maritime Museum] in Greenwich, England. | File:Hipper%27s_bell.jpg|The ship's bell of ''Admiral Hipper'' resides in the collection of the [https://www.rmg.co.uk/national-maritime-museum National Maritime Museum] in Greenwich, England. | |||
| + | File:Blucher_anchor.JPG|Both of ''Blücher''’s anchors were salvaged from her wreck and are on display: this one in Oslo harbor, the other farther down the Oslofjord near Drøbak. | |||
| + | File:Prinz_Eugen_prop.jpg|One of ''Prinz Eugen''’s propellers, salvaged from Kwajalein Atoll and on display at the [https://deutscher-marinebund.de/ German Naval Memorial] in Laboe. | |||
| File:Admiral Hipper ONI.jpg|US Office of Naval Intelligence recognition drawing of an ''Admiral Hipper''-class cruiser. | File:Admiral Hipper ONI.jpg|US Office of Naval Intelligence recognition drawing of an ''Admiral Hipper''-class cruiser. | |||
| File:Seydlitz_авианосец_с_самолётами.jpg|Artist's rendering of ''Seydlitz'' with her conversion to a light carrier completed. | File:Seydlitz_авианосец_с_самолётами.jpg|Artist's rendering of ''Seydlitz'' with her conversion to a light carrier completed. | |||
Revision as of 05:34, 28 February 2017

| Research price114000 exp |
| Purchase price9,000,000 |
| Hit Points37,300 |
| IDS_PGGM030_203MM_C344 х 2 pcs. |
| Rate of Fire5.71 shots/min. |
| Reload Time10.5 sec. |
| Rotation Speed8 deg./sec. |
| 180 Degree Turn Time22.5 sec. |
| Firing Range16.08 km. |
| Maximum Dispersion143 m. |
| HE Shell203 mm Spr.Gr. L/4.7 Kz. |
| Maximum HE Shell Damage2,500 |
| Chance of Fire on Target Caused by HE Shell13 % |
| Initial HE Shell Velocity925 m./s. |
| HE Shell Weight122 kg. |
| AP Shell203 mm P.Spr.Gr. L/4.4 |
| Maximum AP Shell Damage5,900 |
| Initial AP Shell Velocity925 m./s. |
| AP Shell Weight122 kg. |
| 105 mm/65 SK C/33 on a Dop. L. C/31 mount6 х 2 pcs. |
| Firing Range7.6 km. |
| Rate of Fire17.91 shots/min. |
| Reload Time3.35 sec. |
| HE Shell105 mm Spr.Gr. Kz. |
| Maximum HE Shell Damage1,200 |
| Initial HE Shell Velocity900 m./s. |
| Chance of Fire on Target Caused by HE Shell5 % |
| 533 mm Drilling4 х 3 pcs. |
| Rate of Fire0.88 shots/min. |
| Reload Time68 sec. |
| Rotation Speed25 deg./sec. |
| 180 Degree Turn Time7.2 sec. |
| TorpedoG7a T1 |
| Maximum Damage13,700 |
| Torpedo Speed64 knot |
| Torpedo Range6 km. |
| 105 mm/65 SK C/33 on a Dop. L. C/31 mount6 х 2 pcs. |
| . . . Average Damage per Second99.6 |
| . . . Firing Range4.5 km. |
| 20 mm/65 C/38 on an L/30 single mount6 х 1 pcs. |
| . . . Average Damage per Second18 |
| . . . Firing Range2.01 km. |
| 20 mm/65 C/38 on a twin mount8 х 2 pcs. |
| . . . Average Damage per Second33.6 |
| . . . Firing Range2.01 km. |
| 40 mm/56 Flak 28 on a single mount6 х 1 pcs. |
| . . . Average Damage per Second45 |
| . . . Firing Range3.51 km. |
| 37 mm/83 SK C/30 on a Dopp LC/30 mount4 х 2 pcs. |
| . . . Average Damage per Second10.4 |
| . . . Firing Range3.51 km. |
| Maximum Speed32 knot |
| Turning Circle Radius740 m. |
| Rudder Shift Time15 sec. |
| Surface Detectability Range13.79 km. |
| Air Detectability Range7.18 km. |

Admiral Hipper — German Tier VIII cruiser.
In 1934, a technical design specification was developed for a draft design of a heavy cruiser. Drawing from the lessons learned from the Deutschland class ships, engineers discarded the idea of using diesel power plants and instead opted for turbines and boilers with high steam parameters. The lead cruiser, Admiral Hipper, participated in the invasions of Denmark and Norway during World War II and conducted several raids in the Atlantic. On December 31, 1942, Hipper participated in the Battle of the Barents Sea against the JW-51B convoy, where she took damage in the engagement.
Modules
 |
Rate of Fire (shots/min) | 180° Turn Time (sec) | Maximum Dispersion (m) | Maximum HE Shell Damage (HP) | Chance of Fire on Target Caused by HE Shell (%) | Maximum AP Shell Damage (HP) |
Research price (exp) |
Purchase price ( | |
|---|---|---|---|---|---|---|---|---|---|
| 203 mm/60 SK C/34 on an LC/34 mount | 5.7 | 22.5 | 143 | 2,500 | 13 | 5,900 | 0 | 700,000 |
 |
Hit Points (HP) | Armor (mm) | Armor (mm) | Main Turrets (pcs.) | Secondary Gun Turrets (pcs.) | AA Mounts (pcs.) | Torpedo Tubes (pcs.) | Hangar Capacity (pcs.) |
Research price (exp) |
Purchase price ( | |
|---|---|---|---|---|---|---|---|---|---|---|---|
| Admiral Hipper (A) | 37,300 | 16 | 160 | 4 | 6 | 6/8/4/6/6 | 4 | 0 | 900,000 | ||
| Admiral Hipper (B) | 43,800 | 16 | 160 | 4 | 6 | 4/6/18 | 4 | 26,000 | 2,000,000 |
 |
Rate of Fire (shots/min) | Torpedo Tubes Reload Time (sec) | 180° Turn Time (sec) | Maximum Damage (HP) | Torpedo Speed (knot) | Torpedo Range (km) |
Research price (exp) |
Purchase price ( | |
|---|---|---|---|---|---|---|---|---|---|
| G7a T1 | 0.9 | 68 | 7.2 | 13,700 | 64 | 6 | 0 | 260,000 |
 |
IDS_SHIP_PARAM_SUO_INCREASE_DIST (%) | Maximum Firing Range (km) |
Research price (exp) |
Purchase price ( | |
|---|---|---|---|---|---|
| FKS Typ 8 Mod. 1 | 0 | 0 | 750,000 | ||
| FKS Typ 8 Mod. 2 | 0 | 23,000 | 1,800,000 |
 |
Maximum Speed (knot) |
Research price (exp) |
Purchase price ( | |
|---|---|---|---|---|
| Propulsion: 110,000 hp | 32 | 0 | 600,000 |
Compatible Upgrades
| Slot 1 |
|||||
|---|---|---|---|---|---|
| Slot 2 |
|||||
| Slot 3 |
|||||
| Slot 4 |
|||||
| Slot 5 |
Player Opinion
Performance
Given nicknames such as “Admiral Hipster”, "Hippie", or "Pringles(although not anymore)" due to her sister ship being named Prinz Eugen, the Admiral Hipper is a capable heavy cruiser. In historical terms, the Admiral Hipper class of cruisers were the most advanced designs ever commissioned by the German Navy. Like other German cruisers, the Admiral Hipper can take advantage of the superior range and favourable dispersion of her 8 inch guns. These guns can do excellent AP damage to cruisers but can also deal a surprising amount of damage to battleships. Furthermore, the excellent range of her hydroacoustic search radar allows the Admiral Hipper to seek out and eliminate destroyers hiding in their smoke screens. While the Admiral Hipper has many strengths, she is not without faults. An underwhelming anti-aircraft suite leaves her vulnerable to air attacks. Furthermore, the HE shells can sometimes inflict disappointing damage and the armour scheme of the ship is far from invulnerable. Finally, while her range remains excellent by cruiser standards, any battleship at-tier or above will significantly outrange the Hipper, which combined with her high detectability (the worst among cruisers in her tier other than the Prinz Eugen) makes drawing too much attention to itself nearly suicidal.
The Admiral Hipper is most suited to the role of either a second line long range support ship or part of a raiding cruiser group. The Hipper is at its best when attacking either other cruisers, or an already-distracted target: if it finds itself dueling a battleship, a Hipper captain would be well-advised to leg it into the haze and reengage under better circumstances.Pros:
- Very impressive AP damage.
- Fast reload time at 13 seconds.
- Excellent range, favorable dispersion and high shell velocity.
- Retains the same improved hydroacoustic search ability.
- Fastest main battery traverse of her Tier VIII constituents.
- Angling works well despite relatively low main armor belt value.
- Good overall AA (C hull) .
- Able to stealth fire with the appropriate build, albeit with a sub-1km buffer.
Cons:
- Only 8 main guns.
- 6km torpedo range + lowest damage of the Tier VIII cruisers.
- Huge, easy to pen citadel from plunging fire.
- Low HE damage + base fire chance.
- Engine and rudder vulnerable to being incapacitated.
- High detection range at her tier among her colleagues.
Research
Optimal Configuration
Upgrades
Virtually all builds of Admiral Hipper find themselves mounting at least two upgrades in common: Main Armaments Modification 1 in Upgrade Slot 1 and Damage Control System Modification 1 in Upgrade Slot 4. Steering Gears Modification 2 is typically taken in Upgrade Slot 5 to improve her handling. Concealment System Modification 1 is highly recommended in Upgrade Slot 6 in order to help curtail her large detection radius. Combined with a captain with the Level 4 skill Concealment Expert, her detectability range drops under 12km. Conversely, Steering Gears Modification 3 is a strong option in Slot 6 for captains who prefer quicker rudder response.
As with most cruisers, the upgrade in Upgrade Slot 2 is what will differentiate one Admiral Hipper from another.
Generalist Build: The easy choice for Slot 2 is Aiming Systems Modification 1, which improves her shell dispersion and provides a minor buff to her secondary battery. This is the recommended pick for captains who don't wish to specialize the ship in anti-aircraft defenses.
Anti-Aircraft Build: Admiral Hipper’s already outstanding AA suite can be made even more potent by equipping AA Guns Modification 2, and maximized by assigning a captain with Advanced Firing Training. This pair of upgrades pushes the firing radius of her 105mm dual-purpose guns out to 6.5 km, providing excellent anti-aircraft protection for herself and teammates when utilizing Defensive AA Fire. This does mean sacrificing the exceptional German Hydroacoustic Search, however, and is a setup that is largely wasted in games without an aircraft carrier present.
Commander Skills
Admiral Hipper prefers to hold opponents at arms' length. Brawling is not recommended unless the situation is heavily favorable, and the skills of her commander should be tailored to such a strategy. At this end of the German cruiser line the ships begin to play — and handle — more like small battleships, and players will frequently find their commander skill choices echoing those popularly found on battleships: Priority Target at Level 1 and Expert Marskman at Level 2. Concealment Expert is also highly recommended at Level 4, as is Advanced Firing Training for captains pursuing an Anti-Aircraft Build. Level 4 also offers Manual Control for AA Armament to captains wishing to go all-in on their Anti-Aircraft Build; this is a very strong skill for high-tier German cruisers and battleships due to the AA potency of their dual-purpose 105mm guns.
Level 3 is where captains are offered some customization in their build. Captains preferring the Anti-Aircraft Build will want to opt for Basic Firing Training. Those pursuing the Generalist Build are better off opting for Demolition Expert; Vigilance is also a decent choice.
| Recommended Commander Skills | ||||||||
|---|---|---|---|---|---|---|---|---|
| Cost (points) |
Endurance | Attack | Support | Versatility | ||||
| 1 |
★★★ |
★ |
★ |
|
|
|
★★ |
|
| 2 |
★★ |
★★ |
★★★ |
|
|
|
★★ |
★ |
| 3 |
★ |
★ |
|
|
★★ |
★ |
★★ |
★★ |
| 4 |
|
★ |
|
|
★★★ |
|
|
★★★ |
| Key: ★★★ - Extremely Useful ★★ - Frequently Useful ★ - Occasionally Useful No stars - Meh Χ - Not recommended | ||||||||
Camouflage
Type 1, 2, or 5 camouflage can be equipped for credits; Types 1 or 5 are recommended at a minimum to reduce detectibility range.
Players who wish to spend doubloons can equip Admiral Hipper with Type 18 camouflage that lowers her detection radius, reduces the accuracy of incoming shells, reduces her repair costs, and increases the amount of experience she earns.
Signals
Recommended Signal Flags 
| |||||
|---|---|---|---|---|---|
| Combat | |||||
 ★ |

|

|

|
 ★ |
 ★ |

|

|
 ★★ |
 ★★★ |
 ★ |

|

|

| ||||
Note: Use of the Juliet Charlie signal makes detonation impossible.
Gallery
Historical Info
Historical Gallery


.jpg)


