Aerial Combat
| Revision as of 17:11, 6 June 2017 | Revision as of 17:16, 6 June 2017 | |||
| Line 182: | Line 182: | |||
| A particular enemy squadron can be targeted by Ctrl-clicking. This will cause the AA guns to prefer that squadron over all other targets, as well as giving a 30% DPS bonus. The Manual Control for Anti-Aircraft captain skill gives a +100% DPS bonus to AA guns of 85 mm or larger against a manually designated target. | A particular enemy squadron can be targeted by Ctrl-clicking. This will cause the AA guns to prefer that squadron over all other targets, as well as giving a 30% DPS bonus. The Manual Control for Anti-Aircraft captain skill gives a +100% DPS bonus to AA guns of 85 mm or larger against a manually designated target. | |||
| ? | === | + | === Detectability and deactivating AA === | |
| ? | AA (and secondary) guns can be switched off using the P key by default. This is mostly used by destroyers in order to maintain concealment. However, this is only useful if the destroyer is equipped with medium to long range AA guns (e.g. destroyers with DP/large-caliber AA), as a destroyer with only short range AA will have less range than its detectability range by air (e.g. Kamikaze's 0.9km AA vs 3.0km air detection radius), and thus would be detected regardless | + | Firing AA guns increases the air detectability of a ship, but does not increase its surface detectabiity. This "bloom" is removed almost immediately upon ceasing AA fire, unlike the bloom from firing the main battery. | |
| + | ||||
| + | AA (and secondary) guns can be switched off using the P key by default. This is mostly used by destroyers in order to maintain concealment. However, this is only useful if the destroyer is equipped with medium to long range AA guns (e.g. destroyers with DP/large-caliber AA), as a destroyer with only short range AA will have less range than its detectability range by air (e.g. Kamikaze's 0.9km AA vs 3.0km air detection radius), and thus would be detected regardless. There may be other reasons for switching off AA other than to maintain low detectability; for example, not giving away one's position in smoke. | |||
| Certain ships (e.g. Kolberg, Arkansas Beta) and hull configurations (Langley Hull A) completely lack AA defense and pressing P would only disable the secondaries (if any are present). | Certain ships (e.g. Kolberg, Arkansas Beta) and hull configurations (Langley Hull A) completely lack AA defense and pressing P would only disable the secondaries (if any are present). | |||
Revision as of 17:16, 6 June 2017
Aircraft Movement
Waypoint Control
Aircraft can be moved around the map using the overhead view (Left-Shift to toggle between overhead and 3rd-person view), or even on the Map view (bound to 'M' by default).
If you press and hold Shift, you can add waypoints with each left click on the map, up to 5 waypoints per squadron. The final waypoint can be an order to attack, guard, or land a squadron. All but the last waypoints must be move orders.
Catapult Fighter and Spotting Aircraft
Catapult Fighters and Spotting Aircraft cannot be controlled by the player, and move around the map automatically. They can go as far as 4.23 km away from the ship for Spotting Aircraft, and 3.24 km for Catapult Fighters.
Air-to-Air Combat
Fighters
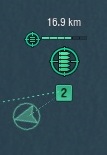
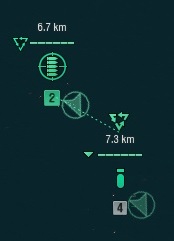
When driving an aircraft carrier, you will most likely (with a few exceptions) have fighter aircraft at your disposal. Fighters are represented by an in-game icon consisting of stacked bullets.
| US Fighter Squadron | Japanese Fighter Squadron |
|---|---|
| |

|
The bullets will be either solid or outlined, where the solid bullets represent remaining ammunition for that fighter squad. After a fighter squad has spent all of its ammunition, it must return to the carrier to re-arm.
The number of fighters in a squadron may vary by nationality. US carriers use 6-aircraft squadrons (exception: Premium Carrier "Saipan" which uses fighter squadrons of 3 planes but got up to 3 squadrons active), while Japanese carriers use 4-aircraft squadrons. The number of fighters in a squadron are represented by a set of bars across the top of the squad icon (green for friendly, red for hostile). Solid colour bars (green or red) indicate fighters, whereas shaded transparent bars represent missing fighters which have either been shot down or where there were not enough aircraft reserves on the carrier to form a complete squadron. The Air Supremacy commander skill will increase the fighters per squadron by 1, making 7 (4 for "Saipan") for the US and 5 for the Japanese.
To engage a fighter squadron, first select the squadron to use for attack by pressing the assigned squadron number. You can select multiple squadrons by holding down CTRL while you select the squadrons. Once the squadron(s) are selected, left-click on the enemy aircraft squadron you wish to attack to plot an intercept course directly to the target and have the fighters automatically engage once in range. You may also optionally plot a series of waypoints with the selected squadrons before clicking on the target enemy squadron. This may be useful to avoid enemy ship-based Anti-Aircraft fire, or perhaps to avoid other enemy aircraft squadrons you do not wish to engage.
Any enemy aircraft you shoot down will be recorded, and a ribbon will be displayed for each downed plane. However, if you lose planes you will not be notified unless the entire squadron has been shot down, at least verbally.
Fighters vs. Fighters
If you attack enemy fighters, all affected squadrons (one or more of your squads plus the targeted enemy squad) will stay in the same location once engaged. This can be used to your advantage if you are engaged within the Anti-Air screen of a nearby friendly ship, or conversely detrimental if you're engaged over enemy ships. Your squadron will continue the attack until the enemy squadron under attack is destroyed or it disengages from the fight. You can disengage from a fight by giving your squadron(s) a new waypoint or a different target. Note that the enemy fighter squadron will still be attacking your squadron if you disengage, even if you choose to engage a different target, until otherwise directed by the enemy fighter squadron's captain. This can be troubling if your planes have run out of ammo, leaving them about as defenseless as bombers.
Fighters vs. Bombers
If you attack enemy bombers, all the affected squadrons will first intercept the target squadron and then cause the squadron under attack to slow down slightly. Bombers cannot target fighters, but they can defend themselves if they have the capability, so it is possible to take losses when fighting enemy bombers. The enemy bombers will continue on their course, or adjust course if directed by their captain, and your fighter squadrons will automatically follow and continue the engagement until the enemy squadron is destroyed, the fighters' ammunition is depleted, or the fighters are given new orders.
While being attacked by fighters, an enemy bomber squadron's accuracy is significantly affected. Depending on whether it is a dive bomber or torpedo bomber squadron, the dispersion indicators for the affected squadrons will be roughly twice as large, meaning it will be much harder for the enemy squadron to accurately place ordnance. This accuracy effect only lasts while the enemy squadron is under active attack. It does not apply until a fighter squadron has reached and engaged an enemy squadron, and the effect will end if you disengage the attack. It can be an effective tactic to target bomber squadrons which have not yet dropped their ordnance in order to mitigate the potential damage to ships in your fleet, as opposed to bombers which have already attacked and are returning to their host carrier. Note that strafing runs do not decrease accuracy, only direct engagements do.
Guarding Squadrons
Fighters can be set to guard friendly squadrons by selecting a fighter squadron, and then Left-click on a friendly squad you wish to guard. Fighters will automatically fly with the guarded squadron for as long as they are assigned to guard it. If the guarded squadron is attacked, the fighters will automatically engage the squadron attacking the guarded friendly squadron. If the guarded squadron is destroyed, the fighters will discontinue the attack on the enemy squadron that had been attacking the guarded squadron and will await further orders. You can assign your fighters to guard any allied aircraft squadron, even if they belong to another player on your team. You can even guard other fighter squadrons if you wish, though it's not usually beneficial to do so.
You can assign other strike planes to follow a squad, but they will not attack the leading squad's target. Instead, you have to manually assign targets.
Strafing
Fighters have a special ability called strafing. It is a form of manually targeted attack which expends a significant portion of the fighter squadrons ammunition in a concentrated area. If successfully applied to areas where enemy aircraft squadrons are located, it can quickly reduce enemy squadron strength. However, if it misses it can be easily punishable by an enemy strafing run or making you lose significant distance on a chased squadron.
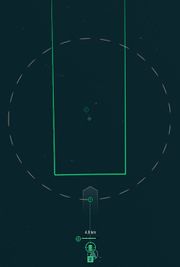
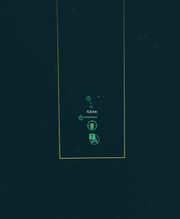
The strafing ability is applied by holding down the ALT key for a selected squadron(s) and moving the aiming locator to a desired position. Once you have selected a position for a strafing run (as indicated by the green band), you can order the strafing run by left-clicking at the desired location. As with all manually aimed aircraft abilities, you are free to give the squadron different orders until the squadron enters the engagement area of the selected ability identified by the dashed grey circular outline around the strafing zone. Once in the engagement zone, the strafing area will change colour from green to yellow indicating that the squadron is committed to performing the strafing attack. New orders can be given to the squadron while it is performing the strafing run, but the affected squadron will not respond to any commands until the strafing run is complete.
To use this ability successfully you may need to predict where enemy aircraft will be located by the time your fighter squadrons enter the strafing engagement zone. If the enemy aircraft leave the strafing zone before your fighters begin their strafing run, the enemy aircraft won't be affected by the strafe and your fighters will have wasted their ammunition. Enemy strike planes can gain a significant lead if you poorly place your strafing runs, and enemy fighters can potentially line up a counter-strafe that will probably be devastating on your planes. Please note that the strafing run does not decrease the accuracy of enemy strike planes, and sometimes attacking directly is more beneficial to your teammates. It is important to correctly determine where you start your strafing run. If you begin the strafing run too soon, you might miss the target completely. If the strafing run is started too far away, the enemy squadron will have ample time to leave the engagement area.
Anti-Surface Combat
All carriers have strike planes, whether dive bombers or torpedo bombers or both, in any loadout. Strike planes perform similarly to fighters besides the fact they cannot attack enemy planes and their payload is a one-time-use, meaning if you use it then they must resupply in order to attack again. Strike planes are often slower than fighters, but they gain a speed boost when their payload is dropped.
| Nation | Torpedo Type | Range | Speed | Damage | Flood Chance | Deployed Aboard |
|---|---|---|---|---|---|---|
| |
Type 91 mod. 1A | 3.31km | 35 knots | 8,567 | 63% | Hosho, Zuiho, Ryujo, Hiryu, Shokaku, Taiho, Hakuryu |
| |
Bliss Leavitt Mk7 mod. 5A | 3.21km | 35 knots | 8,500 | 63% | Langley |
| |
Mk. 13 mod. 0A | 3.66km | 34 knots | 9,866 | 71% | Bogue, Independence, Ranger, Lexington, Essex, Midway |
Torpedo Bombers
These are the main weapons of carriers, since torpedoes will do massive damage when well-placed. Simply left-clicking a target will do an "auto-drop" which will do the aiming for you, but has reduced effectiveness since the A.I. of the planes do not take dodging into account. It also drops rather far away, making dodging easy since the torpedoes are spotted as soon as they go into the water. Few people rely on auto-dropping, since most people can figure out how to react within the long window that the torpedoes give them to dodge. By holding ALT, similar to fighters, you will perform a "manual-drop" which lets you torpedo any given area with a more accurate spread. Unlike the auto-drop, manual-drops need aiming done by the player, and if you drop too close the torpedoes can fail to arm before they hit their target. Most torpedoes take about 2-3 seconds to arm and be able to detonate on their target, and compensating for that delay is what makes manual-dropping difficult for new players. Too close and the torpedoes won't do damage at all, too far and the target will have a longer window to dodge the torpedoes. Finding the perfect distance to get your torpedoes to arm shortly before hitting is something not easily mastered.
The Japanese manual-drop is special, since it converges on the end-point of the spread. This allows for potential pincer-torpedo attacks, and landing one is also something hard to master. One may try the strategy that applies to all carriers and give minimal time to dodge the torpedoes, or they could attempt a long-ranged "snipe" with torpedoes that can potentially be deadly. It is recommended to do these long-ranged snipes on disabled ships only such as if their engine is incapacitated, they are ramming into an allied ship, they have run aground, or their rudder is jammed.
Torpedo damage per nation varies as well, the USN torpedoes deal 9867 max damage while the IJN torpedoes are a little less damaging at 8567. However, the USN never gets the flexibility of several torpedo squadrons, so you have to make that one squad count.
| Nation | Bomb Type | Damage | Fire Chance | Deployed Aboard |
|---|---|---|---|---|
| |
Type 99 N25 mod. 1 | 4,600 | 123% | Zuiho, Ryujo, Hiryu, Shokaku, Taiho, Hakuryu |
| |
250 lb. AN-M57 | 5,400 | 120% | Langley |
| |
500 lb. AN-M64 | 7,500 | 141% | Bogue, Independence, Ranger, Lexington (stock dive bombers) |
| |
1,000 lb. AN-M65 | 10,800 | 162% | Saipan, Essex, Midway, Lexington (upgraded dive bombers) |
Dive Bombers
Dive bombers are the second type of strike plane, and they are a bit faster than torpedo bombers. Their service time (at least usually) is less than torpedo bombers, and they are a bit faster. There are usually more dive bombers on a carrier than torpedo bombers. On the IJN side, dive bombers seem like a secondary weapon with their relatively small damage compared to torpedo planes (4500 vs. 8567). However, USN dive bombers cause massive damage starting from Tier VI onwards. They use a 500 lb bomb versus the Japanese 100 kg (250 lb) that deals about 3000 max damage more. Starting from Lexington at Tier VIII, that number is even higher, at 10800 with the 1000 lb bomb. The large American bombs will be able to deal heavy damage to any ship they hit, provided they hit. That is the trade-off, USN planes suffer from increased dispersion while IJN have tighter dispersion with less damage.
Dive bombers are similar to torpedo bombers in almost every way. They can be auto-dropped, which is recommended most of the time since leading dive-bomber squads can be a serious waste of time. Alternatively, they can be manual-dropped and have tighter dispersion. Unlike torpedo bombers, dive bomber hits are based on random chance within the target area. Even if you are almost dead-on in your aim, you can sometimes miss.
Anti-Air (AA) Defense
Damage mechanics
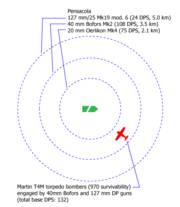
Unlike main guns or surface secondaries, AA guns do not have ballistics calculations for each individual shell as that would overload the game servers; the tracers that are visible in-game are purely cosmetic. Instead, AA works like an aura around the ship, which affects enemy planes that enter it. The auras are divided into short, medium and long range auras which overlaps one another. The closer the enemy plane approaches to the ship the more auras will "engage" the plane. Each weapon type has its own aura range and average Damage per Second (DPS) value. For example, below is the AA complement of the Pensacola (Hull B):
- 20 mm Oerlikon Mk4 15x1, DPS: 54, range: 2.0 km
- 40 mm Bofors Mk2 6x4, DPS: 95, range: 3.5 km
- 127 mm/25 Mk19 mod. 6 8x1, DPS: 58, range: 4.2 km
The AA aura for dual-purpose (DP) guns, such as the 127 mm on the Pensacola, persists even if the guns are firing at surface targets. They can perform both functions simultaneously, rather than alternating between surface and air engagements as they would in real life.
The DPS and range of AA guns can be increased by equipping certain upgrades and training certain commander skills. There are also two in-battle methods of increasing DPS. The first is by setting an enemy squadron as a priority target by using CTRL + LMB on the squadron. This will increase the DPS of all AA by a factor of 1.3. The second is by activating the Defensive Fire consumable (available on most cruisers from tier VI and up, as well as on American destroyers from tier V and up), this will increase the DPS of AA weapons 25mm or larger by 3 on cruisers and American destroyers, 1.25 on American carriers, and 1.75 on Japanese carriers. Both methods will also stack, therefore setting a squadron as a priority target and activating the Defensive Fire consumable will increase long range AA DPS by a factor of 3.9.
For each AA gun that is destroyed, the total DPS for the corresponding aura will also be reduced. The AA guns have no limit to their engagement arc, regardless of which way the ship is facing the aura will always cover a 360° area around the ship.
Although the AA guns are assigned DPS values, it does not represent the amount of damage it can deal to enemy planes. Similarly, the survivability statistic for planes do not represent its hit points. The guns do not deal any actual damage, while the planes have no hit point pool. Instead, DPS and survivability are used to calculate the chances of shooting down a plane in a squadron. Due to this, AA guns can sometimes seem to do no damage to enemy planes, while other times they can appear to do massive damage.
Using the previously mentioned Pensacola as an example, a squadron of enemy Martin T4M torpedo bombers (800 survivability) enters the range of its 40 mm Bofors and 127 mm DP guns (total DPS of 153). Every second the bomber stays in the AA aura, a roll is made to determine whether the squadron loses a plane. In this case, the probability of shooting down a plane would be equal to 153/800 = 0.191 = 19.1%/sec. If the Pensacola set the squadron as a priority target using CTRL + LMB and activated its Defensive Fire consumable, the DPS of its 40 mm Bofors against the target would increase to 370.5 (95*1.3*3), while the DPS for 127 mm guns would increase to 226.2 (58*1.3*3). The total DPS against the bombers would now be 370.5+226.2 = 596.7, and the probability for shooting down a plane increased to 596.7/800 = 0.746 = 74.6%/sec, a considerable increase over the previous figure.
The AA aura of each ship interacts with the enemy squadrons independently, even when the auras intersect. The DPS from each ship's individual aura does not get added with one another, however having multiple auras engage the same squadron effectively results in having more rolls made against it, thereby increasing the probability of shooting down the planes.
Target selection
By default, AA will prefer targets in this order:
- Torpedo bombers (with payload)
- Dive bombers (with payload)
- Torpedo bombers (without payload)
- Dive bombers (without payload)
- Fighters
A particular enemy squadron can be targeted by Ctrl-clicking. This will cause the AA guns to prefer that squadron over all other targets, as well as giving a 30% DPS bonus. The Manual Control for Anti-Aircraft captain skill gives a +100% DPS bonus to AA guns of 85 mm or larger against a manually designated target.
Detectability and deactivating AA
Firing AA guns increases the air detectability of a ship, but does not increase its surface detectabiity. This "bloom" is removed almost immediately upon ceasing AA fire, unlike the bloom from firing the main battery.
AA (and secondary) guns can be switched off using the P key by default. This is mostly used by destroyers in order to maintain concealment. However, this is only useful if the destroyer is equipped with medium to long range AA guns (e.g. destroyers with DP/large-caliber AA), as a destroyer with only short range AA will have less range than its detectability range by air (e.g. Kamikaze's 0.9km AA vs 3.0km air detection radius), and thus would be detected regardless. There may be other reasons for switching off AA other than to maintain low detectability; for example, not giving away one's position in smoke.
Certain ships (e.g. Kolberg, Arkansas Beta) and hull configurations (Langley Hull A) completely lack AA defense and pressing P would only disable the secondaries (if any are present).
Other notes:
- Manually designating an AA target (Ctrl-click) will immediately activate AA fire without the need to press P.
- Activating the Defensive AA Fire consumable will also immediately activate AA fire without the need to press P.
- Deactivating AA fire will immediately terminate the Defensive AA Fire consumable if it is active, and begin its cooldown. This can be used to shave a few seconds off until the next charge is ready.
