Aircraft
(link)
Learn more about the different types of aircraft in World of Warships.Contents
Basics
Controls
Icons
Minimap View versus Main UI View
Carrier-Launched Aircraft
All aircraft carriers in World of Warships have a mix of two plane types: fighters, which are used to defend your own aircraft as well as your teammates' ships; and strike aircraft — equipped to attack enemy surface ships — whether they be dive bombers or torpedo bombers or a mix of the two.
- Fighters are used exclusively against other aircraft. They have no ability to damage surface vessels.
- Strike Aircraft cannot attack enemy planes and their payload is a one-time-use, meaning that once their bombs or torpedoes are launched, they must return to their carrier in order to re-arm and attack again. Strike planes are almost universally slower than fighters while carrying their strike ordnance, but they gain a speed boost once their payload has been dropped.
Fighters

| US Fighter Squadron | Japanese Fighter Squadron |
|---|---|
| |

|
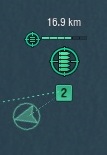
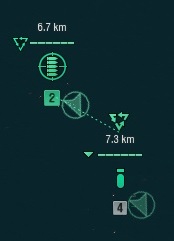
The bullets will be either solid or outlined, where the solid bullets represent remaining ammunition for that fighter squad. After a fighter squad has spent all of its ammunition, it must return to the carrier to re-arm.
The number of fighters in a squadron may vary by nationality. US carriers use 6-aircraft squadrons (exception: Premium Carrier "Saipan" which uses fighter squadrons of 3 planes but got up to 3 squadrons active), while Japanese carriers use 4-aircraft squadrons. The number of fighters in a squadron are represented by a set of bars across the top of the squad icon (green for friendly, red for hostile). Solid colour bars (green or red) indicate fighters, whereas shaded transparent bars represent missing fighters which have either been shot down or where there were not enough aircraft reserves on the carrier to form a complete squadron. The Air Supremacy commander skill will increase the fighters per squadron by 1, making 7 (4 for "Saipan") for the US and 5 for the Japanese.
To engage a fighter squadron, first select the squadron to use for attack by pressing the assigned squadron number. You can select multiple squadrons by holding down CTRL while you select the squadrons. Once the squadron(s) are selected, left-click on the enemy aircraft squadron you wish to attack to plot an intercept course directly to the target and have the fighters automatically engage once in range. You may also optionally plot a series of waypoints with the selected squadrons before clicking on the target enemy squadron. This may be useful to avoid enemy ship-based Anti-Aircraft fire, or perhaps to avoid other enemy aircraft squadrons you do not wish to engage.
Any enemy aircraft you shoot down will be recorded, and a ribbon will be displayed for each downed plane. However, if you lose planes you will not be notified unless the entire squadron has been shot down, at least verbally.
Fighters vs. Fighters
If you attack enemy fighters, all affected squadrons (one or more of your squadrons plus the targeted enemy squadron(s)) will stay in the same location once engaged. This can be used to your advantage if you are engaged within the Anti-Air screen of a nearby friendly ship, or conversely detrimental if you're engaged over enemy ships. Your squadron will continue the attack until the enemy squadron under attack is destroyed or it disengages from the fight. You can disengage from a fight by giving your squadron(s) a new waypoint or a different target. Note that the enemy fighter squadron will still be attacking your squadron if you disengage, even if you choose to engage a different target, until otherwise directed by the enemy fighter squadron's captain. This can be troubling if your planes have run out of ammo, leaving them about as defenseless as bombers.
Fighters vs. Bombers
If you attack enemy bombers, all the affected squadrons will first intercept the target squadron and then cause the squadron under attack to slow down slightly. Bombers cannot target fighters, but they can defend themselves if they have the capability, so it is possible to take losses when fighting enemy bombers. The enemy bombers will continue on their course, or adjust course if directed by their captain, and your fighter squadrons will automatically follow and continue the engagement until the enemy squadron is destroyed, the fighters' ammunition is depleted, or the fighters are given new orders.
While being attacked by fighters, an enemy bomber squadron's accuracy is significantly affected. Depending on whether it is a dive bomber or torpedo bomber squadron, the dispersion indicators for the affected squadrons will be roughly twice as large, meaning it will be much harder for the enemy squadron to accurately place ordnance. This accuracy effect only lasts while the enemy squadron is under active attack. It does not apply until a fighter squadron has reached and engaged an enemy squadron, and the effect will end if you disengage the attack. It can be an effective tactic to target bomber squadrons which have not yet dropped their ordnance in order to mitigate the potential damage to ships in your fleet, as opposed to bombers which have already attacked and are returning to their host carrier. Note that strafing runs do not decrease accuracy, only direct engagements do.
Guarding Squadrons
Fighters can be set to guard friendly squadrons by selecting a fighter squadron, and then Left-click on a friendly squad you wish to guard. Fighters will automatically fly with the guarded squadron for as long as they are assigned to guard it. If the guarded squadron is attacked, the fighters will automatically engage the squadron attacking the guarded friendly squadron. If the guarded squadron is destroyed, the fighters will discontinue the attack on the enemy squadron that had been attacking the guarded squadron and will await further orders. You can assign your fighters to guard any allied aircraft squadron, even if they belong to another player on your team. You can even guard other fighter squadrons if you wish, though it's not usually beneficial to do so.
You can assign other strike planes to follow a squad, but they will not attack the leading squad's target. Instead, you have to manually assign targets.
Strafing
Fighters have a special ability called strafing. It is a form of manually targeted attack which expends a significant portion of the fighter squadrons ammunition in a concentrated area. If successfully applied to areas where enemy aircraft squadrons are located, it can quickly reduce enemy squadron strength. However, if it misses it can be easily punishable by an enemy strafing run or making you lose significant distance on a chased squadron.
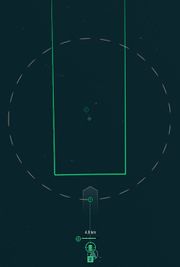
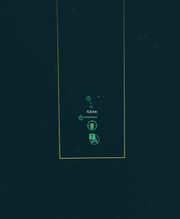
The strafing ability is applied by holding down the ALT key for a selected squadron(s) and moving the aiming locator to a desired position. Once you have selected a position for a strafing run (as indicated by the green band), you can order the strafing run by left-clicking at the desired location. As with all manually aimed aircraft abilities, you are free to give the squadron different orders until the squadron enters the engagement area of the selected ability identified by the dashed grey circular outline around the strafing zone. Once in the engagement zone, the strafing area will change colour from green to yellow indicating that the squadron is committed to performing the strafing attack. New orders can be given to the squadron while it is performing the strafing run, but the affected squadron will not respond to any commands until the strafing run is complete.
To use this ability successfully you may need to predict where enemy aircraft will be located by the time your fighter squadrons enter the strafing engagement zone. If the enemy aircraft leave the strafing zone before your fighters begin their strafing run, the enemy aircraft won't be affected by the strafe and your fighters will have wasted their ammunition. Enemy strike planes can gain a significant lead if you poorly place your strafing runs, and enemy fighters can potentially line up a counter-strafe that will probably be devastating on your planes. Please note that the strafing run does not decrease the accuracy of enemy strike planes, and sometimes attacking directly is more beneficial to your teammates. It is important to correctly determine where you start your strafing run. If you begin the strafing run too soon, you might miss the target completely. If the strafing run is started too far away, the enemy squadron will have ample time to leave the engagement area.
Only aircraft carriers Tier VI and above can engage in strafing runs.
Torpedo Bombers

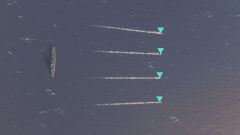
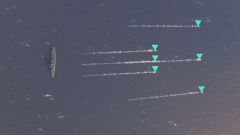
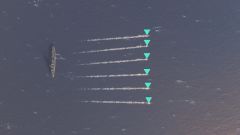
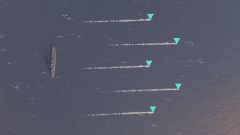
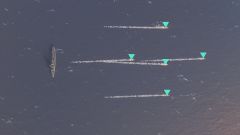
All tech tree carriers drop their torpedoes in a simple line abreast. Premium carriers such as Kaga, Enterprise, and Graf Zeppelin frequently feature different and unique torpedo drop patterns; a table highlighting the different drop patterns is below.
There are two methods for attacking with torpedo bombers:
(link)
Learn more about manual torpedo drops.Auto Attack
Clicking an enemy target with the Left Mouse Button will order the selected torpedo bomber to perform an "auto-drop". In this method of attack, the game calculates where to drop the torpedoes for an optimum attack against the enemy target; however, this presumes that the target does not change course and speed. Attentive players will usually note the approach of enemy torpedo bombers and maneuver to avoid the incoming attack, throwing off the automatic aim. Additionally, "auto-drop" drops the torpedoes into the water rather far away from the target, making dodging easier since the torpedoes are spotted almost soon as they go into the water. Very few aircraft carrier captains rely on auto-dropping, since most players can figure out how to react within the long window that the torpedoes give them to dodge. This is the only attack method available to torpedo bombers launched by Tier IV and Tier V aircraft carriers.
Manual Attack (Alternative Attack Mode)
By holding down Alt and then clicking the Left Mouse Button, captains can perform a "manual drop" which allows them to command the torpedo squadron to drop the torpedoes in a specific area. Unlike the auto-drop, manual drops require that they be aimed by the player, and dropping too close to a target can cause the torpedoes to fail to arm prior to striking home. Aerial torpedoes take between 3 and 3.5 seconds to arm and be able to detonate on their target, and compensating for that delay is what makes manual dropping difficult for new carrier captains: too close and the torpedoes won't do damage at all, too far away and the target will have a longer window to dodge the torpedoes. Finding the perfect distance to allow aerial torpedoes to arm shortly before hitting requires practice to master, and is only available to torpedo bombers on Tier VI aircraft carriers and higher.
Types of Aerial Torpedoes
Aerial Torpedo Data
Aerial Torpedo Drop Patterns
Dive Bombers

Japanese naval aviation heavily favored torpedo attacks; this is reflected in game in the relative striking power and quantity of their torpedo squadrons versus their dive bomber squadrons (4,600 bomb damage vs. 8,567 torpedo damage). American carrier doctrine came to represent almost the polar opposite, particularly after the Battle of Midway. As such, American dive bombers have the capability to cause massive damage starting from Tier V onwards, as they equip a 500-pound bomb — versus the Japanese 100 kg (220 pounds) — that deals about 3,000 max damage more. Starting from Lexington at Tier VIII, that number is even higher, at 10,800 damage from a 1,000-pound bomb. The large American bombs will deal heavy damage to any ship they hit, provided they hit. That is the unfortunate trade-off: American dive bombers suffer from increased dispersion and higher damage while Japanese squadrons have tighter dispersion with less damage. Large high explosive bombs are also a notable feature of Tier VIII German premium Graf Zeppelin.
Tier VIII-X American carriers (including premium Enterprise) as well as German Graf Zeppelin are unique in that they have access to armor-piercing bombs capable of doing tremendous damage to enemy battleships. Just like armor-piercing shells, armor-piercing bombs have the ability to land full damage citadel hits against enemy ships.
Dive bombers are similar to torpedo bombers in almost every way. They have a point-and-click auto attack, which is recommended most of the time since leading dive bomber squads is often a serious waste of time. Alternatively, they can be manually dropped and produce a much tighter dispersion. Unlike torpedo bombers, dive bomber hits are based on random chance within the target area. Even if they are aimed almost dead-on, they can sometimes miss. There are two methods for attacking with dive bombers:
(link)
Learn more about manual dive bomb drops.Auto Attack
Clicking an enemy target with the Left Mouse Button will order the selected dive bomber squadron to perform an "auto-drop". In this method of attack, the game places a bomb drop circle on the center of the targeted ship; this drop circle follows the ship as it moves, and the game continually updates the correct drop point for the bombs. Most dive bomber squadrons have an elliptical drop circle; when auto-attacking, the long axis of the ellipsis is oriented on the ship along the same line of approach as the selected squadron. This can be adjusted by clicking and dragging the target approach reticle shown on the dashed perimeter around the ship. It is not uncommon for aircraft carrier captains rely on auto-dropping dive bombers, as they are essentially point-and-click and can be left to their own devices once a target is assigned; usually, only minor adjustments in the angle of approach to the target are required. This is the only attack method available to dive bombers launched by Tier IV and Tier V aircraft carriers.
Manual Attack (Alternative Attack Mode)
By holding down Alt and then clicking the Left Mouse Button, captains can perform a "manual drop" which allows them to command the dive bomber squadron to drop the bombs on a specific area. Unlike the auto-drop, manual drops require that they be aimed by the player and predict the future movement of the target. Dive bombers take approximately two seconds to drop their bombs into the drop circle once they pass the dashed perimeter around the target area; compensating for that delay takes some practice depending on the target ship and how actively they are maneuvering. Finding the correct timing and approach vectors for dive bombers is a tough skill to master, and is only available to dive bombers on Tier VI aircraft carriers and higher.
Types of Bombs
Bomb Data
Bomb Drop Circles
Catapult-Launched Aircraft
Catapult Fighter

Spotting Aircraft


