Farragut

| Research price35500 exp |
| Purchase price3,120,000 |
| Hit Points10,900 |
| 127 mm/38 Mk.12 on a Mk.21 mod.1 mount5 х 1 pcs. |
| Rate of Fire15 shots/min. |
| Reload Time4 sec. |
| Rotation Speed15 deg./sec. |
| 180 Degree Turn Time12 sec. |
| Firing Range11.45 km. |
| Maximum Dispersion100 m. |
| HE Shell127 mm HE Mk32 |
| Maximum HE Shell Damage1,800 |
| Chance of Fire on Target Caused by HE Shell5 % |
| Initial HE Shell Velocity792 m./s. |
| HE Shell Weight24.5 kg. |
| AP Shell127 mm AP/SC Mk38 |
| Maximum AP Shell Damage2,100 |
| Initial AP Shell Velocity792 m./s. |
| AP Shell Weight25 kg. |
| 533 mm Mk142 х 4 pcs. |
| Rate of Fire0.68 shots/min. |
| Reload Time88 sec. |
| Rotation Speed25 deg./sec. |
| 180 Degree Turn Time7.2 sec. |
| TorpedoMk11 |
| Maximum Damage11,733 |
| Torpedo Speed56 knot |
| Torpedo Range5.49 km. |
| 127 mm/38 Mk.12 on a Mk.21 mod.1 mount2 х 1 pcs. |
| . . . Average Damage per Second6.4 |
| . . . Firing Range5.01 km. |
| 127 mm/38 Mk.12 on a Mk.24 mod.11 mount3 х 1 pcs. |
| . . . Average Damage per Second24 |
| . . . Firing Range5.01 km. |
| 12.7 mm Browning on a single mount4 х 1 pcs. |
| . . . Average Damage per Second15.2 |
| . . . Firing Range1.2 km. |
| Maximum Speed36.5 knot |
| Turning Circle Radius560 m. |
| Rudder Shift Time4 sec. |
| Surface Detectability Range7.33 km. |
| Air Detectability Range2.74 km. |

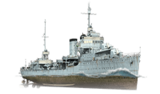
Farragut — American Tier VI destroyer.
The first U.S. destroyer of the new generation. She was armed with dual-purpose artillery, which significantly enhanced her AA defenses. The torpedo tubes were placed along the ship’s centerline, and thus they could be used more efficiently. The destroyers of this class were modernized to receive automatic AA guns.
Modules
 |
Rate of Fire (shots/min) | 180° Turn Time (sec) | Maximum Dispersion (m) | Maximum HE Shell Damage (HP) | Chance of Fire on Target Caused by HE Shell (%) | Maximum AP Shell Damage (HP) |
Research price (exp) |
Purchase price ( | |
|---|---|---|---|---|---|---|---|---|---|
| 127 mm/38 Mk.12 on a Mk.21 mod.1/Mk. 24 mod.11 mount | 15 | 12 | 100 | 1,800 | 5 | 2,100 | 0 | 198,500 |
 |
Hit Points (HP) | Armor (mm) | Armor (mm) | Main Turrets (pcs.) | Secondary Gun Turrets (pcs.) | AA Mounts (pcs.) | Torpedo Tubes (pcs.) | Hangar Capacity (pcs.) |
Research price (exp) |
Purchase price ( | |
|---|---|---|---|---|---|---|---|---|---|---|---|
| Farragut (A) | 10,900 | 6 | 16 | 5 | 4/5 | 2 | 0 | 240,000 | |||
| Farragut (B) | 11,500 | 6 | 16 | 5 | 2/2/5 | 2 | 6,800 | 480,000 |
 |
Rate of Fire (shots/min) | Torpedo Tubes Reload Time (sec) | 180° Turn Time (sec) | Maximum Damage (HP) | Torpedo Speed (knot) | Torpedo Range (km) |
Research price (exp) |
Purchase price ( | |
|---|---|---|---|---|---|---|---|---|---|
| Mark 11 | 0.7 | 88 | 7.2 | 11,733 | 56 | 5.5 | 0 | 152,000 | |
| Mark 12 | 0.7 | 88 | 7.2 | 11,733 | 64 | 6.4 | 7,200 | 575,000 |
 |
IDS_SHIP_PARAM_SUO_INCREASE_DIST (%) | Maximum Firing Range (km) |
Research price (exp) |
Purchase price ( | |
|---|---|---|---|---|---|
| Mk6 mod. 1 | 0 | 0 | 165,000 | ||
| Mk6 mod. 2 | 0 | 5,000 | 340,000 |
 |
Maximum Speed (knot) |
Research price (exp) |
Purchase price ( | |
|---|---|---|---|---|
| Propulsion: 42,800 hp | 36.5 | 0 | 155,000 |
Compatible Upgrades
| Slot 1 |
|||||
|---|---|---|---|---|---|
| Slot 2 |
|||||
| Slot 3 |
|||||
| Slot 4 |
Player Opinion
Performance
Farragut continues the evolution of American destroyer design where Nicholas left off, retaining the same main battery guns — adding one more — while moving to a centerline-mounted torpedo configuration.
Players who enjoyed Nicholas will find more of the same with Farragut. Her speed and handling characteristics are nearly identical, and she starts off with the exact same 5.5 km range torpedoes (the Mark 11) of her predecessor. The eventual torpedo upgrade module is worthwhile, giving her almost a full kilometer more of torpedo range and, more critically, faster fish. The move to centerline mounts for her torpedo launchers takes some getting used to; she can put eight torpedoes into the water on either side, but captains are likely to miss the flexibility offered by preceding ships of having launchers on both sides of the ship.
Irritatingly, Farragut has a smaller health pool than Nicholas; Level 3 commander skill Survivability Expert is almost necessary in order to get the most out of her. Like her immediate predecessor, she can exchange Engine Boost ![]() for Defensive AA Fire
for Defensive AA Fire ![]() , but she must equip Hull (C) — and give up one of her main battery guns — to do so. Airplanes remain one of Farragut’s biggest weaknesses, and her anti-aircraft suite remains largely powerless to deter them.
, but she must equip Hull (C) — and give up one of her main battery guns — to do so. Airplanes remain one of Farragut’s biggest weaknesses, and her anti-aircraft suite remains largely powerless to deter them.
Pros:
- Main battery rate of fire is excellent.
- Solid top speed of 36.7 knots; she can break 40 knots with the Engine Boost
 consumable.
- Upgraded torpedoes have a 0.9 km higher range than stock version, and travel noticeably faster.
Cons:
- Very weak armor; takes damage just as quickly as Nicholas.
- AA guns are mainly for show and will rarely shoot anything down; even the hull upgrades don't do much to help.
- Hull (B) only adds 600 more hit points, and she has fewer hit points than Nicholas.
- Shell arcs make long-range targeting difficult.
Research
Availability of researchable upgrades for Farragut is as follows:
- Hull: Upgrade to Hull (B) for more health and improved rudder shift time. Unlocking Hull (C) removes one main battery gun (and comes with a corresponding reduction in long-range anti-aircraft firepower), increases her short-range AA suite, and allows Farragut to equip Defensive AA Fire
 . Research of Hull (C) unlocks progression to Mahan.
- Torpedoes: The Mk12 torpedoes travel faster and farther than the stock Mk11's for no change in reload speed; Hull (B) must be equipped before they can be installed.
- Gun Fire Control System: Upgrade to Mk6 mod. 2 for an extra 10% range on the main battery.
As a gunboat destroyer, Farragut is best served by maximizing her health pool; this makes Hull (B) the best place to spend early experience gains. Her stock gun range is quite good, so snag the Torpedo module upgrade next, followed by the Fire Control System module to buff her main battery range.
Hull (C) is an optional upgrade for captains who are interested in access to the Defensive AA FireOptimal Configuration
Upgrades
The recommended upgrades for Farragut are as follows:
- Slot 1: Main Armaments Modification 1

- Slot 2: Propulsion Modification 1

- Slot 3: Aiming Systems Modification 1

- Slot 4: Propulsion Modification 1 (
 )
)
There aren't a lot of "out of the box" options in terms of upgrades for Farragut captains. Main Armament Modification 1 is the top pick in Slot 1, while Aiming Systems Modification 1 is recommended for Slot 2. AA Guns Modification 1 ![]() might be a decent option for captains who equip Hull (C) and swap Engine Boost
might be a decent option for captains who equip Hull (C) and swap Engine Boost ![]() for Defensive AA Fire
for Defensive AA Fire ![]() . Propulsion Modification 1 in Slot 2 and Propulsion Modification 2 in Slot 4 are both highly recommended in the interests of sustaining Farragut’s mobility while under fire from enemy ships.
. Propulsion Modification 1 in Slot 2 and Propulsion Modification 2 in Slot 4 are both highly recommended in the interests of sustaining Farragut’s mobility while under fire from enemy ships.
Commander Skills
Preventative Maintenance at Level 1, Last Stand at Level 2, and Concealment Expert at Level 4 are easy recommendations for Farragut commanders.
Level 3 offers a number of good options. Survivability Expert is a safe pick, buffing Farragut’s health pool by 20%. Demolition Expert or Basic Firing Training are recommended for captains looking to get more damage out of their main battery. Superintendent is a strong choice if premium consumables are not equipped.
Alternate Level 4 skill recommendations include: Manual Fire Control for AA Armament for captains using Hull (C), though the overall DPS gain is incredibly small for investing four skill points; Advanced Firing Training to buff the range of Farragut’s main battery as well as her anti-aircraft guns; Radio Position Finding, to aid in hunting down enemy destroyers; and Inertia Fuse for HE Shells, which will improve Farragut’s main battery damage against enemy capital ships.
| Recommended Commander Skills | ||||||||
|---|---|---|---|---|---|---|---|---|
| Cost (points) |
Endurance | Attack | Support | Versatility | ||||
| 1 |
★ |
★★★ |
★ |
|
|
|
|
|
| 2 |
★★ |
★ |
★ |
|
★ |
|
★★ |
★★★ |
| 3 |
|
★★★ |
★ |
|
★★★ |
★★ |
★★ |
★ |
| 4 |
|
|
★ |
|
★ |
|
|
★★★ |
| Key: ★★★ - Extremely Useful ★★ - Frequently Useful ★ - Occasionally Useful No stars - Meh Χ - Not recommended | ||||||||
Consumables
Farragut can equip the following consumables:
- Slot 1: Damage Control Party

- Slot 2: Smoke Generator

- Slot 3: Engine Boost (or Defensive AA Fire [Hull (C) Only])
Given how easily modules are disabled on a destroyer under fire, investing credits (or doubloons) in Damage Control Party II (![]() ) is recommended. The free versions of Engine Boost
) is recommended. The free versions of Engine Boost ![]() or Defensive AA Fire
or Defensive AA Fire ![]() should be sufficient for random battles.
should be sufficient for random battles.
Camouflage
Type 1, 2, or 5 camouflage can be equipped for credits; Types 1 or 5 are recommended at a minimum to reduce detectibility range.
Players who wish to spend doubloons can equip Farragut with Type 16 camouflage that lowers her detection radius, reduces the accuracy of incoming shells, reduces her repair costs, and increases the amount of experience she earns.
Signals
Equipping Juliet Whiskey Unaone (![]() ) is recommended; Farragut captains who work into torpedo range of enemy ships need to get maximum results. Juliet Charlie (
) is recommended; Farragut captains who work into torpedo range of enemy ships need to get maximum results. Juliet Charlie (![]() ) is also a well-advised choice for any destroyer. Victor Lima (
) is also a well-advised choice for any destroyer. Victor Lima (![]() ) and India X-Ray (
) and India X-Ray (![]() ) signals are similarly worthy of consideration to increase the fire chance of her main battery shells. Captains who opt to equip Hull (C) may wish to fly November Echo Setteseven (
) signals are similarly worthy of consideration to increase the fire chance of her main battery shells. Captains who opt to equip Hull (C) may wish to fly November Echo Setteseven (![]() ) and Sierra Mike (
) and Sierra Mike (![]() ) as well.
) as well.
Recommended Signal Flags 
| |||||
|---|---|---|---|---|---|
| Combat | |||||
 ★★★ |

|

|
 ★ |
 ★★★ |
 ★★★ |
 ★★ |

|
 ★ |
 ★★★ |
 ★ |

|

|

| ||||
Note: Use of the Juliet Charlie signal makes detonation impossible.
Gallery
Historical Info
Historical Gallery

.jpg)
_underway_at_sea_on_14_September_1936.jpeg)


_underway_in_September_1939.jpg)
_at_sea_in_December_1943.jpg)
_off_the_Puget_Sound_Navy_Yard_in_September_1944.jpg)