Furutaka

| Research price11500 exp |
| Purchase price1,370,000 |
| Hit Points28,300 |
| IDS_PJGM144_200MM50_TYPE_E_RF3 х 2 pcs. |
| Rate of Fire2.73 shots/min. |
| Reload Time22 sec. |
| Rotation Speed6 deg./sec. |
| 180 Degree Turn Time30 sec. |
| Firing Range12.62 km. |
| Maximum Dispersion109 m. |
| HE Shell200 mm HE Common Type4 |
| Maximum HE Shell Damage3,300 |
| Chance of Fire on Target Caused by HE Shell17 % |
| Initial HE Shell Velocity870 m./s. |
| HE Shell Weight110 kg. |
| AP Shell200 mm AP Type5 |
| Maximum AP Shell Damage4,500 |
| Initial AP Shell Velocity870 m./s. |
| AP Shell Weight110 kg. |
| 76 mm /40 3rd Year Type on a single mount4 х 1 pcs. |
| Firing Range4.3 km. |
| Rate of Fire17.14 shots/min. |
| Reload Time3.5 sec. |
| HE Shell76 mm HE Mk2 |
| Maximum HE Shell Damage1,300 |
| Initial HE Shell Velocity680 m./s. |
| Chance of Fire on Target Caused by HE Shell5 % |
| 610 mm Quad2 х 4 pcs. |
| Rate of Fire0.67 shots/min. |
| Reload Time90 sec. |
| Rotation Speed25 deg./sec. |
| 180 Degree Turn Time7.2 sec. |
| TorpedoType8 |
| Maximum Damage14,600 |
| Torpedo Speed63 knot |
| Torpedo Range6 km. |
| 76 mm /40 3rd Year Type on a single mount4 х 1 pcs. |
| . . . Average Damage per Second6.4 |
| . . . Firing Range3 km. |
| 13 mm/76 Type 93 on a twin mount4 х 2 pcs. |
| . . . Average Damage per Second8 |
| . . . Firing Range1.2 km. |
| 7.7 mm/80 Type 92 on a single mount2 х 1 pcs. |
| . . . Average Damage per Second3.2 |
| . . . Firing Range0.99 km. |
| Maximum Speed34.5 knot |
| Turning Circle Radius750 m. |
| Rudder Shift Time9.2 sec. |
| Surface Detectability Range11.87 km. |
| Air Detectability Range5.78 km. |

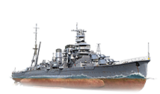
Furutaka — Japanese Tier V cruiser.
A powerful scout cruiser employed to carry out reconnaissance operations and to protect battleship fleets from enemy light naval forces. Furutaka’s primary distinction from her predecessors was an enhanced artillery armament featuring a pyramid arrangement of turret mounts.
Modules
 |
Rate of Fire (shots/min) | 180° Turn Time (sec) | Maximum Dispersion (m) | Maximum HE Shell Damage (HP) | Chance of Fire on Target Caused by HE Shell (%) | Maximum AP Shell Damage (HP) |
Research price (exp) |
Purchase price ( | |
|---|---|---|---|---|---|---|---|---|---|
| 200 mm/50 3rd Year Type No 1 in a Model E2 turret | 2.7 | 30 | 109 | 3,300 | 17 | 4,500 | 0 | 130,000 | |
| 203 mm/50 3rd Year Type No 2 in a Model E2 turret | 4 | 30 | 109 | 3,300 | 17 | 4,700 | 3,200 | 320,000 |
 |
Hit Points (HP) | Armor (mm) | Armor (mm) | Main Turrets (pcs.) | Secondary Gun Turrets (pcs.) | AA Mounts (pcs.) | Torpedo Tubes (pcs.) | Hangar Capacity (pcs.) |
Research price (exp) |
Purchase price ( | |
|---|---|---|---|---|---|---|---|---|---|---|---|
| Furutaka (A) | 28,300 | 6 | 105 | 3 | 4 | 2/4/4 | 2 | 0 | 150,000 | ||
| Furutaka (B) | 30,700 | 6 | 105 | 3 | 4 | 2/4/4 | 2 | 6,300 | 480,000 |
 |
Rate of Fire (shots/min) | Torpedo Tubes Reload Time (sec) | 180° Turn Time (sec) | Maximum Damage (HP) | Torpedo Speed (knot) | Torpedo Range (km) |
Research price (exp) |
Purchase price ( | |
|---|---|---|---|---|---|---|---|---|---|
| Type8 | 0.7 | 90 | 7.2 | 14,600 | 63 | 6 | 0 | 120,000 | |
| Type8 mod. 2 | 0.6 | 94 | 7.2 | 16,266 | 59 | 10 | 3,600 | 400,000 |
 |
IDS_SHIP_PARAM_SUO_INCREASE_DIST (%) | Maximum Firing Range (km) |
Research price (exp) |
Purchase price ( | |
|---|---|---|---|---|---|
| Type5 mod. 1 | 0 | 0 | 100,000 | ||
| Type5 mod. 2 | 0 | 2,400 | 260,000 |
 |
Maximum Speed (knot) |
Research price (exp) |
Purchase price ( | |
|---|---|---|---|---|
| Propulsion: 102,000 hp | 34.5 | 0 | 90,000 |
Compatible Upgrades
| Slot 1 |
|||||
|---|---|---|---|---|---|
| Slot 2 |
|||||
| Slot 3 |
Player Opinion
Performance
Tier V Furutaka marks the beginning of the Japanese heavy cruiser line. She mounts a small battery of 203 mm guns but carries a powerful torpedo armament. The switch to larger guns results in lower DPM but allows for crippling salvos.
Furutaka mounts a standard cruiser Damage Control Party ![]() , with a 5 second active time and a 60 second cool down period between uses. She also carries a Hydroacoustic Search
, with a 5 second active time and a 60 second cool down period between uses. She also carries a Hydroacoustic Search ![]() which can detect torpedoes at 3 km and enemy ships at 4 km. This comes with 3 charges as standard and is active for 100 seconds with a 120 second cool down between uses. Her third slot has a Catapult Fighter
which can detect torpedoes at 3 km and enemy ships at 4 km. This comes with 3 charges as standard and is active for 100 seconds with a 120 second cool down between uses. Her third slot has a Catapult Fighter ![]() with 3 uses. This launches a pair of fighters which patrol around the player ship for up to 100 seconds.
with 3 uses. This launches a pair of fighters which patrol around the player ship for up to 100 seconds.
Furutaka’s top speed is rather typical of a Tier V cruiser at 34.5 knots. This allows her to keep pace with most of her peers, although she trails some distance behind Émile Bertin and Montecuccoli. She has a fast rudder shift time of just 5.7 seconds which allows her to quickly change direction. Unfortunately, that benefit is somewhat reduced by a large 750 meter turning circle, which can make maneuvering in confined spaces difficult. With the Concealment Expert skill her detection can be reduced to 10.7 km, which allows players to reach advantageous positions.
Armament
Furutaka mounts a small main battery of 203 mm guns rather than the 152 mm or smaller guns carried by most other Tier V cruisers. Her main guns also feature improved accuracy compared to her peers, using destroyer dispersion rather than cruiser dispersion. This means that shells will tend to group closer to the aiming point and helps to compensate for her small main battery. Furutaka also introduces players to another key characteristic of Japanese cruisers, a painfully slow turret traverse time which makes it difficult to rapidly change or track targets at short ranges.
As a heavy cruiser, Furutaka has increased striking power when compared to most other ships at Tier V. Her AP rounds have better penetration and cause more damage than the 152 mm guns found on most other cruisers. They have sufficient penetration at most combat ranges to pose a threat to the citadel armor of enemy cruisers which show broadside. They can also penetrate battleship upper belt armor at short to medium ranges. Unlike light cruisers, her AP can overmatch the bow and stern plating of Tier IV and V cruisers, dealing damage regardless of their angle.
Against most angled targets or destroyers, her HE rounds are a better choice. With high damage and good fire chance per shell, they allow players to reliably damage most targets, although the slow reload and low number of guns mean that Furutaka is a poor fire starter. She is unlikely to seriously tax the Damage Control Party of enemy ships.
Furutaka carries a quad torpedo launcher on each side, with hard hitting and long range torpedoes. With a 10 km range they can be used against targets at a distance. Although they hit hard, the torpedoes travel rather slowly and have a large detection range. Targets will have 9.5 seconds of reaction time to take avoiding action.
Armor & Survivability
Like other Tier V cruisers, Furutaka can feel fragile if players are not careful. Her bow and stern plating is 13 mm thick, which is sufficient to bounce AP rounds from light cruisers as well as Kirov and Mikoyan, but will be overmatched by the 203 mm guns found on other heavy cruisers. Additionally, it is easily penetrated by all calibers of HE round. She has thicker armor along her hull, where 25 mm plating will shatter small-caliber HE rounds and can bounce AP shells from many battleships she will face when angled.
Furutaka has a large citadel which runs for most of the ship between the fore and aft turrets. Additionally, there is a large section between the bridge and the catapult that is raised above the waterline . With only 75 mm of armor protection, the citadel is highly vulnerable if players show too much broadside. At ranges below 5 km, even many Tier V destroyers are capable of penetrating this citadel armor.
Although her armor may be thin, Furutaka has one of the largest health pools at her tier. With effective maneuvering and use of cover to limit damage taken, she can remain in the fight for longer than players might expect.
Anti-Aircraft
Furutaka has fairly weak AA defenses. She has some long-range AA guns which reach out to 5.2 km, but she only puts out a single flak cloud that is unlikely to pose much threat to enemy aircraft. Much of Furutaka’s continuous DPS comes from her short-range weapons, which are limited to 2.5 km range and will not engage enemy aircraft until they are already established on an attack run.
Anti-Submarine
Furutaka has an ASW airstrike which can attack submarines at up to 5 km range, with a minimum range of 500 meters. This drops a single depth charge which causes 3,400 damage on a direct hit. This has a 30 second reload between uses.
Battle Performance
Players will need to use effective positioning and ammunition selection in order to compensate for Furutaka’s low base damage output. A well-aimed salvo can potentially cripple an enemy cruiser or destroyer, if the right ammunition is selected. For this reason, the Gun Feeder captain skill is recommended as it will allow players to more quickly switch ammunition types.
Furutaka is not suited to close range fighting, where her long reload, slow turret traverse and wide turning circle will reduce her effectiveness. At medium ranges she will be able to use her concealment to reach good firing positions, which will combine with her improved dispersion to allow some powerful strikes against enemy ships. Against enemy cruisers, remaining bow-in can be a viable tactic, as she can bounce the AP rounds of most same-tier cruisers. With two-thirds of her firepower forward, she will not lose much potential DPM this way. Enemy cruisers that attempt to unmask more guns or launch torpedoes will need to risk showing broadside. Against destroyers or angled targets, HE rounds should be the usual choice.
Although her torpedoes can be devastating, their slow speed and high reaction time mean that they cannot be relied on to regularly land serious hits. But their long range and relatively slow speed make them good area denial weapons and they can dissuade enemy ships from pursuing or moving too close. They are potentially powerful, but unreliable, weapons that can turn the tide of a battle. Or, they are just as likely to be dodged by an enemy who is not asleep at the wheel.Pros:
- Guns are very accurate
- 203 mm guns are powerful weapons at her tier
- Can overmatch Tier IV and V cruiser plating
- Torpedoes have high damage
- Decent concealment
- Has access to Hydroacoustic Search consumable
Cons:
- Slow turret traverse
- Low DPM due to reload and number of guns
- Torpedoes are easily detected and slow
- Poor AA defenses
- Large turning circle
Research
Optimal Configuration
Upgrades
The recommended upgrades for Furutaka are as follows:
- Slot 1: Main Armaments Modification 1
 keeps the guns and torpedo tubes active and firing.
- Slot 2: Damage Control System Modification 1
 makes the ship more resistant to fires and flooding.
- Slot 3: Main Battery Modification 2
 makes her guns more comfortable and saves a skill point that would otherwise be spent on Grease the Gears to improve her gun handling. Aiming Systems Modification 1
  gives her guns more accuracy and is an option.
Commander Skills
The key skills for Furutaka include Grease the Gears at Level 1, Priority Target at Level 2, Adrenaline Rush at Level 3, and Concealment Expert at Level 4. Captains who use the ship’s torpedoes often may also wish to invest in one or more of the torpedo skills if they have points remaining after investing in her main guns and concealment. The AA skills, particularly Expert AA Marksman, are almost always a good choice for leftover skill points on cruisers. While Pyrotechnician could be taken at Level 2 to improve her shells' fire chances, her rate of fire is too low to properly take advantage of the relative small boost to fire chance per shell. Captains may also with to invest in Top Grade Gunner to improve the slow rate of fire when they find themselves unable to drop off detection using her concealment.
| Recommended Commander Skills | ||||||
|---|---|---|---|---|---|---|
| Cost (points) |
Attack | Defense | ||||
| 1 |
★★★ |
★ |
|
★★★ |
|
★★ |
| 2 |
★ |
★ |
|
|
★★★ |
★ |
| 3 |
|
★ |
★★★ |
|
★ |
★★ |
| 4 |
★ |
|
|
|
★★★ |
|
| Key: ★★★ - Extremely Useful ★★ - Frequently Useful ★ - Occasionally Useful No stars - Not Useful | ||||||
Consumables
Furutaka equips the following consumables:
- Slot 1: Damage Control Party

- Slot 2: Hydroacoustic Search
 – 3 charges
- Slot 3: Catapult Fighter
 – 3 charges
- Slot 4: Submarine Surveillance
 – 3 charges
Signals
Furutaka captains should mount the standard flags to improve the ship's performance in battle. To improve upon the ship's armaments, India X-Ray (![]() ), Victor Lima (
), Victor Lima (![]() ), and Juliet Whiskey Unaone (
), and Juliet Whiskey Unaone (![]() ) flags are recommended to increase the fire chance and flooding chances respectively. To improve the ship’s survivability, captains should mount November Foxtrot (
) flags are recommended to increase the fire chance and flooding chances respectively. To improve the ship’s survivability, captains should mount November Foxtrot (![]() ) and India Yankee (
) and India Yankee (![]() ) flags. Sierra Mike (
) flags. Sierra Mike (![]() ) flags are recommended to increase the ship’s already high top speed. Lastly, economic and special signal flags can be mounted to improve the ship’s economic gains per battle.
) flags are recommended to increase the ship’s already high top speed. Lastly, economic and special signal flags can be mounted to improve the ship’s economic gains per battle.
Recommended Signal Flags 
| |||||
|---|---|---|---|---|---|
| Combat | |||||
 ★ |

|
 ★★ |
 ★ |
 ★★★ |
 ★★ |
 ★ |
 ★ |
 ★★ |
 ★★★ |
 ★★ |

|

|

| ||||
Note: Use of the Juliet Charlie signal makes detonation impossible.
Gallery
Historical Info
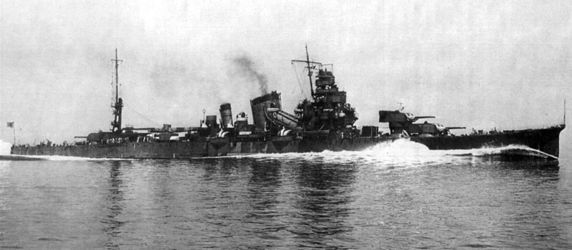
Historical Gallery

References
Ship Change Log
See here for links to Update notes.
- Added to the game in Update 0.3.1.
- Update 0.3.1.2:
- The duration of the Spotting aircraft consumable was increased.
- Update 0.4.0:
- The Fighter Aircraft consumable was added for use on the top researchable hull.
- Update 0.4.0.4:
- The "Hydroacoustic Search" consumable was added to the base hull configuration.
- Update 0.5.0:
- Rudder shift time on the upgraded hull was decreased by 1.1 s.
- Type 8 mod 2 torpedoes were added.
- The gun modules are now researched sequentially.
- Increased 203 mm main battery turret traverse speed from 4 to 5 degrees per second.
- Main battery reload time decreased from 17 to 15 s.
- Update 0.5.2:
- Experience earnings reduced by 7%.
- Update 0.5.6:
- Performance characteristics were improved for the top hull.
- Hull (C) was replaced by a new one, with improved performance characteristics:
- Her main guns were reinforced: now the ship is equipped with three twin main turrets (3х2) instead of the previous 6х1 arrangement. Now her new twin main turrets are arranged in a more reasonable and conventional way (two forward turrets and one aft turret) and have higher traverse speed.
- Her torpedo tubes were reinforced: 2х4 instead of the previous 2х3 configuration. The new torpedo tubes reload slower, but they can launch one extra torpedo in each torpedo salvo.
- New set of AA defenses: 2х2 13mm/76 Type93 Twin, 4x2 25mm/60 Type96 Twin mod. 1, and 4х1 120mm/40 10th Year Type mod. B2/C:
- The AA damage within the 1km AA engagement area radius was nullified (3 -> 0 points).
- The average AA damage within the 1.2km AA engagement area did not change (7 points).
- The average AA damage within the 3.1km AA engagement area was added (0 -> 20 points).
- The average AA damage within the 4.5km AA engagement area radius increased by 10 points (from 10 to 20 points).
- Hull (В): rudder shift speed and amount of HP now correspond with Hull (C).
- The hull will now reflect the landmark modernization of the ship when she had her main gun turrets upgraded. By making this change, we moved the ship a bit closer to later-period Japanese heavy cruisers to better prepare the player for a change in battle tactics.
- Added anti-torpedo protection like that of Tier VI Aoba.
- Update 0.5.8:
- The armor model of the hull was refined.
- Update 0.5.10:
- Fixed display of the rangefinder.
- Update 0.5.11:
- Secondary Battery Modification 2 is now available in Upgrade Slot 2.
- Update 0.6.2:
- The national flag was moved from the stern to the mast.
- Update 0.6.3:
- Base firing range increased from 11,790 to 12,620 m.
- Fixed the operation of the "Manual Fire Control for AA Armament" Skill.
- Update 0.6.12:
- Detectability when firing main guns in smoke changed to 6.92 km.
- Update 0.6.13:
- Fire extinguishing time now 30 s instead of 60 s.
- Improved display of thin elements.
- Minor fixes to ship geometry and textures.
- Hull (B): durability of the casemate reduced by 200, durability of the superstructure increased by 200. The change does not affect the HP of the ship in any way.
- Update 0.6.14:
- The position of the catapult in the stowed position was changed, the guns now elevate over the catapult when shifting the barrels to the other side. The changes do not affect the game balance in any way.
- Update 0.7.6:
- Improved display of thin elements on the hull.
- Update 0.7.10:
- The range of the Hydroacoustic Search consumable was unified: 4 km for detecting ships, 3 km for detecting torpedoes.
- Update 0.7.11:
- Accuracy of the main battery was improved to be similar to that of Zao.
- Update 0.8.8:
- Fixed a bug due to which the accuracy of the Hull (C) guns was lower than the accuracy of the Hull (A) and (B) guns.
- Update 0.10.0:
- The firing range of the secondary battery was increased to 4.3 km.
- Update 0.10.3:
- Hulls (A) and (B) were removed, Hull (C) was renamed to (B). A new base hull was created on the basis of Hull (C) with a modified air defense composition.
- Update 0.10.11:
- Fixed model and textures of the ship.
- Updated 0.11.8:
- Fixed the display of the ship's silhouette in the battle interface.
- Update 13.1:
- Added the Submarine Surveillance consumable with the following characteristics:
- Range: 5 km.
- Reload: 120 s.
- Number of charges: 3.
- Action time: 20 s.
- Added the Submarine Surveillance consumable with the following characteristics: