Hood
| Revision as of 19:32, 17 May 2017 Added Pros/Cons | Revision as of 02:49, 18 May 2017 Added Design History | |||
| Line 118: | Line 118: | |||
| |History=<!-- write text below --> | |History=<!-- write text below --> | |||
| + | ====Design==== | |||
| + | The inception of what was to become ''HMS Hood'' began as a request to the Director of Naval Construction to design a class of ships that would succeed the ''Queen Elizabeth-class'' super dreadnoughts and would incorporate the latest design of underwater torpedo protection. After a few proposed designs, an intervention by Admiral Jellicoe, the Commander-in-Chief of the ''Royal Navy'', argued a change of the design to that of a battlecruiser, in order to provide a response to the new ''Mackensen-class'' battlecruisers being constructed by the ''Imperial German Navy'' at the time. After a second round of design proposals that prioritized speed over protection, design “No. 2” as it was known, became selected as the plan for the Admiral-class battlecruisers we know today. | |||
| + | ||||
| + | ''HMS Hood'', planned at 860 feet was a long ship by design, as there was an emphasis on hull elongation in order to reduce the drought of the ship – in order to improve underwater integrity – and to increase free-weight freeboard – that had the effect of making her a stable artillery platform. As well, she incorporated the new design of anti-torpedo blisters approved by the Admiralty. A two-layer system – outer layer filled with air and inner layer filled with crushing tubes – in order to both absorb and spread out the shock of explosions. As added security, the blisters were positioned over the oil-fuel cells, which were designed watertight and separate from the rest of the ship. Initially designed, Hood was to have 8 inches of sloped main belt armour and 1.5-2 inches of horizontal protection to match the survivability of the ''Queen Elizabeth-class''. The outcome of the Battle of Jutland necessitated a redesign of ''Hood’s'' armour protection. Her belts and barbettes were increased to 12 inches, and her primary decks were increased to 3 inches of thickness. | |||
| + | ||||
| + | While it was the apt decision to improve her survivability, history would prove that the measures taken were not adequate. As her ancestors, ''Hood'' still possessed deplorable protection against plunging fire; in-fact, ''Hood'' did not possess an armoured main deck, only multiple decks of reinforced thickness. This was adequate for shells that used a direct fuse, but not for delayed-fuse shells that came into service by the Second World War. Another inherent fault of British battlecruiser designs: the magazines were placed on top of the shell rooms, which made them a hazard if damaged. In the end, the Hood became another victim of her pedigree. | |||
| + | ||||
| + | True to her nature, ''Hood'' was a fast ship; rated for 32 knots at top speed. To achieve such speeds, the designers took advantage of her immense size and mounted no less than 24 Admiralty boilers that fed to four multi-geared turbines. She was an innovator; being the first ship in the ''Royal Navy'' to use small-tube boilers that gave her more power for less weight. In fact, she generated 30% more power than ''Renown-class''. At 150,000 shaft horsepower, she was the most powerful ship in the world upon her completion. But such performance paid a price: at top speed she was horrendously fuel-inefficient, burning 70 tonnes of fuel per hour. | |||
| + | ||||
| + | ''Hood'' mounted what was considered the staple of ''Royal Navy'' capital ships: eight 15-inch Mark II rifles in four twin-gun turrets, arranged super-firing pairs forward and aft. The Mark II were improved versions of the Mark I; they could elevate up to +30º, to increase range. The 15-inch Mark I are a direct enlargement of the 13.5-inch Mark V rifles. The change in armament reflects a change in priority. The 15-inch guns are trade-in shell velocity for shell weight, believing that penetration will not be compromised due to increased hitting power. | |||
| + | ||||
| + | ''HMS Hood'', the lead – and only – ship of the ''Admiralty-class'' battlecruisers was laid down 1 September 1916 at John Brown & Co. Shipyards at Clydebank, Scotland. She was launched 22 August 1918, and commissioned into the ''Royal Navy'' on 15 May 1920. What was revealed was a beautiful amalgamation of old and new: she still retained a tripod mast and hand-operated secondary guns, but also incorporated novelties like a fully enclosed bridge, and fire-control from elevated directors. She also brought back the clipper-bow, something not seen on ''Royal Navy'' ships since the 1860s. | |||
| + | ||||
| + | ====Service==== | |||
| Shortly after commissioning, HMS ''Hood'' became the flagship of the Battlecruiser Squadron of the Atlantic Fleet. Much of ''Hood''’s service during the 1920’s was goodwill visits, regular patrols and circumnavigations. Hood became the poster ship of the Royal Navy, dubbed “The Mighty ''Hood''”, sailing around the world as the embodiment of British pride and power. She participated in a circumnavigation from east to west via the Panama Canal alongside the battlecruiser HMS ''Repulse'' and several Danae-class Cruisers starting November 1923, to return home 10 months later after having visited South Africa, India, Australia, New Zealand, Canada, the USA, and several smaller colonies en route. While in Australia in 1924, she escorted the battlecruiser HMAS ''Australia'' out to see where she was scuttled, in compliance with the Washington Naval Treaty. After visiting Lisbon, Portugal, in 1925 to participate in Vasco da Gama, ''Hood'' spent the rest of the decade largely performing winter training and exercises in the Mediterranean. | Shortly after commissioning, HMS ''Hood'' became the flagship of the Battlecruiser Squadron of the Atlantic Fleet. Much of ''Hood''’s service during the 1920’s was goodwill visits, regular patrols and circumnavigations. Hood became the poster ship of the Royal Navy, dubbed “The Mighty ''Hood''”, sailing around the world as the embodiment of British pride and power. She participated in a circumnavigation from east to west via the Panama Canal alongside the battlecruiser HMS ''Repulse'' and several Danae-class Cruisers starting November 1923, to return home 10 months later after having visited South Africa, India, Australia, New Zealand, Canada, the USA, and several smaller colonies en route. While in Australia in 1924, she escorted the battlecruiser HMAS ''Australia'' out to see where she was scuttled, in compliance with the Washington Naval Treaty. After visiting Lisbon, Portugal, in 1925 to participate in Vasco da Gama, ''Hood'' spent the rest of the decade largely performing winter training and exercises in the Mediterranean. | |||
Revision as of 02:49, 18 May 2017

| Purchase priceSpecial |
| Hit Points67,700 |
| IDS_PBGM048_15IN42_MK24 х 2 pcs. |
| Rate of Fire2 shots/min. |
| Reload Time30 sec. |
| Rotation Speed5 deg./sec. |
| 180 Degree Turn Time36 sec. |
| Firing Range18.57 km. |
| Maximum Dispersion242 m. |
| HE Shell381 mm HE Mk VIIIb |
| Maximum HE Shell Damage5,300 |
| Chance of Fire on Target Caused by HE Shell34 % |
| Initial HE Shell Velocity731.5 m./s. |
| HE Shell Weight879 kg. |
| AP Shell381 mm AP Mk XIIIa |
| Maximum AP Shell Damage11,400 |
| Initial AP Shell Velocity731.5 m./s. |
| AP Shell Weight879 kg. |
| 102 mm/45 QF Mk.XVI on a Mk.XIX mount7 х 2 pcs. |
| Firing Range5.6 km. |
| Rate of Fire20 shots/min. |
| Reload Time3 sec. |
| HE Shell102 mm HE 35 lb |
| Maximum HE Shell Damage1,500 |
| Initial HE Shell Velocity811 m./s. |
| Chance of Fire on Target Caused by HE Shell6 % |
| 102 mm/45 QF Mk.XVI on a Mk.XIX mount7 х 2 pcs. |
| . . . Average Damage per Second65.8 |
| . . . Firing Range5.01 km. |
| 12.7 mm Mk.III4 х 4 pcs. |
| . . . Average Damage per Second8.4 |
| . . . Firing Range1.2 km. |
| UP AA Rocket Mk.I5 х 20 pcs. |
| . . . Average Damage per Second50 |
| . . . Firing Range1.5 km. |
| 40 mm/39 Vickers QF Mk.VIII on a Mk.VI mount3 х 8 pcs. |
| . . . Average Damage per Second59.4 |
| . . . Firing Range2.49 km. |
| Maximum Speed32 knot |
| Turning Circle Radius910 m. |
| Rudder Shift Time13.4 sec. |
| Surface Detectability Range15.71 km. |
| Air Detectability Range11.09 km. |

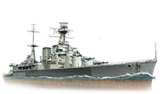
Hood — British special premium Tier VII battleship.
In 1915, development commenced on a new battlecruiser with enhanced sea endurance for the North Sea. After three British cruisers were sunk in the Battle of Jutland, the project was revised to strengthen the armor. Hood entered the Atlantic Fleet in May 1920, becoming the mightiest ship in the world. During World War II, she was the flagship of Force H in Gibraltar. Between 1940 and 1941, the ship carried out patrol missions in the Atlantic and escorted convoys. On May 20, 1941, Hood encountered Bismarck and Prinz Eugen, came under heavy fire, and sank after her magazine detonated.
Modules
 |
Rate of Fire (shots/min) | 180° Turn Time (sec) | Maximum Dispersion (m) | Maximum HE Shell Damage (HP) | Chance of Fire on Target Caused by HE Shell (%) | Maximum AP Shell Damage (HP) |
Research price (exp) |
Purchase price ( | |
|---|---|---|---|---|---|---|---|---|---|
| 381 mm/42 Mk.I on a Mk.II mount | 2 | 36 | 242 | 5,300 | 34 | 11,400 | 0 | 0 |
 |
Hit Points (HP) | Armor (mm) | Armor (mm) | Main Turrets (pcs.) | Secondary Gun Turrets (pcs.) | AA Mounts (pcs.) | Torpedo Tubes (pcs.) | Hangar Capacity (pcs.) |
Research price (exp) |
Purchase price ( | |
|---|---|---|---|---|---|---|---|---|---|---|---|
| Hood | 67,700 | 13 | 381 | 4 | 7 | 4/3/5/7 | 0 | 0 |
 |
IDS_SHIP_PARAM_SUO_INCREASE_DIST (%) | Maximum Firing Range (km) |
Research price (exp) |
Purchase price ( | |
|---|---|---|---|---|---|
| Mk VII mod. 1 | 0 | 0 | 0 |
 |
Maximum Speed (knot) |
Research price (exp) |
Purchase price ( | |
|---|---|---|---|---|
| Propulsion: 144,000 hp | 32 | 0 | 0 |
Compatible Upgrades
| Slot 1 |
||||
|---|---|---|---|---|
| Slot 2 |
||||
| Slot 3 |
||||
| Slot 4 |
Player Opinion
Performance
Pros:
- Good top speed.
- Great close-range AA.
- Hard hitting guns.
- Decent secondary armament.
Cons:
- Weak armor.
- AA range is too short to guard other ships.
- Slow turret traverse.
- Somewhat sluggish maneuverability.
Research
Optimal Configuration
Upgrades
As a Tier VII battleship with four upgrade slots, the following upgrades are recommended on Hood:
Slot 1
- Auxiliary Armaments Modification 1, in order to improve the AA rockets' survivability. The rocket batteries are vital to Hood's AA defense against air strikes and the main batteries already have very good survivability.
Slot 2
- Aiming Systems Modification 1 for captains focused on the main batteries and increasing their accuracy, or
- AA Guns Modification 2 for captains wishing to boost the range of Hood’s anti-aircraft bubbles (the big winner in this case would be her rocket batteries).
Slot 4
- Damage Control System Modification 1 is the top pick of the bunch, in order to reduce fire and flooding chance on the ship (as Hood has poor torpedo protection for her tier).
Slot 5
- Steering Gears Modification 2 will further improve her good rudder shift time, or
- Damage Control System Modification 2 will make Hood more resistant to fire and flooding damage.
Commander Skills
| Recommended Commander Skills | ||||||||
|---|---|---|---|---|---|---|---|---|
| Cost (points) |
Endurance | Attack | Support | Versatility | ||||
| 1 |
★ |
★★ |
|
|
|
|
|
|
| 2 |
★ |
★ |
★★ |
|
|
|
★★★ |
|
| 3 |
★ |
|
|
|
★★ |
★★★ |
|
★ |
| 4 |
|
★ |
|
|
★★★ |
|
|
★★ |
| Key: ★★★ - Extremely Useful ★★ - Frequently Useful ★ - Occasionally Useful No stars - Meh Χ - Not recommended | ||||||||
Camouflage
As a premium ship, Hood comes included with Type 10 camouflage that lowers her detection radius, reduces the accuracy of incoming shells, and increases the amount of experience she earns.
Signals
Hood is able to mount 8 signal flags simultaneously. India Delta is recommended to improve the ship’s survivability by increasing the amount of health recovered when the repair party consumable is used. India Yankee and Juliet Yankee Bissotwo also improve survivability by decreasing the time to repair fires and flooding respectively. November Foxtrot is also highly recommended to reduce the cooldown time on the ship’s consumables. Economic flags such as Zulu, Zulu Hotel, and Equal Speed Charlie London can be used to increase the credit and experience gain per battle. Lastly, Sierra Mike can be mounted to increase Hood's already fast speed.
Recommended Signal Flags 
| |||||
|---|---|---|---|---|---|
| Combat | |||||
 ★ |
 ★ |
 ★★★ |

|

|

|

|

|
 ★★ |
 ★★ |
 ★★★ |
 ★★★ |

|

| ||||
Note: Use of the Juliet Charlie signal makes detonation impossible.
Gallery

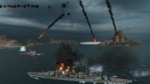
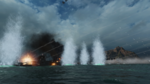
Hood creates a fireworks show.
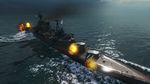
Hood takes a hit while engaging enemy aircraft.


Historical Info
Historical Gallery
_profile_drawing.png)


