Kagero
| Revision as of 17:18, 18 May 2016 Removed protection from "Ship:Kagero" | Revision as of 06:36, 18 October 2018 Changed to official operation name in 0.7.10. | |||
26 intermediate revisions by 11 users not shown | ||||
| Line 1: | Line 1: | |||
| ? | # | + | <!-- DO NOT EDIT OR DELETE LINES WITH COMMENTS (it's look like as this or next line) | |
| + | -->{{WoWs_Ship|Promo=<!-- in case of gift or promo ship write conditions to get it. --> | |||
| + | ||||
| + | |Anno=<!-- you can write below short description for the ship. it will replace default once. --> | |||
| + | Due to a good balance of her main characteristics, ''Kagero'' was the most successful destroyer design in the Imperial Japanese Navy. She had extremely long-range, high-speed, oxygen-fueled torpedoes that made her considerably superior to all ships of her type in terms of torpedo armament power.<br><br> | |||
| + | {{Model3DViewer|51a2f971b93b44a3b827765d9fed6c2f}} | |||
| + | ||||
| + | |Performance=<!-- write text about performance in battles below --> | |||
| + | Dropping down from Tier IX as a part of the Japanese destroyer line changes in [[Ship:Update_0.5.15|Update 0.5.15]], ''{{#var:ship_name}}'' now fills ''[[Fubuki]]''’s old spot at Tier VIII. Fans of the old ''Fubuki'' and new captains who have moved up from ''[[Akatsuki]]'' will find ''{{#var:ship_name}}'' familiar in many ways. Both should be accustomed to the A-X-Y turret arrangement of the main battery, her handling characteristics are nearly identical (similar turning circle radius and rudder shift time), and her anti-aircraft suite is still hardly worth mentioning. So, what's new? | |||
| + | ||||
| + | For starters, ''{{#var:ship_name}}''’s guns reload faster, though they do give up some range to those of ''Akatsuki'' and pre-0.5.15 ''Fubuki''. This gives her more of a fighting chance when cornered by an enemy gunboat destroyer (such as ''[[Benson]]''), especially if said enemy is already wounded. With that said, however, captains who have progressed this far up the line should know by now when to hang in a gun duel against an enemy destroyer and when discretion is the better part of valor; never court a gunfight with an American or Russian destroyer with lots of health. ''{{#var:ship_name}}''’s detection radius is improved over both old ''Fubuki'' and ''Akatsuki''; not only can she can equip [[Ship:Upgrades#Tier_VIII.2B_Equipment_.28Slot_6.29|Concealment Module 1]] (as a Tier VIII ship), but her base detection radius of 6.8 km is the lowest of all high-tier Japanese destroyers. | |||
| + | ||||
| + | ''{{#var:ship_name}}'' has some fairly glaring deficiencies compared to her counterparts at Tier VIII, though. Her speed is fairly pedestrian, her anti-aircraft guns are ineffective at shooting down enemy planes, and her main battery reload and turret traverse times are painfully slow. Just like ''Akatsuki'', captains are likely to miss the tremendous tactical flexibility of ''Fubuki''’s three torpedo launchers. As nasty as her upgraded torpedoes are — and they hit very, '''very''' hard — their reload time means that getting off more than a few salvos in a match is tough. Luckily, ''{{#var:ship_name}}'' can give up {{Smoke Generator}} in exchange for {{Torpedo Reload Booster}}. This allows her to force an 8-second reload time on her torpedoes once every six minutes (or four, with the premium version). Given her best-in-tier detection radius, this will be a worthwhile gamble for many captains. | |||
| + | ||||
| + | The Japanese destroyer line becomes challenging to excel in at high tiers, but ''Kagero'' provides all the tools necessary for captains to do just that; they need only bring patience and a willingness to learn how to handle her. | |||
| + | ||||
| + | |Pros=<!-- write list of positive points below. use * as in ordinary wiki-list. --> | |||
| + | * Lowest detection range of all Tier VIII destroyers. | |||
| + | * Fast, powerful torpedoes that hit like freight trains. | |||
| + | * Good handling; same turning circle as her predecessors, quick rudder shift. | |||
| + | * Gains access to {{Torpedo Reload Booster}}, allowing her to launch 16 torpedoes within 10 seconds. | |||
| + | ||||
| + | |Cons=<!-- write list of negative points below. use * as in ordinary wiki-list. --> | |||
| + | * Mediocre top speed of 35 knots. | |||
| + | * Main battery is slightly improved from ''[[Akatsuki]]'', but is still nothing special. | |||
| + | * Painfully long torpedo reload time, regardless of which torpedoes are equipped. | |||
| + | * Has to choose between torpedo reload booster or the smoke screen consumable, unlike Akizuki. | |||
| + | ||||
| + | |Research=<!-- write text about priority sequence of research below --> | |||
| + | <!--Availability of researchable upgrades for ''{{#var:ship_name}}'' is as follows: | |||
| + | * '''Main Battery:''' | |||
| + | * '''Hull:''' Upgrade to Hull (B) for XXX. Research of this module unlocks progression to YYY. | |||
| + | * '''Torpedoes:''' | |||
| + | * '''Gun Fire Control System:''' Upgrade to XXX for an extra 10% range on the main battery. | |||
| + | * '''Propulsion:''' | |||
| + | --> | |||
| + | ||||
| + | Hull (B) is unquestionably the most important upgrade for ''{{#var:ship_name}}''; the extra hit points provide her additional survivability. The Torpedo module is a fairly minor buff to her fish; the Fire Control System module might actually be better to pick-up first. Captain's pick for this one, there's not really a wrong answer. | |||
| + | ||||
| + | |OptimalConfiguration=<!-- write some general text about selection of optimal configuration below (optional)--> | |||
| + | ||||
| + | |Upgrades=<!-- write text about best upgrades below --> | |||
| + | The recommended upgrades for ''{{#var:ship_name}}'' are as follows: | |||
| + | * '''Slot 1''': {{Main Armaments Modification 1}} | |||
| + | * '''Slot 2''': {{Propulsion Modification 1}} | |||
| + | * '''Slot 3''': {{Aiming Systems Modification 1}} or {{Main Battery Modification 2}} | |||
| + | * '''Slot 4''': {{Propulsion Modification 2}} | |||
| + | * '''Slot 5''': {{Concealment System Modification 1}} | |||
| + | ||||
| + | As a Tier VIII ship, ''{{#var:ship_name}}'' gains access to '''Slot 5'''; '''Concealment System Modification 1''' is the logical choice for the new slot. Her other upgrade recommendations remain largely as they were for ''[[Akatsuki]]'': '''Main Armaments Modification 1'' in '''Slot 1'', '''Aiming Systems Modification 1''' or '''Main Battery Modification 2''' in '''Slot 3''', and '''Propulsion Modifications 1''' and '''2''' in '''Slot 2''' and '''Slot 4''', respectively. | |||
| + | ||||
| + | |CommanderSkills=<!-- write text about best set of Commander Skills below --> | |||
| + | ||||
| + | {{Commander Skills | |||
| + | | Priority Target = 1 | |||
| + | | Preventative Maintenance = 3 | |||
| + | | Expert Loader = | |||
| + | | Aircraft Servicing Expert = | |||
| + | | Direction Center for Catapult Aircraft = | |||
| + | | Dogfighting Expert = | |||
| + | | Incoming Fire Alert = | |||
| + | | Evasive Maneuver = | |||
| + | ||||
| + | | High Alert = 1 | |||
| + | | Jack of All Trades = 2 | |||
| + | | Expert Marksman = 1 | |||
| + | | Torpedo Acceleration = 1 | |||
| + | | Smoke Screen Expert = 1 | |||
| + | | Expert Rear Gunner = | |||
| + | | Adrenaline Rush = 2 | |||
| + | | Last Stand = 3 | |||
| + | ||||
| + | | Survivability Expert = 2 | |||
| + | | Basics of Survivability = 2 | |||
| + | | Torpedo Armament Expertise = 2 | |||
| + | | Emergency Takeoff = | |||
| + | | Basic Firing Training = | |||
| + | | Superintendent = 3 | |||
| + | | Demolition Expert = | |||
| + | | Vigilance = 2 | |||
| + | ||||
| + | | Manual Fire Control for Secondary Armament = | |||
| + | | Fire Prevention = | |||
| + | | Inertia Fuse for HE Shells = 1 | |||
| + | | Air Supremacy = | |||
| + | | Advanced Firing Training = 2 | |||
| + | | Manual Fire Control for AA Armament = | |||
| + | | Radio Position Finding = 2 | |||
| + | | Concealment Expert = 3 | |||
| + | }} | |||
| + | ||||
| + | |Consumables=<!-- write text about selection of Consumables below --> | |||
| + | ''{{#var:ship_name}}'' can equip the following consumables: | |||
| + | * '''Slot 1:''' {{Damage Control Party}} | |||
| + | * '''Slot 2:''' {{Smoke Generator}} '''or''' {{Torpedo Reload Booster}} | |||
| + | * '''Slot 3:''' {{Engine Boost}} | |||
| + | ||||
| + | ''{{#var:ship_name}}'' captains must choose between equipping {{Smoke Generator}} and a downgraded version of the {{Torpedo Reload Booster}} consumable that ''[[Shiratsuyu]]'' and ''[[Akizuki]]'' have access to. Whichever one is chosen, captains are encouraged to invest the credits (or doubloons) in the premium version. As ever, investing in {{Damage Control Party II}} is also highly recommended. {{Engine Boost II}} might be worthwhile for captains without {{Smoke Generator}}; otherwise, the free version should be more than adequate. | |||
| + | ||||
| + | |Camouflage=<!-- write text about useful camouflage below --> | |||
| + | [[Ship:Camouflage#Standard Camouflage|Type 1, 2, or 5 camouflage]] can be equipped for credits; Types 1 or 5 are recommended at a minimum to reduce detectibility range. | |||
| + | ||||
| + | Players who wish to spend doubloons can equip ''{{#var:ship_name}}'' with [[Ship:Camouflage#Permanent_Camouflage|Type 18 camouflage]] that lowers her detection radius, reduces the accuracy of incoming shells, reduces her repair costs, and increases the amount of experience she earns. | |||
| + | ||||
| + | ''{{#var:ship_name}}'' also has an alternate premium camouflage called "Urashima", in which she appears as she does during the Halloween scenario "[[Sunray in the Darkness]]". | |||
| + | ||||
| + | |Signals=<!-- write text about best set of signals below --> | |||
| + | ||||
| + | |Gallery=<!-- write below list of files without tags. description (if necessary) for each should be separated with | --><gallery> | |||
| + | File:KageroTorp.jpg|''Kagero'' fires her torpedoes at incoming enemy ships. | |||
| + | File:KageroSmoke.jpg|''Kagero'' launches torpedoes at an enemy ''[[Tirpitz]]'' and ''[[Friedrich der Große]]'' from within her smokescreen. | |||
| + | File:KageroStealth.jpg|''Kagero'' speeds towards the enemy capture point under the cover of a cyclone. | |||
| + | File:KageroSink.jpg|''Kagero'' runs into an enemy ''[[Iowa]]'' and ''[[Roon]]''. | |||
| + | </gallery> | |||
| + | ||||
| + | |History=<!-- write text below --> | |||
| + | <div class="thumb tright"> | |||
| + | {{AnnoWiki|content= | |||
| + | <h2>''Kagero'', 1939</h2> | |||
| + | ===Construction=== | |||
| + | :Builder: Maizuru Naval Yard; Kyoto, Japan | |||
| + | :Laid down: 3 September 1937 | |||
| + | :Launched: 27 September 1938 | |||
| + | :Commissioned: 6 November 1939 | |||
| + | ---- | |||
| + | ===Specifications=== | |||
| + | :Displacement: 2,033tons, standard | |||
| + | :Length: 118.5m | |||
| + | :Beam: 10.7m | |||
| + | :Draft: 3.76m | |||
| + | ---- | |||
| + | ====Machinery==== | |||
| + | :3 Kampon boilers, 2 Kampon turbines | |||
| + | ---- | |||
| + | ====Performance==== | |||
| + | :35 knots at 52,000 shaft horsepower | |||
| + | :5,000 nautical miles at 18 knots | |||
| + | ---- | |||
| + | ====Armor==== | |||
| + | :Main Belt: 19mm | |||
| + | :Main Deck: 19mm | |||
| + | :Transverse Bulkheads: 6mm | |||
| + | :Turrets: 20mm | |||
| + | :Conning Tower: 21mm | |||
| + | ---- | |||
| + | ====Armament==== | |||
| + | =====Main===== | |||
| + | :Six (3 x 2) 127mm/50 Type 3 | |||
| + | =====Anti-Aircraft===== | |||
| + | :Four (4 x 1) 25mm Type 96 | |||
| + | =====Torpedoes===== | |||
| + | :8 (4 x 2) 610mm Type 92 | |||
| + | ---- | |||
| + | ====Complement==== | |||
| + | :240 men | |||
| + | }} | |||
| + | </div> | |||
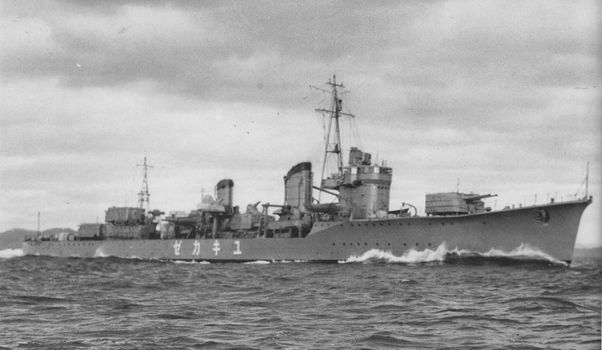
| + | [[File:Yukikaze underway 1939.jpg|none|frame|x350px|link=|''Kagero''-class destroyer ''Yukikaze'' underway, December 1939.]] | |||
| + | ||||
| + | ===Design=== | |||
| + | After the success of the ''Asashio''-class of destroyers were venerated in their proficiency and capability, the Imperial Japanese determined that their next two classes of Type A destroyers would be based of the work established by this design. The first of the Type A classes became the ''Kagero''-class destroyers. The design choices seemed justified, the ''Kagero''-class compared very favourably with their American contemporaries. The Japanese ships had a heavier main artillery setup; although the US mounts had the benefit of dual-purpose capability. As well, although American destroyers had more torpedo tubes, Japanese destroyers had the benefit of reloads. | |||
| + | ||||
| + | In order to streamline design time as much as possible, the ''Kagero''-class were nearly identical in hull design to their predecessors. Superficially, everything - even the superstructure layout - was identical to the ''Asashio''-class. Design-wise, one of the more noticeable differences was the placement of the torpedo storage rooms; in the ''Kagero''-class they were placed forward of their respective launchers. Propulsion wise, the new class used the same layout: 3 Kampon boilers feeding to two Kampon turbines. The greater efficiency of the newer boilers generated 2,000 shaft horsepower more than their predecessors, but this did not make any marked difference to the speed. Overall, the ''Kagero''-class had a slightly greater tonnage and a slightly wider beam; in order to improve stability. | |||
| + | ||||
| + | As her predecessor, ''Kagero''-class destroyers reused the identical armament layout as the Special Type (''[[Fubuki]]''-class) destroyers. Six 127mm guns found in 3 twin-gun mounts; one forward and a super firing pair aft. ''Kagero''-class used the Type C turret mounts for their guns; which has the distinct disadvantage of not possessing the ability to angle high enough to engage aircraft, but they were fully enclosed and were lighter than previous mounts. Located amidships were the 2 quadruple-torpedo launchers in their enclosed mounts. each were provided with one reload each. For anti aircraft defence, the destroyers were armed with 25mm auto-cannons in single and dual mounts. | |||
| + | ||||
| + | Throughout the Second World War, the ''Kagero''-class underwent constant service modifications. From late 1942 to 1943, further AA mounts were added, and the installed dual mounts were upgraded to triple mounts. From late 1943 to 1944, the X turret was removed to make more space for 25mm mounts. As well, many scuttles were welded over to increase hull integrity. As front-line ships, ''Kagero''-class received priority for radar installation. In early 1944 a radar room was built into the foremast with a No.22 radar set. Later in 1944 a No.13 set was installed in the aft mainmast. | |||
| + | ||||
| + | In total, 19 destroyers of this class were built for the Imperial Japanese Navy; the first 15 ships proposed for the 1937 Naval shipbuilding programme, and the last 4 spilled into the 1939 programme. | |||
| + | ||||
| + | ===Service=== | |||
| + | '''DesDiv 18''' (''Shiranui'', ''Kagero'') | |||
| + | Participated in the Pearl Harbor attack. Participated in the invasions of the Bismarck Islands. Participated in the Indian Ocean raids. Present for the Battle of Midway. Participated in the Guadalcanal Campaign. Participated in the Battle of the Eastern Solomons. Participated in the Battle of Santa Cruz. Present for the Naval Battles of Guadalcanal. Participated in the Battle of Tassafaronga. Participated in the Battle of Leyte Gulf. | |||
| + | :''Kagero'' was severely damaged by mine and subsequent air attack and eventually sank on 8 May 1943. | |||
| + | :''Shiranui'' was sunk by air attack on 27 October 1944. | |||
| + | ||||
| + | '''DesDiv 15''' (''Natsushio'', ''Oyashio'', ''Hayashio'', ''Kuroshio'') | |||
| + | Participated in the invasions of the Philippines and Netherlands East Indies. Present at the Battle of Midway. Participated in the Battle of the Eastern Solomons. Participated in the Battle of Santa Cruz. Participated in the Guadalcanal Campaign. Present for both Naval Battles of Guadalcanal. Participated in the Battle of Tassafaronga. Participated in the Solomons Campaign. | |||
| + | :''Natsushio'' was torpedoed and sunk by submarine on 9 February 1942. | |||
| + | :''Oyashio'' was severely damaged by a mine, then further damaged by air attack and sunk on 8 May 1943. | |||
| + | :''Hayashio'' was sunk by air attack on 24 November 1942. | |||
| + | :''Kuroshio'' struck several mines and was sunk on 8 May 1943. | |||
| + | ||||
| + | '''DesDiv 16''' (''Yukikaze'', ''Tokitsukaze'', ''Amatsukaze'', ''Hatsukaze'') | |||
| + | Participated in the invasions of the Philippines and Netherlands East Indies. Participated in the battle of the Java Sea. Present for the Battle of Midway. Participated in the Battle of Santa Cruz. Participated in the First Naval Battle of Guadalcanal. Participated in the Battle of the Bismarck Sea. Participated in the Solomons Campaign. Participated in the Battle of Kolombangara. Participated in the Battle of Leyte Gulf. Participated in Operation Tenichigo. | |||
| + | :''Yukikaze'' survived the war and was surrendered. She was awarded to China in July 1947. | |||
| + | :''Tokitsukaze'' was severely damaged by air attack, abandoned, and set adrift on 3 March 1943. She was sunk by air attack the following day. | |||
| + | :''Amatsukaze'' was severely damaged by air attack, run aground, and unsalvageable on 6 April 1945. She was destroyed by demolition on 10 April 1945. | |||
| + | :''Hatsukaze'' was sunk by surface gunfire on 2 November 1943 in the Battle of Empress Augusta Bay. | |||
| + | ||||
| + | '''DesDiv 4''' (''Arashi'', ''Hagikaze'', ''Nowaki'', ''Maikaze'') | |||
| + | Participated in the invasions of the Philippines and Netherlands East Indies. Participated in the Battle of Midway. Participated in the Guadalcanal Campaign. Participated in the Battle of Santa Cruz. Participated in the Battle of Vella Gulf. Participated in the Battle of the Philippine Sea. Participated in the Battle of Leyte Gulf. | |||
| + | :''Arashi'' was sunk by surface gunfire and torpedo on 7 August 1943, during the Battle of Vella Gulf. | |||
| + | :''Hagikaze'' was sunk by surface gunfire and torpedo on 7 August 1943, during the Battle of Vella Gulf. | |||
| + | :''Nowaki'' was sunk by surface gunfire and torpedo on 26 October 1944, during the Battle of Leyte Gulf. | |||
| + | :''Maikaze'' was sunk by surface gunfire during the raid on Truk on 17 February 1944. | |||
| + | ||||
| + | '''DesDiv 17''' (''Urakaze'', ''Tanikaze'', ''Isokaze'', ''Hamakaze'') | |||
| + | Participated in the Pearl Harbor attack. Participated in the Bismarck Islands invasions. Participated in the Indian Ocean raids. Participated in the Battle of Midway. Participated in the Guadalcanal Campaign. Participated in the Battle of the Eastern Solomons. Participated in the Battle of Santa Cruz. Participated in the Battle of Kula Gulf. Participated in the Battle of Kolombangara. Participated in the Battle off Horaniu. Participated in the Battle of Vella Lavella. Participated in the Battle of the Philippine Sea. Participated in the Battle of Leyte Gulf. Participated in Operation Tenichigo. | |||
| + | :''Urakaze'' was torpedoed and sunk by submarine on 21 November 1944. | |||
| + | :''Tanikaze'' was torpedoed and sunk by submarine on 9 June 1944. | |||
| + | :''Isokaze'' was sunk by air attack on 7 April 1945 during Operation Tenichigo. | |||
| + | :''Hamakaze'' was sunk by air attack on 7 April 1945 during Operation Tenichigo. | |||
| + | ||||
| + | '''DesDiv 10''' (''Akigumo'') | |||
| + | Participated in the Pearl Harbor attack. Participated in the Bismarck Islands invasions. Participated in the Indian Ocean raids. Participated in the Battle of Midway. Participated in the Guadalcanal Campaign. Participated in the Battle of Santa Cruz. Participated in the Battle of Vella Lavella. | |||
| + | :''Akigumo'' was torpedoed and sunk by submarine on 11 April 1944. | |||
| + | ||||
| + | |HistoricalGallery=<!-- write below list of files without tags. description (if necessary) for each should be separated with | --><gallery> | |||
| + | File:IJN_DD_Kuroshio_1938_launching.jpg|Launching of ''Kuroshio'', 28 October 1938. | |||
| + | File:Isokaze_launched_June_1939.jpg|Launching of ''Isokaze'', 19 June 1939. | |||
| + | File:Amatsukaze_1940.jpg|''Amatsukaze'' undergoing speed trials, 17 October 1940. | |||
| + | File:Nowaki_1941.jpg|''Nowaki'' underway, 14 April 1941. | |||
| + | File:Shiranui_repairs_1942.jpg|''Shiranui'' undergoing repairs at Maizuru after being torpedoed by USS ''Growler'', circa 1942. | |||
| + | File:IJN_Kagero9.png|Line drawing of ''Kagero''. | |||
| + | </gallery> | |||
| + | ||||
| + | |Video=<!-- put below video clips with using template VideoYT. You can use html-tags for formatting. --> | |||
| + | ||||
| + | |Ref= <!-- write below --> | |||
| + | *Stille, M. Wright, P. (2013). Imperial Japanese Navy Destroyers 1919-45 (2): Asashio to Tachibana Classes. London, UK: Osprey Publishing Ltd. | |||
| + | *Chesneau, R., Gardiner, R. (1980). Conway’s All the World’s Fighting Ships, 1922-1946. London, UK: Conway Maritime Press. | |||
| + | ||||
| + | }}<!-- DO NOT DELETE THIS LINE. DO NOT INSERT ANYTHING BELOW THIS LINE --> | |||
Revision as of 06:36, 18 October 2018

| Research price115000 exp |
| Purchase price9,100,000 |
| Hit Points13,300 |
| 127 mm/50 3rd Year Type on a Type C mount3 х 2 pcs. |
| Rate of Fire8.51 shots/min. |
| Reload Time7.05 sec. |
| Rotation Speed6.9 deg./sec. |
| 180 Degree Turn Time26.09 sec. |
| Firing Range8.55 km. |
| Maximum Dispersion79 m. |
| HE Shell127 mm HE Type1 |
| Maximum HE Shell Damage2,150 |
| Chance of Fire on Target Caused by HE Shell9 % |
| Initial HE Shell Velocity915 m./s. |
| HE Shell Weight23 kg. |
| AP Shell127 mm AP Type0 |
| Maximum AP Shell Damage2,200 |
| Initial AP Shell Velocity915 m./s. |
| AP Shell Weight23 kg. |
| 610 mm Quad2 х 4 pcs. |
| Rate of Fire0.59 shots/min. |
| Reload Time101 sec. |
| Rotation Speed25 deg./sec. |
| 180 Degree Turn Time7.2 sec. |
| TorpedoType90 mod. 1 |
| Maximum Damage17,233 |
| Torpedo Speed62 knot |
| Torpedo Range9.99 km. |
| 25 mm/60 Type 96 on a triple mount3 х 3 pcs. |
| . . . Average Damage per Second9.9 |
| . . . Firing Range2.49 km. |
| 25 mm/60 Type 96 on a single mount4 х 1 pcs. |
| . . . Average Damage per Second7.2 |
| . . . Firing Range2.49 km. |
| Maximum Speed35 knot |
| Turning Circle Radius640 m. |
| Rudder Shift Time4 sec. |
| Surface Detectability Range6.63 km. |
| Air Detectability Range3.07 km. |

Kagerō — Japanese Tier VIII destroyer.
Due to a good balance of her main characteristics, Kagero was the most successful destroyer design in the Imperial Japanese Navy. She had extremely long-range, high-speed, oxygen-fueled torpedoes that made her considerably superior to all ships of her type in terms of torpedo armament power.
Modules
 |
Rate of Fire (shots/min) | 180° Turn Time (sec) | Maximum Dispersion (m) | Maximum HE Shell Damage (HP) | Chance of Fire on Target Caused by HE Shell (%) | Maximum AP Shell Damage (HP) |
Research price (exp) |
Purchase price ( | |
|---|---|---|---|---|---|---|---|---|---|
| 127 mm/50 3rd Year Type on a Type C mount | 8.5 | 26.1 | 79 | 2,150 | 9 | 2,200 | 0 | 590,000 |
 |
Hit Points (HP) | Armor (mm) | Armor (mm) | Main Turrets (pcs.) | Secondary Gun Turrets (pcs.) | AA Mounts (pcs.) | Torpedo Tubes (pcs.) | Hangar Capacity (pcs.) |
Research price (exp) |
Purchase price ( | |
|---|---|---|---|---|---|---|---|---|---|---|---|
| Kagerō (A) | 13,300 | 6 | 20 | 3 | 4/3 | 2 | 0 | 610,000 | |||
| Kagerō (B) | 15,100 | 6 | 20 | 3 | 10 | 2 | 21,000 | 1,600,000 |
 |
Rate of Fire (shots/min) | Torpedo Tubes Reload Time (sec) | 180° Turn Time (sec) | Maximum Damage (HP) | Torpedo Speed (knot) | Torpedo Range (km) |
Research price (exp) |
Purchase price ( | |
|---|---|---|---|---|---|---|---|---|---|
| Type90 mod. 1 | 0.6 | 101 | 7.2 | 17,233 | 62 | 10 | 0 | 1,300,000 | |
| Type93 mod. 2 | 0.5 | 112 | 7.2 | 20,966 | 67 | 10 | 20,000 | 1,800,000 |
 |
IDS_SHIP_PARAM_SUO_INCREASE_DIST (%) | Maximum Firing Range (km) |
Research price (exp) |
Purchase price ( | |
|---|---|---|---|---|---|
| Type8 mod. 1 | 0 | 0 | 350,000 | ||
| Type8 mod. 2 | 0 | 8,000 | 780,000 |
 |
Maximum Speed (knot) |
Research price (exp) |
Purchase price ( | |
|---|---|---|---|---|
| Propulsion: 52,000 hp | 35 | 0 | 600,000 |
Compatible Upgrades
| Slot 1 |
|||||
|---|---|---|---|---|---|
| Slot 2 |
|||||
| Slot 3 |
|||||
| Slot 4 |
|||||
| Slot 5 |
Player Opinion
Performance
Dropping down from Tier IX as a part of the Japanese destroyer line changes in Update 0.5.15, Kagerō now fills Fubuki’s old spot at Tier VIII. Fans of the old Fubuki and new captains who have moved up from Akatsuki will find Kagerō familiar in many ways. Both should be accustomed to the A-X-Y turret arrangement of the main battery, her handling characteristics are nearly identical (similar turning circle radius and rudder shift time), and her anti-aircraft suite is still hardly worth mentioning. So, what's new?
For starters, Kagerō’s guns reload faster, though they do give up some range to those of Akatsuki and pre-0.5.15 Fubuki. This gives her more of a fighting chance when cornered by an enemy gunboat destroyer (such as Benson), especially if said enemy is already wounded. With that said, however, captains who have progressed this far up the line should know by now when to hang in a gun duel against an enemy destroyer and when discretion is the better part of valor; never court a gunfight with an American or Russian destroyer with lots of health. Kagerō’s detection radius is improved over both old Fubuki and Akatsuki; not only can she can equip Concealment Module 1 (as a Tier VIII ship), but her base detection radius of 6.8 km is the lowest of all high-tier Japanese destroyers.
Kagerō has some fairly glaring deficiencies compared to her counterparts at Tier VIII, though. Her speed is fairly pedestrian, her anti-aircraft guns are ineffective at shooting down enemy planes, and her main battery reload and turret traverse times are painfully slow. Just like Akatsuki, captains are likely to miss the tremendous tactical flexibility of Fubuki’s three torpedo launchers. As nasty as her upgraded torpedoes are — and they hit very, very hard — their reload time means that getting off more than a few salvos in a match is tough. Luckily, Kagerō can give up Smoke Generator ![]() in exchange for Torpedo Reload Booster
in exchange for Torpedo Reload Booster ![]() . This allows her to force an 8-second reload time on her torpedoes once every six minutes (or four, with the premium version). Given her best-in-tier detection radius, this will be a worthwhile gamble for many captains.
. This allows her to force an 8-second reload time on her torpedoes once every six minutes (or four, with the premium version). Given her best-in-tier detection radius, this will be a worthwhile gamble for many captains.
Pros:
- Lowest detection range of all Tier VIII destroyers.
- Fast, powerful torpedoes that hit like freight trains.
- Good handling; same turning circle as her predecessors, quick rudder shift.
- Gains access to Torpedo Reload Booster
 , allowing her to launch 16 torpedoes within 10 seconds.
Cons:
- Mediocre top speed of 35 knots.
- Main battery is slightly improved from Akatsuki, but is still nothing special.
- Painfully long torpedo reload time, regardless of which torpedoes are equipped.
- Has to choose between torpedo reload booster or the smoke screen consumable, unlike Akizuki.
Research
Optimal Configuration
Upgrades
The recommended upgrades for Kagerō are as follows:
- Slot 1: Main Armaments Modification 1

- Slot 2: Propulsion Modification 1

- Slot 3: Aiming Systems Modification 1
 or Main Battery Modification 2
- Slot 4: Propulsion Modification 1 (
 )
)
- Slot 5: Concealment System Modification 1

As a Tier VIII ship, Kagerō gains access to Slot 5; Concealment System Modification 1 is the logical choice for the new slot. Her other upgrade recommendations remain largely as they were for Akatsuki: Main Armaments Modification 1 in Slot 1, Aiming Systems Modification 1 or Main Battery Modification 2 in Slot 3, and Propulsion Modifications 1 and 2 in Slot 2 and Slot 4, respectively.
Commander Skills
| Recommended Commander Skills | ||||||||
|---|---|---|---|---|---|---|---|---|
| Cost (points) |
Endurance | Attack | Support | Versatility | ||||
| 1 |
★ |
★★★ |
|
|
|
|
|
|
| 2 |
★ |
★★ |
★ |
★ |
★ |
|
★★ |
★★★ |
| 3 |
★★ |
★★ |
★★ |
|
|
★★★ |
|
★★ |
| 4 |
|
|
★ |
|
★★ |
|
★★ |
★★★ |
| Key: ★★★ - Extremely Useful ★★ - Frequently Useful ★ - Occasionally Useful No stars - Meh Χ - Not recommended | ||||||||
Consumables
Kagerō can equip the following consumables:
- Slot 1: Damage Control Party

- Slot 2: Smoke Generator
 or Torpedo Reload Booster
- Slot 3: Engine Boost

Kagerō captains must choose between equipping Smoke Generator ![]() and a downgraded version of the Torpedo Reload Booster
and a downgraded version of the Torpedo Reload Booster ![]() consumable that Shiratsuyu and Akizuki have access to. Whichever one is chosen, captains are encouraged to invest the credits (or doubloons) in the premium version. As ever, investing in Damage Control Party II (
consumable that Shiratsuyu and Akizuki have access to. Whichever one is chosen, captains are encouraged to invest the credits (or doubloons) in the premium version. As ever, investing in Damage Control Party II (![]() ) is also highly recommended. Engine Boost II (
) is also highly recommended. Engine Boost II (![]() ) might be worthwhile for captains without Smoke Generator
) might be worthwhile for captains without Smoke Generator ![]() ; otherwise, the free version should be more than adequate.
; otherwise, the free version should be more than adequate.
Camouflage
Type 1, 2, or 5 camouflage can be equipped for credits; Types 1 or 5 are recommended at a minimum to reduce detectibility range.
Players who wish to spend doubloons can equip Kagerō with Type 18 camouflage that lowers her detection radius, reduces the accuracy of incoming shells, reduces her repair costs, and increases the amount of experience she earns.
Kagerō also has an alternate premium camouflage called "Urashima", in which she appears as she does during the Halloween scenario "Sunray in the Darkness".Gallery
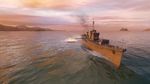
Kagero fires her torpedoes at incoming enemy ships.
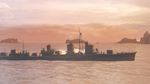
Kagero launches torpedoes at an enemy Tirpitz and Friedrich der Große from within her smokescreen.
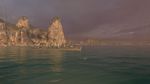
Kagero speeds towards the enemy capture point under the cover of a cyclone.


Historical Info
Historical Gallery


References
- Stille, M. Wright, P. (2013). Imperial Japanese Navy Destroyers 1919-45 (2): Asashio to Tachibana Classes. London, UK: Osprey Publishing Ltd.
- Chesneau, R., Gardiner, R. (1980). Conway’s All the World’s Fighting Ships, 1922-1946. London, UK: Conway Maritime Press.