Kongo
| Revision as of 21:16, 7 August 2017 Protected "Ship:Kongo" ([Move=Allow only administrators] (indefinite)) | Revision as of 05:24, 19 February 2019 Auxiliary Armaments Modification 1 | |||
4 intermediate revisions by 3 users not shown | ||||
| Line 3: | Line 3: | |||
| |Anno=<!-- you can write below short description for the ship. it will replace default once. --> | |Anno=<!-- you can write below short description for the ship. it will replace default once. --> | |||
| ? | When she was commissioned, ''Kongo'' was the most advanced battlecruiser in the world. She was the first among battlecruisers and battleships to be equipped with 356 mm main battery guns. Unlike previous Japanese dreadnoughts, ''Kongo'' received a thinner armor belt while her deck armor and torpedo protection were reinforced. | + | When she was commissioned, ''Kongo'' was the most advanced battlecruiser in the world. She was the first among battlecruisers and battleships to be equipped with 356 mm main battery guns. Unlike previous Japanese dreadnoughts, ''Kongo'' received a thinner armor belt while her deck armor and torpedo protection were reinforced.<br><br>{{Model3DViewer|7cd9cf21d00e4be5af298bb9af93c6de}} | |
| |Performance=<!-- write text about performance in battles below --> | |Performance=<!-- write text about performance in battles below --> | |||
| Line 10: | Line 10: | |||
| |Pros=<!-- write list of positive points below. use * as in ordinary wiki-list. --> | |Pros=<!-- write list of positive points below. use * as in ordinary wiki-list. --> | |||
| * Great gun range: Reaching out to 21+ kilometers, she has the second highest range in the mid tiers after ''[[Fuso]]''. | * Great gun range: Reaching out to 21+ kilometers, she has the second highest range in the mid tiers after ''[[Fuso]]''. | |||
| ? | * Impressive speed: Kongo can reach 30 knots, allowing her to keep up with cruisers and relocate if needed. | + | * Impressive speed: ''Kongo'' can reach 30 knots, allowing her to keep up with cruisers and relocate if needed. | |
| * Decent agility: She is surprisingly maneuverable and can cover her turning circle quite quickly. | * Decent agility: She is surprisingly maneuverable and can cover her turning circle quite quickly. | |||
| * Good gun characteristics: her guns are accurate, powerful, and have decent penetration. | * Good gun characteristics: her guns are accurate, powerful, and have decent penetration. | |||
| Line 19: | Line 19: | |||
| * High detection range: She is easily seen at 16km, but not much of a problem, as she can fire out to 21 km. | * High detection range: She is easily seen at 16km, but not much of a problem, as she can fire out to 21 km. | |||
| * Battlecruiser armor: Her weak armor is easily penetrated by battleship shells, though it can be partially overcome with angling. | * Battlecruiser armor: Her weak armor is easily penetrated by battleship shells, though it can be partially overcome with angling. | |||
| ? | * Sluggish rudder shift time: It takes a long time for her to start turning compared to | + | * Sluggish rudder shift time: It takes a long time for her to start turning compared to American battleships. | |
| * Being a mid-tier battleship, her dispersion is still somewhat high at longer range. This can be mitigated my installing Aiming System Modification 1. | * Being a mid-tier battleship, her dispersion is still somewhat high at longer range. This can be mitigated my installing Aiming System Modification 1. | |||
| Line 28: | Line 28: | |||
| |Upgrades=<!-- write text about best upgrades below --> | |Upgrades=<!-- write text about best upgrades below --> | |||
| ? | + | The recommended upgrades for ''{{#var:ship_name}}'' are as follows: | ||
| ? | * | + | * '''Slot 1''': {{Main Armaments Modification 1}}<nowiki>*</nowiki> | |
| ? | * | + | * '''Slot 2''': {{Damage Control System Modification 1}} | |
| ? | + | * '''Slot 3''': {{Aiming Systems Modification 1}}<nowiki>*</nowiki> | ||
| + | ||||
| + | '''Slot 1''' provides players with the first option in choosing a desired role. Typically, {{Main Armaments Modification 1}} is recommended to provide additional survivability to the main battery, but players who desire to specialize in the secondary or anti-aircraft armament should choose {{Auxiliary Armaments Modification 1}}. | |||
| + | ||||
| + | '''Slot 3''' allows for further specialization. Generally, {{Aiming Systems Modification 1}} is recommended because it reduces shell dispersion of the main and secondary armaments. To increase the effectiveness of the anti-aircraft armament, mount {{AA Guns Modification 1}}. Players wishing to specialize for secondaries should mount {{Secondary Battery Modification 2}}. | |||
| + | ||||
| |CommanderSkills=<!-- write text about best set of Commander Skills below --> | |CommanderSkills=<!-- write text about best set of Commander Skills below --> | |||
| Line 74: | Line 79: | |||
| |Consumables=<!-- write text about selection of Consumables below --> | |Consumables=<!-- write text about selection of Consumables below --> | |||
| ? | + | ''{{#var:ship_name}}'' can equip the following consumables: | ||
| ? | + | * '''Slot 1:''' {{Damage Control Party}} | ||
| ? | * | + | * '''Slot 2:''' {{Repair Party}} | |
| ? | * | + | * '''Slot 3:''' {{Spotting Aircraft}} | |
| ? | + | |||
| + | Spending credits or doubloons on {{Damage Control Party II}} and {{Repair Party II}} are recommended to maximize survivability. | |||
| |Camouflage=<!-- write text about useful camouflage below --> | |Camouflage=<!-- write text about useful camouflage below --> | |||
| Line 84: | Line 90: | |||
| |Signals=<!-- write text about best set of signals below --> | |Signals=<!-- write text about best set of signals below --> | |||
| ? | As with all battleships, ''Kongo'' comes with 8 [[Ship:Flags#Signals|signal flag]] slots. The three most important flags are India Delta, Juliet Yankee Bissotwo and India Yankee | + | As with all battleships, ''Kongo'' comes with 8 [[Ship:Flags#Signals|signal flag]] slots. The three most important flags are India Delta ({{India Delta|Size=18px}}), Juliet Yankee Bissotwo ({{Juliet Yankee Bissotwo|Size=18px}}) and India Yankee ({{India Yankee|Size=18px}}), all of which will improve your survivability. Captains wishing to improve the performance of their secondary battery should consider the addition of Mike Yankee Soxisix ({{Mike Yankee Soxisix|Size=18px}}). | |
| {{Signal Flags | {{Signal Flags | |||
| Line 122: | Line 128: | |||
| <div class="thumb tright"> | <div class="thumb tright"> | |||
| {{AnnoWiki|content= | {{AnnoWiki|content= | |||
| ? | < | + | <h2>''{{#var:ship_name}}'', 1929</h2> | |
| ? | :Vickers Shipbuilding Company; Barrow, England | + | ===Construction=== | |
| + | :Vickers Shipbuilding Company; Barrow, England | |||
| :Laid down: 17 January 1911 | :Laid down: 17 January 1911 | |||
| :Launched: 18 May 1912 | :Launched: 18 May 1912 | |||
| Line 159: | Line 166: | |||
| }} | }} | |||
| </div> | </div> | |||
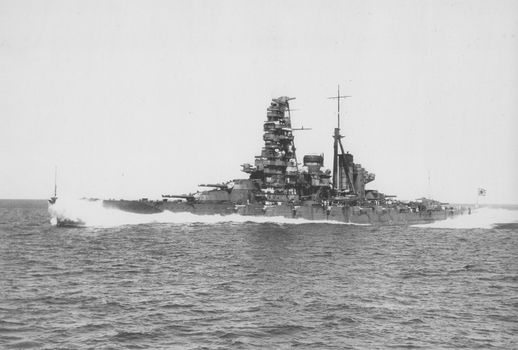
| ? | [[File:Haruna 1934.jpg| | + | [[File:Haruna 1934.jpg|none|frame|x350px|link=|''Haruna'' underway in 1934.]] | |
| ===History=== | ===History=== | |||
| Line 180: | Line 187: | |||
| ==== Miscellaneous ==== | ==== Miscellaneous ==== | |||
| The ship modeled in the game is actually based off ''Hiei'', the second ship of the ''Kongō'' class with a history that differed significantly from the her other three sisters. Unlike her other sisters, she did not undergo the first modernization that strengthened their armor and underwater protection, and was disarmed in 1930 to comply with the terms of the First London Naval Treaty. When Japan withdrew from the terms of the Second London Naval Treaty, along with the second modernizations of her sisters, ''Hiei'' underwent extensive modernizations to bring her up to their specifications. Fitted onto her was a pagoda style mast that differed from the other ''Kongō'' sisters, serving as the prototype of the superstructure that was later fitted onto the ''[[Yamato]]'' class. This is the superstructure that is featured by the in-game model. | The ship modeled in the game is actually based off ''Hiei'', the second ship of the ''Kongō'' class with a history that differed significantly from the her other three sisters. Unlike her other sisters, she did not undergo the first modernization that strengthened their armor and underwater protection, and was disarmed in 1930 to comply with the terms of the First London Naval Treaty. When Japan withdrew from the terms of the Second London Naval Treaty, along with the second modernizations of her sisters, ''Hiei'' underwent extensive modernizations to bring her up to their specifications. Fitted onto her was a pagoda style mast that differed from the other ''Kongō'' sisters, serving as the prototype of the superstructure that was later fitted onto the ''[[Yamato]]'' class. This is the superstructure that is featured by the in-game model. | |||
| + | ||||
| + | ===Historical Inaccuracies=== | |||
| + | * The in-game model is actually based on ''Hiei''. | |||
| + | * ''Kongo'' had six twin 127 mm dual-purpose guns fitted to her midsection; the in-game model has only four. | |||
| + | * By July 1944, ''Kongo'' had 18 triple and six twin 25 mm/60 Type96 anti-aircraft guns, augmented by several more 25 mm guns in single mounts (see Historical Gallery). | |||
| + | * ''Kongo''’s original battlecruiser configuration is missing. It was removed in a previous update. | |||
| |HistoricalGallery=<!-- write below list of files without tags. description (if necessary) for each should be separated with | --> | |HistoricalGallery=<!-- write below list of files without tags. description (if necessary) for each should be separated with | --> | |||
Revision as of 05:24, 19 February 2019

| Research price12000 exp |
| Purchase price1,420,000 |
| Hit Points49,500 |
| 356 mm/45 41st Year Type in a twin turret4 х 2 pcs. |
| Rate of Fire1.94 shots/min. |
| Reload Time31 sec. |
| Rotation Speed3 deg./sec. |
| 180 Degree Turn Time60 sec. |
| Firing Range19.27 km. |
| Maximum Dispersion236 m. |
| HE Shell356 mm HE Type0 |
| Maximum HE Shell Damage5,700 |
| Chance of Fire on Target Caused by HE Shell25 % |
| Initial HE Shell Velocity805 m./s. |
| HE Shell Weight625 kg. |
| AP Shell356 mm AP Type5 |
| Maximum AP Shell Damage10,000 |
| Initial AP Shell Velocity790 m./s. |
| AP Shell Weight635.5 kg. |
| 127 mm/40 Type 89 on a Model A1 mount4 х 2 pcs. |
| Firing Range4.3 km. |
| Rate of Fire12 shots/min. |
| Reload Time5 sec. |
| HE Shell127 mm HE Type0 |
| Maximum HE Shell Damage2,100 |
| Initial HE Shell Velocity725 m./s. |
| Chance of Fire on Target Caused by HE Shell8 % |
| 152 mm/50 41st Year Type on a casemate mount14 х 1 pcs. |
| Firing Range4.3 km. |
| Rate of Fire6 shots/min. |
| Reload Time10 sec. |
| HE Shell152 mm HE Type4 |
| Maximum HE Shell Damage2,500 |
| Initial HE Shell Velocity825 m./s. |
| Chance of Fire on Target Caused by HE Shell9 % |
| 127 mm/40 Type 89 on a Model A1 mount4 х 2 pcs. |
| . . . Average Damage per Second40.4 |
| . . . Firing Range5.01 km. |
| 13 mm/76 Type 93 on a twin mount12 х 2 pcs. |
| . . . Average Damage per Second24 |
| . . . Firing Range1.2 km. |
| Maximum Speed24.9 knot |
| Turning Circle Radius770 m. |
| Rudder Shift Time17.2 sec. |
| Surface Detectability Range15.71 km. |
| Air Detectability Range9.36 km. |

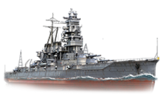
Kongō — Japanese Tier V battleship.
When she was commissioned, Kongo was the most advanced battlecruiser in the world. She was the first among battlecruisers and battleships to be equipped with 356 mm main battery guns. Unlike previous Japanese dreadnoughts, Kongo received a thinner armor belt while her deck armor and torpedo protection were reinforced.
Modules
 |
Rate of Fire (shots/min) | 180° Turn Time (sec) | Maximum Dispersion (m) | Maximum HE Shell Damage (HP) | Chance of Fire on Target Caused by HE Shell (%) | Maximum AP Shell Damage (HP) |
Research price (exp) |
Purchase price ( | |
|---|---|---|---|---|---|---|---|---|---|
| 356 mm/45 41st Year Type in a twin turret | 1.9 | 60 | 236 | 5,700 | 25 | 10,000 | 0 | 190,000 |
 |
Hit Points (HP) | Armor (mm) | Armor (mm) | Main Turrets (pcs.) | Secondary Gun Turrets (pcs.) | AA Mounts (pcs.) | Torpedo Tubes (pcs.) | Hangar Capacity (pcs.) |
Research price (exp) |
Purchase price ( | |
|---|---|---|---|---|---|---|---|---|---|---|---|
| Kongō (A) | 49,500 | 13 | 254 | 4 | 4/14 | 12/4 | 0 | 230,000 | |||
| Kongō (B) | 54,100 | 13 | 254 | 4 | 4/14 | 4/2/6/4 | 6,500 | 480,000 |
 |
IDS_SHIP_PARAM_SUO_INCREASE_DIST (%) | Maximum Firing Range (km) |
Research price (exp) |
Purchase price ( | |
|---|---|---|---|---|---|
| Type5 mod. 1 | 0 | 0 | 76,000 | ||
| Type5 mod. 2 | 0 | 3,600 | 240,000 |
 |
Maximum Speed (knot) |
Research price (exp) |
Purchase price ( | |
|---|---|---|---|---|
| Propulsion: 75,000 hp | 24.9 | 0 | 110,000 | |
| Propulsion: 136,000 hp | 30 | 2,000 | 240,000 |
Compatible Upgrades
| Slot 1 |
|||||
|---|---|---|---|---|---|
| Slot 2 |
|||||
| Slot 3 |
Player Opinion
Performance
Pros:
- Great gun range: Reaching out to 21+ kilometers, she has the second highest range in the mid tiers after Fuso.
- Impressive speed: Kongo can reach 30 knots, allowing her to keep up with cruisers and relocate if needed.
- Decent agility: She is surprisingly maneuverable and can cover her turning circle quite quickly.
- Good gun characteristics: her guns are accurate, powerful, and have decent penetration.
- Feels like a modern battleship in a world of outdated WWI era ships.
Cons:
- Low AA suite potency: Her AA suite will not do much against higher tier aircraft.
- High detection range: She is easily seen at 16km, but not much of a problem, as she can fire out to 21 km.
- Battlecruiser armor: Her weak armor is easily penetrated by battleship shells, though it can be partially overcome with angling.
- Sluggish rudder shift time: It takes a long time for her to start turning compared to American battleships.
- Being a mid-tier battleship, her dispersion is still somewhat high at longer range. This can be mitigated my installing Aiming System Modification 1.
Research
Optimal Configuration
Upgrades
The recommended upgrades for Kongō are as follows:
- Slot 1: Main Armaments Modification 1
 *
*
- Slot 2: Damage Control System Modification 1

- Slot 3: Aiming Systems Modification 1
 *
*
Slot 1 provides players with the first option in choosing a desired role. Typically, Main Armaments Modification 1 ![]() is recommended to provide additional survivability to the main battery, but players who desire to specialize in the secondary or anti-aircraft armament should choose Auxiliary Armaments Modification 1
is recommended to provide additional survivability to the main battery, but players who desire to specialize in the secondary or anti-aircraft armament should choose Auxiliary Armaments Modification 1 ![]() .
.
Slot 3 allows for further specialization. Generally, Aiming Systems Modification 1 ![]() is recommended because it reduces shell dispersion of the main and secondary armaments. To increase the effectiveness of the anti-aircraft armament, mount AA Guns Modification 1
is recommended because it reduces shell dispersion of the main and secondary armaments. To increase the effectiveness of the anti-aircraft armament, mount AA Guns Modification 1 ![]() . Players wishing to specialize for secondaries should mount Secondary Battery Modification 1 (
. Players wishing to specialize for secondaries should mount Secondary Battery Modification 1 (![]() ).
).
Commander Skills
| Recommended Commander Skills | ||||||||
|---|---|---|---|---|---|---|---|---|
| Cost (points) |
Endurance | Attack | Support | Versatility | ||||
| 1 |
★ |
★★ |
|
|
|
|
★ |
|
| 2 |
★★ |
★★ |
★★★ |
|
|
|
★ |
|
| 3 |
★★ |
|
|
|
★★ |
★★★ |
|
★★ |
| 4 |
★ |
★★★ |
★ |
|
★★ |
|
★ |
|
| Key: ★★★ - Extremely Useful ★★ - Frequently Useful ★ - Occasionally Useful No stars - Meh Χ - Not recommended | ||||||||
Consumables
Kongō can equip the following consumables:
- Slot 1: Damage Control Party

- Slot 2: Repair Party

- Slot 3: Spotting Aircraft

Spending credits or doubloons on Damage Control Party II (![]() ) and Repair Party II (
) and Repair Party II (![]() ) are recommended to maximize survivability.
) are recommended to maximize survivability.
Camouflage
Type 1, 2, or 5 camouflage can be equipped for credits; Types 2 or 5 are recommended at a minimum to reduce the accuracy of incoming shells.
Signals
As with all battleships, Kongo comes with 8 signal flag slots. The three most important flags are India Delta (![]() ), Juliet Yankee Bissotwo (
), Juliet Yankee Bissotwo (![]() ) and India Yankee (
) and India Yankee (![]() ), all of which will improve your survivability. Captains wishing to improve the performance of their secondary battery should consider the addition of Mike Yankee Soxisix (
), all of which will improve your survivability. Captains wishing to improve the performance of their secondary battery should consider the addition of Mike Yankee Soxisix (![]() ).
).
Recommended Signal Flags 
| |||||
|---|---|---|---|---|---|
| Combat | |||||

|
 ★★★ |
 ★★★ |
 ★ |

|

|

|
 ★★ |
 ★★ |
 ★★ |
 ★ |
 ★★★ |

|

| ||||
Note: Use of the Juliet Charlie signal makes detonation impossible.
Gallery
.jpg)
.jpg)
.jpg)
.jpg)
.jpg)
.jpg)

Historical Info
Historical Gallery


