Nürnberg
| Revision as of 06:47, 10 June 2017 | Revision as of 09:34, 19 February 2019 AA Guns Modification 1 | |||
12 intermediate revisions by 4 users not shown | ||||
| Line 3: | Line 3: | |||
| |Anno=<!-- you can write below short description for the ship. it will replace default once. --> | |Anno=<!-- you can write below short description for the ship. it will replace default once. --> | |||
| ? | The ship was developed from the ''[[Königsberg]]''-class cruisers. In contrast to her predecessors, she had larger dimensions and featured reinforced turret armor. Moreover, she retained the main battery guns with their high performance characteristics. The cruiser's AA defense comprised numerous anti-aircraft guns. | + | The ship was developed from the ''[[Königsberg]]''-class cruisers. In contrast to her predecessors, she had larger dimensions and featured reinforced turret armor. Moreover, she retained the main battery guns with their high performance characteristics. The cruiser's AA defense comprised numerous anti-aircraft guns.<br><br>{{Model3DViewer|7b648bd59f714d0dadf3687681ffbd29}} | |
| |Performance=<!-- write text about performance in battles below --> | |Performance=<!-- write text about performance in battles below --> | |||
| ? | Touted as a rival to the likes of ''[[ | + | Touted as a rival to the likes of ''[[Budyonny]]'' and ''[[Dallas]]'' at Tier VI, ''Nürnberg'' is a moderate upgrade from her predecessor, ''[[Königsberg]]''. | |
| ? | Players familiar with ''Königsberg'' will adapt to ''Nürnberg'' quickly while noting several improvements. For starters, her guns reload faster, dropping from 7.5 seconds to 6 seconds between salvos. She is laid out almost identically, though ''Nürnberg''’s | + | Players familiar with ''Königsberg'' will adapt to ''Nürnberg'' quickly while noting several improvements. For starters, her guns reload faster, dropping from 7.5 seconds to 6 seconds between salvos. She is laid out almost identically, though ''Nürnberg''’s stern turrets rests along the ship's centerline as opposed to ''Königsberg''’s offset stern turrets. She retains the same superlative range — 16.5 km — as well as the torpedo layout of ''Königsberg'', with two triple-tube launchers on each side of the ship. | |
| ? | Her AA is improved, but like her predecessor, she's unlikely to shoot down too many planes despite the additional guns. Hull (C) offers ''Nürnberg'' captains an intriguing choice: they can give up one torpedo launcher per side in exchange for a significant buff to her AA suite | + | Her AA is improved, but like her predecessor, she's unlikely to shoot down too many planes despite the additional guns. Hull (C) offers ''Nürnberg'' captains an intriguing choice: they can give up one torpedo launcher per side in exchange for a significant buff to her AA suite. Many captains opt to bypass this configuration of the ship and play Hull (B) exclusively, but players who find themselves joining a division with an aircraft carrier on a regular basis are advised to strongly consider investing in Hull (C) and the {{Defensive AA Fire}} consumable. | |
| ''Nürnberg''’s strengths are many, but so are her weaknesses. While captains may be used to it by the time they reach ''Nürnberg'', her turret layout is still somewhat awkward and she lacks significant armor. Battleships can citadel her with ease at virtually all angles, and enemy heavy cruisers — such as ''[[Aoba]]'' or ''[[Molotov]]'' — salivate at the thought of catching a ''Nürnberg'' broadside with AP rounds in their barrels. Playing her well requires careful positioning and extremely good situational awareness; ''Nürnberg'' is not a ship that one can put into a risky situation and live to fight another day. She'll reward cautious play, but will fold quickly under concentrated enemy fire. | ''Nürnberg''’s strengths are many, but so are her weaknesses. While captains may be used to it by the time they reach ''Nürnberg'', her turret layout is still somewhat awkward and she lacks significant armor. Battleships can citadel her with ease at virtually all angles, and enemy heavy cruisers — such as ''[[Aoba]]'' or ''[[Molotov]]'' — salivate at the thought of catching a ''Nürnberg'' broadside with AP rounds in their barrels. Playing her well requires careful positioning and extremely good situational awareness; ''Nürnberg'' is not a ship that one can put into a risky situation and live to fight another day. She'll reward cautious play, but will fold quickly under concentrated enemy fire. | |||
| Line 16: | Line 16: | |||
| |Pros=<!-- write list of positive points below. use * as in ordinary wiki-list. --> | |Pros=<!-- write list of positive points below. use * as in ordinary wiki-list. --> | |||
| * Same impressive range as her predecessor. | * Same impressive range as her predecessor. | |||
| ? | * Good gun handling and shell speed, coupled with the German version of | + | * Good gun handling and shell speed, coupled with the German version of {{Hydroacoustic Search}}, makes her an ideal anti-destroyer ship. | |
| * Guns reload every 6 seconds, far faster than her peers at Tier VI. | * Guns reload every 6 seconds, far faster than her peers at Tier VI. | |||
| * Low shell arc and high muzzle velocity. | * Low shell arc and high muzzle velocity. | |||
| * Same surprising AP damage when it punches through. | * Same surprising AP damage when it punches through. | |||
| * Improved AA suite. | * Improved AA suite. | |||
| ? | ||||
| * Like ''[[Königsberg]]'', the X and Y turrets can rotate 360 degrees, making switching firing sides a snap. | * Like ''[[Königsberg]]'', the X and Y turrets can rotate 360 degrees, making switching firing sides a snap. | |||
| ? | * Extremely good turning radius with | + | * Extremely good turning radius with speedy rudder shift time. | |
| ? | + | |||
| |Cons=<!-- write list of negative points below. use * as in ordinary wiki-list. --> | |Cons=<!-- write list of negative points below. use * as in ordinary wiki-list. --> | |||
| * Handling feels like a Tier VI ''[[Königsberg]]''. | * Handling feels like a Tier VI ''[[Königsberg]]''. | |||
| ? | * AA suite, despite being better, will still struggle to shoot down many airplanes unless | + | * AA suite, despite being better, will still struggle to shoot down many airplanes unless {{Defensive AA Fire}} is active. | |
| * Same citadel layout and A-XY turret layout as her predecessor. | * Same citadel layout and A-XY turret layout as her predecessor. | |||
| * Still very little armor, making modules vulnerable to incapacitations and devastating citadel hits. | * Still very little armor, making modules vulnerable to incapacitations and devastating citadel hits. | |||
| ? | * | + | * The Hull (C) upgrade takes away two torpedo launchers (while providing additional anti-aircraft armament); Hull (B) retains the torpedoes but is more vulnerable to enemy aircraft. Choosing between the two is difficult unless divisioned with a friendly aircraft carrier. | |
| ? | + | |||
| |Research=<!-- write text about priority sequence of research below --> | |Research=<!-- write text about priority sequence of research below --> | |||
| + | Availability of researchable upgrades for ''{{#var:ship_name}}'' is as follows: | |||
| + | * '''Hull:''' Upgrade to Hull (B) for additional health, a sliver more AA, and a improved rudder shift time. Hull (C) further upgrades her AA suite but strips off one torpedo launcher on each side of the ship. Research of Hull (B) unlocks progression to ''[[Yorck]]''. | |||
| + | * '''Gun Fire Control System:''' Upgrade to FKS Typ 6 mod. 2 for an extra 10% range on the main battery. | |||
| + | ||||
| + | Hull (B) should be a priority, as ''Nürnberg'' needs all the health she can get. Hull (C) should be considered optional and is best for captains who prefer a longer-ranged, fleet support type role and intend to equip {{Defensive AA Fire}} all the time rather than {{Hydroacoustic Search}}. | |||
| |OptimalConfiguration=<!-- write some general text about selection of optimal configuration below (optional)--> | |OptimalConfiguration=<!-- write some general text about selection of optimal configuration below (optional)--> | |||
| |Upgrades=<!-- write text about best upgrades below --> | |Upgrades=<!-- write text about best upgrades below --> | |||
| ? | + | The recommended upgrades for ''{{#var:ship_name}}'' are as follows: | ||
| ? | + | * '''Slot 1''': {{Main Armaments Modification 1}} | ||
| ? | + | * '''Slot 2''': {{Damage Control System Modification 1}} | ||
| ? | + | * '''Slot 3''': {{AA Guns Modification 1}} | ||
| ? | + | * '''Slot 4''': {{Steering Gears Modification 2}} | ||
| ? | + | |||
| |CommanderSkills=<!-- write text about best set of Commander Skills below --> | |CommanderSkills=<!-- write text about best set of Commander Skills below --> | |||
| + | Key skills for ''{{#var:ship_name}}'' commanders include Priority Target, Adrenaline Rush, Demolition Expert, and Concealment Expert. | |||
| {{Commander Skills | {{Commander Skills | |||
| | Priority Target = 3 | | Priority Target = 3 | |||
| ? | | Preventative Maintenance = | + | | Preventative Maintenance = 2 | |
| ? | | Expert Loader = | + | | Expert Loader = 1 | |
| | Aircraft Servicing Expert = | | Aircraft Servicing Expert = | |||
| | Direction Center for Catapult Aircraft = 1 | | Direction Center for Catapult Aircraft = 1 | |||
| Line 60: | Line 62: | |||
| | High Alert = 2 | | High Alert = 2 | |||
| | Jack of All Trades = 1 | | Jack of All Trades = 1 | |||
| ? | | Expert Marksman = | + | | Expert Marksman = 2 | |
| | Torpedo Acceleration = | | Torpedo Acceleration = | |||
| | Smoke Screen Expert = | | Smoke Screen Expert = | |||
| | Expert Rear Gunner = | | Expert Rear Gunner = | |||
| ? | | Adrenaline Rush = | + | | Adrenaline Rush = 3 | |
| | Last Stand = 1 | | Last Stand = 1 | |||
| Line 71: | Line 73: | |||
| | Torpedo Armament Expertise = | | Torpedo Armament Expertise = | |||
| | Emergency Takeoff = | | Emergency Takeoff = | |||
| ? | | Basic Firing Training = | + | | Basic Firing Training = 2 | |
| | Superintendent = 1 | | Superintendent = 1 | |||
| | Demolition Expert = 3 | | Demolition Expert = 3 | |||
| Line 78: | Line 80: | |||
| | Manual Fire Control for Secondary Armament = | | Manual Fire Control for Secondary Armament = | |||
| | Fire Prevention = | | Fire Prevention = | |||
| ? | | Inertia Fuse for HE Shells = | + | | Inertia Fuse for HE Shells = | |
| | Air Supremacy = | | Air Supremacy = | |||
| | Advanced Firing Training = 2 | | Advanced Firing Training = 2 | |||
| Line 87: | Line 89: | |||
| |Consumables=<!-- write text about selection of Consumables below --> | |Consumables=<!-- write text about selection of Consumables below --> | |||
| + | ''{{#var:ship_name}}'' can equip the following consumables: | |||
| + | * '''Slot 1:''' {{Damage Control Party}} | |||
| + | * '''Slot 2:''' {{Defensive AA Fire}} '''or''' {{Hydroacoustic Search}} | |||
| + | * '''Slot 3:''' {{Catapult Fighter}} '''[Hull (A) and (B) only]''' | |||
| + | ||||
| + | Premium versions of all consumables are recommended. | |||
| |Camouflage=<!-- write text about useful camouflage below --> | |Camouflage=<!-- write text about useful camouflage below --> | |||
| [[Ship:Camouflage#Standard Camouflage|Type 1, 2, or 5 camouflage]] can be equipped for credits; Types 2 or 5 are recommended at a minimum to reduce the accuracy of incoming shells. | [[Ship:Camouflage#Standard Camouflage|Type 1, 2, or 5 camouflage]] can be equipped for credits; Types 2 or 5 are recommended at a minimum to reduce the accuracy of incoming shells. | |||
| ? | Players who wish to spend doubloons can equip ''Nürnberg'' with [[Ship:Camouflage#Permanent_Camouflage|Type 16 camouflage]] that lowers her detection radius, reduces the accuracy of incoming shells, and increases the amount of experience she earns. | + | Players who wish to spend doubloons can equip ''Nürnberg'' with [[Ship:Camouflage#Permanent_Camouflage|Type 16 camouflage]] that lowers her detection radius, reduces the accuracy of incoming shells, reduces her repair costs, and increases the amount of experience she earns. | |
| |Signals=<!-- write text about best set of signals below --> | |Signals=<!-- write text about best set of signals below --> | |||
| + | New ''{{#var:ship_name}}'' captains should prioritize flags that enhance their experience gains, such as Equal Speed Charlie London ({{Equal Speed Charlie London|Size=18px}}) and Red Dragon ({{Red Dragon|Size=18px}}). Recommended combat flags include Victor Lima ({{Victor Lima|Size=18px}}), India X-Ray ({{India X-Ray|Size=18px}}), Sierra Mike ({{Sierra Mike|Size=18px}}), and November Foxtrot ({{November Foxtrot|Size=18px}}). Captains who have upgraded to Hull (C) should also equip November Echo Setteseven ({{November Echo Setteseven|Size=18px}}) to maximize their AA. | |||
| {{Signal Flags | {{Signal Flags | |||
| + | | November Echo Setteseven = 1 | |||
| + | | Mike Yankee Soxisix = | |||
| + | | India X-Ray = 3 | |||
| + | | Juliet Whiskey Unaone = | |||
| + | | Victor Lima = 3 | |||
| | Hotel Yankee = | | Hotel Yankee = | |||
| ? | + | |||
| | November Foxtrot = 2 | | November Foxtrot = 2 | |||
| ? | | | + | | Sierra Mike = 2 | |
| + | | India Delta = | |||
| | Juliet Yankee Bissotwo = | | Juliet Yankee Bissotwo = | |||
| ? | | India | + | | India Yankee = | |
| + | | Juliet Charlie = 1 | |||
| ? | + | | Zulu = | ||
| ? | + | |||
| ? | | Zulu | + | ||
| | India Bravo Terrathree = | | India Bravo Terrathree = | |||
| ? | | | + | | Equal Speed Charlie London = 3 | |
| ? | | | + | | Zulu Hotel = 2 | |
| + | | Papa Papa = | |||
| ? | | | + | | Wyvern = | |
| ? | | | + | | Red Dragon = 2 | |
| ? | + | |||
| ? | + | |||
| ? | + | |||
| | Dragon Flag = 1 | | Dragon Flag = 1 | |||
| + | | Ouroboros = | |||
| + | | Hydra = | |||
| }} | }} | |||
| Line 123: | Line 137: | |||
| |History=<!-- write text below --> | |History=<!-- write text below --> | |||
| + | <div class="thumb tright"> | |||
| + | {{AnnoWiki|content= | |||
| + | <h2>''{{#var:ship_name}}'', 1939</h2> | |||
| ===Construction=== | ===Construction=== | |||
| ? | :Deutsche Werke; Kiel, Germany | + | :Builder: Deutsche Werke; Kiel, Germany | |
| :Laid down: 4 November 1933 | :Laid down: 4 November 1933 | |||
| :Launched: 6 December 1934 | :Launched: 6 December 1934 | |||
| :Commissioned: 2 November 1935 | :Commissioned: 2 November 1935 | |||
| ? | + | ---- | ||
| ===Specifications=== | ===Specifications=== | |||
| :6,520 tons displacement, standard | :6,520 tons displacement, standard | |||
| Line 134: | Line 151: | |||
| :16.4m beam | :16.4m beam | |||
| :4.9m draft | :4.9m draft | |||
| ? | + | ---- | ||
| ====Machinery==== | ====Machinery==== | |||
| :8 boilers, 3 turbines | :8 boilers, 3 turbines | |||
| ? | + | ---- | ||
| ====Performance==== | ====Performance==== | |||
| :32 knots at 60,000 shaft horsepower | :32 knots at 60,000 shaft horsepower | |||
| :2,400 nm at 13 knots | :2,400 nm at 13 knots | |||
| ? | + | ---- | ||
| ====Armor==== | ====Armor==== | |||
| :Main belt: 18-152mm | :Main belt: 18-152mm | |||
| Line 147: | Line 164: | |||
| :Turrets: 20-80mm | :Turrets: 20-80mm | |||
| :Conning tower: 102mm | :Conning tower: 102mm | |||
| ? | + | ---- | ||
| ====Armament==== | ====Armament==== | |||
| =====Main===== | =====Main===== | |||
| Line 157: | Line 174: | |||
| =====Torpedoes===== | =====Torpedoes===== | |||
| :Twelve (4x3) 533mm torpedo tubes | :Twelve (4x3) 533mm torpedo tubes | |||
| + | }} | |||
| + | </div> | |||
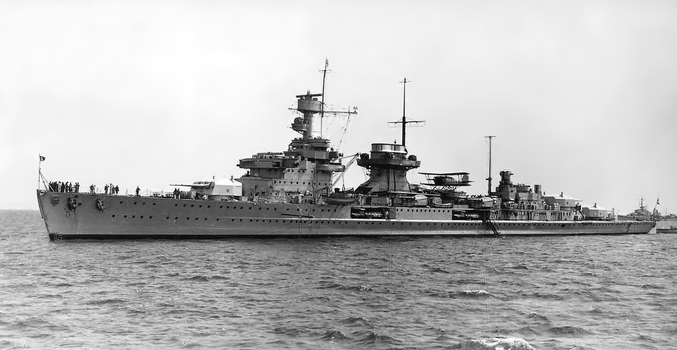
| + | [[File:Nurnberg at Kiel 1939.png|none|frame|x350px|link=|''Nürnberg'' at Kiel in early 1939 with a Heinkel HE 60 airplane on her catapult.]] | |||
| ===History=== | ===History=== | |||
| Line 169: | Line 189: | |||
| |HistoricalGallery=<!-- write below list of files without tags. description (if necessary) for each should be separated with | --><gallery> | |HistoricalGallery=<!-- write below list of files without tags. description (if necessary) for each should be separated with | --><gallery> | |||
| ? | File:Nürnberg (1934).jpg | + | File:Nurnberg crest.jpg|The ''wappen'' (coat of arms) of ''Nürnberg''. | |
| ? | File: | + | File:Leipzig crest.jpg|The ''wappen'' (coat of arms) of ''Leipzig''. | |
| + | File:Nürnberg (1934).jpg|''Nürnberg'', circa 1934. | |||
| + | File:Leipzig at Kiel.jpg|''Leipzig'' at anchor in Kiel, 1935. | |||
| File:Bundesarchiv DVM 10 Bild-23-63-63, Leichter Kreuzer "Nürnberg".jpg|''Nürnberg'' before the war. | File:Bundesarchiv DVM 10 Bild-23-63-63, Leichter Kreuzer "Nürnberg".jpg|''Nürnberg'' before the war. | |||
| File:Nurnberg6.jpg|''Nürnberg''’s forward gun turret in September 1940. | File:Nurnberg6.jpg|''Nürnberg''’s forward gun turret in September 1940. | |||
| File:Cruiser Nuernberg underway May 1945.jpg|''Nürnberg'' underway in May 1945, escorted by RAF Coastal Command Liberator maritime patrol bombers. | File:Cruiser Nuernberg underway May 1945.jpg|''Nürnberg'' underway in May 1945, escorted by RAF Coastal Command Liberator maritime patrol bombers. | |||
| ? | File:Nürnberg1946Kiel.jpg|''Nürnberg'' | + | File:Nürnberg1946Kiel.jpg|''Nürnberg'' at Kiel in 1946, after being ceded to the Soviet Union. | |
| ? | + | File:Nurnberg 14m.jpg|Line-drawing of ''Nürnberg''. | ||
| </gallery> | </gallery> | |||
Revision as of 09:34, 19 February 2019

| Research price34000 exp |
| Purchase price3,040,000 |
| Hit Points23,800 |
| 150 mm/60 SK C/25 on a Drh Tr C/28 mount3 х 3 pcs. |
| Rate of Fire10 shots/min. |
| Reload Time6 sec. |
| Rotation Speed7.6 deg./sec. |
| 180 Degree Turn Time23.68 sec. |
| Firing Range14.99 km. |
| Maximum Dispersion136 m. |
| HE Shell150 mm Spr.Gr. L/4.4 Kz. |
| Maximum HE Shell Damage1,700 |
| Chance of Fire on Target Caused by HE Shell8 % |
| Initial HE Shell Velocity960 m./s. |
| HE Shell Weight45.5 kg. |
| AP Shell150 mm P.Spr.Gr. L/3.7 |
| Maximum AP Shell Damage3,900 |
| Initial AP Shell Velocity960 m./s. |
| AP Shell Weight45.5 kg. |
| 88 mm/76 SK C/32 on a Dop. L. C/32 mount4 х 2 pcs. |
| Firing Range5.6 km. |
| Rate of Fire15 shots/min. |
| Reload Time4 sec. |
| HE Shell88 mm Spr.Gr. |
| Maximum HE Shell Damage1,000 |
| Initial HE Shell Velocity950 m./s. |
| Chance of Fire on Target Caused by HE Shell4 % |
| 533 mm Drilling4 х 3 pcs. |
| Rate of Fire0.88 shots/min. |
| Reload Time68 sec. |
| Rotation Speed25 deg./sec. |
| 180 Degree Turn Time7.2 sec. |
| TorpedoG7a T1 |
| Maximum Damage13,700 |
| Torpedo Speed64 knot |
| Torpedo Range6 km. |
| 88 mm/76 SK C/32 on a Dop. L. C/32 mount4 х 2 pcs. |
| . . . Average Damage per Second32.4 |
| . . . Firing Range3.99 km. |
| 20 mm/65 C/38 on an L/30 single mount4 х 1 pcs. |
| . . . Average Damage per Second12 |
| . . . Firing Range2.01 km. |
| 37 mm/83 SK C/30 on a Dopp LC/30 mount4 х 2 pcs. |
| . . . Average Damage per Second10.4 |
| . . . Firing Range3.51 km. |
| 7.92 mm MG 34 machine gun6 х 1 pcs. |
| . . . Average Damage per Second15.6 |
| . . . Firing Range0.99 km. |
| Maximum Speed32 knot |
| Turning Circle Radius720 m. |
| Rudder Shift Time10.6 sec. |
| Surface Detectability Range12.22 km. |
| Air Detectability Range5.52 km. |

Nürnberg — German Tier VI cruiser.
The ship was developed from the Königsberg-class cruisers. In contrast to her predecessors, she had larger dimensions and featured reinforced turret armor. Moreover, she retained the main battery guns with their high performance characteristics. The cruiser's AA defense comprised numerous anti-aircraft guns.
Modules
 |
Rate of Fire (shots/min) | 180° Turn Time (sec) | Maximum Dispersion (m) | Maximum HE Shell Damage (HP) | Chance of Fire on Target Caused by HE Shell (%) | Maximum AP Shell Damage (HP) |
Research price (exp) |
Purchase price ( | |
|---|---|---|---|---|---|---|---|---|---|
| 150 mm/60 SK C/25 on a Drh Tr C/28 mount | 10 | 23.7 | 136 | 1,700 | 8 | 3,900 | 0 | 215,000 |
 |
Hit Points (HP) | Armor (mm) | Armor (mm) | Main Turrets (pcs.) | Secondary Gun Turrets (pcs.) | AA Mounts (pcs.) | Torpedo Tubes (pcs.) | Hangar Capacity (pcs.) |
Research price (exp) |
Purchase price ( | |
|---|---|---|---|---|---|---|---|---|---|---|---|
| Nürnberg (A) | 23,800 | 10 | 100 | 3 | 4 | 6/4/4/4 | 4 | 0 | 345,000 | ||
| Nürnberg (B) | 27,000 | 10 | 100 | 3 | 4 | 10/8 | 4 | 9,000 | 700,000 |
 |
Rate of Fire (shots/min) | Torpedo Tubes Reload Time (sec) | 180° Turn Time (sec) | Maximum Damage (HP) | Torpedo Speed (knot) | Torpedo Range (km) |
Research price (exp) |
Purchase price ( | |
|---|---|---|---|---|---|---|---|---|---|
| G7a T1 | 0.9 | 68 | 7.2 | 13,700 | 64 | 6 | 0 | 260,000 |
 |
IDS_SHIP_PARAM_SUO_INCREASE_DIST (%) | Maximum Firing Range (km) |
Research price (exp) |
Purchase price ( | |
|---|---|---|---|---|---|
| FKS Typ 6 Mod. 1 | 0 | 0 | 210,000 | ||
| FKS Typ 6 Mod. 2 | 0 | 8,000 | 670,000 |
 |
Maximum Speed (knot) |
Research price (exp) |
Purchase price ( | |
|---|---|---|---|---|
| Propulsion: 60,000 hp | 32 | 0 | 180,000 |
Compatible Upgrades
| Slot 1 |
|||||
|---|---|---|---|---|---|
| Slot 2 |
|||||
| Slot 3 |
|||||
| Slot 4 |
Player Opinion
Performance
Touted as a rival to the likes of Budyonny and Dallas at Tier VI, Nürnberg is a moderate upgrade from her predecessor, Königsberg.
Players familiar with Königsberg will adapt to Nürnberg quickly while noting several improvements. For starters, her guns reload faster, dropping from 7.5 seconds to 6 seconds between salvos. She is laid out almost identically, though Nürnberg’s stern turrets rests along the ship's centerline as opposed to Königsberg’s offset stern turrets. She retains the same superlative range — 16.5 km — as well as the torpedo layout of Königsberg, with two triple-tube launchers on each side of the ship.
Her AA is improved, but like her predecessor, she's unlikely to shoot down too many planes despite the additional guns. Hull (C) offers Nürnberg captains an intriguing choice: they can give up one torpedo launcher per side in exchange for a significant buff to her AA suite. Many captains opt to bypass this configuration of the ship and play Hull (B) exclusively, but players who find themselves joining a division with an aircraft carrier on a regular basis are advised to strongly consider investing in Hull (C) and the Defensive AA Fire ![]() consumable.
consumable.
Pros:
- Same impressive range as her predecessor.
- Good gun handling and shell speed, coupled with the German version of Hydroacoustic Search
 , makes her an ideal anti-destroyer ship.
- Guns reload every 6 seconds, far faster than her peers at Tier VI.
- Low shell arc and high muzzle velocity.
- Same surprising AP damage when it punches through.
- Improved AA suite.
- Like Königsberg, the X and Y turrets can rotate 360 degrees, making switching firing sides a snap.
- Extremely good turning radius with speedy rudder shift time.
Cons:
- Handling feels like a Tier VI Königsberg.
- AA suite, despite being better, will still struggle to shoot down many airplanes unless Defensive AA Fire
 is active.
- Same citadel layout and A-XY turret layout as her predecessor.
- Still very little armor, making modules vulnerable to incapacitations and devastating citadel hits.
- The Hull (C) upgrade takes away two torpedo launchers (while providing additional anti-aircraft armament); Hull (B) retains the torpedoes but is more vulnerable to enemy aircraft. Choosing between the two is difficult unless divisioned with a friendly aircraft carrier.
Research
Availability of researchable upgrades for Nürnberg is as follows:
- Hull: Upgrade to Hull (B) for additional health, a sliver more AA, and a improved rudder shift time. Hull (C) further upgrades her AA suite but strips off one torpedo launcher on each side of the ship. Research of Hull (B) unlocks progression to Yorck.
- Gun Fire Control System: Upgrade to FKS Typ 6 mod. 2 for an extra 10% range on the main battery.
Optimal Configuration
Upgrades
The recommended upgrades for Nürnberg are as follows:
- Slot 1: Main Armaments Modification 1

- Slot 2: Damage Control System Modification 1

- Slot 3: AA Guns Modification 1

- Slot 4: Steering Gears Modification 2

Commander Skills
Key skills for Nürnberg commanders include Priority Target, Adrenaline Rush, Demolition Expert, and Concealment Expert.
| Recommended Commander Skills | ||||||||
|---|---|---|---|---|---|---|---|---|
| Cost (points) |
Endurance | Attack | Support | Versatility | ||||
| 1 |
★★★ |
★★ |
★ |
|
|
|
|
|
| 2 |
★★ |
★ |
★★ |
|
|
|
★★★ |
★ |
| 3 |
|
★ |
|
|
★★ |
★ |
★★★ |
★★ |
| 4 |
|
|
|
|
★★ |
|
★ |
★★★ |
| Key: ★★★ - Extremely Useful ★★ - Frequently Useful ★ - Occasionally Useful No stars - Meh Χ - Not recommended | ||||||||
Consumables
Nürnberg can equip the following consumables:
- Slot 1: Damage Control Party

- Slot 2: Defensive AA Fire or Hydroacoustic Search
- Slot 3: Catapult Fighter
 [Hull (A) and (B) only]
Premium versions of all consumables are recommended.
Camouflage
Type 1, 2, or 5 camouflage can be equipped for credits; Types 2 or 5 are recommended at a minimum to reduce the accuracy of incoming shells.
Players who wish to spend doubloons can equip Nürnberg with Type 16 camouflage that lowers her detection radius, reduces the accuracy of incoming shells, reduces her repair costs, and increases the amount of experience she earns.
Signals
New Nürnberg captains should prioritize flags that enhance their experience gains, such as Equal Speed Charlie London (🚫) and Red Dragon (🚫). Recommended combat flags include Victor Lima (![]() ), India X-Ray (
), India X-Ray (![]() ), Sierra Mike (
), Sierra Mike (![]() ), and November Foxtrot (
), and November Foxtrot (![]() ). Captains who have upgraded to Hull (C) should also equip November Echo Setteseven (
). Captains who have upgraded to Hull (C) should also equip November Echo Setteseven (![]() ) to maximize their AA.
) to maximize their AA.
Recommended Signal Flags 
| |||||
|---|---|---|---|---|---|
| Combat | |||||
 ★ |

|

|

|
 ★★★ |
 ★★★ |

|

|
 ★ |
 ★★ |
 ★★ |

|

|

| ||||
Note: Use of the Juliet Charlie signal makes detonation impossible.
Gallery
Historical Info
Historical Gallery


.jpg)


