Perth

| Purchase price4,800 |
| Hit Points27,100 |
| 152 mm/50 BL Mk.XXIII on a Mk.XXI mount4 х 2 pcs. |
| Rate of Fire8 shots/min. |
| Reload Time7.5 sec. |
| Rotation Speed7 deg./sec. |
| 180 Degree Turn Time25.71 sec. |
| Firing Range12.81 km. |
| Maximum Dispersion121 m. |
| HE Shell152 mm HE 6crh Mk IV |
| Maximum HE Shell Damage2,100 |
| Chance of Fire on Target Caused by HE Shell9 % |
| Initial HE Shell Velocity841 m./s. |
| HE Shell Weight50.8 kg. |
| AP Shell152 mm AP 6crh Mk IV |
| Maximum AP Shell Damage3,100 |
| Initial AP Shell Velocity841 m./s. |
| AP Shell Weight50.8 kg. |
| 102 mm/45 QF Mk.XVI on a Mk.XIX mount4 х 2 pcs. |
| Firing Range5 km. |
| Rate of Fire20 shots/min. |
| Reload Time3 sec. |
| HE Shell102 mm HE 35 lb |
| Maximum HE Shell Damage1,500 |
| Initial HE Shell Velocity811 m./s. |
| Chance of Fire on Target Caused by HE Shell6 % |
| 533 mm QR Mk IV2 х 4 pcs. |
| Rate of Fire0.63 shots/min. |
| Reload Time96 sec. |
| Rotation Speed25 deg./sec. |
| 180 Degree Turn Time7.2 sec. |
| Torpedo533 mm Mk IX |
| Maximum Damage15,433 |
| Torpedo Speed61 knot |
| Torpedo Range8.01 km. |
| 102 mm/45 QF Mk.XVI on a Mk.XIX mount4 х 2 pcs. |
| . . . Average Damage per Second37.6 |
| . . . Firing Range5.01 km. |
| 20 mm Oerlikon Mk.I on a Mk.IIA mount2 х 1 pcs. |
| . . . Average Damage per Second7.2 |
| . . . Firing Range2.01 km. |
| 12.7 mm Mk.III5 х 4 pcs. |
| . . . Average Damage per Second10.5 |
| . . . Firing Range1.2 km. |
| Maximum Speed32.5 knot |
| Turning Circle Radius700 m. |
| Rudder Shift Time7.6 sec. |
| Surface Detectability Range9.78 km. |
| Air Detectability Range6.44 km. |

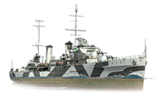
Perth — Commonwealth premium Tier VI cruiser.
Perth first went on sale on 18 November 2016 on the NA servers, and on 11 November 2016 on the EU servers.
Modules
 |
Rate of Fire (shots/min) | 180° Turn Time (sec) | Maximum Dispersion (m) | Maximum HE Shell Damage (HP) | Chance of Fire on Target Caused by HE Shell (%) | Maximum AP Shell Damage (HP) |
Research price (exp) |
Purchase price ( | |
|---|---|---|---|---|---|---|---|---|---|
| 152 mm/50 BL Mk.XXIII on a Mk.XXI mount | 8 | 25.7 | 121 | 2,100 | 9 | 3,100 | 0 | 0 |
 |
Hit Points (HP) | Armor (mm) | Armor (mm) | Main Turrets (pcs.) | Secondary Gun Turrets (pcs.) | AA Mounts (pcs.) | Torpedo Tubes (pcs.) | Hangar Capacity (pcs.) |
Research price (exp) |
Purchase price ( | |
|---|---|---|---|---|---|---|---|---|---|---|---|
| Perth | 27,100 | 10 | 100 | 4 | 4 | 5/2/4 | 2 | 0 | 0 |
 |
Rate of Fire (shots/min) | Torpedo Tubes Reload Time (sec) | 180° Turn Time (sec) | Maximum Damage (HP) | Torpedo Speed (knot) | Torpedo Range (km) |
Research price (exp) |
Purchase price ( | |
|---|---|---|---|---|---|---|---|---|---|
| 533 mm Mk IX | 0.6 | 96 | 7.2 | 15,433 | 61 | 8 | 0 | 0 |
 |
IDS_SHIP_PARAM_SUO_INCREASE_DIST (%) | Maximum Firing Range (km) |
Research price (exp) |
Purchase price ( | |
|---|---|---|---|---|---|
| Mk VI mod. 1 | 0 | 0 | 0 |
 |
Maximum Speed (knot) |
Research price (exp) |
Purchase price ( | |
|---|---|---|---|---|
| Propulsion: 72,500 hp | 32.5 | 0 | 0 |
Compatible Upgrades
| Slot 1 |
||||||
|---|---|---|---|---|---|---|
| Slot 2 |
||||||
| Slot 3 |
||||||
| Slot 4 |
Player Opinion
Performance
Perth is a sister ship to Tier VI British cruiser Leander; however, she has some significant differences. Most notably, she carries a high explosive round — like Belfast (and unlike her sister ship) — allowing her to set enemies on fire with something other than secondaries. Her other primary difference is her smoke screen. Unlike the short deployment time, long duration typical British cruiser smoke, Perth has a Smoke Generator ![]() that deploys smoke continuously for 90 seconds, but each individual cloud of smoke only lasts for 10. This allows Perth to create a "moving smoke screen" so to speak, enabling her to remain invisible for a full 100 seconds if moving at speeds less than 12.5 knots.
that deploys smoke continuously for 90 seconds, but each individual cloud of smoke only lasts for 10. This allows Perth to create a "moving smoke screen" so to speak, enabling her to remain invisible for a full 100 seconds if moving at speeds less than 12.5 knots.
In the negative column, Perth’s armor piercing rounds are not the improved AP of the regular tech tree British light cruisers, and her anti-aircraft suite is even weaker than that of stock hull Leander. Her short main battery firing range also means she must be played very carefully or she will be quickly removed from the battle by anything that can citadel her; which is, unfortunately, anything in the game with cruiser-caliber guns or better. When her short firing range is combined with her woefully mediocre anti-aircraft suite, Perth’s ability to equip either a Spotting Aircraft ![]() or a Catapult Fighter
or a Catapult Fighter ![]() — something Leander can't do — becomes an important choice; either will give her some spotting ability outside of her smoke screen, but one will increase her range and the other will help cover her from enemy aircraft.
— something Leander can't do — becomes an important choice; either will give her some spotting ability outside of her smoke screen, but one will increase her range and the other will help cover her from enemy aircraft.
Pros:
- Lowest detection radius of all Tier VI cruisers.
- Has access to high explosive rounds, giving her more flexibility against angled targets and destroyers.
- Good handling charateristics: short rudder shift time, and tight turning circle.
- Comes with a unique version of the Smoke Generator
 consumable that allows Perth to move at low speeds and take her smoke cloud with her.
- Can choose between equipping either a Spotting Aircraft
 or Catapult Fighter
  .
.
Cons:
- Loses access to Repair Party
 that comes standard on sister ship Leander.
- Dreadfully bad anti-aircraft suite, and cannot equip Defensive AA Fire
 .
.
- Low health pool; narrowly misses out on having the least health of any Tier VI cruiser (Nürnberg retains that honor).
- Shortest main battery firing range of all Tier VI cruisers.
Research
Optimal Configuration
Upgrades
The recommended upgrades for Perth are as follows:
- Slot 1: Main Armaments Modification 1
 *
*
- Slot 2: Propulsion Modification 1
 *
*
- Slot 3: Aiming Systems Modification 1
 *
*
- Slot 4: Steering Gears Modification 2

More than any other ship in the game, Perth benefits from access to the Special Upgrades that are available through the Container reward system. Captains with access to any of the following are encouraged to mount them instead in their respective slots: Spotting Aircraft Modification 1 ![]() , Smoke Generator Modification 1
, Smoke Generator Modification 1 ![]() , and Hydroacoustic Search Modification 1
, and Hydroacoustic Search Modification 1 ![]() .
.
Commander Skills
Perth has more commander skill options available to her than Leander, simply by virtue of the fact she has high explosive shells available to her main battery. Skills such as Expert Loader or Demolition Expert are not wasted on her as they would be on her cousin in the Royal Navy cruiser branch. In point of fact, Demolition Expert is likely the second-best Level 3 skill available to Perth commanders. Key skills in any Perth commander build are Expert Marksman at Level 2, Superintendent at Level 3, and Concealment Expert at Level 4. A well-played Perth will sometimes find herself in situations where she is fully dependent upon her Spotting Aircraft ![]() to be able to see the enemy, which makes Direction Center for Catapult Aircraft an excellent 1 point investment. Jack of All Trades at Level 2 combined with a November Foxtrot signal (
to be able to see the enemy, which makes Direction Center for Catapult Aircraft an excellent 1 point investment. Jack of All Trades at Level 2 combined with a November Foxtrot signal (![]() ) will reduce the timers on her crucial consumable cooldowns.
) will reduce the timers on her crucial consumable cooldowns.
Investing commander skill points into improving Perth’s anti-aircraft defenses is not recommended.
| Recommended Commander Skills | ||||||||
|---|---|---|---|---|---|---|---|---|
| Cost (points) |
Endurance | Attack | Support | Versatility | ||||
| 1 |
★★★ |
★ |
★ |
|
|
|
|
|
| 2 |
★ |
★★★ |
★★★ |
|
★ |
|
★★ |
★ |
| 3 |
|
★★ |
★ |
|
|
★★★ |
★★★ |
★★ |
| 4 |
|
|
★★★ |
|
|
|
★ |
★★★ |
| Key: ★★★ - Extremely Useful ★★ - Frequently Useful ★ - Occasionally Useful No stars - Meh Χ - Not recommended | ||||||||
Consumables
Perth can equip the following consumables:
- Slot 1: Damage Control Party

- Slot 2: Hydroacoustic Search

- Slot 3: Spotting Aircraft or Catapult Fighter
- Slot 4: Smoke Generator
Perth retains the dependency that her cruiser cousins in the regular Royal Navy tech tree have on their consumables; subsequently, premium versions of ALL consumables are recommended. Smoke Generator II (![]() ) and Damage Control Party II (
) and Damage Control Party II (![]() ) are particularly critical given their impact to to her survivability. Spotting Aircraft II (
) are particularly critical given their impact to to her survivability. Spotting Aircraft II (![]() ) is also highly recommended to ensure that Perth can spot targets outside of her smoke without having to rely on her teammates (plus the range boost is very useful), while Hydroacoustic Search II (
) is also highly recommended to ensure that Perth can spot targets outside of her smoke without having to rely on her teammates (plus the range boost is very useful), while Hydroacoustic Search II (![]() ) will help Perth captains steer clear of torpedoes while they lurk in their bank of smoke.
) will help Perth captains steer clear of torpedoes while they lurk in their bank of smoke.
Camouflage
As a premium ship, Perth comes included with Type 10 camouflage that lowers her detection radius, reduces the accuracy of incoming shells, and increases the amount of experience she earns.
Signals
November Foxtrot (![]() ) is the most important signal flag that Perth can equip, followed by Sierra Mike (
) is the most important signal flag that Perth can equip, followed by Sierra Mike (![]() ) and the flags that increase her HE shell fire chance: India X-Ray (
) and the flags that increase her HE shell fire chance: India X-Ray (![]() ) and Victor Lima (
) and Victor Lima (![]() ). When equipping India X-Ray, adding a Juliet Charlie (
). When equipping India X-Ray, adding a Juliet Charlie (![]() ) to eliminate the bonus chance of detonation is a good idea.
) to eliminate the bonus chance of detonation is a good idea.
Recommended Signal Flags 
| |||||
|---|---|---|---|---|---|
| Combat | |||||
 ★★ |

|
 ★ |
 ★ |
 ★★★ |
 ★★★ |

|

|

|
 ★★★ |
 ★★★ |

|

|

| ||||
Note: Use of the Juliet Charlie signal makes detonation impossible.
Gallery

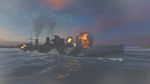
Perth exchanges fire with an enemy Leander-class cruiser.
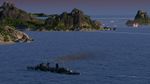
Perth fires a broadside while safely in smoke.
A salvo of high explosive shells hits home on an enemy Leander-class cruiser.

The ship's special smokescreen is unique; it only lasts for a short period of time. Therefore, it is most useful for personal defense.
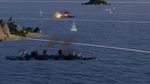
A final salvo of high explosive shells from the Perth destroys the enemy Sims-class destroyer.
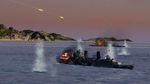
The moment the captain realized he made a mistake...


Historical Info
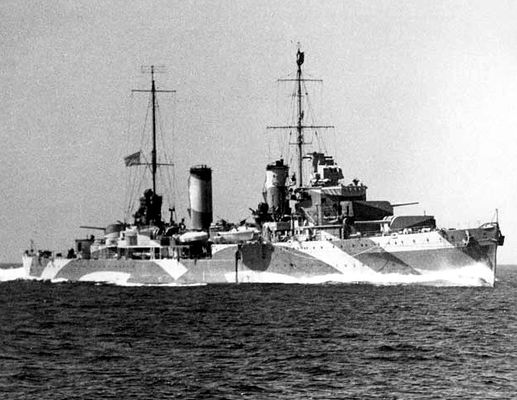
Historical Gallery


.jpg)


.jpg)


_wreck_photo_01_in_October_2015.JPG)


Video