Matilda
| Revision as of 14:09, 26 February 2015 | Revision as of 18:35, 27 November 2016 added videos | |||
15 intermediate revisions by 10 users not shown | ||||
| Line 1: | Line 1: | |||
| {{TankData|Tank=GB07_Matilda | {{TankData|Tank=GB07_Matilda | |||
| ? | |Unlike its | + | |Unlike its tier 5 brothers the Premium [[Matilda IV]], this tank is located a tier Lower and carries the historical 2-Pounder gun, so players used to the Soviet Matilda may judge this tank a bit unfairly, although, in reality, the British Matilda can penetrate even a tier 6 Heavy tank from most distances, and although the damage will be anaemic, the extremely fast reload time and excellent accuracy will cause your higher tier opponents to seek cover in preference to being punctured to death. However, the Damage Per Minute is more potent against similar tiered opponents and a near death sentence against tier IIIs. It is very easy to rack up a healthy number of kills in a Matilda for this reason. | |
| ? | Players new to the Matilda will find this tank rather slow moving, and slightly difficult to | + | Players new to the Matilda will find this tank rather slow moving, and slightly difficult to manoeuvrer in tight corridors. Its 24km/h top speed will negate any effort to keep up any fast paced combat, but the Matilda is the most heavily armoured Tier 4 tank (although the [[AMX 40]] is close and is better sloped), with only a similar armouring found on the tier 5 [[KV-1]] Heavy tank. It is very capable of hitting enemies from most distances without much trouble (with its top gun) and poses a difficult target for artillery due to its small silhouette. | |
| |Gallery= | |Gallery= | |||
| Line 12: | Line 12: | |||
| |InTheGame_pros= | |InTheGame_pros= | |||
| ? | * | + | * Above average HP for its tier | |
| ? | * Best | + | * Best armour all-around for its tier on medium or long distance. | |
| ? | * Excellent gun penetration and accuracy capable of damaging | + | * Excellent gun penetration, shell velocity and accuracy capable of damaging tier V and some tier VI tanks with ease. | |
| ? | * | + | * INSANE Rate of Fire. | |
| ? | * Good gun depression | + | * Good gun depression. | |
| ? | + | |||
| |InTheGame_cons= | |InTheGame_cons= | |||
| ? | * Poor top speed and acceleration, a | + | * Poor top speed, manoeuvrability and acceleration, a Matilda driver can expect missing ''some'' of the action. | |
| ? | * Somewhat easy target for artillery in some cases, although its spaced | + | * Somewhat easy target for artillery in some cases, although its spaced armour skirts help, as well as its compact size. | |
| ? | * Low damage per shot, makes finishing off enemies in a pinch near impossible in some cases | + | * Low damage per shot, makes finishing off enemies in a pinch near impossible in some cases. | |
| ? | * Low signal range | + | * Low signal range, particularly with stock radio. | |
| ? | + | |||
| ? | + | |||
| |InTheGame_performance= | |InTheGame_performance= | |||
| ? | The Matilda performs as a medium-heavy.It is an excellent tank with great | + | The Matilda performs as a medium-heavy.It is an excellent tank with great armour that causes most shots to just bounce off of it, and has excellent guns to return fire with. With 70mm of sloped frontal armour, it is not uncommon for a Matilda at low health to take down another full health tank or two. The greatest qualm (disadvantage) of the Matilda is its speed, for it is abysmal for its tier (But certainly not the slowest at all). Even with upgraded track and engine, it only manages 24 km/h, about the equivalent of the [[D.W. 2]]. Thus, there are two ways to use this tank, one is to slowly but surely follow up the main frontal push taking opportunity shots with its excellent accuracy and quick rate of fire (as well as taking out retreating tanks that are badly damaged). The second is to guard a set spot or choke point, as it can be difficult to coax out due its armour and small silhouette. Do be aware for artillery though because while the Matilda's small birds-eye silhouette makes it difficult to target, one good shot can disable a track, leaving the tank a sitting duck or leave it a burning husk. | |
| ? | Being top of the tier list, the only ways to outclass a Matilda on a light tank is making it go into the open with numbers, as its fast rotating turret can keep up with tanks that try to | + | Being top of the tier list, the only ways to outclass a Matilda on a light tank is making it go into the open with numbers, as its fast rotating turret can keep up with tanks that try to outmanoeuvre it. Attacks from the rear or (far less frequently) side also deal damage and another good way to destroy a Matilda is to ground it by taking out either of its track and destroy it with artillery. In a one-on-one duel at the same tier, it is very difficult to outclass a Matilda(it is possible, with the [[Luchs]] and [[Hetzer]], if it fires heat), so attempt to flank it, call in fire from a friendly tank destroyer or call in the arty to at least pin it down. Do expect that certain shots from an arty can bounce off. | |
| ? | Experienced tankers may want to take advantage of the high accuracy-high penetration gun by equipping a Enhanced Gun Laying Drive and either Coated Optics or Binoculars and finally a Rammer or a Ventilation system as it turns the Matilda into a deadly " | + | Experienced tankers may want to take advantage of the high accuracy-high penetration gun by equipping a Enhanced Gun Laying Drive and either Coated Optics or Binoculars and finally a Gun Rammer or a Ventilation system as it turns the Matilda into a deadly "machine-gun" that can shred most tanks (That it can pen) with relative ease, at long or short range. Even with low damage per shot, the 40mm cannon fires really fast, and offers a serious danger even for heavily armoured tanks, like the [[KV-1]]; if you keep that in mind and catch every opportunity to deal damage, it's possible to deal above 1000 hit-points in damage in a single game. | |
| ? | It is important to note, however, that although the 76mm HE gun has low penetration, it has quite good damage for its tier and has a fast reload rate. Using this gun to allow for a more "brawler" | + | It is important to note, however, that although the 76mm HE gun has low penetration, it has quite good damage for its tier and has a fast reload rate. Using this gun to allow for a more "brawler" play-style isn't without its benefits. The 76mm gun will one or two shot any tank below tier 4 and some tanks that are tier 4. It is recommended to try the HE gun as even though it is in fact a derp gun, it has a quite good possibility to hit from medium range. Do note that this gun can penetrate and do catastrophic damage to even tier 6s, such as the sides of most tanks and the flimsy armour of TDs and fast medium tanks. The 76mm is however, near worthless when using HE against another Matilda. | |
| ? | Probably the most effective use of the Matilda is as a counter-light. Although it is slow, light tanks that it faces have nearly no hope of penetrating it. And again, although the alpha is | + | Probably the most effective use of the Matilda is as a counter-light. Although it is slow, light tanks that it faces have nearly no hope of penetrating it. And again, although the alpha is anaemic to higher tiers 50 damage can take quite a chunk off of a lower tier light tank. Lower tier TDs will even be afraid of your high penetration, high rate of fire gun. | |
| |InTheGame_research= | |InTheGame_research= | |||
| Line 59: | Line 56: | |||
| '''Design features''' | '''Design features''' | |||
| ? | The Matilda | + | The Matilda Senior weighed around 27 tons (27 tonnes or 60,000 lb) more than twice as much as its predecessor, and was armed with a QF 2 pounder (40 mm) tank gun in a three-man turret. The turret traversed by hydraulic motor or by hand through 360 degrees; the gun itself could be elevated through an arc from -15 to +20 degrees. One of the most serious weaknesses of the Matilda II was the lack of a high-explosive round for its main gun. A high-explosive shell was designed for the 2 pounder but for reasons never explained it was not placed in production. The tank's best weapon against un-armoured targets was thus its single machine gun. | |
| ? | Like many other British infantry tanks, it was heavily armoured; from 20 mm (0.79 in) at the thinnest | + | Like many other British infantry tanks, it was heavily armoured; from 20 mm (0.79 in) at the thinnest. It was 78 mm (3.1 in) at the front, much more than most contemporaries. The turret armour was 75 mm (3.0 in) all round, the hull side armour was 65 to 70 millimetres (2.6 to 2.8 in), and the rear armour, protecting the engine to sides and rear, was 55 millimetres (2.2 in). The frontal armour was 75 millimetres (3.0 in), although the nose plates top and bottom were thinner but angled. The turret roof was the same thickness as the hull roof and engine deck: 20 millimetres (0.79 in). The German Panzer III and Panzer IV tanks, of the same period, had 30 to 50 millimetres (1.2 to 2.0 in) thick hull armour. The shape of the nose armour was based on Christie's designs, and came to a narrow point with storage lockers added on either side. The heavy armour of the Matilda's cast turret became legendary; for a time in 1940–41 the Matilda earned the nickname "Queen of the Desert". The sheer thickness of its armour made the tank impervious to the 37 mm and 50 mm calibre anti-tank guns that were then commonly used by the Germans, as well as the 47 mm used by the Italians in North Africa; only the 75 mm PAK 40 anti-tank gun and 88 mm anti-aircraft gun could penetrate its armour reliably.[[image:The_A12E1,_the_prototype_of_the_Matilda_II_Heavy_Infantry_Tank_Mark_II.jpg|thumb|200px|right|The A12E1, the prototype of the Matilda II Heavy Infantry Tank Mark II]]While the Matilda possessed a degree of protection that was then unmatched in the North African theatre, the sheer weight of the armour mounted on the vehicle contributed to a very low average speed of about 6 mph (9.7 km/h) on desert terrain. At the time, this was not thought to be a problem since British infantry tank doctrine prioritized heavy armour and trench-crossing ability over speed and cross-country mobility (which was considered to be characteristic of cruiser tanks such as the [[Crusader]]). The slow speed of the Matilda was further exacerbated by a troublesome suspension and a comparatively weak power unit, the latter of which was actually created using two bus engines linked to a single shaft. This arrangement was both complicated and time-consuming to maintain, as it required technician crews to work on each engine separately and subjected automotive components to uneven wear-and-tear. It did however, provide some mechanical redundancy, since failure in one engine would not prevent the Matilda from travelling under its own power using the other. | |
| ? | The tank's suspension system was that which had been developed by Vickers for their Medium C prototype in the mid-1920s. The tank was carried by five double | + | The tank's suspension system was that which had been developed by Vickers for their Medium C prototype in the mid-1920s. The tank was carried by five double wheel-bogies on each side. Four of the bogies were on bell-cranks in pairs with a common horizontal coil spring. The fifth, rearmost, bogie was sprung against a hull bracket. Between the first bogie and the idler wheel was a larger diameter vertically sprung "jockey wheel". The first Matildas had return rollers; these were replaced in later models by track skids, which were far easier to manufacture and to service in the field. | |
| The turret carried the main armament with the machine gun to the right in a rotating internal mantlet. Traverse was by a hydraulic system. As the gun was balanced for ease of movement by the gunner much of the breech end was behind the trunnions. Two smoke grenade launchers were carried on the right side of the turret. The grenade launcher mechanisms were cut down Lee-Enfield rifles, each firing a single smoke grenade. | The turret carried the main armament with the machine gun to the right in a rotating internal mantlet. Traverse was by a hydraulic system. As the gun was balanced for ease of movement by the gunner much of the breech end was behind the trunnions. Two smoke grenade launchers were carried on the right side of the turret. The grenade launcher mechanisms were cut down Lee-Enfield rifles, each firing a single smoke grenade. | |||
| Line 77: | Line 74: | |||
| '''North Africa 1940 to 1942''' | '''North Africa 1940 to 1942''' | |||
| [[image:Captured_Matilda_in_Afrika_Korps_service.jpg|thumb|200px|left|Captured_Matilda_in_Afrika_Korps_service]] | [[image:Captured_Matilda_in_Afrika_Korps_service.jpg|thumb|200px|left|Captured_Matilda_in_Afrika_Korps_service]] | |||
| ? | Up to early 1942, in the war in North Africa, the Matilda proved highly effective against Italian and German tanks, although vulnerable to the larger calibre and medium calibre anti-tank guns. In late 1940, during Operation Compass, Matildas of the British 7th Armoured | + | Up to early 1942, in the war in North Africa, the Matilda proved highly effective against Italian and German tanks, although vulnerable to the larger calibre and medium calibre anti-tank guns. In late 1940, during Operation Compass, Matildas of the British 7th Armoured Division wreaked havoc among the Italian forces in Egypt. The Italians were equipped with L3 tankettes and M11/39 medium tanks, neither of which had any chance against the Matildas. Italian gunners were to discover that the Matildas were impervious to a wide assortment of artillery. Matildas continued to confound the Italians as the British pushed them out of Egypt and entered Libya to take Bardia and Tobruk. Even as late as November 1941, German infantry combat reports show the impotence of ill-equipped infantry against the Matilda. | |
| ? | Ultimately, in the rapid manoeuvre warfare often practised in the open desert of North Africa, the Matilda's low speed and unreliable steering mechanism became major problems. Another problem was the lack of a high-explosive shell (the appropriate shell existed but was not issued). When the German Afrika Korps arrived in North Africa, | + | Ultimately, in the rapid manoeuvre warfare often practised in the open desert of North Africa, the Matilda's low speed and unreliable steering mechanism became major problems. Another problem was the lack of a high-explosive shell (the appropriate shell existed but was not issued). When the German Afrika Korps arrived in North Africa, the 88 mm anti-aircraft gun was again pressed into service against the Matilda, causing heavy losses during Operation Battleaxe, when sixty-four Matildas were lost. The arrival of the more powerful 50mm Pak 38 anti-tank gun also provided a means for the German infantry to engage Matilda tanks at combat ranges. Nevertheless, during Operation Crusader, Matilda tanks of 1st and 32nd Army Tank Brigades were instrumental in the breakout from Tobruk and the capture of the Axis fortress of Bardia . The operation was decided by the infantry tanks after the failure of the cruiser tank equipped 7th Armoured Division to overcome the Axis tank forces in the open desert. | |
| ? | As the German army received new tanks with more powerful guns, as well as more powerful anti-tank guns and ammunition, the Matilda proved less and less effective. Firing tests conducted by the | + | As the German army received new tanks with more powerful guns, as well as more powerful anti-tank guns and ammunition, the Matilda proved less and less effective. Firing tests conducted by the Afrika korps showed that the Matilda had become vulnerable to a number of German weapons at ordinary combat ranges. Due to the "painfully small" size of its turret ring - 54 inches (1.37 m) - the tank could not be up-gunned sufficiently to continue to be effective against more heavily armoured enemy tanks. It was also somewhat expensive to produce. Vickers proposed an alternative, the [[Valentine]] tank, which had the same gun and a similar level of armour protection but on a faster and cheaper chassis derived from that of their "heavy cruiser" tank. With the arrival of the Valentine in autumn 1941, the Matilda was phased out by the British Army through attrition, with lost vehicles no longer replaced. By the time of the battle of El Alamein (October 1942), few Matildas were in service, with many having been lost during Operation Crusader and then the Gazala battles in early summer of 1942. Around twenty-five took part in the battle as mine-clearing, Matilda Scorpion mine flail tanks. | |
| '''Minor campaigns''' | '''Minor campaigns''' | |||
| Line 91: | Line 88: | |||
| '''Foreign use''' | '''Foreign use''' | |||
| [[image:British_Matilda_Tank_being_inspected_by_German_forces_after_being_abandoned_Greece_1941.jpg|thumb|200px|left|British Matilda Tank being inspected by German forces after being abandoned Greece 1941]] | [[image:British_Matilda_Tank_being_inspected_by_German_forces_after_being_abandoned_Greece_1941.jpg|thumb|200px|left|British Matilda Tank being inspected by German forces after being abandoned Greece 1941]] | |||
| ? | The Red Army received 918 of the 1,084 Matildas sent to the USSR. The Soviet Matildas saw action as early as the Battle of Moscow and became fairly common during 1942. Unsurprisingly, the tank was found to be too slow and unreliable. Crews often complained that snow and dirt were accumulating behind the "skirt" panels, clogging the suspension. The slowness and heavy armour made them comparable to the Red Army' | + | The Red Army received 918 of the 1,084 Matildas sent to the USSR. The Soviet Matildas saw action as early as the Battle of Moscow and became fairly common during 1942. Unsurprisingly, the tank was found to be too slow and unreliable. Crews often complained that snow and dirt were accumulating behind the "skirt" panels, clogging the suspension. The slowness and heavy armour made them comparable to the Red Army's [[KV-1]] heavy tanks, but the Matilda had nowhere near the firepower of the KV. Most Soviet Matildas were expended during 1942 but a few served on as late as 1944. The Soviets modified the tanks with the addition of sections of steel welded to the tracks to give better grip. | |
| '''Use of captured Matildas''' | '''Use of captured Matildas''' | |||
| Line 97: | Line 94: | |||
| Following Operation Battleaxe a dozen Matildas left behind the Axis lines were repaired and put into service by the Germans. The Matildas were well regarded by their German users although their use in battle caused confusion to both sides, despite extra-prominent German markings. | Following Operation Battleaxe a dozen Matildas left behind the Axis lines were repaired and put into service by the Germans. The Matildas were well regarded by their German users although their use in battle caused confusion to both sides, despite extra-prominent German markings. | |||
| + | {{VideoYT|Mavg4UqSlso|320}}{{VideoYT|BTNfYwk9p4s|320}}{{VideoYT|k9CRuTzxjWQ|320}}{{VideoYT|VB0A9EwEeWg|320}} | |||
| |HistoricalGallery= | |HistoricalGallery= | |||
| Line 126: | Line 124: | |||
| }} | }} | |||
| + | ||||
| + | [[Category:British Tanks]] | |||
Revision as of 18:35, 27 November 2016
Matilda

Mouse over "
[Client Values; Actual values in
| 140,000 |
| 540114 HP Hit Points |
| 26.52/2713.99/29 t Weight Limit |
- Commander (Radio Operator)
- Gunner
- Driver
- Loader
| 174190 hp Engine Power |
| 24/11 km/h Speed Limit |
| 3436 deg/s Traverse |
| 6.5613.58 hp/t Power/Wt Ratio |
| NoNo Pivot |
| // mm Hull Armor |
| 75/75/7575/75/75 mm Turret Armor |
AP/APCR/HE
HE/HEAT Shells |
30/1200/15
56/2800/15 Shell Cost |
| 50/50/60175/110/60 HP Damage |
| 78/121/2338/100/23 mm Penetration |
|
28.57 r/m ▲
15 r/m Standard Gun ▲ Rate of Fire Standard Gun |
|
1428.5 ▲
Standard Gun
▼
Standard Gun
▲
2625 Standard Gun ▲
Standard Gun ▼
Standard Gun
▲ Damage Per Minute Standard Gun
|
|
0.36 m ▲
0.53 m With 50% Crew: 0.446 m ▲ Accuracy With 50% Crew: 0.657 m |
| 1.7 s 1.9 s Aim time |
| 3434 deg/s Turret Traverse |
| 360° Gun Arc |
| -10°/+20°-10°/+20° Elevation Arc |
| 16055 rounds Ammo Capacity |
| 1515 % Chance of Fire |
| 330 m 340 m View Range |
| 350 m 450 m Signal Range |
IV
140000
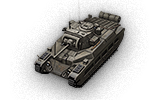
The Matilda is a British tier 4 medium tank.
Developed from 1936 through 1938. A total of 2987 vehicles were manufactured by August 1943. It was the only British tank to remain in service throughout World War II.
Unlike its tier 5 brothers the Premium Matilda IV, this tank is located a tier Lower and carries the historical 2-Pounder gun, so players used to the Soviet Matilda may judge this tank a bit unfairly, although, in reality, the British Matilda can penetrate even a tier 6 Heavy tank from most distances, and although the damage will be anaemic, the extremely fast reload time and excellent accuracy will cause your higher tier opponents to seek cover in preference to being punctured to death. However, the Damage Per Minute is more potent against similar tiered opponents and a near death sentence against tier IIIs. It is very easy to rack up a healthy number of kills in a Matilda for this reason.
Players new to the Matilda will find this tank rather slow moving, and slightly difficult to manoeuvrer in tight corridors. Its 24km/h top speed will negate any effort to keep up any fast paced combat, but the Matilda is the most heavily armoured Tier 4 tank (although the AMX 40 is close and is better sloped), with only a similar armouring found on the tier 5 KV-1 Heavy tank. It is very capable of hitting enemies from most distances without much trouble (with its top gun) and poses a difficult target for artillery due to its small silhouette.
The Matilda leads to the Churchill I, and the Cavalier.
Modules / Available Equipment and Consumables
Modules

Guns
| Tier | Gun | Penetration (mm) |
Damage (HP) |
Rate of fire (rounds/minute) |
Dispersion (m/100m) |
Aiming time (s) |
Weight (kg) |
Price (
| |
|---|---|---|---|---|---|---|---|---|---|
| IV | OQF 3-inch Howitzer Mk. I | 38/100/23 | 175/110/60 | 15 | 0.53 | 1.9 | 116 | 30000 | |
| IV | QF 2-pdr Mk. X-B | 121/145/23 | 55/55/60 | 28.57 | 0.36 | 1.9 | 175 | 28000 | |
| IV | QF 2-pdr Mk. X | 78/121/23 | 50/50/60 | 28.57 | 0.36 | 1.7 | 130 | 6000 |

Engines
| Tier | Engine | Engine Power (hp) |
Chance of Fire on Impact (%) |
Weight (kg) |
Price (
| |
|---|---|---|---|---|---|---|
| III | 2x AEC | 174 | 15 | 331 | 1500 | |
| III | 2x Leyland E164 | 190 | 15 | 331 | 4000 |

Suspensions
| Tier | Suspension | Load Limit (т) |
Traverse Speed (gr/sec) |
Rmin | Weight (kg) |
Price (
| |
|---|---|---|---|---|---|---|---|
| III | Matilda Mk. II | 27 | 34 | B/2 | 7200 | 2270 | |
| IV | Matilda Mk. IIA | 29 | 36 | B/2 | 7200 | 4800 |

Radios
| Tier | Radio | Signal Range (m) |
Weight (kg) |
Price (
| |
|---|---|---|---|---|---|
| VII | WS No. 19 Mk. II | 450 | 40 | 21000 | |
| VI | WS No. 19 Mk. I | 400 | 40 | 15000 | |
| V | WS No. 9 | 375 | 40 | 3600 | |
| III | WS No. 11 | 350 | 40 | 600 |
Compatible Equipment


![]()
![]()
![]()


![]()


Compatible Consumables
![]()
![]()
![]()
![]()
![]()
![]()
![]()
![]()
![]()
![]()
![]()
![]()
![]()
![]()
![]()
![]()
![]()
![]()
![]()
Player Opinion
Pros and Cons
Pros:
- Above average HP for its tier
- Best armour all-around for its tier on medium or long distance.
- Excellent gun penetration, shell velocity and accuracy capable of damaging tier V and some tier VI tanks with ease.
- INSANE Rate of Fire.
- Good gun depression.
Cons:
- Poor top speed, manoeuvrability and acceleration, a Matilda driver can expect missing some of the action.
- Somewhat easy target for artillery in some cases, although its spaced armour skirts help, as well as its compact size.
- Low damage per shot, makes finishing off enemies in a pinch near impossible in some cases.
- Low signal range, particularly with stock radio.
Performance
The Matilda performs as a medium-heavy.It is an excellent tank with great armour that causes most shots to just bounce off of it, and has excellent guns to return fire with. With 70mm of sloped frontal armour, it is not uncommon for a Matilda at low health to take down another full health tank or two. The greatest qualm (disadvantage) of the Matilda is its speed, for it is abysmal for its tier (But certainly not the slowest at all). Even with upgraded track and engine, it only manages 24 km/h, about the equivalent of the D.W. 2. Thus, there are two ways to use this tank, one is to slowly but surely follow up the main frontal push taking opportunity shots with its excellent accuracy and quick rate of fire (as well as taking out retreating tanks that are badly damaged). The second is to guard a set spot or choke point, as it can be difficult to coax out due its armour and small silhouette. Do be aware for artillery though because while the Matilda's small birds-eye silhouette makes it difficult to target, one good shot can disable a track, leaving the tank a sitting duck or leave it a burning husk.
Being top of the tier list, the only ways to outclass a Matilda on a light tank is making it go into the open with numbers, as its fast rotating turret can keep up with tanks that try to outmanoeuvre it. Attacks from the rear or (far less frequently) side also deal damage and another good way to destroy a Matilda is to ground it by taking out either of its track and destroy it with artillery. In a one-on-one duel at the same tier, it is very difficult to outclass a Matilda(it is possible, with the Luchs and Hetzer, if it fires heat), so attempt to flank it, call in fire from a friendly tank destroyer or call in the arty to at least pin it down. Do expect that certain shots from an arty can bounce off.
Experienced tankers may want to take advantage of the high accuracy-high penetration gun by equipping a Enhanced Gun Laying Drive and either Coated Optics or Binoculars and finally a Gun Rammer or a Ventilation system as it turns the Matilda into a deadly "machine-gun" that can shred most tanks (That it can pen) with relative ease, at long or short range. Even with low damage per shot, the 40mm cannon fires really fast, and offers a serious danger even for heavily armoured tanks, like the KV-1; if you keep that in mind and catch every opportunity to deal damage, it's possible to deal above 1000 hit-points in damage in a single game.
It is important to note, however, that although the 76mm HE gun has low penetration, it has quite good damage for its tier and has a fast reload rate. Using this gun to allow for a more "brawler" play-style isn't without its benefits. The 76mm gun will one or two shot any tank below tier 4 and some tanks that are tier 4. It is recommended to try the HE gun as even though it is in fact a derp gun, it has a quite good possibility to hit from medium range. Do note that this gun can penetrate and do catastrophic damage to even tier 6s, such as the sides of most tanks and the flimsy armour of TDs and fast medium tanks. The 76mm is however, near worthless when using HE against another Matilda.
Probably the most effective use of the Matilda is as a counter-light. Although it is slow, light tanks that it faces have nearly no hope of penetrating it. And again, although the alpha is anaemic to higher tiers 50 damage can take quite a chunk off of a lower tier light tank. Lower tier TDs will even be afraid of your high penetration, high rate of fire gun.
Early Research
- The WS No. 9 radio is the only thing that carries over from the Vickers Medium Mk. III.
- Start by researching the 2x Leyland E164 engine since it's cheap and has the same weight.
- Researching the the Quick Fire 2-Pounder Mk. X-B gun is a priority, as it gives the Matilda the much needed penetration boost it needs.
- Next research the upgraded suspension.
- Go from there.
- Note that the only thing the second turret adds is 10m to view range, but don't forget that it will increase the hitpoints of the tank (from 340hp to 370hp).
Suggested Equipment
![]()
![]()
![]()
![]()
![]()
Gallery


Historical Info

The Infantry Tank Mark II(sometimes referred to as Matilda II, Matilda senior, by General Staff Specification A12, Waltzing Matilda, or simply an 'I' tank) was a British infantry tank of the Second World War. It served from the start of the war to its end and became particularly associated with the North Africa Campaign. It was replaced in service by the Infantry Tank Mk III Valentine. With its heavy armour the Matilda II was an excellent infantry support tank, but with somewhat limited speed and armament. When the earlier Infantry Tank Mark I which was also known as "Matilda" was removed from service the Infantry Tank Mk II became known simply as the "Matilda".
Development history
The first suggestion for a larger Infantry Tank was made in 1936, with specification A12 and contractor decided around the end of the year. The Infantry Tank Mk II was designed at the Royal Arsenal,Woolwich to General Staff specification A.12 and built by the Vulcan Foundry. The design was based on the A7 (which had started development in 1929) rather than on the Infantry Tank Mk I, which was a two-man tank with a single machine gun for armament. When war was recognised as imminent, production of the Matilda II was ordered and that of the Matilda I curtailed. The first order was placed shortly after trials were completed with 140 ordered from Vulcan Foundry in mid 1938
Design features
The Matilda Senior weighed around 27 tons (27 tonnes or 60,000 lb) more than twice as much as its predecessor, and was armed with a QF 2 pounder (40 mm) tank gun in a three-man turret. The turret traversed by hydraulic motor or by hand through 360 degrees; the gun itself could be elevated through an arc from -15 to +20 degrees. One of the most serious weaknesses of the Matilda II was the lack of a high-explosive round for its main gun. A high-explosive shell was designed for the 2 pounder but for reasons never explained it was not placed in production. The tank's best weapon against un-armoured targets was thus its single machine gun.
Like many other British infantry tanks, it was heavily armoured; from 20 mm (0.79 in) at the thinnest. It was 78 mm (3.1 in) at the front, much more than most contemporaries. The turret armour was 75 mm (3.0 in) all round, the hull side armour was 65 to 70 millimetres (2.6 to 2.8 in), and the rear armour, protecting the engine to sides and rear, was 55 millimetres (2.2 in). The frontal armour was 75 millimetres (3.0 in), although the nose plates top and bottom were thinner but angled. The turret roof was the same thickness as the hull roof and engine deck: 20 millimetres (0.79 in). The German Panzer III and Panzer IV tanks, of the same period, had 30 to 50 millimetres (1.2 to 2.0 in) thick hull armour. The shape of the nose armour was based on Christie's designs, and came to a narrow point with storage lockers added on either side. The heavy armour of the Matilda's cast turret became legendary; for a time in 1940–41 the Matilda earned the nickname "Queen of the Desert". The sheer thickness of its armour made the tank impervious to the 37 mm and 50 mm calibre anti-tank guns that were then commonly used by the Germans, as well as the 47 mm used by the Italians in North Africa; only the 75 mm PAK 40 anti-tank gun and 88 mm anti-aircraft gun could penetrate its armour reliably.
The tank's suspension system was that which had been developed by Vickers for their Medium C prototype in the mid-1920s. The tank was carried by five double wheel-bogies on each side. Four of the bogies were on bell-cranks in pairs with a common horizontal coil spring. The fifth, rearmost, bogie was sprung against a hull bracket. Between the first bogie and the idler wheel was a larger diameter vertically sprung "jockey wheel". The first Matildas had return rollers; these were replaced in later models by track skids, which were far easier to manufacture and to service in the field. The turret carried the main armament with the machine gun to the right in a rotating internal mantlet. Traverse was by a hydraulic system. As the gun was balanced for ease of movement by the gunner much of the breech end was behind the trunnions. Two smoke grenade launchers were carried on the right side of the turret. The grenade launcher mechanisms were cut down Lee-Enfield rifles, each firing a single smoke grenade.
Production history
The first Matilda was produced in 1937 but only two were in service when war broke out in September 1939. Following the initial order from Vulcan Foundry, a second order was placed shortly after with Ruston & Hornsby. Some 2,987 tanks were produced by the Vulcan Foundry, John Fowler & Co. of Leeds, Ruston & Hornsby, and later by theLondon, Midland and Scottish Railway at Horwich Works; Harland and Wolff, and theNorth British Locomotive Company Glasgow. The last were delivered in August 1943. Peak production was 1,330 in 1942, the most common model being the Mark IV. The Matilda was difficult to manufacture. For example, the pointed nose was a single casting that, upon initial release from the mould, was thicker than required in some areas. To avoid a needless addition to the tank's weight, the thick areas were ground away. This process required highly skilled workers and additional time. The complex suspension and multi-piece hull side coverings also added time to manufacturing.
Combat history
French Campaign of 1940
The Matilda was first used in combat by the 7th Royal Tank Regiment in France in 1940. Only 23 of the unit's tanks were Matilda IIs; the rest of the British Infantry Tanks in France were A11 Matildas. Its 2-pounder gun was comparable to other tank guns in the 37 to 45 mm range. Due to the thickness of its armour, it was largely immune to the guns of the German tanks and anti-tank guns in France. The famous 88 mm anti-aircraft guns were pressed into service as the only effective counter. In the counter-attack at Arras British Matilda IIs (and Matilda Is) were able to briefly disrupt German progress but being unsupported, their losses were high. All vehicles surviving the battles around Dunkirk were abandoned when the BEF evacuated.
North Africa 1940 to 1942

Up to early 1942, in the war in North Africa, the Matilda proved highly effective against Italian and German tanks, although vulnerable to the larger calibre and medium calibre anti-tank guns. In late 1940, during Operation Compass, Matildas of the British 7th Armoured Division wreaked havoc among the Italian forces in Egypt. The Italians were equipped with L3 tankettes and M11/39 medium tanks, neither of which had any chance against the Matildas. Italian gunners were to discover that the Matildas were impervious to a wide assortment of artillery. Matildas continued to confound the Italians as the British pushed them out of Egypt and entered Libya to take Bardia and Tobruk. Even as late as November 1941, German infantry combat reports show the impotence of ill-equipped infantry against the Matilda. Ultimately, in the rapid manoeuvre warfare often practised in the open desert of North Africa, the Matilda's low speed and unreliable steering mechanism became major problems. Another problem was the lack of a high-explosive shell (the appropriate shell existed but was not issued). When the German Afrika Korps arrived in North Africa, the 88 mm anti-aircraft gun was again pressed into service against the Matilda, causing heavy losses during Operation Battleaxe, when sixty-four Matildas were lost. The arrival of the more powerful 50mm Pak 38 anti-tank gun also provided a means for the German infantry to engage Matilda tanks at combat ranges. Nevertheless, during Operation Crusader, Matilda tanks of 1st and 32nd Army Tank Brigades were instrumental in the breakout from Tobruk and the capture of the Axis fortress of Bardia . The operation was decided by the infantry tanks after the failure of the cruiser tank equipped 7th Armoured Division to overcome the Axis tank forces in the open desert. As the German army received new tanks with more powerful guns, as well as more powerful anti-tank guns and ammunition, the Matilda proved less and less effective. Firing tests conducted by the Afrika korps showed that the Matilda had become vulnerable to a number of German weapons at ordinary combat ranges. Due to the "painfully small" size of its turret ring - 54 inches (1.37 m) - the tank could not be up-gunned sufficiently to continue to be effective against more heavily armoured enemy tanks. It was also somewhat expensive to produce. Vickers proposed an alternative, the Valentine tank, which had the same gun and a similar level of armour protection but on a faster and cheaper chassis derived from that of their "heavy cruiser" tank. With the arrival of the Valentine in autumn 1941, the Matilda was phased out by the British Army through attrition, with lost vehicles no longer replaced. By the time of the battle of El Alamein (October 1942), few Matildas were in service, with many having been lost during Operation Crusader and then the Gazala battles in early summer of 1942. Around twenty-five took part in the battle as mine-clearing, Matilda Scorpion mine flail tanks.
Minor campaigns
In early 1941, a small number of Matildas were used during the East Africa Campaign at the Battle of Keren. However, the mountainous terrain of East Africa did not allow the tanks of B Squadron 4th Royal Tank Regiment to be as effective as the tanks of the 7th Royal Tank Regiment had been in Egypt and Libya. A few Matildas of the 7th RTR were present on Crete during the German invasion, and all of them were lost.
Pacific Theatre
In the Pacific Japanese forces were lacking in heavy anti-tank guns and the Matilda remained in service with several Australian regiments in the Australian 4th Armoured Brigade, in the South West Pacific Area. They first saw active service in the Huon Peninsula campaign in October 1943. Matilda II tanks remained in action until the last day of the war in the Wewak,Bougainville and Borneo campaigns, which made the Matilda the only British tank to remain in service throughout the war.
Foreign use

The Red Army received 918 of the 1,084 Matildas sent to the USSR. The Soviet Matildas saw action as early as the Battle of Moscow and became fairly common during 1942. Unsurprisingly, the tank was found to be too slow and unreliable. Crews often complained that snow and dirt were accumulating behind the "skirt" panels, clogging the suspension. The slowness and heavy armour made them comparable to the Red Army's KV-1 heavy tanks, but the Matilda had nowhere near the firepower of the KV. Most Soviet Matildas were expended during 1942 but a few served on as late as 1944. The Soviets modified the tanks with the addition of sections of steel welded to the tracks to give better grip.
Use of captured Matildas
Following Operation Battleaxe a dozen Matildas left behind the Axis lines were repaired and put into service by the Germans. The Matildas were well regarded by their German users although their use in battle caused confusion to both sides, despite extra-prominent German markings.


