Fubuki

| Research price34000 exp |
| Purchase price3 100 000 |
| Hit Points11 500 |
| 127 mm/50 3rd Year Type2 х 2 pcs. |
| Rate of Fire7.5 shots/min. |
| Reload Time8 sec. |
| Rotation Speed6.9 deg./sec. |
| 180 Degree Turn Time26.09 sec. |
| Firing Range10.47 km. |
| Maximum Dispersion93 m. |
| HE Shell127 mm HE Type1 |
| Maximum HE Shell Damage1800 |
| Chance of Fire on Target Caused by HE Shell7 % |
| Initial HE Shell Velocity915 m./s. |
| HE Shell Weight23 kg. |
| AP Shell127 mm AP Type0 |
| Maximum AP Shell Damage2200 |
| Initial AP Shell Velocity915 m./s. |
| AP Shell Weight23 kg. |
| 610 mm Triple3 х 3 pcs. |
| Rate of Fire0.82 shots/min. |
| Reload Time73 sec. |
| Rotation Speed25 deg./sec. |
| 180 Degree Turn Time7.2 sec. |
| TorpedoType8 |
| Maximum Damage14 600 |
| Torpedo Speed63 knot |
| Torpedo Range6 km. |
| 25 mm/60 Type96 Twin mod. 15 х 2 pcs. |
| . . . Average Damage per Second25 |
| . . . Firing Range3.09 km. |
| 13 mm/76 Type93 Twin2 х 2 pcs. |
| . . . Average Damage per Second7 |
| . . . Firing Range1.2 km. |
| 13 mm/76 Type934 х 1 pcs. |
| . . . Average Damage per Second10 |
| . . . Firing Range1.2 km. |
| Maximum Speed35 knot |
| Turning Circle Radius640 m. |
| Rudder Shift Time3.8 sec. |
| Surface Detectability Range7.02 km. |
| Air Detectability Range3.78 km. |

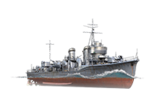
Fubuki — Japanese Tier VI destroyer.
This "special type" destroyer shaped the development for destroyers in all navies of the world. Fubuki’s greater dimensions allowed for a significantly greater firepower, AA artillery and an even more powerful torpedo armament. In terms of speed, however, Fubuki was somewhat inferior to destroyers of preceding classes.
Modules
 |
Rate of Fire (shots/min) | 180 Degree Turn Time (sec) | Maximum Dispersion (m) | Maximum HE Shell Damage (HP) | Chance of Fire on Target Caused by HE Shell (%) | Maximum AP Shell Damage (HP) |
Research price (exp) |
Purchase price ( | |
|---|---|---|---|---|---|---|---|---|---|
| 127 mm/50 Tipo tercer año en una montura Tipo C | 7,5 | 26,09 | 93 | 2150 | 9 | 2200 | 0 | 180 000 |
 |
Hit Points (HP) | Armor (mm) | Armor (mm) | Main Turrets (pcs.) | Secondary Gun Turrets (pcs.) | AA Mounts (pcs.) | Torpedo Tubes (pcs.) | Hangar Capacity (pcs.) |
Research price (exp) |
Purchase price ( | |
|---|---|---|---|---|---|---|---|---|---|---|---|
| Fubuki (A) | 11 500 | 6 | 20 | 2 | 2/4/5 | 3 | 0 | 230 000 | |||
| Fubuki (B) | 12 900 | 6 | 20 | 2 | 4/2/15/1/4 | 3 | 10 500 | 950 000 |
 |
Rate of Fire (shots/min) | Torpedo Tubes Reload Time (sec) | 180 Degree Turn Time (sec) | Maximum Damage (HP) | Torpedo Speed (knot) | Torpedo Range (km) |
Research price (exp) |
Purchase price ( | |
|---|---|---|---|---|---|---|---|---|---|
| Tipo 8 mod. 1 | 0,8 | 73 | 7,2 | 14 600 | 63 | 6 | 0 | 180 000 | |
| Tipo 8 mod. 2 | 0,8 | 76 | 7,2 | 16 266 | 59 | 10 | 4000 | 400 000 |
 |
Firing Range Increase (%) | Maximum Firing Range (km) |
Research price (exp) |
Purchase price ( | |
|---|---|---|---|---|---|
| Tipo 6 mod. 1 | 0 | 10,5 | 0 | 105 000 | |
| Tipo 6 mod. 2 | 10 | 11,5 | 3200 | 220 000 |
 |
Maximum Speed (knot) |
Research price (exp) |
Purchase price ( | |
|---|---|---|---|---|
| Propulsión: 50 000 CV | 35 | 0 | 120 000 |
Compatible Upgrades
| Slot 1 | [[File:wows icon_modernization_PCM030_MainWeapon_Mod_I_bb1e79efbcc73dfa03a6dd5ae173566ee691b77e3a6587389d6f7ea07eb03588.png", "local": "{\"default\": \"gui|44px|Modificación 1 del armamento principal|link=Ship:Upgrades#Modificaci.C3.B3n.C2.A01_del.C2.A0armamento_principal]] | [[File:wows icon_modernization_PCM031_SecondaryWeapon_Mod_I_5369d8b071df59a515906433ea1fff10a55841495258bcd04d3365467e61e4af.png", "local": "{\"default\": \"gui|44px|Modificación 1 del armamento auxiliar|link=Ship:Upgrades#Modificaci.C3.B3n.C2.A01_del.C2.A0armamento_auxiliar]] | [[File:wows icon_modernization_PCM032_PowderMagazine_Mod_I_9607d8ec91ddcca4a95443845b888fbd9de4cd81df5a30a199d400657a552017.png", "local": "{\"default\": \"gui|44px|Modificación 1 de la santabárbara|link=Ship:Upgrades#Modificaci.C3.B3n.C2.A01_de_la.C2.A0santab.C3.A1rbara]] | |
|---|---|---|---|---|
| Slot 2 | [[File:wows icon_modernization_PCM006_MainGun_Mod_II_bffc35efc4e090487fd6110a10a2be1f5d51b7918303f724194817e698055412.png", "local": "{\"default\": \"gui|44px|Modificación 2 de la batería principal|link=Ship:Upgrades#Modificaci.C3.B3n.C2.A02_de_la.C2.A0bater.C3.ADa_principal]] | [[File:wows icon_modernization_PCM018_AirDefense_Mod_III_d3f357c6dc4e5e627a86e17a16432cb38da32bb1b7999b4a7852371491511770.png", "local": "{\"default\": \"gui|44px|Modificación 1 de los cañones AA|link=Ship:Upgrades#Modificaci.C3.B3n.C2.A01_de_los.C2.A0ca.C3.B1ones_AA]] | [[File:wows icon_modernization_PCM033_Guidance_Mod_I_10c7521afe2d577c42618dd04cf6834f2be78cf6b64503844cf87793a5816484.png", "local": "{\"default\": \"gui|44px|Modificación 1 de los sistemas de tiro|link=Ship:Upgrades#Modificaci.C3.B3n.C2.A01_de_los.C2.A0sistemas_de_tiro]] | [[File:wows icon_modernization_PCM070_Torpedo_Mod_IV_9e34ebc4f1a15656201b4148e32870eb1c67ddb2fb1a0bc410406236b472d1dd.png", "local": "{\"default\": \"gui|44px|Modificación 1 de los tubos de torpedo|link=Ship:Upgrades#Modificaci.C3.B3n.C2.A01_de_los.C2.A0tubos_de_torpedo]] |
| Slot 4 | [[File:wows icon_modernization_PCM020_DamageControl_Mod_I_bbc708467bc8f1e6264ac88fb8999ea40660e4b0b94b59ab7b3f1a8b60539ed8.png", "local": "{\"default\": \"gui|44px|Modificación 1 del sistema de control de daños|link=Ship:Upgrades#Modificaci.C3.B3n.C2.A01_del.C2.A0sistema_de_control_de_da.C3.B1os]] | [[File:wows icon_modernization_PCM069_Movement_Mod_I_ca8429dcc45fdad36cdd474a13e5a289d6f7cf27ae32c9f30d42b72b9db493af.png", "local": "{\"default\": \"gui|44px|Protección de la sala de máquinas|link=Ship:Upgrades#Protecci.C3.B3n_de_la_sala_de_m.C3.A1quinas]] | ||
| Slot 5 | [[File:wows icon_modernization_PCM023_DamageControl_Mod_II_3c6aea0c5bccc94f1d8f1fa52662232afa007d784638ce6e981c8ad3457c63fa.png", "local": "{\"default\": \"gui|44px|Modificación 2 del sistema de control de daños|link=Ship:Upgrades#Modificaci.C3.B3n.C2.A02_del.C2.A0sistema_de_control_de_da.C3.B1os]] | [[File:wows icon_modernization_PCM024_Engine_Mod_II_4b4f4c217cf5cf580f47ccbbf76ecede110c5143055c55ab45a82d19e87423fb.png", "local": "{\"default\": \"gui|44px|Modificación 1 de la propulsión|link=Ship:Upgrades#Modificaci.C3.B3n.C2.A01_de_la.C2.A0propulsi.C3.B3n]] | [[File:wows icon_modernization_PCM025_SteeringGear_Mod_II_523c86ce4c7d228e73ee3d2cb406f4d78a205aa2453fec45b0925dec519bf7c5.png", "local": "{\"default\": \"gui|44px|Modificación 1 del aparato de gobierno|link=Ship:Upgrades#Modificaci.C3.B3n.C2.A01_del.C2.A0aparato_de_gobierno]] | [[File:wows icon_modernization_PCM089_DepthCharges_Mod_I_734ed2711a1c6aa8227fa258f81054dcc2db8aecf66e4baaf0006589181ceb33.png", "local": "{\"default\": \"gui|44px|Modificación 1 de las cargas de profundidad|link=Ship:Upgrades#Modificaci.C3.B3n.C2.A01_de_las_cargas_de_profundidad]] |
Player Opinion
Performance
With the re-shuffling of the Japanese destroyer line in Update 0.5.15, Fubuki moves down to Tier VI, a more historically-appropriate slot than her old position at Tier VIII.
In order to properly balance her at her new tier, Fubuki in World of Warships is missing one of the aft turrets she had historically. Her resulting main battery armament of two double-barreled 127mm turrets is perhaps sufficient for self-defense, but the reload time of her guns is a anemic 8 seconds. Fubuki won't be doing a lot of offensive work with her main battery; that distinction is left to her three triple-tube torpedo launchers, a notable upgrade over the two launchers of immediate predecessor Mutsuki.
Captains of stock, un-upgraded Fubuki will struggle to make her baseline torpedoes work well. They have a paltry 6.0 km range — oddly worse than those of Mutsuki — to go with Fubuki’s detection radius of 7.0 km. This flies in the face of traditional Japanese destroyer gameplay to this point: that of the stealthy ninja striking unseen. In her early configuration, Fubuki must almost adopt American-style destroyer tactics of using islands to shield her while she launches torpedoes from a favorable position. When combined, all these factors make Fubuki a challenge to play until Hull (B) and the upgraded Torpedo module are unlocked and equipped. Once that happens, though, things take a drastic turn and Fubuki becomes a true joy. Equipped with 10.0 km range torpedoes on a reload of slightly over 70 seconds, she can comfortably swamp single targets with torpedo spreads they will struggle to avoid, or dump her fish at multiple targets simultaneously, causing chaos with enemy formations. Her triple launchers give her tremendous tactical flexibility.
Clocking in at only 35 knots, her maximum speed is a definite drawback and her anti-aircraft suite will barely scratch enemy aircraft. Despite her weaknesses, however, a fully-upgraded Fubuki in the hands of a patient captain is a thing of beauty to behold for her teammates and a true terror to her enemies.Pros:
- Accurate, high-velocity, and long-ranged guns.
- Respectable health pool compared to her contemporaries of other nations.
- Detection radius is better than gunboat destroyers she is likely to run across.
- High volume of torpedoes and highly flexible torpedo launcher configuration (three triple-tube launchers).
- Upgraded torpedo range allows greater versatility and opens the possibility of long-range launches.
Cons:
- Top speed is the lowest in her tier; she cannot outrun pursuing American or Russian destroyers or even some enemy cruisers.
- Stock torpedoes are exceptionally tough to use effectively.
- Long reload time and very poor turret rotation of main battery guns.
- Weak armor, as befits a destroyer.
- Handling is a mixed bag: her rudder response is good, but her turning circle is large compared to her competition at Tier VI.
Research
Optimal Configuration
Upgrades
There are only a few good options for upgrades on Fubuki. Main Armaments Modification 1 is the best pick for Upgrade Slot 1, while Propulsion Modification 1 is recommended in Upgrade Slot 4. Propulsion Modification 2 is the best pick of a sorry lot for Upgrade Slot 5. Upgrade Slot 2 offers either Aiming Systems Modification 1 or Main Battery Modification 2; either offers a minor boost to Fubuki’s main battery.
Commander Skills
Like any good ninja, Fubuki commanders rely on stealth and having a low detection radius to impact a battle. This makes Tier 4's Concealment Expert the best skill captains can invest in. Up to that point, there are some easy skills to pick up and some tough choices to make.
Preventative Maintenance is the easy pick at Tier 1; Priority Target is generally not very useful on a destroyer that spends its time evading detection and attacking from stealth. Tier 2 offers a trio of potential winners in Expert Marksman, Adrenaline Rush, and Last Stand, but improving her engine, rudder and torpedo tubes, latter is highly recommended — especially in Fubuki’s stock configuration. Torpedo Armament Expertise and Superintendent are the top choices of Tier 3. Among the other skills available, Vigilance may provide some captains with valuable reaction time to avoid enemy torpedoes, and Survivability Expert pushes Fubuki’s health pool up to 15,000 points with the upgraded hull.
Tier 4 offers one outstanding option and a few intriguing possibilities. After the necessary Concealment Expert, Advanced Firing Training may be worth considering, pushing Fubuki’s main battery range out far enough to a maximum of 13.8 km when she's fully upgraded. Another possibility is Radio Location, which may allow Fubuki to more easily ambush her enemies, particularly during the late game, and by deduction evade undetected destroyers.
| Recommended Commander Skills | ||||||||
|---|---|---|---|---|---|---|---|---|
| Cost (points) |
Endurance | Attack | Support | Versatility | ||||
| 1 |
★ |
★★★ |
|
|
|
|
|
|
| 2 |
★ |
★★ |
★ |
★ |
★ |
|
★★ |
★★★ |
| 3 |
★★ |
★ |
★★ |
|
|
★★★ |
|
★ |
| 4 |
|
|
★ |
|
★★ |
|
★★ |
★★★ |
| Key: ★★★ - Extremely Useful ★★ - Frequently Useful ★ - Occasionally Useful No stars - Not Useful | ||||||||
Consumables
As Fubuki is the slowest destroyer of all the Tier VI destroyers, it's highly recommended to mount premium Engine Boost II for better escaping from her peers. Premium Smoke Generator II is also highly recommended mainly for defensive usage, again because she is the slowest destroyer compared to her peers. Lastly, premium Damage Control Party II is also highly recommended because when she is caught facing off against her peers, and the fact that she is a destroyer with a high chance of incapacitation of vital modules (engine control, rudder control), the player will have to utilize the best of her speed to be able to escape.
Camouflage
Type 1, 2, or 5 camouflage can be equipped for credits; Types 1 or 5 are recommended at a minimum to reduce detectibility range.
Players who wish to spend doubloons can equip Fubuki with Type 16 camouflage that lowers her detection radius, reduces the accuracy of incoming shells, and increases the amount of experience she earns.
Signals
For players looking for a competitive playstyle, it is highly recommended to mount the following signals: Juliet Charlie, Sierra Mike, November Foxtrot, Victor Lima, India X-Ray, and Juliet Whiskey Unaone.
Juliet Charlie protects the player from the increased potential detonation chances which India X-Ray and Juliet Whiskey Unaone give. In exchange, the two flags provide a potential increase in damage (+0.5% fire chance and +15% chance to causing flooding respectively). There is no need to worry about Victor Lima's debuff (+4% chance of getting flooding), as Fubuki is a destroyer and will most likely not survive a torpedo strike.
Sierra Mike provides Fubuki the much-needed speed (35 kts to 36.75 kts) to face off against her peers, and November Foxtrot provides that small but potentially life-saving decrease in cooldown timer for the mounted consumables.
Players looking for a more relaxed play or simply grinding down the line are highly recommended to mount the following signals: Equal Speed Charlie London, Juliet Charlie, Sierra Mike, Zulu, November Foxtrot, and Zulu Hotel.
Equal Speed Charlie London will help speed up the player's XP grind and Zulu will help make a little extra credits for the player during the grind. Sierra Mike will give a more comfortable speed for players who wish to be able to cruise to their next target location during a battle. Juliet Charlie is optional for players who dislike being detonated. November Foxtrot is also optional, but if the player dislikes dealing with a disabled engine, rudder, or other vital module, then this can be coupled with premium Damage Control Party II for a more relaxing play. Zulu Hotel will increase commander training and retraining (if the player chose to use his captain from the preceding Tier V destroyer Mutsuki).Gallery
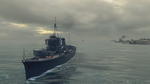
Fubuki leads her team into battle.
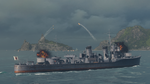
Fubuki launches all of her torpedoes at a cluster of enemy battleships.

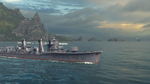
A torpedo narrowly speeds past the destroyer.
Fubuki fires her main guns at an enemy North Carolina.
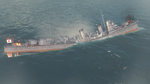
After sustaining a torpedo hit, Fubuki breaks in half and sinks.


Historical Info
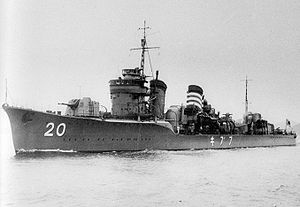
Historical Gallery


.jpg)


