Détection & camouflage
| Version du 18 octobre 2018 à 15:21 | Version du 18 octobre 2018 à 15:22 | |||
| Ligne 15 : | Ligne 15 : | |||
| *Pour les traçantes des véhicules non repérés: | *Pour les traçantes des véhicules non repérés: | |||
| **En mode [[#Arcade_View|Vue Arcade]] et [[#Sniper_View|Vue Sniper]], les traçantes sont visibles si elles sont émises de la position que vous visez, avec un angle de + ou - 25°. [https://overlord-wot.blogspot.com/2011/10/thoughts-on-upcoming-70.html] Sur cette image, vous pouvez seulement voir la traçante dans les deux premiers cas: <br />[[image:Tracers_arcage.jpg|link=]] | **En mode [[#Arcade_View|Vue Arcade]] et [[#Sniper_View|Vue Sniper]], les traçantes sont visibles si elles sont émises de la position que vous visez, avec un angle de + ou - 25°. [https://overlord-wot.blogspot.com/2011/10/thoughts-on-upcoming-70.html] Sur cette image, vous pouvez seulement voir la traçante dans les deux premiers cas: <br />[[image:Tracers_arcage.jpg|link=]] | |||
| ? | **En mode [[#Strategic_View_.28SPG.29| | + | **En mode [[#Strategic_View_.28SPG.29|Vue stratégique]], toutes les traçantes sont visibles sur votre écran. | |
| === Portée de vue === | === Portée de vue === | |||
Version du 18 octobre 2018 à 15:22

Vous ne verrez jamais tout ce qui se passe en jeu. Les mécaniques de jeux et les limitations techniques limitent ce que vous pouvez voir à tout moment. La principale limitation technique est la performance du serveur. La mécanique de repérage utilise 30% des ressources du serveur pour faire tourner la bataille.
On distingue 3 principaux termes qui sont souvent confondus par les joueurs:
- Distance d'affichage - Limitation technique qui permet de voir les tanks et les autres objets dans ce monde en 3D. Cette distance est de 707m maximum.
- Portée de repérage - Cette mécanique de jeu permet de repérer, c'est à dire faire apparaître les cibles, par vous même. Cette portée est de 445m maximum.
- Portée de vue - Une valeur spécifique à chaque char qui permet de calculer la portée de repérage et ne dépends pas de vous. Il n'y a aucune limitation en théorie.
Ce qui suit explique plus en détails les termes précédents ainsi que d'autres facteurs importants.
Sommaire
Traçantes d'obus
Vous pouvez voir les traçantes d'obus si les conditions suivantes sont respectées:
- Vous verrez toujours les traçantes d'obus de vos alliés (en fonction des limitations de la distance d'affichage).
- Vous verrez toujours les traçantes d'obus des ennemis repérés (en fonction des limitations de la distance d'affichage).
- Pour les traçantes des véhicules non repérés:
- En mode Vue Arcade et Vue Sniper, les traçantes sont visibles si elles sont émises de la position que vous visez, avec un angle de + ou - 25°. [1] Sur cette image, vous pouvez seulement voir la traçante dans les deux premiers cas:

- En mode Vue stratégique, toutes les traçantes sont visibles sur votre écran.
- En mode Vue Arcade et Vue Sniper, les traçantes sont visibles si elles sont émises de la position que vous visez, avec un angle de + ou - 25°. [1] Sur cette image, vous pouvez seulement voir la traçante dans les deux premiers cas:
Portée de vue
La portée de vue est la distance maximale théorique que votre chef de char (pas vous!) peut voir, et dépends de la tourelle de votre véhicule, de votre compétence de base du chef de char, si ce dernier possède Œil de lynx et si l'opérateur radio possède Longue-Vue, tout comme les statistiques de votre char et ses améliorations possibles à travers les différents équipements comme des optiques traitées ou un télescope binoculaire. La portée de vue n'a pas d'impact en elle-même, elle permet simplement de calculer la portée de repérage. Elle ne doit pas être confondue avec la distance d'affichage, puisqu'elle n'a aucun impact dessus.
Les équipements améliorant la portée de vue ne touchent aucune autres statistiques. Ils augmentent la portée de vue jusqu'à une distance particulière. Si votre portée de vue, sans les équipements, excède déjà cette limite, rajouter des équipements n'augmentera pas votre portée de vue.
Cependant, il n'y a pas de limite des 500m sur la portée de repérage. Plus votre portée de vue sera élevée et meilleure sera votre portée de repérage, a l'intérieur de votre portée de vue. En gros, cela signifie que votre tank aura un "bonus" de portée de vue, surtout si votre adversaire possède du camouflage. Ce bonus va réduire la valeur de camouflage de l'adversaire jusqu'à un minimum de 0% avant que votre portée de vue ne décroisse alors que vous essayez de repérer un tank adverse.
La portée de vue maximale que vous pouvez actuellement avoir (v1.2.0.1) dans le jeu est d'à peu près 606.79m avec un M48A1 Patton,un M60 ou un Waffenträger auf E 100 avec un chef de char entraîné à 100% et un équipage entraîné avec la compétence Frères d'armes, le chef de char doit avoir la compétence Œil de lynx à 100%, l'opérateur radio doit avoir la compétence Longue-vue à 100%, et avoir équipé la Ventilation améliorée et le Télescope binoculaire. Vous devez aussi utiliser un consommable premium comme la Caisse de Cola ou le Chocolat respectivement pour le Patton et le M60, et le WT auf E100.
Spotting Range
Spotting Range is the maximum distance at which you will detect/spot an enemy tank if you have line of sight.
Minimum Spotting Range
You will always spot any vehicle that comes within 50m of you, regardless of line of sight. Because you do not need line of sight, this is also called proximity spotting, and can be used on certain maps to spot enemies going past a choke-point without actually being exposed to them.
Maximum Spotting Range
You can never spot a vehicle further away than 445m, the game engine performs no spotting checks past this boundary.
Note that unlike draw distance limits, spotting range limits are the same in all directions (think of a virtual bubble instead of a cube).
Calculating Spotting Range
Spotting Range is not a fixed value particular to your tank, but depends on the target you are spotting, its current position and situation. In other words, as many different individual spotting ranges are calculated by the server for your tank as there are targets within the minimum and maximum spotting ranges to you. For each target the spotting range is calculated invidiually according to the following formula:
![]()
If your spotting range to a vehicle equals or exceeds your distance to that vehicle, and you have line of sight, or if the vehicle is within the minimum spotting range, you will spot it. Otherwise it remains hidden to you unless spotted by another vehicle on your team that you are in radio communication with.
See above for how effective view range can be calculated. Camouflage mechanics are explained below.
Spotting Mechanics
To determine whether you have line of sight to a vehicle within your spotting range and will thus spot it, the server calculates a virtual vision ray extending from one of two view range ports on your vehicle to each of the six visiblility checkpoints of the target vehicle.
If a vision ray is obstructed by non-transparent objects like houses, terrain, or even just a lamp post, this ray ends there and does not reach the target vehicle. Important to know is that both the vehicle being spotted as well as other vehicles from other players are fully transparent as far as spotting mechanics go.
If no vision rays reach their target, you will not spot it. But if at least one of the six vision rays reaches the target, you will spot the vehicle and it will light up if it was previously hidden. At this point it makes no difference if any of the other visions rays would reach their target as well because.
View Range Ports
Each tank has two View Range Ports as shown in this illustration:

- Static View Range Port: A static location on the tank model, placed on its highest elevation and centered there.
- Dynamic View Range Port: Located where gun is mounted to the turret, dynamically moves along with the turret.
In general, the two view range ports take turns every 2 seconds, i.e. every 2 seconds visibility checks are performed using the respective other view range port.
Visibility Checkpoints
Each tank has six Visibility Checkpoints distributed across the tank as shown in this illustration:

- Top, Middle of Turret (same location as Static View Range Port)
- Gun Mount (same location as Dynamic View Range Port)
- Front, Center of Hull
- Rear, Center of Hull
- Right Side, Middle of Turret
- Left Side, Middle of Turret
Rate of Visibility Checks
You will not necessarily spot an enemy tank as soon as you have line of sight on it. The rate of visibility checks is limited as follows:
- within 50 m range - every 0.1 sec
- within 150 m range - every 0.5 sec
- within 270 m range - every 1.0 sec
- within 445 m range - every 2.0 sec
NOTE: While Overlord confirmed the above as still correct for 0.7.1, US community manager Vallther claimed on 23 January 2012 that the frequency of the visibility checks depends "a lot on the map" and that he "requested a total check from Q&A regarding the matter". [2]
The rate limitation on visibility checks means that it is entirely possible that a hidden tank moves out of cover right after a visibility check, shoots you, and returns back into cover right before the next visibility check, thus never getting spotted and staying hidden. This can also lead to fast tanks getting spotted only closer to you than your spotting range would normally allow - at a maximum speed of 72 km/h a tank can cross 40m between spotting checks past 270m range.
Spotting Duration
Once spotted, a vehicle stays lit up for a minimum duration of 5 seconds which can extend up to 10 seconds after the spotter moves out of spotting range or gets destroyed. The exact duration seems to be random. Tanks spotted right next to each other may stay lit up for different durations. The Designated Target perk for the Gunner extends this duration further.
Camouflage
One factor when calculating spotting range is the camouflage factor of the vehicle to be spotted. The higher the target's camouflage factor, the shorter the spotting range.
Calculating the Camouflage Factor
The camouflage factor is calculated as follows:
camoFactor = baseCamo * (0.00375 * camoSkill + 0.5) * camoAtShot + camoPattern + camoNet + environmentCamo
The camoFactor cannot exceed a value of 1, so if the equation results in a higher value camoFactor is set to 1.
Let's look at the different elements of that equation in detail:
- baseCamo
- Every vehicle in game comes with a base camouflage value assigned to it by the developers as part of game balancing. The value is defined separately for moving and for standing still. The baseCamo value is generally lower while moving the hull than while standing still, but for some tanks including most light tanks the values are equal for both states, which is a big advantage for dedicated scout tanks.
The baseCamo values are not shown in game but can be calculated based on the spotting range formula and the formula for the camouflage factor explained here. Allow for a certain margin of error because of differences in the distance display in game and the distance between visibility checkpoints and view range ports plus the fact that in game distance is only shown in 1 meter steps.
An incomplete list of measured spotting ranges in meters can currently be found in this table. First value is for standing, second for moving and third for shooting. A tank with 400m viewrange and 100 percent crew was used during tests, without any special perks/skills/equipment/consumables. All other tables like this and this should be considered outdated, because several camo factors changed in 0.8.6. Also note that some fan sites display base camo values dating from the v0.6.2.8 closed beta game client. Nearly all of these values are outdated by now, you should ignore them.
- camoSkill
- This is your crew's effective skill level for the Camouflage skill.
- camoAtShot
- This is another value defined by the developers for tank/turret/gun combination individually as part of game balancing. The same gun can have a different value on different tanks (or theoretically even on different turrets on the same tank, although no example is known of that). Gun caliber or existence of a muzzle brake on the gun have no influence on this value.
The value is not displayed in game, but can be determined through testing in the same way as the baseCamo value (see above). The value is on average around 25%.
- camoPattern
- This is the camouflage bonus provided by a camouflage pattern permanently bought for gold or temporarily rented for credits via the "Exterior" window. If a camouflage pattern of the same type as the map you are playing on (summer, winter, desert) is applied. The amount added depends on vehicle type, biggest is for tank destroyers. the Maps page for details on which category a map falls into. Since map selection in most game modes is random, for most of your tanks you'll have to buy a camouflage pattern for all three map types if you want to ensure you always get the bonus. However, as mentioned in the Map Restrictions section above, tier 1 tanks and some tier 2 tanks will currently never play on a Winter or Desert map in random battle mode.
- camoNet
- This is the camouflage bonus provided by Camouflage Net equipment, if installed and active (you must have been standing without moving your hull for at least 3 seconds). It provides a bonus based on vehicle type, biggest is for tank destroyers.
- environmentCamo
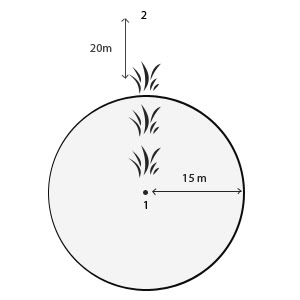 Environment Camouflage Schema
As soon as you fire your gun, the camouflage bonus provided by transparent objects in a 15m radius around your tank is reduced to 30% of the original value. Objects furter away are unaffected.
Environment camouflage bonuses stack, but special rules apply when firing your gun:
- In the illustration to the right, each bush provides the same environment camouflage bonus X. Since these bonuses stack, tank 1 has an environmentCamo value of 3 * X.
- However, as soon as tank 1 fires its gun, the environment bonuses within the 15m radius no longer stack. Instead, only the bonus from the bush with the highest camouflage bonus is taken into account. In addition, the bonus from that bush is reduced to 30% of its original value, so 0.3 * X. Bonuses from environment outside of the 15m radius stack as usual. Thus, while firing tank 1 has an environment camouflage bonus of 0.3 * X + X = 1.3 * X.
No camouflage bonus is provided by:
- Player tanks (dead or alive)
- Grass
- Downloadable camouflage skins as opposed to the camouflage patterns you buy for gold or rent for credits
- Anything else
Note that your tank does not need to be fully hidden to take advantage of an environment camouflage bonus, the environment only needs to cover all of your visibility checkpoints in the direction of the spotting tank's view range ports for the bonus to apply.
Examples
Let's look at an example to see how it all comes together.
Say our spotting target has a baseCamo coefficient of 25% or 0.25 while standing still and 15% or 0.15 while moving the hull. The camoAtShot factor is 25% or 0.25 as well. The entire crew of 5 has 100% Camouflage skill level and the Commander has 100% primary skill level. Improved Ventilation equipment is installed. Our tank is sitting completely inside of a dense bush and has not been moving for more than 3 seconds.
The effective camouflage skill is:
- (100 + 5 + (100 + 5 + (100 + 5) * 0.1) * 4) / 5 = 113.4
Should this calculation be confusing to you, remember that you need to factor in both the bonus from Improved Ventilation equipment as well as the Commander bonus. It would, however, be understandable if the calculation above still seems confusing, because there's no way to tell what those figures relate to unless you spend some minutes figuring out the equation. To make things easier for you, here's the above numbers explained:
- (CommanderSkill + VentBonus + (CrewSkill + VentBonus + (CommanderSkill + VentBonus) * 0.1) * NumberOfNonCommanderCrewMembers) / TotalNumberOfCrewMembersIncludingCommander = X
Now we can calculate the camouflage factor using the value for the effective camouflage factor:
- 0.25 * (0.00375 * 113.4 + 0.5) + 0.64 = 0.8713125 (87.13%)
As soon as our tank starts moving out of the bush, the camouflage factor is as follows:
- 0.15 * (0.00375 * 113.4 + 0.5) = 0.1387875 (13.88%)
Now to get a complete spotting example, let's add an example spotter with an effective view range of 400m. Spotting range is calculated as follows:
First example: 400 - (400 - 50) * 0.8713125 = 95.04m spotting range.
Second example: 400 - (400 - 50) * 0.1387875 = 351.42m spotting range.
Tips
- A camoFactor of 1 means your tank is invisible up to 50m to any possible spotter.
- Bushes or standing trees within the 15m diameter become transparent to your view. This helps you determine your distance from them.
- To maximize your use of camouflage bonus provided by your environment, do not sit inside of bushes while you fire, instead sit more than 15m behind one or even several bushes. This is particularly important for scouts. Firing reveals your position. If you absolutely need to take a shot, e.g. to track your target for your team's artillery, pull back just before you take the shot - your target will stay visible to you even with the bush intransparent for the normal spotting duration. However, don't forget that enemies can see your tracers, so you may see shells homing in on your position despite being invisible to the enemy.
- Since dedicated scout tanks have the same high base camouflage values while standing still as they do while moving, they are best for reaching forward spotting positions unseen.
- Baiting the enemy to shoot you can be an effective tactic to light them up because of the camouflage reduction while shooting.
- As long as you are outside of 445m maximum spotting range you do not need to worry about camouflage, you will be invisible to the enemy team regardless of what you do. The difficulty is knowing whether you are outside of their maximum spotting range - keep paying attention to the minimap as enemy tanks get spotted and memorize their locations/count.
Radio Range

Each vehicle comes equipped with a radio that allows your Radio Operator to communicate with other vehicles on your team. Two friendly vehicles can communicate if they are no further away from each other than the sum of their respective radio ranges (also called signal ranges). For example, a tank with 300m effective radio range and a tank with 500m effective radio range stay in communication up to a distance of 800m. Your effective radio range depends on your vehicle's radio and on the effective skill level of those crew members responsible for the Radio Operator role.
If you are in communication with a friendly vehicle, then you will share information about the position and health of all enemy vehicles either of you are currently spotting. You will not relay any information received from other friendly vehicles via radio communication, however, nor will it be relayed to you. In other words, you will know the location of:
- Any friendly vehicle within your combined radio ranges.
- Any vehicles (friend or foe) spotted by you.
- Any vehicles (friend or foe) spotted by a friendly vehicle that is within your combined radio ranges.
Example:
- You are looking down a long street from your tank destroyer and do not see any enemies, because they are outside your own spotting range. However, when a friendly tank moves down the street, it spots an enemy tank that was there all along. As long as you are within radio range of that friendly tank, you will see that enemy tank just as if you were spotting it yourself.
- See the illustration to the right for an example of a more complex situation.