Akatsuki

| Cena výzkumu63000 exp |
| Pořizovací cena5 100 000 |
| HP (body zdraví)11 600 |
| 127 mm/50 3rd Year Type na palebném stanovišti Type B3 х 2 ks. |
| Rychlost střelby8 ran/min. |
| Doba přebíjení7.5 sek |
| Rychlost otočení6.9 stupňů/sek |
| Čas otočení o 180 stupňů26.09 sek |
| Dostřel9.43 km |
| Maximální rozptyl92 m. |
| HE granát127 mm HE Type1 |
| Maximální poškození HE granátu2 150 |
| Procento zapálení HE granátem9 % |
| Úsťová rychlost HE granátu915 m/s |
| Hmotnost HE granátu23 kg |
| AP granát127 mm AP Type0 |
| Maximální poškození AP granátu2 200 |
| Úsťová rychlost AP granátu915 m/s |
| Hmotnost AP granátu23 kg. |
| 610 mm 3hlavňový3 х 3 ks. |
| Rychlost střelby0.86 ran/min. |
| Čas přebití70 sek |
| Rychlost otočení25 stupňů/sek |
| 180 Degree Turn Time7.2 sek |
| TorpédoType8 mod. 2 |
| Maximální poškození16 267 |
| Rychlost torpéda59 uzlů |
| Dosah torpéd9.99 km |
| 127 mm/50 3rd Year Type na palebném stanovišti Type B3 х 2 ks. |
| . . . Průměrné poškození za vteřinu30.3 |
| . . . Dostřel5.01 km |
| 25 mm/60 Type 96 na samostatném palebném stanovišti4 х 1 ks. |
| . . . Průměrné poškození za vteřinu7.2 |
| . . . Dostřel2.49 km |
| Maximální rychlost38 uzlů |
| Poloměr otáčení640 m. |
| Čas otočení kormidla4.5 sek |
| Odhalení z hladiny7.16 km |
| Odhalení ze vzduchu3.02 km |

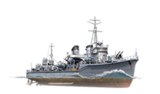
Akatsuki — tier VII torpédoborec Japonska.
This ship belonged to the "special type" series of destroyers. In contrast to Fubuki-class ships, she had more efficient propulsion and boasted a substantially higher speed.
Moduly
 |
Rychlost střelby (shots/min) | Čas otočení o 180° (sec) | Maximální rozptyl (m) | Maximum HE Shell Damage (HP) | Chance of Fire on Target Caused by HE Shell (%) | Maximum AP Shell Damage (HP) |
Research price (exp) |
Purchase price ( | |
|---|---|---|---|---|---|---|---|---|---|
| 127 mm/50 3rd Year Type na palebném stanovišti Type B | 8 | 26,1 | 92 | 2 150 | 9 | 2 200 | 0 | 390 000 |
 |
Body výdrže (HP) | Armor (mm) | Armor (mm) | Hlavní věže (pcs.) | Sekundární dělové věže (pcs.) | Bodová obrana (pcs.) | Torpédomety (pcs.) | Hangar Capacity (pcs.) |
Research price (exp) |
Purchase price ( | |
|---|---|---|---|---|---|---|---|---|---|---|---|
| Akatsuki (A) | 11 600 | 6 | 20 | 3 | 4/3 | 3 | 0 | 500 000 | |||
| Akatsuki (B) | 13 100 | 6 | 20 | 3 | 2/1/4/3 | 3 | 12 400 | 1 100 000 |
 |
Rychlost střelby (shots/min) | Torpedo Tubes Reload Time (sec) | Čas otočení o 180° (sec) | Maximální poškození (HP) | Rychlost torpéda (knot) | Dosah torpéda (km) |
Research price (exp) |
Purchase price ( | |
|---|---|---|---|---|---|---|---|---|---|
| Type8 mod. 2 | 0,9 | 70 | 7,2 | 16 266 | 59 | 10 | 0 | 400 000 | |
| Type90 mod. 1 | 0,8 | 76 | 7,2 | 17 233 | 62 | 10 | 16 400 | 1 300 000 |
 |
IDS_SHIP_PARAM_SUO_INCREASE_DIST (%) | Maximum Firing Range (km) |
Research price (exp) |
Purchase price ( | |
|---|---|---|---|---|---|
| Type7 mod. 1 | 0 | 0 | 235 000 | ||
| Type7 mod. 2 | 0 | 6 200 | 500 000 |
 |
Maximální rychlost (knot) |
Research price (exp) |
Purchase price ( | |
|---|---|---|---|---|
| Pohon: 50 000 hp | 38 | 0 | 350 000 |
Vybavení
| Slot 1 | |||||
|---|---|---|---|---|---|
| Slot 2 | |||||
| Slot 3 | |||||
| Slot 4 |
Názor hráče
Představení lodi
In many ways, Akatsuki is a side-grade from Fubuki. She is largely the same as her immediate predecessor, with a few minor improvements.
Chief among these is a notable increase in her top speed. One of Fubuki’s more irksome negatives is her maximum speed of 35 knots; Akatsuki’s top speed bumps up to 38 knots. Her handling characteristics are almost the same as Fubuki as well, retaining her turning circle radius while losing time on rudder shift. Also improving is Akatsuki’s main battery. Though her guns are not her main damage dealer, she picks up two more barrels via an additional turret on the aft end of the ship. This makes her a more significant threat when she does decide to open up with her guns. The turrets themselves are the same as those on Fubuki, and they reload a little faster.
Akatsuki’s primary armament is in the same configuration as Fubuki’s — three triple-tube torpedo launchers — while having access to slightly better torpedoes in terms of damage. Her detection radius is slightly higher than her immediate predecessor's as well, so captains will have to be a touch more cautious in their positioning when there are enemy gunboat destroyers — such as Mahan or Kiev — in the mix. She is as vulnerable to enemy aircraft as most other destroyers as well, so when and enemy carrier is present, cautious play is recommended.
While Akatsuki is not a huge upgrade from Fubuki, the upgrades she does get are key to allowing her to remain competitive in her tier.Plusy:
- Three triple-tube torpedo launchers give her enormous flexibility.
- Six main battery guns give Akatsuki a much nastier punch in gunfights than Fubuki.
- Excellent top speed.
- Good overall handling characteristics; veterans of Fubuki will feel comfortable maneuvering their new ship.
Mínusy:
- Large detection radius is a significant handicap.
- Anti-aircraft suite is as weak as captains playing through the line have come to expect.
- Health pool is on the low end for Tier VII destroyers.
- Lacks access to the Posilovač dobíjení torpéd (
 ) consumable that Shiratsuyu gets.
Výzkum
Doporučená konfigurace
Vylepšení
The recommended upgrades for Akatsuki are as follows:
- Slot 1: Úprava hlavní výzbroje 1 (
 )
)
- Slot 2: Úprava pohonu 1 (
 )
)
- Slot 3: Úprava zaměřovacích systémů 1 (
 ) or Úprava hlavní baterie 2 (
 )
)
- Slot 4: Úprava pohonu 1 (
 )
)
Most of the upgrades Akatsuki captains will equip are pretty self-explanatory; there isn't a lot of variety available to significantly improve her performance. Slot 1 is best filled with Main Armaments Modification 1. Most captains will opt for Aiming Systems Modification 1 in Slot 3, but Main Battery Modification 2 is also a decent choice; when Main Battery Modification 2 is combined with Level 3 commander skill Basic Firing Training, the impact to Akatsuki’s reload time is negligible while the improvement to her turret rotation is notable. Propulsion Modification 1 is the number one pick for Slot 4 in order to protect Akatsuki’s mobility; Propulsion Modification 2 is recommended in Slot 4 for similar reasons.
Kapitánské body
Commander skill points are best spent on Preventative Maintenance or Priority Target at Level 1 and Concealment Expert at Level 4. The tiers in between offer a variety of options for captains to choose from, allowing them to tailor their Akatsuki play in whichever way suits them best.
Level 2's Torpedo Armament Expertise is always attractive to Japanese destroyer captains. Captains who fear having their engine disabled more will want to consider Last Stand instead. Expert Marksman also offers a significant buff to her turret rotation speed.
Tough choices also abound at Level 3. Torpedo Acceleration is appealing, lowering her torpedo range to 8.0 km while increasing the top speed of her Type 90 torpedoes to 67 knots. This gives enemies approximately 0.7 seconds less of reaction time. Vigilance is also a good option, allowing Akatsuki captains to avoid enemy torpedoes easier themselves as well as spot them for teammates. Superintendent might also be a good pick for captains who don't wish to spend credits on premium consumables. Survivability Expert helps shore up one of Akatsuki’s bigger weaknesseses: her health pool. Demolition Expert helps make her main battery guns more effective at lighting enemy ships on fire.
Level 4 doesn't offer Akatsuki much besides Concealment Expert, though Advanced Firing Training improves her main battery range and gives her a larger window from which she can fire her guns. Radio Position Finding is an intriguing skill that can help cunning players avoid enemy destroyers (or actively hunt them).
| Doporučené přidělení kapitánských bodů | ||||||||
|---|---|---|---|---|---|---|---|---|
| Cena (body) |
Vytrvalostní | Útočné | Podpůrné | Všestranné | ||||
| 1 |
|
|
|
|
|
|
|
|
| 2 |
|
|
|
|
|
|
|
|
| 3 |
|
|
|
|
|
|
|
|
| 4 |
|
|
|
|
|
|
|
|
| Key: ★★★ - Extrémně užitečné ★★ - Často užitečné ★ - Příležitostně účinné nic - zbytečné | ||||||||
Spotřební doplňky
Akatsuki can equip the following consumables:
- Slot 1: Havarijní tým (
 )
)
- Slot 2: Kouřový generátor(
 )
)
- Slot 3: Posílení motoru

Like all destroyers, Havarijní tým II (![]() ) is recommended in order to repair broken modules when under enemy fire. The premium version of Kouřový generátor(
) is recommended in order to repair broken modules when under enemy fire. The premium version of Kouřový generátor(![]() ) is also a good pick to ensure she can escape when needed. Šablona:Engine Boost II likely isn't necessary.
) is also a good pick to ensure she can escape when needed. Šablona:Engine Boost II likely isn't necessary.
Kamufláž
Type 1, 2, or 5 camouflage can be equipped for credits; Types 1 or 5 are recommended at a minimum to reduce detectibility range.
Players who wish to spend doubloons can equip Akatsuki with Type 17 camouflage that lowers her detection radius, reduces the accuracy of incoming shells, reduces her repair costs, and increases the amount of experience she earns.
Signály
For players looking for a competitive playstyle, it is highly recommended to mount the following signals: Juliet Charlie, Sierra Mike, November Foxtrot, Victor Lima, India X-Ray, and Juliet Whiskey Unaone.
Juliet Charlie protects the player from the increased potential detonation chances which India X-Ray and Juliet Whiskey Unaone give. In exchange, the two flags provide a potential increase in damage (+0.5% fire chance and +15% chance to causing flooding respectively). There is no need to worry about Victor Lima's debuff (+4% chance of getting flooding), as Akatsuki is a destroyer and will most likely not survive a torpedo strike.
Sierra Mike provides Akatsuki a healthy boost to her speed (38 kts to 40 kts), and November Foxtrot provides that small but potentially life-saving decrease in cooldown timer for the mounted consumables.
Players looking for a more relaxed play or simply grinding down the line are highly recommended to mount the following signals: Equal Speed Charlie London, Juliet Charlie, Sierra Mike, Zulu, November Foxtrot, and Zulu Hotel.
Again, Equal Speed Charlie London will help speed up the player's XP grind and Zulu will help make a little extra credits for the player during the grind. Sierra Mike will give a more comfortable speed for players who wish to be able to cruise to their next target location during a battle. Juliet Charlie is optional for players who dislike being detonated. November Foxtrot is also optional, but if the player dislikes dealing with a disabled engine, rudder, or other vital module, then this can be coupled with premium Damage Control Party II for a more relaxing play. Zulu Hotel will increase commander training and retraining (if the player chose to use his captain from the preceding Tier VI destroyer Fubuki).
Doporučené Signály 
| |||||
|---|---|---|---|---|---|
| Bojové | |||||
 |
 |
 |
 |
 |
 |
 |
 |
 |
 |
 |
 |
 |
 | ||||
Poznámka: Použití signálu Juliet Charlie plně zabraňuje detonaci.
Galerie
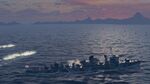
Akatsuki fires torpedoes at incoming battleships.
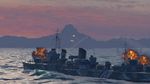
Akatsuki engages another enemy Akatsuki.
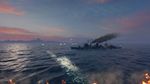
Under enemy fire, Akatsuki attempts to dodge enemy torpedoes.
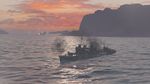
Akatsuki fires at an enemy Atago from within her smokescreen.


Historické informace
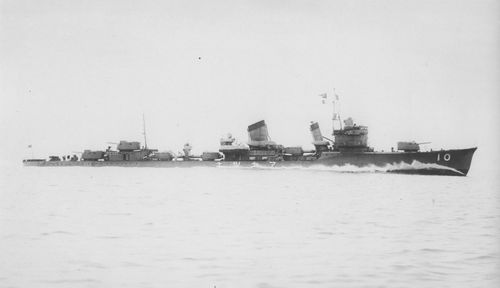
Historické snímky


Video
| torpédoborce | II Tachibana |
| křižníky | I Hashidate • II Chikuma • III Tenryū • III Katori |
| bitevní lodě | II Mikasa |
| letadlové lodě | IV [[Ship:Hōshō (< 23.01.2019)|Hōshō (< 23.01.2019)]] • IV Hōshō • V [[Ship:Zuihō (< 23.01.2019)|Zuihō (< 23.01.2019)]] • VI [[Ship:Ryūjō (< 23.01.2019)|Ryūjō (< 23.01.2019)]] • VI Ryūjō • VII [[Ship:Hiryū (< 23.01.2019)|Hiryū (< 23.01.2019)]] • VII [[Ship:Kaga (< 23.01.2019)|Kaga (< 23.01.2019)]] • VIII [[Ship:Shōkaku (< 23.01.2019)|Shōkaku (< 23.01.2019)]] • VIII Shōkaku • VIII Kaga |
| Nizozemí | IX Groningen |
| U.S.A. | II Sampson • II Smith |
| Commonwealth | III Vampire |
| Evropa | II Tátra • III Romulus • IV Klas Horn • V Visby • V Muavenet • V Kalmar |
| Německo | II V-25 • III G-101 • IV V-170 • V T-22 • VI Ernst Gaede • VI T-61 |
| U.S.S.R. | II Storozhevoi • III Derzki • IV Izyaslav • V Gremyashchy |
| Itálie | II Curtatone • III Nazario Sauro • IV Turbine • V Maestrale • VI Aviere • VI Leone |
| Pan-Amerika | VI Juruá |
| Japonsko | II Tachibana |
| U.K. | II Medea • III Valkyrie • III Campbeltown |
| Francie | II Enseigne Gabolde • III Fusilier • IV Bourrasque • V L'Adroit • V Jaguar • V Siroco |
| Pan-Asie | II Longjiang • III Phra Ruang • IV Shenyang • V Jianwei • VI Fushun • VI Anshan |
| Španělsko | X Álvaro de Bazán |