Furutaka

| Cena výzkumu11500 exp |
| Pořizovací cena1 370 000 |
| HP (body zdraví)28 300 |
| IDS_PJGM144_200MM50_TYPE_E_RF3 х 2 ks. |
| Rychlost střelby2.73 ran/min. |
| Doba přebíjení22 sek |
| Rychlost otočení6 stupňů/sek |
| Čas otočení o 180 stupňů30 sek |
| Dostřel12.62 km |
| Maximální rozptyl109 m. |
| HE granát200 mm HE běžný Type4 |
| Maximální poškození HE granátu3 300 |
| Procento zapálení HE granátem17 % |
| Úsťová rychlost HE granátu870 m/s |
| Hmotnost HE granátu110 kg |
| AP granát200 mm AP Type5 |
| Maximální poškození AP granátu4 500 |
| Úsťová rychlost AP granátu870 m/s |
| Hmotnost AP granátu110 kg. |
| 76 mm /40 3rd Year Type na samostatném palebném stanovišti4 х 1 ks. |
| Dostřel4.3 km |
| Rychlost střelby17.14 ran/min. |
| Čas přebití3.5 sek |
| HE granát76 mm HE Mk2 |
| Maximální poškození HE granáty1 300 |
| Úsťová rychlost HE granátu680 m/s |
| Procento zapálení HE granáty5 % |
| 610 mm 4hlavňový2 х 4 ks. |
| Rychlost střelby0.67 ran/min. |
| Čas přebití90 sek |
| Rychlost otočení25 stupňů/sek |
| 180 Degree Turn Time7.2 sek |
| TorpédoType8 |
| Maximální poškození14 600 |
| Rychlost torpéda63 uzlů |
| Dosah torpéd6 km |
| 76 mm /40 3rd Year Type na samostatném palebném stanovišti4 х 1 ks. |
| . . . Průměrné poškození za vteřinu6.4 |
| . . . Dostřel3 km |
| 13 mm/76 Type 93 na dvouhlavňovém palebném stanovišti4 х 2 ks. |
| . . . Průměrné poškození za vteřinu8 |
| . . . Dostřel1.2 km |
| 7.7 mm/80 Type 92 na samostatném palebném stanovišti2 х 1 ks. |
| . . . Průměrné poškození za vteřinu3.2 |
| . . . Dostřel0.99 km |
| Maximální rychlost34.5 uzlů |
| Poloměr otáčení750 m. |
| Čas otočení kormidla9.2 sek |
| Odhalení z hladiny11.87 km |
| Odhalení ze vzduchu5.78 km |

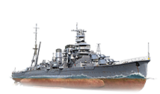
Furutaka — tier V křižník Japonska.
A powerful scout cruiser employed to carry out reconnaissance operations and to protect battleship fleets from enemy light naval forces. Furutaka’s primary distinction from her predecessors was an enhanced artillery armament featuring a pyramid arrangement of turret mounts.
Moduly
 |
Rychlost střelby (shots/min) | Čas otočení o 180° (sec) | Maximální rozptyl (m) | Maximum HE Shell Damage (HP) | Chance of Fire on Target Caused by HE Shell (%) | Maximum AP Shell Damage (HP) |
Research price (exp) |
Purchase price ( | |
|---|---|---|---|---|---|---|---|---|---|
| 200 mm/50 3rd Year Type No 1 ve věži Model E2 | 2,7 | 30 | 109 | 3 300 | 17 | 4 500 | 0 | 130 000 | |
| 203 mm/50 3rd Year Type No 2 ve věži Model E2 | 4 | 30 | 109 | 3 300 | 17 | 4 700 | 3 200 | 320 000 |
 |
Body výdrže (HP) | Armor (mm) | Armor (mm) | Hlavní věže (pcs.) | Sekundární dělové věže (pcs.) | Bodová obrana (pcs.) | Torpédomety (pcs.) | Hangar Capacity (pcs.) |
Research price (exp) |
Purchase price ( | |
|---|---|---|---|---|---|---|---|---|---|---|---|
| Furutaka (A) | 28 300 | 6 | 105 | 3 | 4 | 2/4/4 | 2 | 0 | 150 000 | ||
| Furutaka (B) | 30 700 | 6 | 105 | 3 | 4 | 2/4/4 | 2 | 6 300 | 480 000 |
 |
Rychlost střelby (shots/min) | Torpedo Tubes Reload Time (sec) | Čas otočení o 180° (sec) | Maximální poškození (HP) | Rychlost torpéda (knot) | Dosah torpéda (km) |
Research price (exp) |
Purchase price ( | |
|---|---|---|---|---|---|---|---|---|---|
| Type8 | 0,7 | 90 | 7,2 | 14 600 | 63 | 6 | 0 | 120 000 | |
| Type8 mod. 2 | 0,6 | 94 | 7,2 | 16 266 | 59 | 10 | 3 600 | 400 000 |
 |
IDS_SHIP_PARAM_SUO_INCREASE_DIST (%) | Maximum Firing Range (km) |
Research price (exp) |
Purchase price ( | |
|---|---|---|---|---|---|
| Type5 mod. 1 | 0 | 0 | 100 000 | ||
| Type5 mod. 2 | 0 | 2 400 | 260 000 |
 |
Maximální rychlost (knot) |
Research price (exp) |
Purchase price ( | |
|---|---|---|---|---|
| Pohon: 102 000 hp | 34,5 | 0 | 90 000 |
Vybavení
| Slot 1 | |||||
|---|---|---|---|---|---|
| Slot 2 | |||||
| Slot 3 |
Názor hráče
Představení lodi
The first heavy cruiser within Japan's cruiser tree and one of the first heavy cruisers in the game, Furutaka carries a powerful complement of six 203mm guns, allowing her to deal with anything she encounters. While slow-firing, their large caliber and accuracy allows Furutaka captains to deal large amounts of damage in a single salvo. Fully upgraded, her guns have a range of 13.9km, while her torpedoes can hit 10km. A common tactic is to close in on an isolated target and launch all available torpedoes before turning around to disengage. While she is faster than most cruisers at her tier, she rapidly slows down when turning, as such you will be the most vulnerable when turning to run away from the opponent.
If possible, captain's are recommended to remain undetected, as Furutaka's poor armor prevents her from tanking damage effectively. Avoid getting drawn into a close range gunfight at all costs, as Furutaka will almost always lose. The ship excels most when firing at unsuspecting targets from a distance. Despite her poor armor, playing Furutaka plays more like a strike cruiser rather than a typical heavy cruiser. Often the best way to play the cruiser, especially in higher tier battles, is to find a battleship or destroyer to support.
Furutaka's weak armor can be compensated for by conducting evasive maneuvers and angling. While her hull can withstand armor piercing shells from other cruisers when angled, most battleships will have little to no problem over-matching most sections of the ship.
Furutaka's Hull C upgrade has changed quite drastically to reflect its historical renovation. Aside from increasing the AA suite's armament, the upgrade now rearranges the cruiser's six guns into three dual-gun turrets, two superfiring turrets on the front and one on the rear, the same configuration that Aoba carries. This basically doubles Furutaka's forward armament compared to its Hull B, allowing it to chase and track targets far more effectively with its forward guns, and carry out evasive maneuvers while firing.Plusy:
- Faster than most other cruisers at her tier.
- Powerful, accurate guns for her tier with very large firing arcs on all turrets.
- HE shells have a high fire chance and great damage.
- Upon upgrade to Hull C, the ship can bear the majority of her firepower forwards, allowing the cruiser to pursue and harass fleeing ships with relative ease.
- Potent torpedoes with good range, decent speed, and powerful warheads.
- Torpedo mounts have excellent firing angles compared to higher tier Japanese cruisers.
Mínusy:
- Lightly armored for a heavy cruiser with a large citadel.
- Due to her larger gun caliber, the ship has a longer reload time than most other cruisers at her tier.
- Short main battery firing range at 13.9km.
- Carries only four torpedoes per side.
- The ship’s anti-aircraft armament is weak and leaves the ship vulnerable to carrier strikes.
Výzkum
Doporučená konfigurace
Vylepšení
The recommended upgrades for Furutaka are as follows:
- Slot 1: Úprava hlavní výzbroje 1 (
 ) keeps the guns and torpedo tubes active and firing.
- Slot 2: Úprava systému řízení oprav 1 (
 ) makes the ship more resistant to fires and flooding.
- Slot 3: Úprava zaměřovacích systémů 1 (
 ) gives her guns more accuracy.
Kapitánské body
The key skills for Furutaka include Expert Loader at Level 1, Expert Marksman at Level 2, Demolition Expert at Level 3, and Concealment Expert at Level 4. Captains who use the ship’s torpedoes often may find Torpedo Armament Expertise useful for reducing the reload time of the launchers. Last Stand is recommended to those who often find their engine or rudder incapacitated. Lastly, Basic Firing Training and Advanced Firing Training can be taken to improve upon the ship’s anti-aircraft armament.
| Doporučené přidělení kapitánských bodů | ||||||||
|---|---|---|---|---|---|---|---|---|
| Cena (body) |
Vytrvalostní | Útočné | Podpůrné | Všestranné | ||||
| 1 |
|
|
|
|
|
|
|
|
| 2 |
|
|
|
|
|
|
|
|
| 3 |
|
|
|
|
|
|
|
|
| 4 |
|
|
|
|
|
|
|
|
| Key: ★★★ - Extrémně užitečné ★★ - Často užitečné ★ - Příležitostně účinné nic - zbytečné | ||||||||
Spotřební doplňky
Furutaka can equip the following consumables:
- Slot 1: Havarijní tým (
 )
)
- Slot 2: Hydroakusticý vyhledávač (
 )
)
- Slot 3: Katapultovaný stíhač (
 )
)
Premium version of all consumables are useful to reduce the cooldowns.
Kamufláž
Furutaka does not have a purchasable permanent camouflage available to her. Instead, Type 1, 2, or 5 camouflage can be equipped for credits; Types 1 or 5 are recommended at a minimum to reduce detectability range.
Signály
Furutaka captains should mount the standard flags to improve the ship's performance in battle. To improve upon the ship's armaments, India X-Ray (![]() ), Victor Lima (
), Victor Lima (![]() ), and Juliet Whiskey Unaone (
), and Juliet Whiskey Unaone (![]() ) flags are recommended to increase the fire chance and flooding chances respectively. To improve the ship’s survivability, captains should mount November Foxtrot (
) flags are recommended to increase the fire chance and flooding chances respectively. To improve the ship’s survivability, captains should mount November Foxtrot (![]() ) and India Yankee (
) and India Yankee (![]() ) flags. Sierra Mike (
) flags. Sierra Mike (![]() ) flags are recommended to increase the ship’s already high top speed. Lastly, economic and special signal flags can be mounted to improve the ship’s economic gains per battle.
) flags are recommended to increase the ship’s already high top speed. Lastly, economic and special signal flags can be mounted to improve the ship’s economic gains per battle.
Doporučené Signály 
| |||||
|---|---|---|---|---|---|
| Bojové | |||||
 |
 |
 |
 |
 |
 |
 |
 |
 |
 |
 |
 |
 |
 | ||||
Poznámka: Použití signálu Juliet Charlie plně zabraňuje detonaci.
Galerie
Historické informace
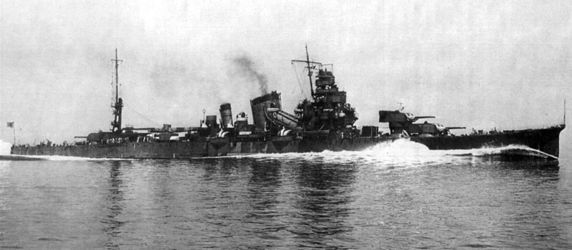
Historické snímky

| torpédoborce | II Tachibana |
| křižníky | I Hashidate • II Chikuma • III Tenryū • III Katori |
| bitevní lodě | II Mikasa |
| letadlové lodě | IV [[Ship:Hōshō (< 23.01.2019)|Hōshō (< 23.01.2019)]] • IV Hōshō • V [[Ship:Zuihō (< 23.01.2019)|Zuihō (< 23.01.2019)]] • VI [[Ship:Ryūjō (< 23.01.2019)|Ryūjō (< 23.01.2019)]] • VI Ryūjō • VII [[Ship:Hiryū (< 23.01.2019)|Hiryū (< 23.01.2019)]] • VII [[Ship:Kaga (< 23.01.2019)|Kaga (< 23.01.2019)]] • VIII [[Ship:Shōkaku (< 23.01.2019)|Shōkaku (< 23.01.2019)]] • VIII Shōkaku • VIII Kaga |