Herní mechanika


- Tato stránka vám poskytne co nejvíce informací o herních mechanikách a jádru hry, kolik bude potřeba. Po přečtení nebude potřeba listování diskuzním fórem pro základní informace. Podrobnější informace je možné najít na stránkách wargaming.net.
Obsah
- 1 Matchmaking
- 2 Statistiky tanků
- 3 Zkušenosti a posádka
- 4 Obsazení základny
- 5 Pohyblivost
- 6 Přesnost a rozměření
- 7 Mechaniky probití
- 8 Poškození a jeho mechanika
- 9 Opravy
- 10 Zdroje
Matchmaking
Statistiky tanků

The performance of your tank depends directly on the qualification of its crew. Each crew member is fulfilling one or several roles in your tank and the performance of your tank in those areas depends on their effective primary skill levels. For example, reload time depends on the Loader's skill. Since the commander provides 10% of his own skill level as a bonus to each crew member, he is also relevant for every stat of your tank. If you have more than one crew member responsible for the same stat (e.g. two Loaders), then the average of their effective skill levels will be used to calculate the effective stat. Refer to the Crew page for more details about which crew member affects which stat of your tank.
Jak jsou statistiky vytvořeny (kalkulovány)
The stats of your tank as they are shown in the garage or in the tech trees, i.e. the nominal stats, do not necessarily represent your tank's actual performance. In game versions up to 0.7.1.1, they were calculated based on a hypothetical 133.33% effective primary crew skill, which cannot be reached in game. Game version 0.7.2 introduced a change to how the stats are displayed, now they are shown based on 100% effective primary crew skill. However, since all skill modifiers, even the Commander's bonus, are ignored, most stats will continue to differ from what is displayed even if you happen to have a 100% crew.
Your tank's actual performance for each stat can be calculated based on the effective skill levels of those crew members which are responsible for the operation of that part of the tank, using one of the following two formulae:

- Notes
A degressive stat becomes reduced with higher skill. For example, your aiming time is shorter as your Gunner's skill level increases. A progressive stat increases with higher skill. For example, your view range as Commander's skill level increases.
Note that only stats that depend on actual crew interaction are affected by crew skill. Your tank will not get thicker armour or become heavier with more experienced crew. Also while a better Loader will make your gun reload faster, he will not influence the speed with which auto-cannons or autoloaders fire the shells in their magazines, because shells from the magazines are chambered automatically. The Loader does come back into play when reloading the magazines, however.
Note further that the values displayed in game are just approximations because either the actual values are rounded to the nearest integer, or only the integer part is shown without any rounding. This is not only inconsistent, but also means that since 0.7.2 you can unfortunately only calculate an approximation of your effective stats based on what is shown in game.
Zlepší statistik tanku po překročení 100% výcviku posádky
Apart from advancing your crew's major qualification to 100% skill level, you can advance your tank's performance further as follows:
- Bonus to Tank Stats
- Certain skills and perks provide bonuses to specific tank stats.
- You can buy equipment for credits that gives a direct bonus to specific tank stats. For example, Coated Optics provide a 10% bonus to view range, and a Gun Rammer provides 10% bonus to reload time.
- There are also credit or gold bought consumables that provide a bonus to engine power and turret traverse.
- Bonus to Crew Skills
- Brothers in Arms is a perk that increases every skill level of every crew member by 5 as long as it is active for all crew members.
- Improved Ventilation is a credit bought equipment for close-topped tanks only that increases the skill level of the primary skill and non-role specific secondary skills of every crew member by 5, i.e. effectively +5 for the Commander and +5.5 for his crew. This bonus is displayed in your garage screen when you mouse over each crew member, but the displayed numbers are rounded to the nearest integer.
- Chocolate/Rations/Cola/Coffee are gold bought consumables that equally increase every skill level of every crew member, but by 10, i.e. effectively +10 for the Commander and +11 for his crew. This bonus is not displayed in your garage screen.
Příklady
Let's go through a few examples to make it clearer or confuse you more, as the case may be. Hopefully you like math!
- Easy example
The entire crew of your stock Leichttraktor is at 50% primary skill level. What is your view range?
- The garage stat shown for view range is 262m
- Note that actual view range is 262.5m, but the decimals are not shown in game, so your calculations will unfortunately never be quite exact. The following examples are based on the values actually available to you.
- Responsible for view range is the Commander. He has an effective skill level of 50%.
- View range is a progressive stat. Thus we calculate 262m / 0.875 * (0.00375 * 50 + 0.5).
- We obtain as a result your effective view range of 206m.
- That means your Commander cannot see any tank further away than 206m even if it is right in front of you and shooting at you. Keep that in mind and make sure you train those crews!
- You decide to remedy the situation immediately by equipping Binoculars equipment that you had available and which give a 25% bonus to view range. You calculate 206m * 1.25 = 257.5m. There you go, marked improvement, but only while your hull does not move for at least 3 seconds.
- Advanced example
You just bought your stock Marder II with a 75% crew and want to know how fast it reloads.
- The garage stat shown for rate of fire is 26.25 rounds per minute. Since you want the actual reload time, you calculate 60s/26.25 = 2.286s reload time for every shot.
- Responsible for that is the Loader. The Marder II does not have a separate Loader. Instead, the Gunner is loading the gun himself. What is his effective skill level? His primary skill level is 75%. But we must not forget the Commander's bonus. The Commander's skill level is also 75%. So we calculate 75% (Loader) + 75% (Commander) * 0.1 (in a case like this where Commander and crew have the same skill level you can also simply calculate 75% * 1.1) and obtain the effective skill level of our Loader at 82.5%.
- Reload time is a degressive stat. Thus we calculate 2.286s * 0.875 / (0.00375 * 82.5 + 0.5). We obtain as a result our effective (rounded) reload time of 2.47s.
- We can also calculate rate of fire. Since that is progressive we go 26.25 / 0.875 * (0.00375 * 82.5 + 0.5), i.e. our stock Marder II has a (rounded) rate of fire of 24.28 with a 75% crew.
- Difficult example
You have advanced in World of Tanks and bought a shiny new AMX 50B. It is still stock, but you invested some gold into training your crew immediately to 100% skill level. But you ran out of gold so only your Commander and your Gunner got trained to 100%, while you trained the rest of your new crew to 75% with credits. You also installed Improved Ventilation equipment. What is your rate of fire?
- Unfortunately, for all auto-loader and auto-cannons the in-game stats shown for rate of fire don't show the reload speed for the entire drum, instead showing how many shots you can shoot with the time it takes to reload the entire drum and the gap in-between firing the separate clips. Since we do not want to work with incorrect data and also make the example a bit more complicated, let's look at the stats not shown in game. The vehicle's gun has an autoloader and can fire 4 shells every 2.5 seconds until the magazine needs to be reloaded, which nominally takes 30 seconds.
- Responsible for that is the Loader. The AMX 50B has three crew members assigned to that role, the Commander, the Gunner and the Radio Operator. The Commander and the Gunner are at 100% primary skill level, the Radio Operator is at 75%. So what is the effective skill level for our calculation? As explained above, we take the average of each crew member's effective skill level, so we need to calculate it for each of them first, add them and then divide by their number: 100+5=105% (Commander) + 100+5+105*0.1=115.5% (Gunner) + 75+5+105*0.1=90.5% (Radio Operator) / 3. As you can see, it becomes a bit more complicated here, we need to take into account equipment, which crew member receives the Commander's bonus and which doesn't. Our calculated effective skill level is thus 103.67%
- Now back to our formula to calculate the actual tank stats. If you paid attention above, you'll know that the 2.5s for revolving the magazine while firing are automatically performed by the tank and not influenced by crew skill. Reloading the magazine, however, depends on the crew. Knowing that, we take the 2.5s as a constant and calculate 30s * 0.875 / (0.00375 * 103.67 + 0.5) = 29.54s as the time it takes to reload a magazine. But we wanted to know rate of fire, i.e. the average amount of shells the tank can shoot every minute. We know the tank takes 28.13s to load and fire the first of four shells and then fires the remaining 3 shells with a 2.5s delay between each shot. Thus we calculate 60/((28.13s + (4 - 1) * 2.5s)/4 and finally obtain our answer, our crew allows our tank to fire 6.74 rounds per minute.
Zkušenosti a posádka
Získávání zkušeností a kreditů je ve světě WoT jedním z vašich primárních cílů. Zkušenosti se využívají na výzkum nových modulů a tanků, případně na výcvik posádky a kredity se využívají k zaplacení nově vyzkoumaných modulů a vozidel, vybavení, spotřebního materiálu a munice, školení a přeškolení posádky i ke koupi dočasných kamufláží.
Zkušenosti a kredity
Zkušenosti a kredity jsou získávány ve všech herních režimech kromě výcvikových bitev pro následující akce:
| XP uděleno? | Kreditů uděleno? | |
|---|---|---|
| Během bitvy: | ||
| Vstup do bitvy | Ne |
Pevně dané podle tieru hráčova tanku |
| První odhalení nepřítele | Malý plošný bonus za odhalený tank, dvojnásobek za odhalené SPG |
Malý plošný bonus za odhalený tank, dvojnásobek za odhalené SPG |
| Poškození nepřítele, kterého jste sami odhalili | Per point of damage, modified by victim's tank type and tank tier compared to your own (damaging higher tiers pays more). All damage counts, whether caused by direct hits, splash damage, ramming, fire or ammo-rack explosion. |
Per point of damage. All damage counts, whether caused by direct hits, splash damage, ramming, fire or ammo-rack explosion. |
| Damaging enemies that are not lit up at all | ||
| Damaging enemies that your team is spotting, but not yourself | 50% of the above |
50% of the above |
| Damage done to targets you are spotting, by team members who are not spotting them themselves | 50% of what the team member doing the damage would earn if he spotted the target himself, divided by the number of team members spotting the target. |
50% of what the team member doing the damage would earn if he spotted the target himself, divided by the number of team members spotting the target. |
| Inflicting critical (module/crew) damage | This means destroying an enemy tank's module (only damaging it is not enough), or killing a crew member. Small bonus depending on the tier of the target compared to yours, whether caused by direct hits, splash damage, ramming, fire or ammo-rack explosion. Light tanks receive a bonus for critical damage inflicted to heavy tanks. In all cases, only the first critical destruction counts (or second, in case a repair/first aid consumable was used) |
No |
| Disabling an enemy vehicle (killing complete crew) | Same reward as inflicting damage for the remaining hitpoints |
Same reward as inflicting damage for the remaining hitpoints |
| Killing shot | Small bonus modified by the tier of the killed enemy compared to yours |
No |
| Close combat bonus | Damaging enemy tanks at under 200m range gives a very small bonus |
No |
| Scoring base capture points | Per point scored, up to 100 points, if the base was captured successfully |
No |
| Scoring base defense points | Per point scored, more than 100 points possible |
No |
| Completed base capture | Flat bonus |
Flat amount paid to everyone who is in the capture circle at the moment of completed base capture, independent of individual contribution |
| After the battle: | ||
| Survival | Small flat bonus |
No |
| Team performance factor | Coefficient based on the total damage inflicted to the enemy team by your teammates |
No |
| Loss | No |
No |
| Draw | No |
No |
| Victory | Coefficient of 1.5 |
The "Joining a battle" reward is multiplied by 1.85. No bonus to other rewards earned during the battle. |
| Courageous Resistance (Battle Hero, Epic or Platoon achievements on a loss) |
When your team is defeated but you get one of the Battle Hero, Epic or Platoon achievements, you will receive the same experience bonus as the victorious team. Coefficient of 1.5. |
When your team is defeated but you get one of the Battle Hero, Epic or Platoon achievements, you will receive the same credit bonus as the victorious team. The "Joining a battle" reward is multiplied by 1.85. |
| Victory in a tank company or clan wars battle | In addition to the normal bonus for victory, 50% of the XP gain of the losers is transferred to the winners. |
In addition to the normal bonus for victory, 50% of the credits gain of the losers is transferred to the winners. |
| Tank specific balancing factor | Tank specific coefficient, assumed to be 1 for all tanks except the Churchill III. |
Tank specific coefficient, generally higher for premium tanks |
| Active premium account | Coefficient of 1.5 |
Coefficient of 1.5 |
| First daily victory with the vehicle | Coefficient of 2 |
No |
| Exiting battle during loading screen or countdown | No "Joining a battle" bonus. Since your tank is actually present in the battle until it gets destroyed, it can passively earn XP e.g. for spotting enemy vehicles. |
No "Joining a battle" bonus. Since your tank is actually present in the battle until it gets destroyed, it can passively earn credits e.g. spotting enemy vehicles. |
| Exiting battle after countdown | There is a penalty for XP earning, but only if the tank has not yet been destroyed. Also, if the tank was not destroyed before exiting, further XP can be earned passively while it remains on the battlefield, e.g. for spotting enemy vehicles. |
Credits as earned, there is no penalty. If the tank was not destroyed before exiting, further credits can be earned passively while it remains on the battlefield, e.g. for spotting enemy vehicles. |
| Team Damage inflicted | Small penalty, supposedly twice the amount of XP you would receive for causing the same amount of damage to the enemy. |
Penalty to an amount of four times the repair costs required to fix the damage that was inflicted, limited by the total amount earned during battle. |
| Team Damage received | None. |
Half the repair costs required to fix the damage or a quarter of the penalty paid by the player(s) who caused the team damage, whichever is lower. |
Neobdržíte zkušenosti za:
- Team-killing.
- Damaging an ally's tank, even if said ally is "blue" (i.e. the player's name is shown in blue after team damage/team kill).
- Shots that deal no hull damage, destroy no module or kill no crew member.
- Shots that destroy a module that had already been destroyed prior (except when a repair pack has been used on it).
- For receiving damage. As stated above, you must damage your attacker.
- For receiving titles in the "hero of the battle" window.*
- For receiving medals or completing achievements.
- No bonus experience for a draw or a lost battle.
- A specific bonus for "killing all enemy tanks" does not exist, but as listed above, the entire team receives more XP the more damage to enemy tanks is inflicted by the team (see "Team performance factor").
(*You will, however, get bonus experience or credits if you receive a specific award during an "Operation" event. For example, if it is "Operation Sniper", you would receive extra experience or credits for earning the "Sniper" achievement.)
Volné zkušenosti
Volné zkušenosti můžete získat navíc k běžným zkušenostem navázaným na vozidla, které získáváte hraním her.
Po každé bitvě se 5 % bojových zkušeností zkonvertuje na volné zkušenosti, ale během některých speciálů se toto procento může zvýšit. Volné zkušenosti můžete využít k výzkumu libovolného modulu či vozidla, a k urychlení výcviku zkušeností a specializací pro libovolnou posádku.
Bojové zkušenosti získané na elitních (plně vyzkoumaných či prémiových) vozidlech lze za zlaťáky zkonvertovat na volné zkušenosti. Volné zkušenosti můžete využít k výzkumu libovolného modulu či vozidla.
Zkušenosti posádky
Each crew member receives experience equal to the experience the vehicle earned in a battle, possibly modified by experience bonuses and penalties.
Obsazení základny
Na začátku bitvy se spojenecký tým objeví poblíž vaší základny, která má uprostřed vlajku. Nepřátelská základna je umístěna na opačné straně mapy. Neutrální základna bývá obvykle umístěna uprostřed mezi soupeřícími týmy.
Bitvy lze vyhrát buď tím, že zničíte všechny nepřátelské tanky nebo tím, že obsadíte nepřátelskou/neutrální základnu. Chcete-li obsadit nepřátelskou/neutrální základnu, musíte svůj tank dostat do bílého kruhu nepřátelské základny (běžně nazývaná jako base). Na horní části obrazovky se vám zobrazí zelený pruh s názvem "Obsazení nepřátelské základny" (obsazení vaší základny bude zobrazeno červenou lištou s nápisem "Obsazování spojenecké základny!"). Váš tank musí zůstat v kruhu, dokud na počítadle nedosáhnete 100%. Každý tank v kruhu generuje 1 bod za sekundu. Najednou základnu nemůže obsazovat více tanku než 3. Jakmile základnu obsadíte, vyhráváte hru.
Podmínky vítězství a umístění základny závisí na typu bitvy. '
Body za obsazování základny
Jak obsazujete základnu, dostáváte body za obsazování. Pamatujte, že čím vice spojeneckých vozidel obsazuje nepřátelskou základnu, tím rychleji je obsazena.
Také si při obsazování základny všimněte následujícího:
- Pokud obsazující vozidlo opustí nepřátelskou základnu, postup obsazení základny se vrátí na nulu.
- Pokud je obsazující vozidlo během obsazování poškozeno, postup se vrátí na nulu, ale obsazování pokračuje.
- Pokud je vozidlo během obsazování základny zničeno, postup se vrátí na nulu a obsazování nepokračuje.
- Nepřátelskou základnu můžete obsadit, i když se nepřátelské tanky objeví v kruhu základny (pokud zvládnete útok odrazit a přežít dostatečně dlouho).
Jakmile je obsazování základny dokončeno, hra se neukončí jak by každý myslel. Hra má nastavené zpoždění a to přibližně 5 sekund, ale vítězství je vaše (pokud tedy neskončí dříve než je základna obsazená). Zpoždění se přičítá pokaždé, když je zničen nepřátelský tank. Pár pravidel:
- Všechna spojenecká vozidla jsou zničena: enemy tým vyhrává - prohra.
- Všechna vozidla obou týmů jsou zničená: remíza.
- Obě základny jsou obsazeny i se započítanou prodlevou 5 sekund: remíza.
- Všechny ostatní případy: váš tým vyhrává.
Výjimkou je režim "Útok", kdy jeden z týmu má základnu a druhý na ní útočí. Jinak vše funguje stejně jako v běžných bitvách.
Ve Střetnutích je pouze neutrální základna, kterou mohou oba týmy obsazovat. Je zde stejná mechanika jako v klasických bitvách, ale existují zde dva rozdíly:
- Nelze obsazovat základnu zároveň s nepřítelem. Probíhající obsazování se jednoduše zastaví a obnoví se až když jeden z týmu opustí kruh základny.
- Další rozdíl je v rychlosti obsazování základny, kdy je 1 bod obsazení připsaný každých 2,5 sekundy, rychlost obsazení je tedy zpomalená.
Dohled a Kamufláž
Na toto rozsáhlé téma se můžete podívat v sekci Dohled a Kamufláž (WoT).
Pohyblivost

Movement of your tank in World of Tanks is critical not only to reach advantageous locations or to retreat from disadvantageous ones, but also and in particular while figthing other tanks to increase your effective armour or avoid shots entirely.
Výkon motoru a akcelerace
Acceleration is mainly based on your engine power/tank weight ratio. More engine power means better acceleration while more weight means less acceleration. Several consumables are available to give your engine power a boost during battle.
Other factors that play a role are your suspension's terrain resistance and the terrain type and elevation you are driving on. Note that the different types of Enhanced Suspension equipment provide no bonus to your vehicle's driving performance.
Odpor terénu
The terrain resistance, or passability/passing ability, as Wargaming calls it in their patch notes, describes your suspension's performance (top speed, acceleration, traverse speed) on different types of ground. The performance degrades the softer the ground becomes. The game distinguishes three types of terrain: hard (roads, pavement, cobblestones), average (some paths, dirt, sand, grass, shallow water), and soft (swamps, deep water).
Most terrain types are easily recognizable, but swamps can be difficult. On Karelia and the aptly named map Swamp it is quite easy, but on Lakeville in the valley the grass texture looks like any other, when in fact the underlying ground is soft.
The exact amount of this degradation is a property of the suspension installed to your tank but is not displayed in game. Wider tracks do not necessarily provide better handling on soft ground, e.g. the M24 Chaffee has by far the best off-road performance of the dedicated tier 5 light scout tanks despite also having the narrowest tracks. For all tanks, if a suspension upgrade is available, it always comes with better performance on some or all types of terrain, i.e. less terrain resistance.
Maximální rychlost
A common misconception is that the listed forward/reverse speed of your tank is an indication of the speed your tank should drive at. That is not the case. Instead, this stat indicated the speed limit of your tank's transmission system. While there are some tanks which can reach their speed limit on flat ground, other tanks can only reach it on a downhill slope and some may never reach theirs at all. Prior to 8.0, this stat was a hard limit that could not be exceeded no matter what. Now, it's based on weight vs. engine power, and can be exceeded under the right conditions.
Hodnota otáčení korby
The hull traverse speed or turn rate of your tank defines how fast your tank can turn its hull. It mainly depends on the installed suspension and your acceleration.
Note that some tanks can traverse their hull on the spot (pivot) while others can only lock a track while driving forwards or backwards, effectively rotating in a larger circle around the locked track.
Although traverse speed is affected by both engine and suspension, in game tank specifications only show the change in traverse speed when different suspension is mounted, but not when different engine is mounted. This means that tracks info only shows values for stock engine, and it can be very confusing and misleading because some vehicles gain a lot of traverse speed by mounting stronger engine, but this change is not visible in tank specifications.
The actual formula is as follows:[1]
- Tr = Tn x (Ec / Es) x (Rh / Rx) x (Ws / Wc) x Pc
- Tr = Real traverse speed (deg/s)
- Tn = Nominal traverse of a tank, including bonus from clutch breaking, drivers' skill and consumables (deg/s).
- Ec = Current engine horsepower (HP) including any bonuses from equipment and consumables.
- Es = Stock engine horsepower (HP).
- Rh = Tank's terrain resistance on hard terrain, including bonuses from Ventilation, Brothers in Arms, Off Road Driving and consumables.
- Rx = Tank's terrain resistance for terrain one is calculating traverse for, including all the bonuses.
- Ws = Weight of stock tank without equipment (kg).
- Wc = Current weight with used modules and extra equipment (kg).
- Pc = Neutral (centre) turn capable, or pivot (locking one tread) steered, 1 for pivot tanks, 0,95 for neutral turn tanks.
Vliv fyziky
In version 0.8.0 a new physics model was introduced.
- If your vehicle enters water that's too deep, an icon will appear on your screen indicating that water is entering the crew and/or engine compartment. If you stay in deep water for too long your tank will destroyed. Prior to 0.8.0, you simply had an invisible wall preventing you from driving into or falling into such bodies of water.
- You can drive off of cliffs. You can use this to attack enemies from directions they weren't expecting. If you're not careful you can fall to your death in some places on some maps. Fast tanks can catch air as they go off a cliff at high speed. This also has interesting implications for ramming (or then again you could just drop your tank on an enemy). Prior to 0.8.0, you simply had an invisible wall preventing you from driving or falling off of cliffs.
- If your tank is going fast enough and you turn sharply, your tank will now drift (slide sideways) while turning.
- Ramming a tank will knock that tank away from you in addition to causing damage. In the right situation, you might be able to knock them off a high cliff.
- You can push friendly tanks up hills far more effectively now than prior to 0.8.0.
- The steepness of the terrain you can climb is now determined by your tank's weight, horsepower, and the speed it was going before it started climbing.
______________________________________________________________________________________________________________________________
A newer physics model has been introduced as of version 9.14.0, retaining most of the original "items of note" for the 0.8.0 system.
Hills are able to be climbed easier and tanks have a more tendency to slide on steeper inclines. Handbrakes have been added to tanks allowing for more complex maneuvers.
Items of the newer physics engine to note:
- Handbrakes are disabled on SPG's and TD's for balancing reasons. (No-one wants a Foch 155 pulling a 180 at the tip of a hat)
- High speed drifting is harder to do in 9.14 and beyond as the newer physics model seems to make tanks grip more and slide less unless the handbrake is pushed.
- Tanks can now roll completely and can be set on their sides.
- There has also been an update to the physics with ramming and collisions. (as stated in the 9.14 patchnotes https://worldoftanks.com/en/content/docs/914-updatenotes/ )
Zbraně a průbojnost pancíře
Na toto rozsáhlé téma se můžete podívat v sekci Zbraně a průbojnost pancíře (WoT).
Přesnost a rozměření

Every shot you take is dispersed randomly around the center of your aiming reticle, i.e. you will not necessarily hit exactly where you aimed. The actual dispersion amount is based on a Gaussian (normal) distribution curve and depends on your gun and the turret it is mounted to.
Přesnost děla
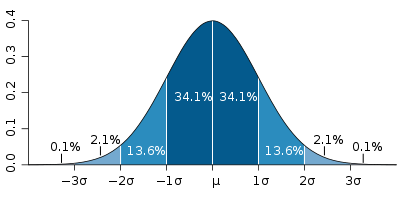
The accuracy value for a gun is given in meters at a range of 100m. The lower the value the more accurate your gun is. The value describes 2 standard deviations σ from the center of your aim. In other words, for a gun with 0.32m effective accuracy at 100m, 95.45% of all shots will land within 0.32m of the center of your aim at that distance. Dispersion amount increases linearly with distance, i.e. 0.32m effective accuracy at 100m translates to 0.64m at 200m and 1.28m at 400m
The accuracy of your shot is determined by a Random Number Generator. The formula is generated by a hamster on a wheel in each WG server.
Zaměřovací (rozměřovací) kruh
The aiming circle (also called the dispersion circle, dispersion indicator or reticle) describes the area of 2 standard deviations (2σ) from your aim point. Based on a standard normal distribution, this means that 4.2% of your shots would fall outside of the aiming circle. Since version 0.8.6 any shots falling outside the circle get a second roll with a flat distribution to place them within the circle (prior to this they were placed on the perimeter). The shots move (deviate) away from your aim point, outwards toward the edge of the circle, but never shoot past its edge.
Postihy na přesnost
The accuracy discussed above applies is the best case scenario. During actual game play several factors can come into play that result in a penalty to your accuracy:
- Dead Gunner: If your Gunner gets knocked out the Gunner's skill will be set to 0% for the purposes of calculating the accuracy stat. The effect is mitigated if the Commander has the Jack of All Trades skill. The effect is removed if the Gunner receives first aid via a consumable. See the Crew page for more information.
- Gun Damage: A damaged ("yellow") gun typically fires with halved accuracy for as long as it remains damaged. The effect is reduced if the Gunner has the Armourer skill. The effect is completely removed if the damaged gun is repaired via a consumable.
- Shooting: With each shot you take your accuracy temporarily gets reduced dramatically depending on the vehicle type, but your Gunner will immediately start aiming again.
- Turret Rotation: Rotating the turret results in a temporary accuracy penalty. The exact amount depends on the installed gun and the speed of your turret's rotation. The effect is reduced if the Gunner has the Snap Shot skill.
- Vehicle Movement: Moving your vehicle forwards or backwards temporarily reduces accuracy. The exact amount depends on the installed suspension and your moving. The effect is reduced if the Driver has the Smooth Ride skill.
- Vehicle Rotation: Rotating your vehicle left or right temporarily reduces accuracy. The exact amount depends on the installed suspension and your rotation speed. The effect is reduced if the Driver has the Smooth Ride skill.
With game version 0.7.2 several crew skills and perks have become available to reduce most of these penalties.
Čas zaměření
The aiming time listed for each gun (in a specific turret) describes the time it takes for the aiming circle diameter to shrink to a third of its size. A wounded gunner will increase the aiming time. The effect is removed if the Gunner receives first aid via a consumable such as a health pack. However, most of the penalties described above increase the aiming circle by a factor bigger than three, which is why fully aiming the gun typically takes longer than the listed amount of time.
Rozdíl mezi klasickou a serverovou přesností
When you fire a shot, your shell trajectory is first calculated based on the data the client has. It is later updated with the data confirmed by the server. If the difference was big, then you may see shell tracers leave your barrel at an angle or change flight path mid-trajectory.
It is unclear whether only the aiming point or also the dispersion of the trajectory around this centre point is corrected based on server data. At least in v0.7.1, if you watch a replay, you can notice that each time you play it, your trajectory will be slightly different. This indicates that either dispersion is not synchronized between client and server, or that it is during a battle but that data is missing in the replay files. In any case, currently replays cannot be used to find out where your shot went exactly.
Mechaniky probití
Aiming properly and hitting the enemy tank are only the means to an end, and that is actually damaging and eventually disabling it. And that is not automatic. Once you have hit an enemy vehicle, the game then calculates where the shot hit the enemy, at what angle you struck the armour, the effective thickness of the armour (based on the impact angle), and thus ultimately whether your shell penetrates the armour.[2]
Vliv úhlu dopadu střely vůči pancíři cíle
The angle at which an Armour Piercing (AP), Armour Piercing Composite Rigid (APCR), High Explosive Anti Tank (HEAT) or High Explosive (HE) shell hits the target's armour is crucial for penetrating it. The ideal impact angle is along the normal, i.e. perpendicular to the armour plate. The actual impact angle is calculated as the deviation from the normal. For this, the ballistic flight path of the shell is taken into account, which can be particularly important for artillery guns and their high arcing trajectories if you fire AP or HEAT shells with them.
If the shell hits an external module (e.g. tracks, observation device, turret rotator), impact angle is not taken into account. The exception to this rule is the gun.
Normalizace střely
The impact angle of AP and APCR shells onto a vehicles armour is normalized, i.e. adjusted towards the armour's normal axis at the point of impact.
In case of spaced armour, shells are normalized at the point of impact on the spaced armour, and if they penetrate, continue along their normalized flight path into the vehicle. Once it impacts the hull armour, normalization occurs again and the remaining penetration potential (i.e. the original penetration potential minus the effective armour thickness of the spaced armour) is used to calculate whether the shell penetrates the hull proper.
As of update 8.6, APCR shells are normalized at 2°. The normalization amount is a constant value depending on the shell; there is no randomization.
The impact angle of HEAT and HE shells is not normalized at all. Angle is used for armor line-of-sight thickness calculations, as normal.
Odražení
If the pre-normalized impact angle of an AP or APCR shell on the target's armour exceeds 70° (85° for HEAT), a ricochet (a specific variant of a bounce) occurs regardless of its penetration value and the shell is deflected off the target without causing any damage. You may ricochet off of spaced armour as well, and even if you penetrate that your shell may still ricochet off the underlying hull armour.
As mentioned above, impact angle is not taken into account when hitting external modules except the gun, so a ricochet off those is impossible.
A ricochet off terrain features, buildings or wrecks is impossible.
Automatické probití
If the AP or APCR shell's caliber is more than 2 times the nominal thickness of the armour (Such as a 130mm shell hitting a 60mm thick plate), projectile shell normalization is increased by the following formula: basic normalization * 1.4 * shell caliber / nominal armour thickness. Note that the shell is still capable of bouncing if it strikes the armor at an angle of 70° or more from normal.
If the AP or APCR shell caliber is more than 3 times the nominal thickness of the armour (such as a 130mm shell hitting a 40mm thick plate), no ricochet will happen even if the impact angle is more than 70° from normal. The increased shell normalization described above will also occur.
In cases involving HE shells or external module hits, overmatch does not occur.
Efektivní tloušťka pancíře
Your tank is armoured with plates of varying thicknesses. The game only provides you with the nominal armour strength of the three main armour plates of your tank's hull and turret, respectively. However, the tanks are actually modeled in much greater detail. The penetration indicator can help you discover the actual nominal armour thickness of your target.
However, the nominal thickness of an armour plate is just the minimal amount of armour a shell impacting it must penetrate. As soon as the impact angle deviates from the normal, i.e. is not perfectly perpendicular to the armour plate's surface, the effective armour thickness that the shell needs to penetrate will be higher than the nominal armour thickness:
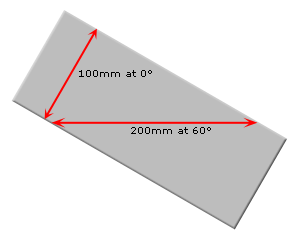
The effective armour thickness is calculated by dividing the nominal armour thickness with the cosine of the nominal impact angle. For example, in the diagram above we have a nominal armour thickness of 100mm and an impact angle of 30°, thus we have an effective armour thickness of 100mm/cos(30°) = 115.47mm that the shell needs to be able to penetrate. In other words, at an impact angle of 30° the armour is effectively over 115.47% stronger than its nominal value.
The following table provides the coefficients for a number of normalized impact angles:
| Impact Angle | Effective Armour Thickness |
|---|---|
| 0° | 100% |
| 10° | 101.54% |
| 20° | 106.42% |
| 30° | 115.47% |
| 40° | 130.54% |
| 50° | 155.57% |
| 60° | 200% |
| 70° | 292.38% |
| > 70° | Ricochet |
As you can see, the effective armour thickness increases exponentially with the impact angle. For shells impacting you at 60° your armour is effectively twice as thick and at 70° nearly three times as thick. As explained above, for angles higher than 70° all AP and APCR shells will ricochet regardless of armour thickness.
As of 8.6, HEAT shells will start to ricochet if the impact angle equals or is greater than 80 degrees. The armor penetration after ricochet will remain the same. As of 8.9, HEAT shells will start to ricochet if the impact angle equals or is greater than 85 degrees. The armor penetration after ricochet will remain the same. The same applies to your targets, of course, so always take that into account when deciding if and where to shoot them. Reducing the impact angle to your target only slightly will exponentially reduce its effective armour thickness and a target that was previously impossible for you to penetrate may suddenly become easy prey. This is also the reason why you should always attack from two different angles at once. A target can only maximize their effective armour in one direction, as soon as they try to accommodate two possible impact angles they suffer an exponential loss in effective armour thickness towards both of them (thus if you are the one getting flanked while in a strongly armoured tank it is best to maximize your effective armour towards one opponent while shooting the other one).
Rozsah hodnoty probití (randomizace)
Penetration values displayed for a gun/shell combination are average values. The actual penetration value is randomized by up to +/- 25% around the average value. Randomization occurs on impact with the target, separately for each new shell you fire.
Ztráta penetrace s ohledem na vzdálenost
Since shell speed decreases the longer a shell flies, the game models linear penetration loss over distance depending on the gun and shell type used:
- Armour Piercing (AP) shells experience low penetration loss over distance.
- Armour Piercing Composite Rigid (APCR) shells generally experience high penetration loss over distance (the exception are the APCR shells used as default ammunition)
- High-Explosive (HE), High-Explonsive Squash Head (HESH), as well as High-Explosive Anti-Tank (HEAT) shells experience no penetration loss at all.
The penetration values displayed in game indicate average penetration values at 0-100m distance (no penetration loss occurs within this range). Penetration values at higher distances are not displayed. As a rule of thumb, the higher the tier of the gun used, the lower the penetration loss over distance. For example, a Leichttraktor loses up to 17.5% penetration firing AP shells and 51.4% firing APCR shells with its default gun, whereas a Maus only loses about 2% with AP and 15.4% with APCR.
Dvojité probití
A shell can continue its flight path after the initial impact, either on the outside of the tank in case of ricochet or inside of the tank following penetration of spaced armour, hull armour or external modules. A shell will continue flying for ten times its caliber (a 100mm shell will continue for 1 meter). The remaining penetration potential is the initial penetration value, randomized at the point of impact +/- 25%, minus whatever effective armour thickness that was penetrated. This remaining penetration potential is then used to calculate whether any other armour plates that are hit can be penetrated. Internal modules or crew members have no armour and thus will always get hit if any penetration potential is left in the shell.
Until update 9.3 the penetration model was simplified and after initially impacting a vehicle a shell is "bound" to this vehicle and cannot hit any other tank anymore (no longer true since). That means that a shell could neither ricochet off a tank to hit another tank within its deflected flight path, nor could a shell pass through a tank to hit another tank behind it. A shell's flight path also ended after impacting the ground and those buildings structurally invulnerable to shell damage.
Poškození a jeho mechanika
If your shell penetrates the enemy tank's armour, its journey is not over. It all depends on the path of your shell after penetrating the armour and what parts of the enemy tank it hits on that path. A shell can indeed pass through a tank's spaced armor without causing any damage.
Poškození střely
Each shell has a specific damage potential. The game mechanics differentiate between armour damage and module and crew damage, but only the potential armour damage of a shell is actually displayed in game. The potential for module and crew damage exists in addition to the armour damage potential and is not shown in game.
The potential for module and crew damage is balanced individually for each shell - generally speaking low tier guns can cause more critical damage than armour damage, whereas the inverse is true for high tier guns. The reason is that low tier tanks have considerably more module hitpoints - another hidden property of your tank - than they have armour hitpoints. At high tiers the opposite is true.
Rozsah hodnoty poškození (randomizace)
Just like shell penetration, all shell damage is randomized by up to +/- 25%, regardless of shell type. The gun properties display the average value. The shell properties display the damage range. Note, however, that the shell values are rounded to the nearest integer, whereas the damage amounts shown in game are truncated. This is a display issue, and both are incorrect: The server uses the exact values.
Poškození pancíře
Each vehicle has hit points, displayed in the garage. Each vehicle enters the battle with 100% hitpoints because you must repair any damage taken by your vehicle in a previous battle before you are allowed to join the fight in it again. Each time the vehicle takes armour damage, its hitpoints get reduced. Once a vehicle's hit points reach zero, the vehicle is destroyed. During a battle, the remaining hitpoints of a vehicle are represented by the progress bars displayed over the targets you aim at.
Spaced armour is a special type of armour that exists to deflect a shell's flight path and to protect against the explosion blast from high-explosive (HE) shells. Spaced armour is special in that it is separate from the hull armour. Damage is not applied to spaced armour and does not reduce the hit points of the vehicle itself.
AP, APCR a HEAT náboje
AP, APCR and HEAT shells cause damage only if they manage to penetrate the target's hull armour. Once the hull armour is penetrated the target will take the full listed damage, +/- 25%. Other factors play no role to the damage calculation. For example, it makes no difference whether you barely penetrated or easily penetrated the target.
HE náboje
The situation is more complex for HE shells because both penetrating and non-penetrating hits and even misses can cause damage.
If this type of shell penetrates the hull armour, the situation is identical to the one just described for the other types of shells, damage is done to the full listed potential, +/- 25%. Since the shell, as high-explosive ammunition, explodes inside of the vehicle after it passes through the armour, any internal modules or crew caught within the explosion radius risk taking damage/getting knocked out (see Module and Crew Damage below).
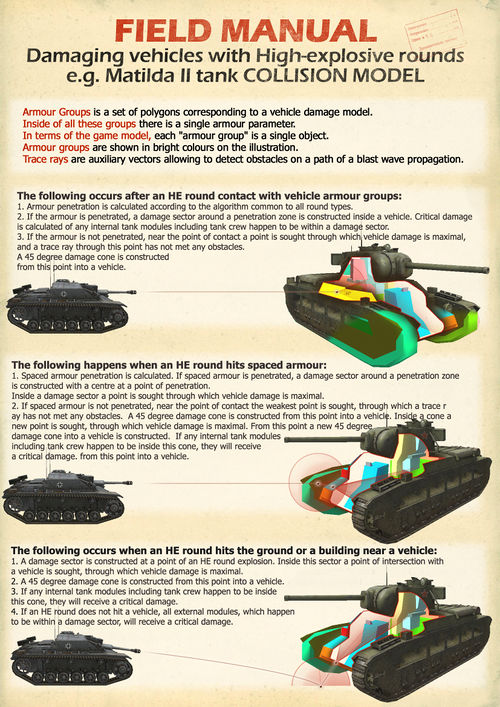
However, HE shells typically have low penetration values, so unless you aim carefully at a weakly armoured area of your target, you will not penetrate and the shell explodes on the outside of the target vehicle at the point of impact. This also applies if an HE shell penetrates spaced armour, which causes it to explode before hitting the hull armour. Finally, even if you miss the target, the shell will explode on impact and may still cause damage to the target if that lies within the explosion radius, which depends on the shell used. In all these cases where hull armour is not penetrated by the shell itself, the amount of damage is lower and calculated according to the following formula:
![]()
SpallCoefficient may be 1.2, 1.25, 1.3, or 1.5 if a spall liner is installed and you calculate armour damage, otherwise 1 (i.e. a spall liner does not protect external modules). actualDamage results of zero or below mean you cause no damage.
ImpactDistance is the distance between the point of impact of the shell and the point of impact between the explosion's blast and the target along a straight, unobstructed line. Since the blast will cover an area of the target's surface, the game selects the spot that leads to maximum damage according to the above formula, i.e. it will be a trade-off between the spot with the lowest nominalArmorThickness and the closest spot that can be hit. Ideally your blast wave reaches an unarmoured area of your target, e.g. the open top and rear on certain tank destroyers or self-propelled guns.
Once the exact point of impact has been determined this way, the actual damage amount is determined as well as is the actual damage potential that the shell can now cause to the target. Whether this actual damage potential causes any damage to the vehicle follows the normal rules, but with the following limitation regarding internal modules and crew:
- If the shell exploded on the vehicle itself, then the propagation of the blast wave into the tank is simulated by calculating a cone-shaped area 45° wide originating from the point of impact of the shell along the normalized impact vector to a distance of 10 times weapon caliber. Damage to internal modules and crew is possible within this area.
- If the shell exploded elsewhere and only the external blast wave impacted the vehicle at a distance above 10 times weapon caliber, then no propagation of the blast into the vehicle itself takes place. Because of this no damage to internal modules and crew can occur.
If spaced armour is impacted by the blast wave first, the calculation above is conducted a second time for the underlying hull armour. Since this second calculation is based on the remaining reduced damage potential, its result is typically zero, i.e. no damage.
Poškození modulů a zranění posádky
As mentioned above, you can not only damage a vehicle's armour, but also its modules and crew. Armour damage and module/crew damage are distinct. That means hitting a module only affects that module, not the hitpoints of the tank, just like hitting the armour does not affect a module. However, the same shell can damage both hull armour and module(s) or crew since it travels through the tank after penetrating the hull armour.
Just like the vehicle's hull, also each of its modules and crew have hitpoints. During a battle, you only see a simplified display of the amount of hitpoints remaining on your modules and crew represented by one of three colour states in the damage panel at the bottom left of your screen. These states are:
Default (i.e. no colour shading): Enough hitpoints for module and crew to be fully operational.
Yellow: This state signifies that a module has taken considerable damage (≥50%) but is still operational. Crew members have no yellow state.
- Tracks: No negative effect.
- Rangefinder: No negative effect.
- Fuel Tank: Subsequent hits are more likely to set your vehicle on fire.
- Turret: 50% reduction in turret traverse.
- Gun: 50% increase in dispersion and decrease in accuracy.
- Engine: 50% engine HP.
- Ammo Rack: 50% Reload speed.
Red: This state signifies that a module is not operational/a crew member is knocked out. Crew members remain in this state unless a consumable is used to restore them to full health, whereas modules will automatically be repaired over time by your crew up to the "Yellow" state of being operational.
- Tracks: Vehicle is immobilized.
- Rangefinder: Maximum spotting range reduced by 85%. The penalty is lessened with the Recon skill.
- Fuel Tank: Fire will start.
- Turret: Turret traverse is disabled.
- Gun: Unable to fire gun, vertical traverse is disabled.
- Engine: Vehicle horsepower drops to 0. You can still move downhill or on any momentum you had.
- Ammo Rack: Vehicle is destroyed unless there are 0 rounds remaining. Light, Medium, and Heavy tanks will have their turrets 'blown off'.
All module and crew state changes are accompanied by a voice message.
Hod záchrany
When a module or crew member is hit, they do not necessarily take damage from the hit. Instead, most modules have a specific chance not to take damage. This is also referred to as a saving throw. The base chances of damaging a specific module or crew member when hitting it are as follows:
- Suspension: 100%
- Engine: 45%
- Fuel Tank: 45%
- Observation Device: 45%
- Radio: 45%
- Turret Ring: 45%
- Gun: 33%
- Ammunition Rack: 27%
All crew members have the same chance to get knocked out when hit, however starting with game version 0.7.4 this chance depends on the damage type:
- Crew hit by AP/APCR/HEAT shell: 33%
- Crew hit by (internal) explosion: 10%
Each of these base chances to damage a module or knock out a crew member can be increased by 3 if the Deadeye perk is active for the attacking Gunner at the time of a shot with an AP, APCR or HEAT shell.
No other factors influence these chances. The amount of ammunition you are carrying does not affect the chance of your ammunition rack taking damage.
Kompletní úmrtí posádky
Note that as soon as all crew members are knocked out, the tank becomes inoperable. Consumables to restore a crew member's health cannot be applied anymore at this point, i.e. there is no way to restore the tank to operating condition. It counts as destroyed, even though its hull stays on the battlefield with all its remaining hitpoints.
Výbuch munice
If the ammunition rack's hitpoints reach zero, it explodes, destroying the tank and its crew completely regardless of the remaining hitpoints on either of them. The only case the tank does not explode with a "red" ammo rack, is when the rack is completely empty.You can increase your ammo rack's hitpoints by installing "Wet" Ammo Rack equipment or by training the Safe Stowage perk on a crew member with the role of loader.
Poškození ohněm (hoření)
There are two ways the enemy can set your tank on fire:
- If your fuel tank's hitpoints reach zero, your tank automatically catches fire.
- Each time your engine gets hit, there is a chance that your tank catches fire. This chance depends on the engine and is displayed on the engine module's properties in game or here on the wiki. Note that the transmission counts as part of the engine but hits to the transmission do not cause fires.
While your tank is on fire, it constantly takes both hull as well as module and crew damage. The exact damage rate depends on the tank but is not displayed in game. The duration of the fire also depends on the tank on your crew's effective Firefighting skill level, and whether your Driver has the Preventative Maintenance perk active and whether you use Automatic Fire Extinguishers consumable; You should also consider that moving while being lit, increases the time to You can also extinguish a fire manually by using Manual Fire Extinguishers consumable.
It should also be noted that driving while being on fire increases the extinguishing time considerably.
Poškození naražením (ramming)
You can also damage a target by ramming it. The collision creates an explosion at the point of impact similar to that of a high-explosive shell. The strength of the explosion, i.e. the damage potential, depends on the kinetic energy applied in the collision (0.5 * combined weight * relative speed^2), or in other words the combined weight of you and your target as well as your relative speed. That means that the heavier both you and your target are and the faster you collide, the stronger the explosion caused by the collision will be.
However, that damage potential is distributed according to the weight of each of the two colliding vehicles relative to their combined weight (1 - individual weight / combined weight). For example, if you weigh 75 tons and you ram a target weighing 25 tons, only 25% of the explosion will affect you.
Actual damage calculation then follows the same rules as for high-explosive shell explosions, thus ramming lightly armoured targets/areas of the target will cause more damage than strongly armoured parts. Damage taken can be reduced by having a Spall Liner equipped. You can further reduce damage taken and at the same time increase the damage inflicted to the target by having your vehicle's Driver trained in the Controlled Impact skill.
If you are about to be rammed, you can reduce the damage you will take by moving away from the approaching enemy, thus reducing your relative speed, and pointing your strongest armour at them. If your Driver has the Controlled Impact skill, you need to be moving to activate it, anyway.
Výstřely s nulovým poškozením
Hits that cause no damage, also called zero damage hits, are notorious among the player base, and various conspiracy theories abound in their respect. However, in most cases they are simply the result of the above described game mechanics in conjunction with poor and sometimes incorrect visual and audible feedback given to the player about what happened with their shell. Bounces and ricochets, hits to spaced armour or to external modules are difficult to distinguish for the player, yet they all have a chance of not resulting in any visible armour damage to the enemy tank (they might still cause module or crew damage, but that is not always immediately visible to the attacking player and thus dismissed).
Everybody experiences zero damage hits, just like everybody experiences misses. However, a thorough understanding of the game mechanics described above will help you minimize them. There is randomization in the game, but you will always hit what you aim for, namely the area covered by your dispersion circle, so aim wisely to maximize the chances of your shots to damage your target.
Ghost Shells
Players also like to claim ghost shells, i.e. shells that either disappear straight out of the barrel or pass straight through a target as if it wasn't there.
The first type is typically due to the player missing the visual tracer effect - watching the battle's replay from a different angle will reveal it to you.
The second type can in rare cases be caused by heavy lag in the client/server connection that causes a synchronization loss - what you are seeing on the client is not actually what is happening on the server, and what's happening on the server is what counts. It may also be caused by a mistake in the collision model of the opponent's vehicle. The collision model is a simplified version of the visual model of the target vehicle, but separated into various hitboxes. If two hitboxes are not perfectly aligned, they may create a void between them that a shell can pass through if it flies through at just the right angle. Finally, for some vehicles there are parts of the visual vehicle model that are intentionally not reflected in the collision model and a shell can pass straight through them. This is often the case for elements fastened to a tank's external hull, e.g. boxes or fuel tanks. In many cases these are just decoration.
Poškození na výstřel/Poškození za minutu
Jedná se o nejběžnější hodnotu, která se používá k posouzení výkonu tanku z hlediska palebné síly a jsou označovány jako poškození na výstřel (Damage Per Shot, dále jen jako "alfa") a poškození za minutu (Damage Per Minute, dále jen "DPM").
Alfa poškození se vztahuje k velikosti poškození, kterou může hráč očekávat za jeden výstřel (nebo v případě autoloaderu za vyprázdnění celého zásobníku či klipu) - v podstatě jaké poškození může hráč udělit nepříteli. Obvykle platí, že tanky s velkým alfa poškozením mají delší doby nabíjení a naopak tanky s menším alfa poškozením mají rychle časy nabíjení.
Damage per Minute, however, refers to the sustained output of a given tank over time and can be seen as the opposite metric of alpha; DPM measures the damage output that a player gains from maximum exposure rather than the minimum. Traditional DPM is calculated as the damage per shot times the rate of fire.
On average, tanks with large alpha values will have less traditional DPM than tanks with smaller alpha values. This rewards tanks with smaller alpha for the increased risks associated with remaining exposed to gain damage output, but such a playstyle does leave a player open to incoming fire.
An alternative measure of DPM is the 'advantageous' (most often referred to as 'first-shot') DPM, which is the value of DPM plus the damage of shells already loaded into the chamber (and hence do not need reloading at the opening of hostilities). This metric tends to better reflect the nature of WoT combat, with engagements not starting at the beginning of the game, and will tend to show large increases in DPM for the high-alpha tanks. In the first-shot paradigm, in fact, most larger-caliber guns will have a higher DPM than most traditionally high DPM guns.
Opravy
Pokud je během bitvy některý modul poškozen, vaše posádka ho začne opravovat. Čas potřebný k opravě modulu závisí na samotném modulu (nikoliv jen na jeho typu) a na efektivní schopnosti Opravy vaší posádky. Pokud máte také ve vybavení Nástroje, můžete zrychlit opravu o 25% nebo pokud máte Rozšířenou sadu náhradních dílu až o 40%.
Posádka opraví poškozený modul pouze do stavu, kdy může být opět funkční, ale zůstane v tzv. "žlutém" či poškozeném stavu. Přesné množství bodů, které tento stav představuje, závisí také na konkrétním modulu. Jedná se přibližně o polovinu jeho celkového počtu bodů, platí to pro většinu modulů.
Chcete-li mít modul opět plně v provozu a obnovit tak jeho všechny body a výhody v bitvě, musíte použít spotřební materiál. malá sada oprav je dostupná za kredity a umožňuje opravit jeden modul (výjimka - od aktualizace 0.7.4 opraví mala sada oprav oba poškozené pásy). velká sada oprav sice stojí také jen kredity, ale cena je mnohem vyšší, než je tomu u malé sady a opraví všechny moduly, které jsou v tu danou chvíli poškozené. Poskytuje také 10% bonus k rychlosti oprav posádky, pokud je nevyužijete. Počínaje patchem 9.18 jdou obě sady oprav opět používat v boji po uplynutí 90 sekund.
Zdroje
- ↑ https://docs.google.com/spreadsheets/d/1nLSD6E9tFdtbUeoWGyU-V6Rj0AyUnGXVCPG2vDMSgWs/edit#gid=0
- ↑ https://eu.wargaming.net/support/kb/articles/315