Bewaffnung & Panzerung
Inhaltsverzeichnis
Zielen

Alles über das Zielen mit der Waffe und das Treffen des Feindes. Lese auch den Abschnitt über Genauigkiet und Streuung.
Automatische Zielerfassung
Automatisches Zielen, oder Auto-Zielen, zielt auf den unteren Teil des Panzers, der dir am nächsten ist: oft wird dein Schuss auf stark gepanzerte oder schlecht angewinkelte Stellen gerichtet. Die automatische Zielerfassung hält nicht vor fahrende Panzer. Es ist nur nützlich, um auf sehr schwach gepanzerte Fahrzeuge zu zielen, die sehr weit von euch entfernt sind, oder wenn ihr beide aus nächster Nähe feuert und euch darauf konzentrieren müsst, eingehenden Schüssen auszuweichen, anstatt sorgfältig zu zielen. Bei diesen Gelegenheiten kann dir das automatische Zielen einige Sorgen ersparen. Standardmäßig wird das Auto-Ziel durch einen Rechtsklick auf ein Ziel aktiviert und durch Drücken von E oder erneutem Rechtsklick deaktiviert.
Beachte, dass das die automatische Zielerfassung so lange auf das Ziel zielt, wie es für dich sichtbar bleibt, selbst wenn es sich hinter einem Felsen, einem Haus oder einem freundlichen Panzer befindet. Das heißt nicht, dass man in solchen Situationen tatsächlich darauf schießen sollte - das klingt nach einer offensichtlichen Sache, aber es passiert immer wieder, insbesondere bei neueren Spielern.
Manuelles Zielen
In den meisten Fällen ist es besser, mit der Kanone selbst zu zielen, als sich auf das automatische Zielen zu verlassen, aber es gibt ein paar Faktoren die man berücksichtigen sollte; jede Granate hat ihre eigene Flugbahn und Fluggeschwindigkeit, und man muss diese oft beim manuellen Zielen berücksichtigen, da das Spiel diese Parameter allerdings nicht angibt, muss man diese auf externen Seiten wie Tanks.gg nachschlagen oder sie mit Erfahrung lernen.
Standartansicht
Die Standartansicht ist der Standardansichtsmodus, mit dem du in den Kampf lädst. Es ist ein Third-Person-Modus, der die Kamera über und hinter dem Turm platziert. Dein Zielkreis folgt der Markierung in der Bildschirmmitte. Dies kann insbesondere für Spieler in der Nähe von Gebäuden verwirrend sein, da der erhöhte Blickwinkel dazu führt, dass die Kanone das Hindernis hochzielt.
Dies kann durch Einrasten der Kanone gemildert werden. Standardmäßig erfolgt dies durch Gedrückthalten der rechten Maustaste. Dies ermöglicht freies umhersehen, ohne den Zielkreis zu bewegen. Beachte, dass die rechte Maustaste standardmäßig auch das automatische Zielen aktiviert, daher wird empfohlen, dem automatischen Zielen eine andere Maustaste oder Taste zuzuweisen.
Scharfschützenansicht
Scharfschützenansicht gibt dir eine First-Person-Ansicht durch die Kanone. Standardmäßig kann man durch Drücken der linken Shift-Taste oder durch Zoomen mit dem Mausrad in die Scharfschützenansicht gelangen. Aufgrund des unterschiedlichen Blickwinkels verursacht dieser Ansichtsmodus keine Zielprobleme in der Nähe von Gebäuden oder anderen Erhebungen.
Ein weiterer Vorteil dieses Ansichtsmodus ist die Vergrößerung des Zielbereichs, die eine genauere Ausrichtung ermöglicht. Hüte jedoch vor einem "Tunnelblick" und behalte die Minikarte im Auge, damit du nicht von Panzern überrascht wirst, die sich von hinten an dich heranschleichen, während du mit dem snipern beschäftigt bist.
Durchdringungsanzeige
Der Penetrationsindikator ist eine Option des Zielkreises in Ihrem Fadenkreuz - die standardmäßig aktiviert ist - der dir mit einem einfachen Farbcode hilft zu beurteilen, ob du die Panzerung des Ziels an dem Ort, auf den du zielst, und mit der geladenen Granate durchdringen kannst. Ein roter Indikator zeigt dir an, dass du nicht in den Ziel-Panzer durchdringen kannst, ein gelber Indikator bedeutet, dass die Panzerdicke des Ziels im Bereich von -/+25% deiner Durchschlagsleistung liegt, während ein grüner Indikator bedeutet, dass die Durchschlagsleistung deines Panzers in allen Fällen die Panzerdicke des Ziels übersteigt.
Der Penetrationsindikator ist ein unschätzbares Werkzeug, um die Schwachstellen eines Ziels zu entdecken, aber sei dir seiner Grenzen bewusst. Es ist ein einfacher Vergleich deiner Durchschlagsleistung mit der Panzerdicke des Ziels entlang der Normalen am Zielpunkt und berücksichtigt nicht den Auftreffwinkel, so dass dein Schuss selbst mit einem grünen Durchschlagsindikator noch abprallen oder nicht in die effektive Panzerdicke des Ziels eindringen kann. Auch weil Streuung jeden Schuss, den du abgibst, beeinflusst, kannst du nicht unbedingt die Schwachstelle treffen, auf die du zielst.
Vorhalten
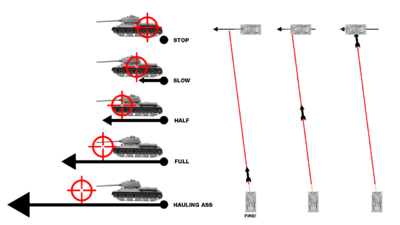
Wenn sich dein Ziel vertikal zu dir bewegt, musst du dein Visier immer manuell anpassen. Dies wird auch als "vorhalten" bezeichnet. Unter Berücksichtigung der Fluggeschwindigkeit deiner Granate musst du dorthin zielen, wo die Flugbahn deiner Granate mit der Bewegung des Ziels übereinstimmt. Zum Beispiel, wenn deine Granate 1000 m/s auf einer flachen Flugbahn fliegt (z.B. AP Granaten aus dem 8,8 cm KwK 43 L/71 "lange 88" des Pz.Kpfw. VI Tiger]), und dein Ziel 500m entfernt ist, braucht deine Granate etwas mehr als eine halbe Sekunde um es zu erreichen. Wenn dein Ziel ein leichter Panzer ist, der sich mit 72 km/h, d.h. 20m/s, vertikal zu dir bewegt, musst du theoretisch 10m vor ihn zielen, um ihn zu treffen.
Da es sich jedoch um ein Online-Spiel handelt und nicht um die Realität, musst du auch die Latenz des Netzwerks, d.h. deinen Ping, berücksichtigen. Wenn du mit einem 500ms-Ping (einem extrem hohen Ping) spielst, musst du das Ziel um weitere 0,5 Sekunden vorhalten. Im Beispiel bedeutet das, dass du deinen Vorsprung verdoppeln und 20m vor dem Ziel zielen musst (siehe auch Latenzkorrektur] unten).
Während das alles mit einer Hochgeschwindigkeitskanone einfach genug ist, wird es mit einer Niedergeschwindigkeitskanone wie der 105 mm AT Howitzer M3 des T82 viel schwieriger. Er feuert HE-Geschosse, die mit einer Geschwindigkeit von 311 m/s auf einer sehr hohen Flugbahn fliegen, d.h. es kann mehrere Sekunden benötigen, um ein weit entferntes Ziel zu erreichen. Den Abstand, den du benötigst, um dein Ziel mit einer solchen Waffe zu treffen, erhöht sich entsprechend. Natürlich gilt, je mehr du vorhalten musst, desto öfter wird dein Ziel verfehlt, wenn dein Ziel seinen Kurs auch nur geringfügig ändert. Das ist etwas, das man im Hinterkopf behalten sollte, wenn man versucht, eingehende Schüsse (aus der Entfernung) zu vermeiden: Sei niemals vorhersehbar! Mach kleine Wendungen oder halte kurz an!
Ballistische Flugbahn
Das Fadenkreuz berücksichtigt die ballistische Flugbahn, so dass es automatisch etwas höher zielt, während du mit der Maus auf ein sichtbares Ziel zielst (rote Umrandung). Sobald du dein Visier jedoch vom Ziel weg bewegst, wird diese automatische Korrektur aufgehoben. Dies ist wichtig, wenn du ein bewegliches Ziel wie oben beschrieben treffen möchtest, denn dann musst du deinen Zielpunkt für die Flugbahn selbst korrigieren. Ein einfacher Weg um zu wissen, wie viel zu korrigieren ist es, zuerst mit dem Fadenkreuz über dem Ziel zu schweben, zu merken, wie hoch es zielt, und dann auf die gleiche Höhe zu zielen, während du vorhältst. Dabei kann es vorkommen, dass sich das Fadenkreuz dem Gelände oder den Objekten anpasst, so dass Sie das auch ausgleichen müssen, wenn diese Situation eintritt.
Zielen und Sichtlinie
Obwohl die Granaten einer ballistischen Flugbahn folgen, ist das Zielen eine starren Sichtlinie. Das kann zu Situationen führen, in denen du dein Fadenkreuz nicht auf einem Ziel platzieren kannst, weil es durch ein Geländemerkmal verdeckt wird, obwohl die ballistische Flugbahn deiner Kanone es dir eigentlich erlauben würde, das Ziel zu treffen. Besonders ausgeprägt ist dies bei Panzerhaubitzen mit hohen Flugbahnen, zum Beispiel bei der T82 HMC. Aufgrund der automatischen Korrektur deines Zielkreise kann es sehr schwierig sein, das Ziel in solchen Situationen zu treffen, aber es gibt ein paar Dinge, die dir helfen können:
Die Scharfschützenansicht hat den niedrigsten Aussichtspunkt (Waffenblende), also verwende diesen nicht, wenn sich dein Ziel hinter einer Erhebung befindet und du Probleme hast, dein Fadenkreuz darauf zu platzieren. Die Standartansicht hat einen höheren Aussichtspunkt (Kommandantenkuppel), so dass Sie in diesem Modus möglicherweise auf das Ziel zielen können. In Situationen, in denen das manuelle Zielen fehlschlägt, kannst du versuchen, das Ziel mit dem automatischen Zielen durch drücken der rechten Maustaste auszuwählen und dein Fadenkreuz ein wenig weiter, möglicherweise gerade genug, fallen zu lassen. Wenn all dies fehlschlägt und das Ziel weit genug entfernt ist, kannst du versuchen, einfach über die Blockade zu zielen und auf das Beste zu hoffen. Es braucht jedoch viel Erfahrung, um diese vollständig manuellen Haubitzenschüsse richtig zu treffen.
Unabhängig von der Höhe kann es auch Situationen geben, in denen du eine Sichtlinie auf das Ziel hast und einen Schuss abgeben kannst, aber du die rote Umrandung des Ziels nicht sehen kannst. Dies geschieht in der Regel, wenn ein anderes Objekt näher bei dir ist als das Ziel und dein Fadenkreuz das andere Ziel anstelle des Panzers, den Sie deutlich sehen und anvisieren wollen, priorisiert. Du kannst den Schuss trotzdem setzten, aber das Zielen kann schwierig sein, wenn dein Fadenkreuz versucht, deinen Zielkreis auf das nähere Objekt einzustellen. Sei besonders vorsichtig, wenn das nähere Objekt ein freundlicher Panzer ist - vielen wurde in solchen Situationen versehentlich von ihren Teamkollegen in den Rücken geschossen.
Strategic View (SPG)
If your vehicle is a self-propelled gun, then Sniper View is not available to you, instead you have an SPG-specific aiming mode called Strategic View available. It is accessed in the same way as Sniper View. It gives you a top down view onto a section of the battlefield. You can use your mouse or the cursor keys to move the view around. You can also place the Strategic View directly onto a certain battlefield area by holding Ctrl and right clicking the desired location on the minimap.
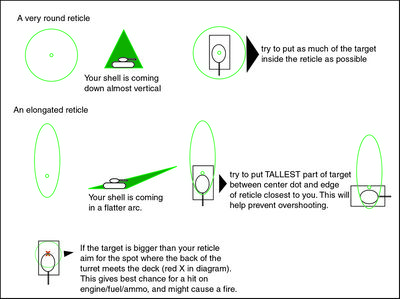
Unlike in the other view modes, in strategic mode the aiming circle does adjust to terrain elevation and ballistic trajectory. Thus it will usually not be a perfect circle but an oval shape. This helps you judge both the angle of the terrain your target is positioned on and your shell trajectory to the target. The little dot within the aiming circle/oval represents the height adjusted center of your aim.
It takes a little getting used to perfect aiming with self-propelled guns, see the illustration to the right for the basics to get you started.
Client vs Server
Shots that fall outside of your aim or go into a completely different direction are usually caused by network or server lag. This can happen because every movement of your aim on your client has to be transmitted to the server first and executed there as well. So regardless of your latency the server aim will always lag slightly behind your aiming on the client. If you press CapsLock + 0 during a battle, your client will show an additional blue reticle which shows the last information the client has received about where the server is currently placing your aim, as well as the size of the aiming circle on the server. Since this is subject to latency as well, it is not entirely accurate either, but if you are having latency related problems it can be a good idea to use the server reticle and wait until server and client reticles match before you fire a shot. The server reticle is not displayed while Automatic Aiming is engaged.
Where to aim
When shooting at an enemy tank, it is always useful to aim for areas with less armour. All tanks have the strongest armour in the front, with the rear being the weakest. In addition, a tank's armour is not uniform. Use the Penetration Indicator to discover weakly armoured spot, so called weak-spots (typically hatches, machine gun mounts, etc.).
Often it can also be helpful to inflict critical damage, e.g. by destroying the tank's tracks and thus immobilizing it, by shooting it's fuel tank to set it on fire, etc. Follow the links for more details.
Accuracy and Dispersion

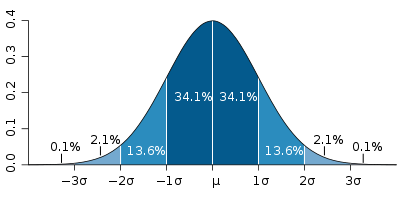
Every shot you take is dispersed randomly around the center of your aiming reticle, i.e. you will not necessarily hit exactly where you aimed. The actual dispersion amount is based on a Gaussian (normal) distribution curve and depends on your gun and the turret it is mounted to.
Gun Accuracy
The accuracy value for a gun is given in meters at a range of 100m. The lower the value the more accurate your gun is. The value describes 2 standard deviations σ from the center of your aim. In other words, for a gun with 0.32m effective accuracy at 100m, 95.45% of all shots will land within 0.32m of the center of your aim at that distance. Dispersion amount increases linearly with distance, i.e. 0.32m effective accuracy at 100m translates to 0.64m at 200m and 1.28m at 400m
The accuracy of your shot is determined by a Random Number Generator. The formula is generated by a hamster on a wheel in each WG server.
Aiming Circle
The aiming circle (also called the dispersion circle, dispersion indicator or reticle) describes the area of 2 standard deviations (2σ) from your aim point. Based on a standard normal distribution, this means that 4.2% of your shots would fall outside of the aiming circle. The shots move (deviate) away from your aim point, outwards toward the edge of the circle, but rarely shoot past its edge.
Accuracy Penalties
The accuracy discussed above applies is the best case scenario. During actual game play several factors can come into play that result in a penalty to your accuracy:
- Dead Gunner: If your Gunner gets knocked out the Gunner's skill will be set to 0% for the purposes of calculating the accuracy stat. The effect is mitigated if the Commander has the Jack of All Trades skill. The effect is removed if the Gunner receives first aid via a consumable. See the Crew page for more information.
- Gun Damage: A damaged ("yellow") gun typically fires with halved accuracy for as long as it remains damaged. The effect is reduced if the Gunner has the Armourer skill. The effect is completely removed if the damaged gun is repaired via a consumable.
- Shooting: With each shot you take your accuracy temporarily gets reduced dramatically depending on the vehicle type, but your Gunner will immediately start aiming again.
- Turret Rotation: Rotating the turret results in a temporary accuracy penalty. The exact amount depends on the installed gun and the speed of your turret's rotation. The effect is reduced if the Gunner has the Snap Shot skill.
- Vehicle Movement: Moving your vehicle forwards or backwards temporarily reduces accuracy. The exact amount depends on the installed suspension and your moving. The effect is reduced if the Driver has the Smooth Ride skill.
- Vehicle Rotation: Rotating your vehicle left or right temporarily reduces accuracy. The exact amount depends on the installed suspension and your rotation speed. The effect is reduced if the Driver has the Smooth Ride skill.
With game version 0.7.2 several crew skills and perks have become available to reduce most of these penalties.
Aiming Time
The aiming time listed for each gun (in a specific turret) describes the time it takes for the aiming circle diameter to shrink to a third of its size. A wounded gunner will increase the aiming time. The effect is removed if the Gunner receives first aid via a consumable such as a health pack. However, most of the penalties described above increase the aiming circle by a factor bigger than three, which is why fully aiming the gun typically takes longer than the listed amount of time.
Client vs Server
When you fire a shot, your shell trajectory is first calculated based on the data the client has. It is later updated with the data confirmed by the server. If the difference was big, then you may see shell tracers leave your barrel at an angle or change flight path mid-trajectory.
It is unclear whether only the aiming point or also the dispersion of the trajectory around this centre point is corrected based on server data. At least in v0.7.1, if you watch a replay, you can notice that each time you play it, your trajectory will be slightly different. This indicates that either dispersion is not synchronized between client and server, or that it is during a battle but that data is missing in the replay files. In any case, currently replays cannot be used to find out where your shot went exactly.
Penetration Mechanics
Aiming properly and hitting the enemy tank are only the means to an end, and that is actually damaging and eventually disabling it. And that is not automatic. Once you have hit an enemy vehicle, the game then calculates where the shot hit the enemy, at what angle you struck the armour, the effective thickness of the armour (based on the impact angle), and thus ultimately whether your shell penetrates the armour.[1]
Impact Angle
The angle at which an Armour Piercing (AP), Armour Piercing Composite Rigid (APCR), High Explosive Anti Tank (HEAT) or High Explosive (HE) shell hits the target's armour is crucial for penetrating it. The ideal impact angle is along the normal, i.e. perpendicular to the armour plate. The actual impact angle is calculated as the deviation from the normal. For this, the ballistic flight path of the shell is taken into account, which can be particularly important for artillery guns and their high arcing trajectories if you fire AP or HEAT shells with them.
If the shell hits an external module (e.g. tracks, observation device, turret rotator), impact angle is not taken into account. The exception to this rule is the gun.
Shell Normalization
The impact angle of AP and APCR shells onto a vehicles armour is normalized, i.e. adjusted towards the armour's normal axis at the point of impact.
In case of spaced armour, shells are normalized at the point of impact on the spaced armour, and if they penetrate, continue along their normalized flight path into the vehicle. Once it impacts the hull armour, normalization occurs again and the remaining penetration potential (i.e. the original penetration potential minus the effective armour thickness of the spaced armour) is used to calculate whether the shell penetrates the hull proper.
As of update 8.6, APCR shells are normalized at 2°. The normalization amount is a constant value depending on the shell; there is no randomization.
The impact angle of HEAT and HE shells is not normalized at all. Angle is used for armor line-of-sight thickness calculations, as normal.
Ricochet
If the pre-normalized impact angle of an AP or APCR shell on the target's armour exceeds 70° (85° for HEAT), a ricochet (a specific variant of a bounce) occurs regardless of its penetration value and the shell is deflected off the target without causing any damage. You may ricochet off of spaced armour as well, and even if you penetrate that your shell may still ricochet off the underlying hull armour.
As mentioned above, impact angle is not taken into account when hitting external modules except the gun, so a ricochet off those is impossible.
A ricochet off terrain features, buildings or wrecks is impossible.
Overmatch
If the AP or APCR shell's caliber is more than 2 times the nominal thickness of the armour (Such as a 130mm shell hitting a 60mm thick plate), projectile shell normalization is increased by the following formula: basic normalization * 1.4 * shell caliber / nominal armour thickness. Note that the shell is still capable of bouncing if it strikes the armor at an angle of 70° or more from normal.
If the AP or APCR shell caliber is more than 3 times the nominal thickness of the armour (such as a 130mm shell hitting a 40mm thick plate), no ricochet will happen even if the impact angle is more than 70° from normal. The increased shell normalization described above will also occur.
In cases involving HE shells or external module hits, overmatch does not occur.
Effective Armour Thickness
Your tank is armoured with plates of varying thicknesses. The game only provides you with the nominal armour strength of the three main armour plates of your tank's hull and turret, respectively. However, the tanks are actually modeled in much greater detail. The penetration indicator can help you discover the actual nominal armour thickness of your target.
However, the nominal thickness of an armour plate is just the minimal amount of armour a shell impacting it must penetrate. As soon as the impact angle deviates from the normal, i.e. is not perfectly perpendicular to the armour plate's surface, the effective armour thickness that the shell needs to penetrate will be higher than the nominal armour thickness:
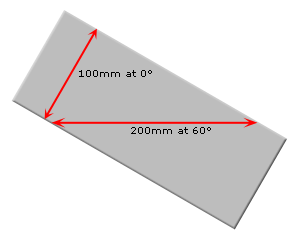
The effective armour thickness is calculated by dividing the nominal armour thickness with the cosine of the nominal impact angle. For example, in the diagram above we have a nominal armour thickness of 100mm and an impact angle of 30°, thus we have an effective armour thickness of 100mm/cos(30°) = 115.47mm that the shell needs to be able to penetrate. In other words, at an impact angle of 30° the armour is effectively over 115.47% stronger than its nominal value.
The following table provides the coefficients for a number of normalized impact angles:
| Impact Angle | Effective Armour Thickness |
|---|---|
| 0° | 100% |
| 10° | 101.54% |
| 20° | 106.42% |
| 30° | 115.47% |
| 40° | 130.54% |
| 50° | 155.57% |
| 60° | 200% |
| 70° | 292.38% |
| > 70° | Ricochet |
As you can see, the effective armour thickness increases exponentially with the impact angle. For shells impacting you at 60° your armour is effectively twice as thick and at 70° nearly three times as thick. As explained above, for angles higher than 70° all AP and APCR shells will ricochet regardless of armour thickness.
As of 8.6, HEAT shells will start to ricochet if the impact angle equals or is greater than 80 degrees. The armor penetration after ricochet will remain the same. As of 8.9, HEAT shells will start to ricochet if the impact angle equals or is greater than 85 degrees. The armor penetration after ricochet will remain the same. The same applies to your targets, of course, so always take that into account when deciding if and where to shoot them. Reducing the impact angle to your target only slightly will exponentially reduce its effective armour thickness and a target that was previously impossible for you to penetrate may suddenly become easy prey. This is also the reason why you should always attack from two different angles at once. A target can only maximize their effective armour in one direction, as soon as they try to accommodate two possible impact angles they suffer an exponential loss in effective armour thickness towards both of them (thus if you are the one getting flanked while in a strongly armoured tank it is best to maximize your effective armour towards one opponent while shooting the other one).
Penetration Randomization
Penetration values displayed for a gun/shell combination are average values. The actual penetration value is randomized by up to +/- 25% around the average value. Randomization occurs on impact with the target, separately for each new shell you fire.
Penetration Loss over Distance
Since shell speed decreases the longer a shell flies, the game models linear penetration loss over distance depending on the gun and shell type used:
- Armour Piercing (AP) shells experience low penetration loss over distance.
- Armour Piercing Composite Rigid (APCR) shells generally experience high penetration loss over distance (the exception are the APCR shells used as default ammunition)
- High-Explosive (HE), High-Explonsive Squash Head (HESH), as well as High-Explosive Anti-Tank (HEAT) shells experience no penetration loss at all.
The penetration values displayed in game indicate average penetration values at 0-100m distance (no penetration loss occurs within this range). Penetration values at higher distances are not displayed. As a rule of thumb, the higher the tier of the gun used, the lower the penetration loss over distance. For example, a Leichttraktor loses up to 17.5% penetration firing AP shells and 51.4% firing APCR shells with its default gun, whereas a Maus only loses about 2% with AP and 15.4% with APCR.
Double Penetration
A shell can continue its flight path after the initial impact, either on the outside of the tank in case of ricochet or inside of the tank following penetration of spaced armour, hull armour or external modules. A shell will continue flying for ten times its caliber (a 100mm shell will continue for 1 meter). The remaining penetration potential is the initial penetration value, randomized at the point of impact +/- 25%, minus whatever effective armour thickness that was penetrated. This remaining penetration potential is then used to calculate whether any other armour plates that are hit can be penetrated. Internal modules or crew members have no armour and thus will always get hit if any penetration potential is left in the shell.
Until update 9.3 the penetration model was simplified and after initially impacting a vehicle a shell is "bound" to this vehicle and cannot hit any other tank anymore (no longer true since). That means that a shell could neither ricochet off a tank to hit another tank within its deflected flight path, nor could a shell pass through a tank to hit another tank behind it. A shell's flight path also ended after impacting the ground and those buildings structurally invulnerable to shell damage.
Damage Mechanics
If your shell penetrates the enemy tank's armour, its journey is not over, the enemy tank does not automatically take damage. It all depends on the path of your shell after penetrating the armour and what parts of the enemy tank it hits on that path. A shell can indeed pass clean through a tank without causing any damage.
Shell Damage
Each shell has a specific damage potential. The game mechanics differentiate between armour damage and module and crew damage, but only the potential armour damage of a shell is actually displayed in game. The potential for module and crew damage exists in addition to the armour damage potential and is not shown in game.
The potential for module and crew damage is balanced individually for each shell - generally speaking low tier guns can cause more critical damage than armour damage, whereas the inverse is true for high tier guns. The reason is that low tier tanks have considerably more module hitpoints - another hidden property of your tank - than they have armour hitpoints. At high tiers the opposite is true.
Damage Randomization
Just like shell penetration, all shell damage is randomized by up to +/- 25%, regardless of shell type. The gun properties display the average value. The shell properties display the damage range. Note, however, that the shell values are rounded to the nearest integer, whereas the damage amounts shown in game are truncated. This is a display issue, and both are incorrect: The server uses the exact values.
Armour Damage
Each vehicle has hit points, displayed in the garage. Each vehicle enters the battle with 100% hitpoints because you must repair any damage taken by your vehicle in a previous battle before you are allowed to join the fight in it again. Each time the vehicle takes armour damage, its hitpoints get reduced. Once a vehicle's hit points reach zero, the vehicle is destroyed. During a battle, the remaining hitpoints of a vehicle are represented by the progress bars displayed over the targets you aim at.
Spaced armour is a special type of armour that exists to deflect a shell's flight path and to protect against the explosion blast from high-explosive (HE) shells. Spaced armour is special in that it is separate from the hull armour. Damage applied to spaced armour does not reduce the hit points of the vehicle itself.
AP, APCR and HEAT Shells
AP, APCR and HEAT shells cause damage only if they manage to penetrate the target's hull armour. Once the hull armour is penetrated the target will take the full listed damage, +/- 25%. Other factors play no role to the damage calculation. For example, it makes no difference whether you barely penetrated or easily penetrated the target.
HE Shells
The situation is more complex for HE shells because both penetrating and non-penetrating hits and even misses can cause damage.
If this type of shell penetrates the hull armour, the situation is identical to the one just described for the other types of shells, damage is done to the full listed potential, +/- 25%. Since the shell, as high-explosive ammunition, explodes inside of the vehicle after it passes through the armour, any internal modules or crew caught within the explosion radius risk taking damage/getting knocked out (see Module and Crew Damage below).
However, HE shells typically have low penetration values, so unless you aim carefully at a weakly armoured area of your target, you will not penetrate and the shell explodes on the outside of the target vehicle at the point of impact. This also applies if an HE shell penetrates spaced armour, which causes it to explode before hitting the hull armour. Finally, even if you miss the target, the shell will explode on impact and may still cause damage to the target if that lies within the explosion radius, which depends on the shell used. In all these cases where hull armour is not penetrated by the shell itself, the amount of damage is lower and calculated according to the following formula:
![]()
SpallCoefficient may be 1.2, 1.25, 1.3, or 1.5 if a spall liner is installed and you calculate armour damage, otherwise 1 (i.e. a spall liner does not protect external modules). actualDamage results of zero or below mean you cause no damage.
ImpactDistance is the distance between the point of impact of the shell and the point of impact between the explosion's blast and the target along a straight, unobstructed line. Since the blast will cover an area of the target's surface, the game selects the spot that leads to maximum damage according to the above formula, i.e. it will be a trade-off between the spot with the lowest nominalArmorThickness and the closest spot that can be hit. Ideally your blast wave reaches an unarmoured area of your target, e.g. the open top and rear on certain tank destroyers or self-propelled guns.
Once the exact point of impact has been determined this way, the actual damage amount is determined as well as is the actual damage potential that the shell can now cause to the target. Whether this actual damage potential causes any damage to the vehicle follows the normal rules, but with the following limitation regarding internal modules and crew:
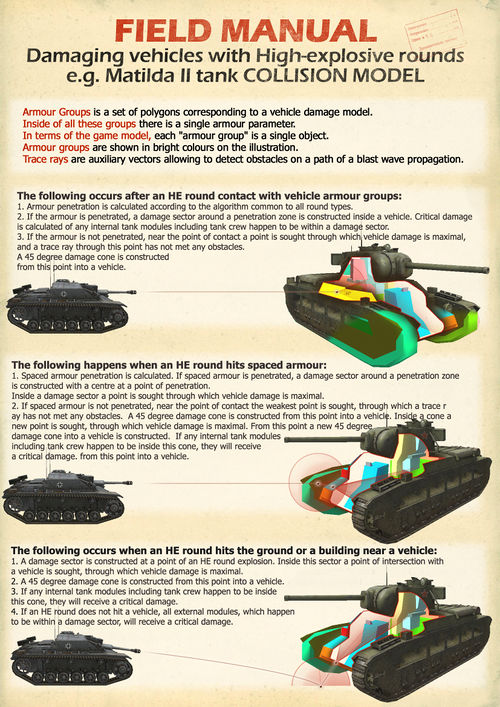
- If the shell exploded on the vehicle itself, then the propagation of the blast wave into the tank is simulated by calculating a cone-shaped area 45° wide originating from the point of impact of the shell along the normalized impact vector to a distance of 10 times weapon caliber. Damage to internal modules and crew is possible within this area.
- If the shell exploded elsewhere and only the external blast wave impacted the vehicle at a distance above 10 times weapon caliber, then no propagation of the blast into the vehicle itself takes place. Because of this no damage to internal modules and crew can occur.
If spaced armour is impacted by the blast wave first, the calculation above is conducted a second time for the underlying hull armour. Since this second calculation is based on the remaining reduced damage potential, its result is typically zero, i.e. no damage.
Module and Crew Damage
As mentioned above, you can not only damage a vehicle's armour, but also its modules and crew. Armour damage and module/crew damage are distinct. That means hitting a module only affects that module, not the hitpoints of the tank, just like hitting the armour does not affect a module. However, the same shell can damage both hull armour and module(s) or crew since it travels through the tank after penetrating the hull armour.
Just like the vehicle's hull, also each of its modules and crew have hitpoints. During a battle, you only see a simplified display of the amount of hitpoints remaining on your modules and crew represented by one of three colour states in the damage panel at the bottom left of your screen. These states are:
Default (i.e. no colour shading): Enough hitpoints for module and crew to be fully operational.
Yellow: This state signifies that a module has taken considerable damage (≥50%) but is still operational. Crew members have no yellow state.
- Tracks: No negative effect.
- Rangefinder: No negative effect.
- Fuel Tank: Subsequent hits are more likely to set your vehicle on fire.
- Turret: 50% reduction in turret traverse.
- Gun: 50% increase in dispersion and decrease in accuracy.
- Engine: 50% engine HP.
- Ammo Rack: 50% Reload speed.
Red: This state signifies that a module is not operational/a crew member is knocked out. Crew members remain in this state unless a consumable is used to restore them to full health, whereas modules will automatically be repaired over time by your crew up to the "Yellow" state of being operational.
- Tracks: Vehicle is immobilized.
- Rangefinder: Maximum spotting range reduced by 85%. The penalty is lessened with the Recon skill.
- Fuel Tank: Fire will start.
- Turret: Turret traverse is disabled.
- Gun: Unable to fire gun, vertical traverse is disabled.
- Engine: Vehicle horsepower drops to 0. You can still move downhill or on any momentum you had. Fire likely.
- Ammo Rack: Vehicle is destroyed unless there are 0 rounds remaining. Light, Medium, and Heavy tanks will have their turrets 'blown off'.
All module and crew state changes are accompanied by a voice message.
Saving Throw
When a module or crew member is hit, they do not necessarily take damage from the hit. Instead, most modules have a specific chance not to take damage. This is also referred to as a saving throw. The base chances of damaging a specific module or crew member when hitting it are as follows:
- Suspension: 100%
- Engine: 45%
- Fuel Tank: 45%
- Observation Device: 45%
- Radio: 45%
- Turret Ring: 45%
- Gun: 33%
- Ammunition Rack: 27%
All crew members have the same chance to get knocked out when hit, however starting with game version 0.7.4 this chance depends on the damage type:
- Crew hit by AP/APCR/HEAT shell: 33%
- Crew hit by (internal) explosion: 10%
Each of these base chances to damage a module or knock out a crew member can be increased by 3 if the Deadeye perk is active for the attacking Gunner at the time of a shot with an AP, APCR or HEAT shell.
No other factors influence these chances. The amount of ammunition you are carrying does not affect the chance of your ammunition rack taking damage.
Complete Crew Death
Note that as soon as all crew members are knocked out, the tank becomes inoperable. Consumables to restore a crew member's health cannot be applied anymore at this point, i.e. there is no way to restore the tank to operating condition. It counts as destroyed, even though its hull stays on the battlefield with all its remaining hitpoints.
Ammunition Rack Explosion
If the ammunition rack's hitpoints reach zero, it explodes, destroying the tank and its crew completely regardless of the remaining hitpoints on either of them. The only case the tank does not explode with a "red" ammo rack, is when the rack is completely empty.You can increase your ammo rack's hitpoints by installing "Wet" Ammo Rack equipment or by training the Safe Stowage perk on a crew member with the role of loader.
Fire Damage
There are two ways the enemy can set your tank on fire:
- If your fuel tank's hitpoints reach zero, your tank automatically catches fire.
- Each time your engine gets hit, there is a chance that your tank catches fire. This chance depends on the engine and is displayed on the engine module's properties in game or here on the wiki. Note that the transmission counts as part of the engine but hits to the transmission do not cause fires.
While your tank is on fire, it constantly takes both hull as well as module and crew damage. The exact damage rate depends on the tank but is not displayed in game. The duration of the fire also depends on the tank on your crew's effective Firefighting skill level, and whether your Driver has the Preventative Maintenance perk active and whether you use Automatic Fire Extinguishers consumable; You should also consider that moving while being lit, increases the time to You can also extinguish a fire manually by using Manual Fire Extinguishers consumable.
It should also be noted that driving while being on fire increases the extinguishing time considerably.
Ramming Damage
You can also damage a target by ramming it. The collision creates an explosion at the point of impact similar to that of a high-explosive shell. The strength of the explosion, i.e. the damage potential, depends on the kinetic energy applied in the collision (0.5 * combined weight * relative speed^2), or in other words the combined weight of you and your target as well as your relative speed. That means that the heavier both you and your target are and the faster you collide, the stronger the explosion caused by the collision will be.
However, that damage potential is distributed according to the weight of each of the two colliding vehicles relative to their combined weight (1 - individual weight / combined weight). For example, if you weigh 75 tons and you ram a target weighing 25 tons, only 25% of the explosion will affect you.
Actual damage calculation then follows the same rules as for high-explosive shell explosions, thus ramming lightly armoured targets/areas of the target will cause more damage than strongly armoured parts. Damage taken can be reduced by having a Spall Liner equipped. You can further reduce damage taken and at the same time increase the damage inflicted to the target by having your vehicle's Driver trained in the Controlled Impact skill.
If you are about to be rammed, you can reduce the damage you will take by moving away from the approaching enemy, thus reducing your relative speed, and pointing your strongest armour at them. If your Driver has the Controlled Impact skill, you need to be moving to activate it, anyway.
Zero Damage Hits
Hits that cause no damage, also called zero damage hits, are notorious among the player base, and various conspiracy theories abound in their respect. However, in most cases they are simply the result of the above described game mechanics in conjunction with poor and sometimes incorrect visual and audible feedback given to the player about what happened with their shell. Bounces and ricochets, hits to spaced armour or to external modules are difficult to distinguish for the player, yet they all have a chance of not resulting in any visible armour damage to the enemy tank (they might still cause module or crew damage, but that is not always immediately visible to the attacking player and thus dismissed).
Everybody experiences zero damage hits, just like everybody experiences misses. However, a thorough understanding of the game mechanics described above will help you minimize them. There is randomization in the game, but you will always hit what you aim for, namely the area covered by your dispersion circle, so aim wisely to maximize the chances of your shots to damage your target.
Ghost Shells
Players also like to claim ghost shells, i.e. shells that either disappear straight out of the barrel or pass straight through a target as if it wasn't there.
The first type is typically due to the player missing the visual tracer effect - watching the battle's replay from a different angle will reveal it to you.
The second type can in rare cases be caused by heavy lag in the client/server connection that causes a synchronization loss - what you are seeing on the client is not actually what is happening on the server, and what's happening on the server is what counts. It may also be caused by a mistake in the collision model of the opponent's vehicle. The collision model is a simplified version of the visual model of the target vehicle, but separated into various hitboxes. If two hitboxes are not perfectly aligned, they may create a void between them that a shell can pass through if it flies through at just the right angle. Finally, for some vehicles there are parts of the visual vehicle model that are intentionally not reflected in the collision model and a shell can pass straight through them. This is often the case for elements fastened to a tank's external hull, e.g. boxes or fuel tanks. In many cases these are just decoration.
Damage Per Shot/Damage Per Minute
The most common metrics used to measure the performance of a tank in terms of firepower are referred to with the terms Damage Per Shot (also referred to most commonly as 'alpha') and Damage Per Minute (DPM).
Alpha damage refers to the amount of damage a player can expect to output in one shot (or in the case of autoloaded guns, in the span of a magazine or partial magazine dump) - essentially, how much damage a player can output for minimal exposure to enemy fire. Normally, tanks with very large alpha damage for tier will have long reload times, and tanks with smaller alpha will have shorter ones.
Damage per Minute, however, refers to the sustained output of a given tank over time and can be seen as the opposite metric of alpha; DPM measures the damage output that a player gains from maximum exposure rather than the minimum. Traditional DPM is calculated as the damage per shot times the rate of fire.
On average, tanks with large alpha values will have less traditional DPM than tanks with smaller alpha values. This rewards tanks with smaller alpha for the increased risks associated with remaining exposed to gain damage output, but such a playstyle does leave a player open to incoming fire.
An alternative measure of DPM is the 'advantageous' (most often referred to as 'first-shot') DPM, which is the value of DPM plus the damage of shells already loaded into the chamber (and hence do not need reloading at the opening of hostilities). This metric tends to better reflect the nature of WoT combat, with engagements not starting at the beginning of the game, and will tend to show large increases in DPM for the high-alpha tanks. In the first-shot paradigm, in fact, most larger-caliber guns will have a higher DPM than most traditionally high DPM guns.
Repair
If a module is knocked out during battle, your crew will instantly start repairing it. The time it takes to repair a module depends on the module itself (not just its type) and the effective repair skill of your crew. Also the Toolbox will increase repair speed by 25% for the normal toolbox or 40% for the improved toolbox.
Your crew will only repair a damaged module just enough to make it operational again, i.e. it will remain in "yellow" or damaged state. The exact amount of hitpoints this state represents depends on the specific module as well. This is approximately half of its total hitpoints for most modules.
To get a module fully operational again and restore all of its hitpoints to it during battle you must use a consumable. The Small Repair Kit is bought for credits and allows you to repair one module during the battle (starting from patch 0.7.4 both tracks can be repaired at once if they are both damaged). The Large Repair Kit costs either gold, or, starting from patch 0.8.5, credits, and fully repairs all modules that are damaged at the time you use it. It will also provide a bonus of 10% to the crew's repair speed unless consumed. Starting from patch 9.18, Repair Kits are usable again during the same battle after a cooldown of 90 seconds.
Referenzfehler: Es sind <ref>-Tags vorhanden, jedoch wurde kein <references />-Tag gefunden.