Mirny-13: Hope
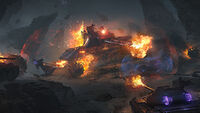
Greetings, Commanders! My name is Hope. I am a Senior Researcher in a group of scientists studying the secrets of Mirny. The main problem I'm working on is how to defeat the Immortal. I think I've solved this riddle, but more on that later. In the meantime, let me tell you about the place where you will fight, as well as about Phase teleportation and Anomalies.
Difficulty Levels
Mirny: Hope features three difficulty levels: low, medium, and high. You can choose the difficulty level in your Garage before each battle. The difficulty level determines the number of credits and Decryption Keys (more on them below) you earn per battle, as well as the strength of the AI opponents. Plus, the difficulty level affects both the amount of Mirium you need to fill Magnus and the amount you get in battles with enemies.
.jpg)
Difficulty levels open sequentially. The first level is the least dangerous and consists of three Phases. In the second Phase, you will face the Immortal for the first time, but at this difficulty level, you will not be able to fight it.
Complete all three Phases at low difficulty to unlock the medium difficulty level, which consists of four Phases. If you can get to the last, fourth Phase, the Immortal will become vulnerable, and you will have a chance to annihilate it. If you manage to achieve this epic victory, then you will access the third and hardest difficulty level.
The high difficulty level will be quite challenging, even for experienced commanders, so get ready to fight with all your might. It is recommended to play at this level in well-coordinated Recon Squads.
Phase Teleportation and Anomalies
Destroy armored AI enemies to obtain a type of supernatural matter known as Mirium. Mirium will drop for each player individually, so you will see only your own load of matter, and no one else can pick it up—as long as you are alive.
Collect Mirium and deliver it to a special Collector called Magnus, depicted on your minimap, before time runs out. Once Magnus is filled with Mirium, your team needs to gather around it within the allotted time, and you will be able to teleport to the next dimension, or Phase. If you don't reach Magnus in time to teleport with the rest of your team, your vehicle will automatically be destroyed. But this doesn’t mean that the battle is over—you will respawn in the next Phase, albeit with half your HP. You will also lose all your collected Mirium and bonuses from Anomalies.
With each new Phase, the AI enemies will become stronger and more dangerous. But your efforts will be rewarded: The more Phases you complete, the more credits you earn after the battle. Remember that it will be more difficult for you to navigate in each subsequent Phase, so always be on the lookout, and coordinate closely with teammates!
At the beginning of each Phase, your vehicle will receive a random buff, or Anomaly. It will increase your effectiveness in combat and carry over from Phase to Phase. If your vehicle is destroyed, you will lose all your Anomalies, as well as all collected Mirium and alternative shells. Be careful, and build up your forces to have a better chance of defeating the Immortal in the final stage of the battle.
There are nine types of Anomaly in the mode, each of which improves a specific parameter of your vehicle.

Machine Gun: +15% to reloading speed

Vampire Bite: Steals hit points upon penetrating enemy vehicles, recovering 20% of damage taken

Sniper: –15% to dispersion while moving or turning

Hammer Thrower: +5% chance to cause +20% bonus damage

Hot Needle: +5% chance to set an enemy on fire

Inspire: +15% to crew performance

Mobility: +10% to dynamic characteristics

Ceramic Core: +15% to damage caused

Regeneration: Gradually restores vehicle hit points, up to 60% of the vehicle’s max HP


Mode Economy
All shells and vehicle repairs in the event are free. Depending on your performance in battle, you are awarded with credits. Each difficulty level has its own fixed number of credits you can earn for completing each Phase.
| DIFFICULTY LEVEL | LOW | MEDIUM | HIGH |
|---|---|---|---|
| PHASE 1 | 5,000 | 10,000 | 10,000 |
| PHASE 2 | 10,000 | 15,000 | 20,000 |
| PHASE 3 | 15,000 | 25,000 | 25,000 |
| PHASE 4 | - | 30,000 | 45,000 |
| MAXIMUM NUMBER OF CREDITS PER BATTLE | 30,000 | 80,000 | 100,000 |
Unravel the Secret of the Immortal!
In Mirny, you will not only fight dangerous armored creatures, but you’ll also learn the backstory of the Mirny: Hope operation—how the Immortal became vulnerable. This mysterious story is captured on eight Reels, which you will receive one by one for completing certain Phases at different difficulty levels. Each Reel contains one piece of video footage, so you need to collect all eight to combine the disparate elements into a single picture and solve the enigma.
But since the information on the Reels is secret, they are all encrypted. To decrypt the Reels, you need Decryption Keys, a special event currency. You can get Decryption Keys in the following ways:
- By playing in the event, depending on the difficulty level, Phase, damage dealt, and delivered Mirium
- For completing the daily event mission in special vehicles (more on that below)
- For free, as part of special bundles with valuable in-game items
For each Reel you decrypt, you will receive rewards:
- Reel 1.
- Reel 2.
- Reel 3.
- Reel 4.
- Reel 5.
- Reel 6.
- Reel 7.
- Reel 8.
- Decrypt all 8 Reels during the Mirny: Hope event.
- Receive an encrypted Reel for completing Phase 2 on low difficulty.
- Decrypt the Reel using Keys: 10 Keys.
- Prizes:
 3x Hedgehog decal
 50,000 Credits
 5x Personal Reserve: +50% to Combat Experience for 2 hours


 Unlocking the Legio Ferrata heavy tank. Vehicles are available for rent for the duration of the Mirny: Hope event.
 Norman Stansfield crew member with the Brothers in Arms perk trained to 100%
 5x Personal Reserve: +300% for Free Experience for 1 hours


 Personal Training Manual for 850,000 XP
- 250,000 Credits
 5x Personal Reserve:+200% to Crew Experience for 1 hour


 Unlocking the Malachite medium tank. Vehicles are available for rent for the duration of the Mirny: Hope event.
 Robert Barnes crew member with the Brothers in Arms perk trained to 100%
 5x Personal Reserve: +50% to credits for 1 hour


 3x Magnus decal
 5x Aim Tuning directive
 3 Days of WoT Premium Account


 Unlocking the Grenadier light tank. Vehicles are available for rent for the duration of the Mirny: Hope event.
 Pyotr Lopakhin crew member with the Brothers in Arms perk trained to 100%
- 5x Personal Reserve: +50% to Combat Experience for 1 hour

 Universal Training Manual for 250,000 XP
 5x Orderly Ammo Rack directive
- 5x Personal Reserve: +50% to credits for 1 hour


 Spotlight decal
 Elias Grodin crew member with the Brothers in Arms perk trained to 100%
- 500,000 Credits


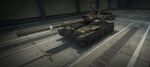
 Tier VII American King Tiger (Captured) heavy tank
 Hope is the Key to Everything badge
 Nox Tenebris 3D Style


Additionally, you can exchange Decryption Keys for spooky event-themed decals. They were recreated from hand-drawn sketches of a surviving tanker who was part of the first Recon Squad sent to Mirny. These decals seemed to come out of the subconscious of a person who faced the inexplicable in the supernatural space of Mirny.

"Palm"
"The Immortal"
"Survivor"


The Story of the King Tiger (Captured)
TOP SECRET!
Event location: Mirny
Reporter: Colonel K., Technical Supply Officer
Recipient: Colonel Gromov, Head of the Operation
We studied the King Tiger (C) and brought it to the base. Attached to this report are the details on its technical characteristics.
Key information:
- According to its serial number, this King Tiger (C) was captured by the Allies, supposedly during the Battle of Bulge. The American forces then used it. Its post-war fate is unknown, as is how it ended up in Mirny. I'm asking to send a general request about the Allies and their use of captured vehicles. Perhaps it will help us find additional information about this vehicle.
- The vehicle is equipped with the Serienturm turret and the 8,8 CM KW.K. 43 gun. The hull armor is standard for a vehicle of this type.
- The American military certainly used the King Tiger (C). We discovered several leaflets in English containing the manuals. Also, we found an inscription in Latin on the inside of the hull: Nox Tenebris. We can't say yet how exactly this inscription was made. It looks very natural, as if it appeared during hull casting. We also found a case of cola in excellent condition but without an expiration date. The discovered items were sent to the scientists for analysis. And the idiot who opened and drank one of the bottles headed that way, too.
- The tank has modifications similar to our standard modifications to adapt the vehicles for Mirny. But they look as if they were assembled from what was at hand. I'm not sure that they have any practical use, except for the spotlight. The first thought is that someone tried to copy our solutions to look like our vehicles but not for use. Did they want to look like us?
- The King Tiger (C) is in excellent technical condition. This is not typical of a vehicle of that age. The technicians are thrilled about it and even argue about whose turn it is to maintain the tank. Surprisingly, I share their feelings—it's very cozy, and quite warm and calm inside the tank. However, it has standard heating.
Dark 3D Styles, Spooky Decals, and More!
Plus, you can get your hands on three dark 3D styles for these three great tanks. 3D styles can be purchased for 4,500 gold each in the game client:
IS-7 - "Ryolit" Style
Leopard 1 - "Blitzlicht" Style
Manticore - "Pointer" Style


Rhyolite, Pointer, and Blitzlicht: Three Styles Forged in Mirny's Wastelands


You can also earn an exclusive badge for decrypting all eight Reels. Finally, if at the end of your dangerous expedition you defeat the Immortal, you will be awarded a spectacular medal. Different medals are awarded for defeating the Immortal on medium and high difficulty, so take this chance to get them both!
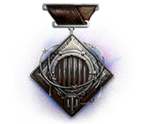
Tame the Beast
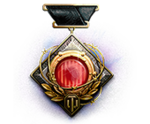
The Chosen One
Hope is the Key to Everything


Special Vehicles
Six special vehicles have been prepared for the expedition to sinister Mirny. The following tanks will be initially available in the mode’s Garage, each with its own gameplay features:
- Hornet (IX. tier - AMX 13 90): a speedy and maneuverable light tank with an autoloader
- Cerberus (IX. tier - Centurion Mk. 7/1): a versatile medium tank with a solid turret and high rate of fire
- Double (IX. tier - IS-3-II): a mighty double-barreled heavy tank with powerful guns and tough armor
You will also have the opportunity to roll into battle in three even more formidable vehicles:
- Malachite (IX. tier - T-54): a medium tank with a great gun, decent armor, and good dynamics
- Grenadier (IX. tier - T49): a speedy light tank featuring a HE autoreloader
- Legio Ferrata (IX. tier - Progetto C50 mod. 66): a versatile heavy tank with a good balance of firepower and dynamics
You can access these vehicles by progressing in the mode and decrypting Reels.
Consumables
To increase your chances of survival in Mirny and to fight enemies more effectively, be sure to use special consumables. The event features Team consumables (giving bonuses to you and the entire team) and Personal consumables (giving bonuses to only your tank). Before the battle starts, you can obtain three of the seven available consumables (in addition to the default Turbocharger ability) for credits.
Turbocharger will be available for all event vehicles. It accelerates your vehicle for a limited time and increases the damage caused by ramming. This ability is free and doesn’t take up a slot.

Born Ready!: Provides instant reloading of guns with cyclic or magazine reloading. Cost 20,000


Pyrokinesis: Sets nearby enemies on fire. Cost 20,000

Emergency Kit: Repairs damaged modules, extinguishes fire, and restores part of the hit points of allied vehicles within the effect radius. Cost 3,000

Lifesteal: Steals hit points from nearby enemies. Cost 3,000

Energy Strike: Causes damage to nearby enemies: Cost 20,000

Emergency Repairs: Instantly restores hit points, extinguishes fire, repairs damaged modules, and heals all injured crew members of your vehicle. Cost 20,000

Energy Shield: Makes your vehicle invulnerable for 7 seconds. Cost 20,000


Also, by default, all players will have a passive Phoenix ability. It automatically activates and respawns your vehicle after destruction with 50% of its hit points after your team enters the next battle Phase.
The use of all consumables is limited by the cooldown that begins after their effect is over.
When choosing a consumable, consider the gameplay of a specific vehicle and your tactics. For example, if you are going to storm the battlefield in the mighty Double (the IX. tier IS-3-II ), then Born Ready!, Energy Strike, and Emergency Repairs will help you fight more effectively on the front lines. And if you roll out in the speedy Hornet (the IX. tier AMX 13 90 ), then the combination of Born Ready!, Pyrokinesis, and Energy Shield will allow you to rush behind enemy lines, deal a lot of damage, and retreat with lightning speed. Experiment with different consumable setups to increase your performance in battles.
AI-Driven Enemies
Each of the AI-driven armored enemies inhabiting Mirny will react differently to your presence, so you will have to use different tactics in different Phases. Know your enemies to win, and get ready for super intense battles.
| Header text | Header text | Header text |
|---|---|---|
| |
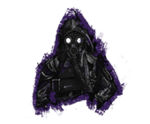
Object 017-F, code named Hedgehog | Black spherical self-propelled objects, equipped with spikes similar to sea mines. These are characterized with unstable behavior and can attack both in groups and solo. Not armed, but explode on impact with vehicles. They move at high speed, easily changing direction. The relatively knowledgeable behavior of the black spheres implies that they are controlled by something.
Once detected, it is recommended to open fire with all available means of destruction. These objects are not armored and therefore are extremely vulnerable. |
| |
Object 017-F bis, code named Alpha Hedgehog | A large spherical self-propelled object. The basic characteristics and behavior are similar to those of ordinary Hedgehogs. They cause increased damage. Once destroyed, they shatter into several Hedgehogs.
When detected, the entire squad is strongly advised to focus on destroying it. |
| |
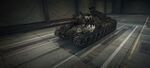
Object 008-R, code named Rabbit | Light combat vehicles that bear the traces of an anomalous effect. They do not engage in combat and retreat if possible. Probably perform the function of scouts. When moving, they leave a fire trail—perhaps they have fuel or lubrication system defects. All attempts to capture a working machine failed—none of those sent to capture one returned. Presumably, they are lightly armored and have high maneuverability. |
| |
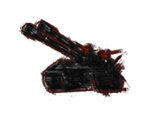
Object 0019-S, code named Guard | Medium and heavy tanks. In battle, they attack in groups—the more numerous they are, the more aggressively they act. They use quite primitive tactics and therefore are predictable in battle. They pose a threat when they act under the leadership of a command vehicle of an unknown type. |
| |
Object 0009-H, code named Hunter | An extremely dangerous enemy combat vehicle that stands out for its size and amazing survivability. It is well protected and has only a few vulnerable spots where it can be damaged.
There were cases when Hunters acted in groups of three. Extremely persistent—they pursue their target until it is destroyed. |
| |
Object 0010-M, code named Mosquito | An immobile but deadly colossus stuck in the ground up to its turret. Mosquitoes immediately attack moving targets within their view range and cause devastating damage with their incredibly accurate and powerful guns. It is recommended to outflank these pillars of destruction or attack them from the rear with utmost caution. |
| |
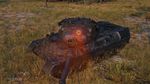
Object 000-I, code named the Immortal | Few scouts survived after facing this... tank? Their stories are vague and sometimes contradictory. Some say that the vehicle's size is no less than a four-story building; others report that the combat vehicle is covered with a red haze that keeps one from determining its size. Some claim that this tank has two guns.
The Immortal bears heavy armoring that, so far, no one has managed to penetrate. Its guns cause tremendous damage—the hulls of our tanks that opposed it were destroyed beyond recognition. However, according to unconfirmed information, the scientists managed to find a possible vulnerability of the Immortal. |
Come Challenge the Immortal!
The most dangerous enemy you will face in the finale of your dangerous expedition is the huge, well-armored monster known as the Immortal. Last time, our lack of knowledge didn't allow us to destroy the Immortal. But thanks to additional research and Hope's tenacity, we were able to unravel the mystery of its invulnerability. Now, the hunter and the victims have swapped places—complete the low difficulty level and unlock the medium one, where, in the fourth Phase, you will fight the Immortal. Push yourself to the limit and triumph!
The battle with this incredibly powerful monster will unfold on a limited area of the map, and only at medium and high difficulty levels. The Immortal is always accompanied by minions that will try to take your attention away from their boss, so you'll have to fight them, as well.
The showdown with the Immortal will take place in two stages. After you've dealt it some damage, it will retreat briefly before returning to the battlefield. All players destroyed in the first stage of the boss battle will respawn for a second chance to fight the Immortal. The Immortal's HP will be shown on a special progress bar.
.jpg)
Vulnerable spots in enemy armor ![]() In the image below, you can see the approximate location of potentially vulnerable spots in the armor of the enemy codenamed "Immortal." According to our data, these spots appear during Phase 4, at medium and high difficulty levels. This information has not yet been confirmed. The vulnerable spots can potentially change.
In the image below, you can see the approximate location of potentially vulnerable spots in the armor of the enemy codenamed "Immortal." According to our data, these spots appear during Phase 4, at medium and high difficulty levels. This information has not yet been confirmed. The vulnerable spots can potentially change.
Reaching the final showdown with the Immortal and gathering information about it is already an epic achievement. And if you manage to win, then you can consider yourself a real hero of Mirny!


