Plymouth

| Purchase priceSpecial |
| Hit Points41,000 |
| 152 mm/50 BL Mk.XXIII on a Mk.XXIII mount4 х 4 pcs. |
| Rate of Fire9.23 shots/min. |
| Reload Time6.5 sec. |
| Rotation Speed8 deg./sec. |
| 180 Degree Turn Time22.5 sec. |
| Firing Range15.3 km. |
| Maximum Dispersion138 m. |
| Chance of Fire on Target Caused by HE Shell0 % |
| AP Shell152 mm AP 6crh Mk IV |
| Maximum AP Shell Damage3,100 |
| Initial AP Shell Velocity841 m./s. |
| AP Shell Weight50.8 kg. |
| 102 mm/45 QF Mk.XVI on a Mk.XIX mount6 х 2 pcs. |
| Firing Range7.25 km. |
| Rate of Fire20 shots/min. |
| Reload Time3 sec. |
| HE Shell102 mm HE 35 lb |
| Maximum HE Shell Damage1,500 |
| Initial HE Shell Velocity811 m./s. |
| Chance of Fire on Target Caused by HE Shell6 % |
| 533 mm QR Mk II2 х 4 pcs. |
| Rate of Fire0.63 shots/min. |
| Reload Time96 sec. |
| Rotation Speed25 deg./sec. |
| 180 Degree Turn Time7.2 sec. |
| Torpedo533 mm Mk IXM |
| Maximum Damage16,767 |
| Torpedo Speed62 knot |
| Torpedo Range9.99 km. |
| 102 mm/45 QF Mk.XVI on a Mk.XIX mount6 х 2 pcs. |
| . . . Average Damage per Second56.4 |
| . . . Firing Range5.01 km. |
| 40 mm/39 Vickers QF Mk.VIII on a Mk.VII mount6 х 4 pcs. |
| . . . Average Damage per Second77.4 |
| . . . Firing Range2.49 km. |
| 20 mm Oerlikon Mk.II on a Mk.V mount12 х 2 pcs. |
| . . . Average Damage per Second73.2 |
| . . . Firing Range2.01 km. |
| 40 mm/56 OQF Mk.III on a Mk.VII mount8 х 1 pcs. |
| . . . Average Damage per Second69.6 |
| . . . Firing Range3.51 km. |
| Maximum Speed31.5 knot |
| Turning Circle Radius680 m. |
| Rudder Shift Time10.1 sec. |
| Surface Detectability Range11.35 km. |
| Air Detectability Range7.16 km. |

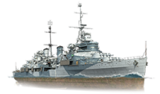
Plymouth — British special premium Tier X cruiser.
The initial variant of the design of the third series of Town-class cruisers with unique armament comprising sixteen 152 mm guns in quadruple turrets.
Plymouth is available in the Armory for Steel.
Modules
 |
Rate of Fire (shots/min) | 180° Turn Time (sec) | Maximum Dispersion (m) | Maximum HE Shell Damage (HP) | Chance of Fire on Target Caused by HE Shell (%) | Maximum AP Shell Damage (HP) |
Research price (exp) |
Purchase price ( | |
|---|---|---|---|---|---|---|---|---|---|
| 152 mm/50 BL Mk.XXIII on a Mk.XXIII mount | 9.2 | 22.5 | 138 | 3,100 | 0 | 0 |
 |
Hit Points (HP) | Armor (mm) | Armor (mm) | Main Turrets (pcs.) | Secondary Gun Turrets (pcs.) | AA Mounts (pcs.) | Torpedo Tubes (pcs.) | Hangar Capacity (pcs.) |
Research price (exp) |
Purchase price ( | |
|---|---|---|---|---|---|---|---|---|---|---|---|
| Plymouth | 41,000 | 13 | 114 | 4 | 6 | 12/8/6/6 | 2 | 0 | 0 |
 |
Rate of Fire (shots/min) | Torpedo Tubes Reload Time (sec) | 180° Turn Time (sec) | Maximum Damage (HP) | Torpedo Speed (knot) | Torpedo Range (km) |
Research price (exp) |
Purchase price ( | |
|---|---|---|---|---|---|---|---|---|---|
| 533 mm Mk IXM | 0.6 | 96 | 7.2 | 16,766 | 62 | 10 | 0 | 0 |
 |
IDS_SHIP_PARAM_SUO_INCREASE_DIST (%) | Maximum Firing Range (km) |
Research price (exp) |
Purchase price ( | |
|---|---|---|---|---|---|
| Mk X mod. 1 | 0 | 0 | 0 |
 |
Maximum Speed (knot) |
Research price (exp) |
Purchase price ( | |
|---|---|---|---|---|
| Propulsion: 80,000 hp | 31.5 | 0 | 0 |
Compatible Upgrades
| Slot 1 |
||||||
|---|---|---|---|---|---|---|
| Slot 2 |
||||||
| Slot 3 |
||||||
| Slot 4 |
||||||
| Slot 5 |
||||||
| Slot 6 |
Player Opinion
Performance
Refer to the in-game Port screens for more useful data.
Background
Plymouth was an initial design of the Edinburgh series of Town-Class cruisers, the ship was designed with a main battery armament of sixteen 6 in guns, mounted in four turrets, while retaining her maneuverability by also slightly increasing her dimensions. The quadruple turrets were eventually dropped from the design due to the difficulty of manufacturing them.
The Ship
Plymouth builds on the Tier VIII Edinburgh, maintaining great maneuverability, unique AP shells, a large 114mm armor belt, and strong set of consumables; Repair Party, Smoke Generator, and Hydroacoustic Search. While also getting Surveillance Radar in its own slot, four extra barrels on her main battery, a faster rate of fire, two extra torpedo tubes, better concealment, and a Tier X heath pool. Plymouth takes an already strong package in the British light cruiser, and rounds it out with the ability to radar from within the concealment of her smoke, all while screening for torps with her hydro.
Armor and Survivability
Plymouth has 16mm bow and stern armor, which can be overmatched by 229mm shells and larger, meaning battleship and even large cruiser guns (Goliath, Henri IV) can penetrate her citadel from any angle, but she is protected against ships like Des Moines and Petropavlovsk. In comparison with her Tier X counterpart Minotaur, she has a thicker armor belt and midsection, preventing her from getting citadeled by HE shells from most ships. In addition, this armor belt is 114mm and can be used by experienced captains to bounce any AP shell in the game when angled correctly. She also lacks a vertical step up in her citadel which is found on Minotaur, meaning she doesn’t take as many trollish citadel hits. Furthermore, Minotaur has a section of 14mm plating on her bow which can be overmatched and exploited by any shell 201mm or larger to citadel her, Plymouth does NOT have this weakness. This means Plymouth can fight bow-on to ships with 228mm guns and smaller (that do not overmatch her), but must position correctly to avoid taking devastating damage from larger caliber shells. Plymouth has low hit points for a tier X cruiser, though she compensates for this with a Repair Party, and a very low detection range, which can be brought to within a couple hundred meters of her radar range. This allows her to radar anything that is close enough to spot her.
Armament
Plymouth sports sixteen 152mm guns, housed in four quadruple turrets, which maintain the faster shells of the Edinburgh, as opposed to the slower shells of Minotaur, with good accuracy. These can still be lobbed over islands, but they’re significantly easier to hit small, fast moving targets at distance. She has a much longer reload time than Minotaur, but also a much heavier salvo weight (60%) due to having four more barrels. All of this combines to provide a substantial damage potential. Like her tech treem sisters, Plymouth cannot load HE shells into her main battery, but also gets specialized AP shells, combined with her weighty broadside, she's spectacular for annihilating destroyers and other lightly armored ships. On the other hand this can make it difficult to deal high damage to bow in battleships and heavily armored cruisers as captains are usually limited to shooting their superstructures. Plymouth’s secondary armament is, at first glance, surprising for a light cruiser, and will set the odd fire, but should not be counted on as their dispersion is quite poor. As an insurance package for getting pushed, Plymouth carries two quadruple 10km torpedo racks, one on each side, this is exactly half the torpedo complement of her contemporary, Minotaur. Identical to those in the Tier IX and X British light cruiser line;, they have good range, speed, and average detection range. Her launch angles to the aft, combined with their fairly quick reload make them very useful while kiting. Although, only having four of them per side means they’re a good deterrent, and that's all, as she doesn’t possess the alpha damage to sink a healthy Tier X battleship with only one launcher.
Anti-Aircraft and ASW
The AA suite on Plymouth is largely lackluster in comparison to her peers. Specifically, on all metrics except range, she is about half as effective as her sister, Minotaur. Plymouth’s AA suite has a range of 5.8km and 4 flak clouds per salvo. Carriers will be able to strike Plymouth at will, so captains will rely on teammates and smoke to protect them from being focused by planes. Similarly, she drops depth charges over her stern, meaning she must be on top of submarines to drop depth charges. But her main guns will do good damage to submarines at surface and periscope depths, and her consumables will help her to spot them for her and her team.
Battle Performance
Plymouth is an extremely well built package for controlling vision (remaining undetected, even when firing, and spotting undetected ships) and zones of the map. She has excellent maneuverability, concealment, and AP shells, making her well suited to a forward position on or just behind the front line with a friendly destroyer. Using her concealment, captains should look to gain position behind island cover, where they can limit line of sight from enemy ships while utilizing shell arcs to maintain a clear line of fire to support friendly destroyers. Captains may wish to use their smoke for cover, or save it for an emergency escape, depending on the situation. Her priority targets should be, in order; destroyers, radar cruisers, submarines, then targets of opportunity. The reason for this is to eliminate any ship which threatens to spot Plymouth, thus remaining undetected for as long as possible, and making her lack of armor moot. While in smoke it is important to remain mobile as enemies will frequently attempt to blind fire the smoke screen. In addition, it is critical to be mindful of when and where to deploy her smoke so as to not be radared and focused by enemies. Plymouth is a radar cruiser, therefore captains should look to spot undetected targets and utilize her damage potential to provide fire support for allied ships. Sixteen guns on a British light cruiser platform, combined with an extensive consumable suite, Plymouth is a force to be reckoned with in all game modes, casual and competitive.Pros:
- Excellent consumables suite (Repair Party, Hydroacoustic Search, Smoke Generator and Surveillance Radar in their own slots).
- Great concealment.
- Good maneuverability.
- Sixteen main battery guns, and eight torpedoes.
- Better armor scheme than her contemporary Minotaur.
- Specialized AP shells of the RN CL tech tree line.
- Strong main battery layout allowing eight guns brought to bear when bow or stern in.
Cons:
- Regular Repair Teams as opposed to the Specialized Repair Teams found on Minotaur.
- Light armor.
- Slower reload time for a light cruiser.
- Slightly below average health pool.
- Only four torpedoes per side.
- Unable to load HE shells into main battery.
- Poor main battery range and firing angles.
- Weak AA battery.
Research
Optimal Configuration
Plymouth is designed to control vision and pump out damage, commanders should seek to improve consumable action time, concealment, reload time, and take Radio Location finder.
Upgrades
The recommended upgrades are:
- Slot 1: Main Armaments Modification 1

- Slot 2: Surveillance Radar Modification 1
 or Hydroacoustic Search Modification 1
  or Engine Room Protection
  *
*
- Slot 3: Aiming Systems Modification 1

- Slot 4: Steering Gears Modification 1

- Slot 5: Concealment System Modification 1

- Slot 6: Main Battery Modification 3

*In Slot 2, Captains should take Surveillance Radar Modification 1 ![]() if they wish to lengthen the action time of Surveillance Radar
if they wish to lengthen the action time of Surveillance Radar ![]() .
.
Commander Skills
| Recommended Commander Skills | ||||||
|---|---|---|---|---|---|---|
| Cost (points) |
Attack | Defense | ||||
| 1 |
★★★ |
★ |
★★★ |
|
★ |
★ |
| 2 |
|
★ |
★★★ |
|
★ |
★ |
| 3 |
|
★ |
★★ |
★ |
★★★ |
★★ |
| 4 |
★ |
★ |
★★ |
|
★★★ |
★ |
| Key: ★★★ - Extremely Useful ★★ - Frequently Useful ★ - Occasionally Useful No stars - Not Useful | ||||||
Consumables
Plymouth equips the following consumables:
- Slot 1: Damage Control Party

- Slot 2: Repair Party
 – 3 charges
- Slot 3: Hydroacoustic Search
 – 3 charges
- Slot 4: Smoke Generator
 – 3 charges
- Slot 5: Surveillance Radar
 – 3 charges
Camouflage
As a premium ship, Plymouth comes with Default permanent camouflage and a set of permanent combat bonuses.
Signals
Recommended Signal Flags 
| |||||
|---|---|---|---|---|---|
| Combat | |||||

|
 ★ |
 ★ |
 ★ |

|

|

|

|

|
 ★★★ |
 ★★★ |
 ★★★ |
 ★★ |
 ★★★ | ||||
Gallery
Historical Info
Historical Gallery
References
Ship Change Log
See here for links to Update notes.
- Available for testing by supertesters in the game starting from Update 0.9.9.
Testing Changes
- DevBlog 65:
- Preliminary characteristics.
- DevBlog 82:
- Main battery firing range increased from 14.27 to 15.3 km.
- DevBlog 85:
- Main battery traverse speed increased from 7 to 8 degrees per second.
- Main battery reload time decreased from 7.5 to 6.5 s.
- DevBlog 87:
- Engine settings changed. Now the ship will accelerate and decelerate in the same way as the Minotaur.
- Main battery reload time decreased from 6.5 to 6.0 s.
- DevBlog 99:
- Main battery reload time increased from 6.0 to 6.5 s.
- Update 0.9.11:
- Available for purchase in the Armory for 27,000 Steel.
- Update 0.10.0:
- Secondary armament firing range increased from 6 to 7.25 km.
- Update 0.11.1:
- The colors of icons for the color schemes of the permanent camouflage were fixed.