Difference between revisions of "Live Oaks"
| Revision as of 22:22, 26 November 2016 added video | Revision as of 14:13, 27 March 2017 | |||
| Line 15: | Line 15: | |||
| Scouts will have a hard time deciding what to do on this map. You may drown if you go straight through the swamp, so their best bet is to hug the swamps edge just enough so that they can still zip around, but not so much that they will be slowed down by the water. It is more preferable to go north if you are scout, solely for the reason that you will be able to maneuver the landscape better than if you were to go on or around the bridge. | Scouts will have a hard time deciding what to do on this map. You may drown if you go straight through the swamp, so their best bet is to hug the swamps edge just enough so that they can still zip around, but not so much that they will be slowed down by the water. It is more preferable to go north if you are scout, solely for the reason that you will be able to maneuver the landscape better than if you were to go on or around the bridge. | |||
| {{VideoYT|D5IhxkhJ340}} | {{VideoYT|D5IhxkhJ340}} | |||
| + | ||||
| + | {{maps}} | |||
| + | ||||
| {{To Do}} | {{To Do}} | |||
| + | ||||
| + | [[de:Live Oaks]] | |||
| + | [[ru:Лайв Окс]] | |||
| + | ||||
| [[category:maps]] | [[category:maps]] | |||
Revision as of 14:13, 27 March 2017


- Map
- Standard battle
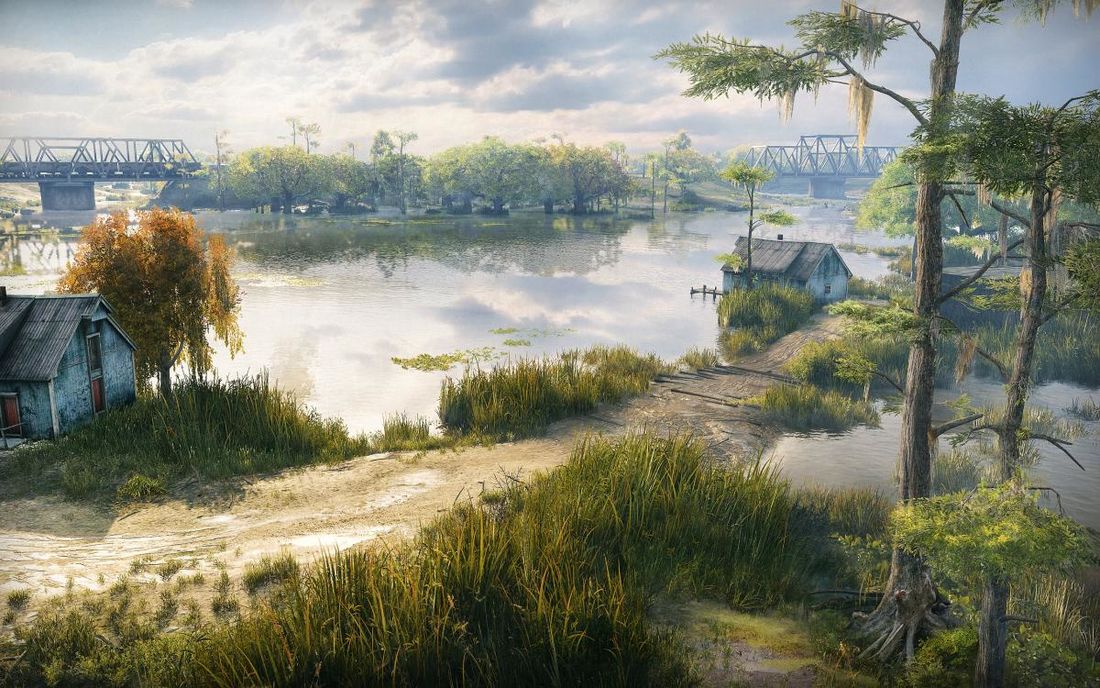
In the center of the map there is a large bog lake. A railway bridge and a fording side on the one flank allow to defend the area using scarce forces, and to concentrate main forces on the other flank. The teams start in the NE and the SW corners of this map.
To the E/SE of the map is the railway bridge. Because the water on the both sides of the bridge is fairly deep, you are forced to advance in a mostly straight line. On this line, most tanks meet around where the bridge is over water between the island and peninsula. A few heavies and tank destroyers should help you win this battle, as well as tanks with good gun depression.
Mediums and heavies will love the N/NW where the city is. This is another place where the peek-a-boo tactic will work wonders. Tank destroyers will have a hard time turning their hull all the time, so it isn't recommended that they come this way unless they have a turret that can somewhat rotate.
SPG's will be able to cover the bridge and the swamp in the middle of the map very easily, not that many tanks will be in the swamp. They will have a harder time getting through the buildings in the city, though it won't be as hard to do when you compare this map to similar maps such as Highway or Siegfried Line.
Scouts will have a hard time deciding what to do on this map. You may drown if you go straight through the swamp, so their best bet is to hug the swamps edge just enough so that they can still zip around, but not so much that they will be slowed down by the water. It is more preferable to go north if you are scout, solely for the reason that you will be able to maneuver the landscape better than if you were to go on or around the bridge.
| Summer Maps | Abbey • Cliff • Ensk • Fjords • Highway • Himmelsdorf • Karelia • Lakeville • Live Oaks • Malinovka • Mines • Mittengard • Murovanka • Fiery Salient • Mountain Pass • Prokhorovka • Redshire • Ruinberg • Fisherman's Bay • Siegfried Line • Steppes • Serene Coast • Swamp • Tundra • Westfield • Widepark • Paris • Berlin • Ghost Town • Pilsen |
| Winter Maps | Windstorm • Winterberg • Arctic Region • Winter Himmelsdorf • Kharkov • Erlenberg |
| Desert Maps | Airfield • Sand River • El Halluf |
| Special | Training ground • Karl • Himmelsdorf Championship • Tank Racing • 2015 New Year |
| Removed Maps | Port • Province • Komarin • Northwest • Sacred Valley • Severogorsk • Stalingrad • • Hidden Village • South Coast • Overlord • Pearl River • Dragon Ridge • Ruinberg on fire |
| |
This article is a stub. You can help the Wargaming wiki by expanding it. |