Acasta
| Revision as of 17:50, 7 August 2018 Screenshots | Revision as of 20:59, 14 April 2020 | |||
13 intermediate revisions by 7 users not shown | ||||
| Line 1: | Line 1: | |||
| <!-- DO NOT EDIT OR DELETE LINES WITH COMMENTS (it's look like as this or next line) --> | <!-- DO NOT EDIT OR DELETE LINES WITH COMMENTS (it's look like as this or next line) --> | |||
| ? | <!-- Add |Ship=code for manual override --> | + | <!-- Add |Ship=code for manual override --> | |
| {{WoWs_Ship | {{WoWs_Ship | |||
| |Promo=<!-- in case of gift or promo ship write conditions to get it. (optional)--> | |Promo=<!-- in case of gift or promo ship write conditions to get it. (optional)--> | |||
| ? | ||||
| |Anno=<!-- you can write below short description for the ship. it will replace default once. --> | |Anno=<!-- you can write below short description for the ship. it will replace default once. --> | |||
| Line 10: | Line 9: | |||
| |Performance=<!-- write text about performance in battles below --> | |Performance=<!-- write text about performance in battles below --> | |||
| ? | + | As a destroyer with the same acceleration that is a highlight of the Royal Navy cruisers, a smoke generator that lasts far shorter than the German destroyers’, and decent concealment, this ship can be considered, by far, one of the weakest destroyers for its tier. However, her ability to single-fire her torpedoes is not to be trifled with. | ||
| ? | + | |||
| ? | + | |||
| ? | + | ''{{#var:ship_name}}'' is unique among her peers due to her lack of the {{Engine Boost}} consumable in exchange for super acceleration. This makes it much easier to quickly react to and evade slow incoming torpedoes that have been detected at proximity detection distance. However, this is only possible if the ship is already in forward motion or stationary, as the acceleration from reversing to forwards is, much like the cruisers of the same nation, painfully slow. Another attribute which ''{{#var:ship_name}}'' also lacks is a buffer range for using torpedoes; that is, her maximum possible concealment is the same as her torpedo effective range (6.0km). Players will have to utilize the enemy ships' path and forward momentum to stay hidden while launching their torpedoes undetected. And the power of ''{{#var:ship_name}}''’s ability to single-fire torpedoes thus comes into play; any enemy ship heading straight in a line can and will be struck by the salvo of all eight of her torpedoes, which generally results in a devastating strike. | ||
| ? | + | |||
| ? | + | |||
| + | While ''{{#var:ship_name}}'' at a first glance seems as one of the weakest destroyers of tier V, her acceleration, concealment, and ability to single-fire torpedoes are her other strengths that players can utilize, although it is difficult to do so. She requires a different mindset and approach to use effectively. And above all else, players should avoid ''[[Podvoisky]]'' as much as possible, as ''Podvoisky'' can be considered her worst enemy due to the speed difference. | |||
| |Pros=<!-- write list of positive points below. use * as in ordinary wiki-list. --> | |Pros=<!-- write list of positive points below. use * as in ordinary wiki-list. --> | |||
| ? | * | + | * Decent main batteries - decent reload speed and turret traverse | |
| ? | * | + | * Decent torpedoes - decent speed, range, and alpha damage | |
| ? | * | + | * Can single launch torpedoes | |
| ? | * | + | * Has superb acceleration similar to the Royal Navy light cruisers | |
| + | * Decent concealment | |||
| |Cons=<!-- write list of negative points below. use * as in ordinary wiki-list. --> | |Cons=<!-- write list of negative points below. use * as in ordinary wiki-list. --> | |||
| ? | * | + | * Poor survivability - lack of useful Smoke Generator and lack of Engine Boost consumables combined with her low health pool makes disengaging difficult | |
| ? | * | + | * Poor shell ballistics - slow velocity and deal little damage | |
| ? | * | + | * Poor speed - lack of Engine Boost consumable easily puts ''{{#var:ship_name}}'' as the slowest destroyer of Tier V | |
| ? | * | + | *Poor firing angles for torpedoes | |
| |Research=<!-- write text about priority sequence of research below --> | |Research=<!-- write text about priority sequence of research below --> | |||
| ? | + | Availability of researchable upgrades for ''{{#var:ship_name}}'' is as follows: | ||
| ? | + | * '''Hull:''' Upgrade to Hull (B) for increased health and better rudder shift. Research of this module unlocks progression to ''[[Icarus]]''. | ||
| ? | * '''Hull:''' Upgrade to Hull (B) for | + | * '''Gun Fire Control System:''' Upgrade to Mk V mod. 2 for an extra 10% range on the main battery. | |
| ? | + | |||
| ? | * '''Gun Fire Control System:''' Upgrade to | + | ||
| ? | + | |||
| ? | + | |||
| ? | ||||
| ? | ||||
| |OptimalConfiguration=<!-- write some general text about selection of optimal configuration below (optional)--> | |OptimalConfiguration=<!-- write some general text about selection of optimal configuration below (optional)--> | |||
| Line 45: | Line 40: | |||
| |Upgrades=<!-- write text about best upgrades below, add * after upgrade link to designate that another upgrade may be viable --> | |Upgrades=<!-- write text about best upgrades below, add * after upgrade link to designate that another upgrade may be viable --> | |||
| ? | + | The recommended upgrades for ''{{#var:ship_name}}'' are as follows: | ||
| ? | * '''Slot 1''': | + | * '''Slot 1''': {{Main Armaments Modification 1}} | |
| ? | * '''Slot 2''': | + | * '''Slot 2''': {{Steering Gears Modification 1}} | |
| ? | * '''Slot 3''': | + | * '''Slot 3''': {{Aiming Systems Modification 1}} | |
| ? | + | |||
| ? | + | |||
| ? | + | |||
| ? | + | |||
| |CommanderSkills=<!-- write text about best set of Commander Skills below --> | |CommanderSkills=<!-- write text about best set of Commander Skills below --> | |||
| ? | + | Key skills for ''{{#var:ship_name}}'' commanders include [[Ship:Commander#Last_Stand|Last Stand]], [[Ship:Commander#Basics_of_Survivability|Basics of Survivability]], and [[Ship:Commander#Concealment_Expert|Concealment Expert]]. | ||
| ? | {{Commander Skills | + | {{Commander Skills 2 | |
| ? | | Priority Target | + | <!-- This version enables a '0' rating. Use it for skills that have no effect (e.g. Improved Engines on a non-CV) or are detrimental to the ship. They should mirror what appears in the game client. --> | |
| ? | | | + | | rating11 = 3 <!-- Priority Target --> | |
| ? | | Expert Loader | + | | rating12 = 2 <!-- Preventive Maint --> | |
| ? | | | + | | rating13 = <!-- Expert Loader --> | |
| ? | | Direction Center for | + | | rating14 = 0 <!-- Air Supremacy --> | |
| ? | | | + | | rating15 = 0 <!-- Direction Center for Fighters --> | |
| ? | | Incoming Fire Alert | + | | rating16 = 0 <!-- Improved Engine Boost --> | |
| ? | | | + | | rating17 = <!-- Incoming Fire Alert --> | |
| + | | rating18 = 0 <!-- Last Gasp --> | |||
| ? | | High Alert | + | | rating21 = 1 <!-- High Alert --> | |
| ? | | Jack of All Trades | + | | rating22 = 2 <!-- Jack of All Trades --> | |
| ? | | Expert Marksman | + | | rating23 = 2 <!-- Expert Marksman --> | |
| ? | | Torpedo Acceleration | + | | rating24 = 1 <!-- Torpedo Acceleration --> | |
| ? | | Smoke Screen Expert | + | | rating25 = 2 <!-- Smoke Screen Expert --> | |
| ? | | | + | | rating26 = 0 <!-- Improved Engines --> | |
| ? | | Adrenaline Rush | + | | rating27 = 3 <!-- Adrenaline Rush --> | |
| ? | | Last Stand | + | | rating28 = 3 <!-- Last Stand --> | |
| ? | | Basics of Survivability | + | | rating31 = <!-- Basics of Survivability --> | |
| ? | | Survivability Expert | + | | rating32 = 2 <!-- Survivability Expert--> | |
| ? | | Torpedo Armament Expertise | + | | rating33 = 2 <!-- Torpedo Armament Expertise--> | |
| ? | | | + | | rating34 = 0 <!-- Aircraft Armor --> | |
| ? | | Basic Firing Training | + | | rating35 = 2 <!-- Basic Firing Training --> | |
| ? | | | + | | rating36 = 1 <!-- Superintendent --> | |
| ? | | Demolition Expert | + | | rating37 = 2 <!-- Demolition Expert --> | |
| ? | | | + | | rating38 = <!-- Vigilance --> | |
| ? | | Manual Fire Control for Secondary Armament | + | | rating41 = <!-- Manual Fire Control for Secondary Armament --> | |
| ? | | Fire Prevention | + | | rating42 = <!-- Fire Prevention --> | |
| ? | | Inertia Fuse for HE Shells | + | | rating43 = 3 <!-- Inertia Fuse for HE Shells --> | |
| ? | | | + | | rating44 = 0 <!-- Sight Stabilization --> | |
| ? | | Advanced Firing Training | + | | rating45 = 1 <!-- Advanced Firing Training --> | |
| ? | | | + | | rating46 = <!-- Massive AA Fire --> | |
| ? | | Radio Position Finding | + | | rating47 = 2 <!-- Radio Position Finding --> | |
| ? | | Concealment Expert | + | | rating48 = 3 <!-- Concealment Expert --> | |
| ? | + | }} | ||
| |Consumables=<!-- write text about selection of Consumables below --> | |Consumables=<!-- write text about selection of Consumables below --> | |||
| ? | + | ''{{#var:ship_name}}'' can equip the following consumables: | ||
| * '''Slot 1:''' {{Damage Control Party}} | * '''Slot 1:''' {{Damage Control Party}} | |||
| ? | * | + | * '''Slot 2:''' {{Smoke Generator}} | |
| ? | + | |||
| ? | + | |||
| ? | + | |||
| ? | + | |||
| ? | + | |||
| ? | + | |||
| |Camouflage=<!-- write text about useful camouflage below --> | |Camouflage=<!-- write text about useful camouflage below --> | |||
| ? | + | [[Ship:Camouflage#Standard Camouflage|Type 1, 2, or 5 camouflage]] can be equipped for credits; Types 1 or 5 are recommended at a minimum to reduce detectibility range. | ||
| ? | [[Ship:Camouflage#Standard Camouflage|Type 1, 2, or 5 camouflage]] can be equipped for credits; | + | ||
| ? | ||||
| ? | ||||
| ? | ||||
| ? | ||||
| ? | ||||
| ? | ||||
| ? | ||||
| ? | ||||
| ? | ||||
| ? | ||||
| |Signals=<!-- write text about best set of signals below --> | |Signals=<!-- write text about best set of signals below --> | |||
| ? | + | {{Signal Flags | ||
| | November Echo Setteseven = | | November Echo Setteseven = | |||
| | Mike Yankee Soxisix = | | Mike Yankee Soxisix = | |||
| ? | | India X-Ray = | + | | India X-Ray = 3 | |
| ? | | Juliet Whiskey Unaone = | + | | Juliet Whiskey Unaone = 2 | |
| ? | | Victor Lima = | + | | Victor Lima = 3 | |
| ? | | Hotel Yankee = | + | | Hotel Yankee = 2 | |
| ? | | November Foxtrot = | + | | November Foxtrot = 2 | |
| ? | | Sierra Mike = | + | | Sierra Mike = 3 | |
| | India Delta = | | India Delta = | |||
| | Juliet Yankee Bissotwo = | | Juliet Yankee Bissotwo = | |||
| | India Yankee = | | India Yankee = | |||
| ? | | Juliet Charlie = | + | | Juliet Charlie = 3 | |
| ? | | Zulu = | + | | Zulu = 1 | |
| | India Bravo Terrathree = | | India Bravo Terrathree = | |||
| ? | | Equal Speed Charlie London = | + | | Equal Speed Charlie London = 3 | |
| ? | | Zulu Hotel = | + | | Zulu Hotel = 3 | |
| | Papa Papa = | | Papa Papa = | |||
| ? | | Wyvern = | + | | Wyvern = 1 | |
| ? | | Red Dragon = | + | | Red Dragon = 3 | |
| ? | | Dragon Flag = | + | | Dragon Flag = 3 | |
| | Ouroboros = | | Ouroboros = | |||
| ? | | Hydra = | + | | Hydra = 3 | |
| ? | }} | + | }} | |
| |Gallery=<!-- write below list of files with description (if necessary) separated with | --><gallery> | |Gallery=<!-- write below list of files with description (if necessary) separated with | --><gallery> | |||
| Line 165: | Line 140: | |||
| <h2>''{{#var:ship_name}}'', YEAR</h2> | <h2>''{{#var:ship_name}}'', YEAR</h2> | |||
| ===Construction=== | ===Construction=== | |||
| ? | :Builder: | + | :Builder: John Brown & Company; Clydebank, United Kingdom | |
| ? | :Laid down: | + | :Laid down: 13 August 1928 | |
| ? | :Launched: | + | :Launched: 8 August 1929 | |
| ? | :Commissioned: | + | :Commissioned: 11 February 1930 | |
| ---- | ---- | |||
| ===Specifications=== | ===Specifications=== | |||
| ? | : | + | :1,370 tons displacement, standard | |
| ? | : | + | :98.5m length | |
| ? | : | + | :9.83m beam | |
| ? | : | + | :3.73m draft | |
| ---- | ---- | |||
| ====Machinery==== | ====Machinery==== | |||
| ? | : | + | :2 x shafts | |
| + | :2 x steam turbines | |||
| ---- | ---- | |||
| ====Performance==== | ====Performance==== | |||
| ? | : | + | :35 knots at 34,000 shaft horsepower | |
| ? | : | + | :4,800 nm at 15 knots | |
| ? | + | |||
| ? | + | |||
| ? | + | |||
| ? | + | |||
| ? | + | |||
| ? | + | |||
| ? | + | |||
| ? | + | |||
| ? | + | |||
| ---- | ---- | |||
| ====Armament==== | ====Armament==== | |||
| =====Main===== | =====Main===== | |||
| ? | : | + | :Four (4x1) 120mm guns | |
| ? | + | |||
| ? | + | |||
| =====Anti-aircraft===== | =====Anti-aircraft===== | |||
| ? | : | + | :Two (2x1) 40mm guns | |
| =====Torpedoes===== | =====Torpedoes===== | |||
| ? | : | + | :Eight (4x2) 533mm torpedo tubes | |
| ---- | ---- | |||
| ? | ||||
| ? | ||||
| ? | ||||
| ? | ||||
| ? | ||||
| ? | ||||
| ? | ||||
| }}</div> | }}</div> | |||
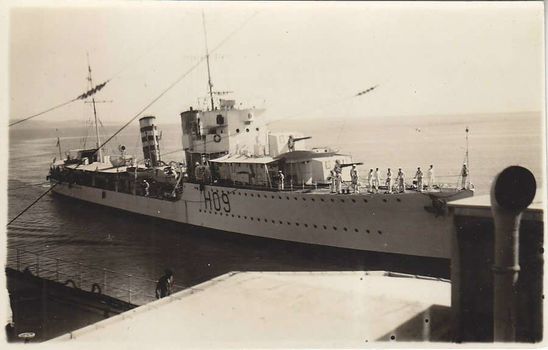
| ? | [[File: | + | [[File:HMS_Acasta.jpeg|none|frame|x350px|link=|HMS Acasta]] | |
| ===History=== | ===History=== | |||
| HMS ''Acasta'', the third ship to bear that name, launched in 1929, was an A-class destroyer built for the Royal Navy. She served in the Second World War and was sunk on 8 June 1940 in action against the German warships ''[[Scharnhorst]]'' and ''[[Gneisenau]]'', while escorting the aircraft carrier ''Glorious''. ''Glorious'' and her other escort — ''Ardent'' — were also sunk. <br /> | HMS ''Acasta'', the third ship to bear that name, launched in 1929, was an A-class destroyer built for the Royal Navy. She served in the Second World War and was sunk on 8 June 1940 in action against the German warships ''[[Scharnhorst]]'' and ''[[Gneisenau]]'', while escorting the aircraft carrier ''Glorious''. ''Glorious'' and her other escort — ''Ardent'' — were also sunk. <br /> | |||
| ? | ''Acasta'' proved to be a tough opponent for the larger German ships, laying smoke to hide ''Glorious'' and making repeated torpedo and gun attacks. She scored several gun hits and one torpedo hit on ''[[Scharnhorst]]'', causing moderate damage to the much larger German vessel. ''Acasta'' was finally sunk after roughly two hours of fighting; the battle flag of the ''[[Gneisenau]]'' was lowered to half mast and her crew brought to attention to | + | ''Acasta'' proved to be a tough opponent for the larger German ships, laying smoke to hide ''Glorious'' and making repeated torpedo and gun attacks. She scored several gun hits and one torpedo hit on ''[[Scharnhorst]]'', causing moderate damage to the much larger German vessel. ''Acasta'' was finally sunk after roughly two hours of fighting; the battle flag of the ''[[Gneisenau]]'' was lowered to half-mast and her crew brought to attention to honor the brave fight of ''Acasta'' and her crew. The damage to the German vessels inflicted by ''Ardent'' and ''Acasta'' caused them to retire to Trondheim, allowing the safe passage of convoys carrying Allied troops from Norway. <br /> | |
| Although many of her crew survived to abandon the ship, communication errors meant the British were initially unaware of the sinking. In the end, there was only a single survivor from ''Acasta''; estimates place the number of sailors from ''Ardent'', ''Acasta'' and ''Glorious'' lost to exposure (rather than direct enemy action) at up to 800. The single survivor from ''Acasta'', Ldg. Seaman Cyril Carter, was rescued by the Norwegian steam merchant ''Borgund'' which also saved 38 men from one of ''Glorious''' lifeboats. All 39 men saved by ''Borgund'' were set ashore at Tórshavn in the Faroe Islands on 14 June. | Although many of her crew survived to abandon the ship, communication errors meant the British were initially unaware of the sinking. In the end, there was only a single survivor from ''Acasta''; estimates place the number of sailors from ''Ardent'', ''Acasta'' and ''Glorious'' lost to exposure (rather than direct enemy action) at up to 800. The single survivor from ''Acasta'', Ldg. Seaman Cyril Carter, was rescued by the Norwegian steam merchant ''Borgund'' which also saved 38 men from one of ''Glorious''' lifeboats. All 39 men saved by ''Borgund'' were set ashore at Tórshavn in the Faroe Islands on 14 June. | |||
| ? | ||||
| ? | ||||
| ? | ||||
| Line 228: | Line 183: | |||
| |Ref= <!-- write below --> | |Ref= <!-- write below --> | |||
| + | # [https://en.wikipedia.org/wiki/HMS_Acasta_(H09) HMS ''Acasta'' (H09) - Wikipedia] | |||
| + | # [https://en.wikipedia.org/wiki/A-_and_B-class_destroyer A- and B-class destroyer - Wikipedia] | |||
| }}<!-- DO NOT DELETE THIS LINE. DO NOT INSERT ANYTHING BELOW THIS LINE --> | }}<!-- DO NOT DELETE THIS LINE. DO NOT INSERT ANYTHING BELOW THIS LINE --> | |||
Revision as of 20:59, 14 April 2020

| Research price11500 exp |
| Purchase price1,350,000 |
| Hit Points9,500 |
| 120 mm/45 QF Mk.IX on a CPXIV/XVII/XVIII mount4 х 1 pcs. |
| Rate of Fire12 shots/min. |
| Reload Time5 sec. |
| Rotation Speed10 deg./sec. |
| 180 Degree Turn Time18 sec. |
| Firing Range10.1 km. |
| Maximum Dispersion90 m. |
| HE Shell120 mm HE |
| Maximum HE Shell Damage1,700 |
| Chance of Fire on Target Caused by HE Shell8 % |
| Initial HE Shell Velocity808 m./s. |
| HE Shell Weight22.68 kg. |
| AP Shell120 mm AP |
| Maximum AP Shell Damage2,100 |
| Initial AP Shell Velocity808 m./s. |
| AP Shell Weight22.68 kg. |
| 533 mm QR Mk IV2 х 4 pcs. |
| Rate of Fire0.63 shots/min. |
| Reload Time95 sec. |
| Rotation Speed25 deg./sec. |
| 180 Degree Turn Time7.2 sec. |
| Torpedo533 mm Mk V |
| Maximum Damage11,967 |
| Torpedo Speed59 knot |
| Torpedo Range6 km. |
| 40 mm/39 Vickers QF Mk.II on a Mk.II HA mount2 х 1 pcs. |
| . . . Average Damage per Second11.4 |
| . . . Firing Range2.49 km. |
| Maximum Speed35 knot |
| Turning Circle Radius540 m. |
| Rudder Shift Time4.1 sec. |
| Surface Detectability Range6.63 km. |
| Air Detectability Range2.57 km. |

Acasta — British Tier V destroyer.
A representative of the first series (A-class) of the so-called "standard" destroyers of the British Navy that had very similar characteristics and arrangement. She was bigger in size and had quadruple torpedo tubes in comparison with the ships of the previous classes.
Modules
 |
Rate of Fire (shots/min) | 180° Turn Time (sec) | Maximum Dispersion (m) | Maximum HE Shell Damage (HP) | Chance of Fire on Target Caused by HE Shell (%) | Maximum AP Shell Damage (HP) |
Research price (exp) |
Purchase price ( | |
|---|---|---|---|---|---|---|---|---|---|
| 120 mm/45 QF Mk.IX on a CPXIV/XVII/XVIII mount | 12 | 18 | 90 | 1,700 | 8 | 2,100 | 0 | 100,000 |
 |
Hit Points (HP) | Armor (mm) | Armor (mm) | Main Turrets (pcs.) | Secondary Gun Turrets (pcs.) | AA Mounts (pcs.) | Torpedo Tubes (pcs.) | Hangar Capacity (pcs.) |
Research price (exp) |
Purchase price ( | |
|---|---|---|---|---|---|---|---|---|---|---|---|
| Acasta (A) | 9,500 | 6 | 10 | 4 | 2 | 2 | 0 | 160,000 | |||
| Acasta (B) | 11,200 | 6 | 10 | 4 | 2 | 2 | 3,100 | 370,000 |
 |
Rate of Fire (shots/min) | Torpedo Tubes Reload Time (sec) | 180° Turn Time (sec) | Maximum Damage (HP) | Torpedo Speed (knot) | Torpedo Range (km) |
Research price (exp) |
Purchase price ( | |
|---|---|---|---|---|---|---|---|---|---|
| 533 mm Mk V | 0.6 | 95 | 7.2 | 11,966 | 59 | 6 | 0 | 100,000 |
 |
IDS_SHIP_PARAM_SUO_INCREASE_DIST (%) | Maximum Firing Range (km) |
Research price (exp) |
Purchase price ( | |
|---|---|---|---|---|---|
| Mk V mod. 1 | 0 | 0 | 110,000 | ||
| Mk V mod. 2 | 0 | 2,300 | 210,000 |
 |
Maximum Speed (knot) |
Research price (exp) |
Purchase price ( | |
|---|---|---|---|---|
| Propulsion: 34,000 hp | 35 | 0 | 125,000 |
Compatible Upgrades
| Slot 1 |
|||||
|---|---|---|---|---|---|
| Slot 2 |
|||||
| Slot 3 |
Player Opinion
Performance
As a destroyer with the same acceleration that is a highlight of the Royal Navy cruisers, a smoke generator that lasts far shorter than the German destroyers’, and decent concealment, this ship can be considered, by far, one of the weakest destroyers for its tier. However, her ability to single-fire her torpedoes is not to be trifled with.
Acasta is unique among her peers due to her lack of the Engine Boost ![]() consumable in exchange for super acceleration. This makes it much easier to quickly react to and evade slow incoming torpedoes that have been detected at proximity detection distance. However, this is only possible if the ship is already in forward motion or stationary, as the acceleration from reversing to forwards is, much like the cruisers of the same nation, painfully slow. Another attribute which Acasta also lacks is a buffer range for using torpedoes; that is, her maximum possible concealment is the same as her torpedo effective range (6.0km). Players will have to utilize the enemy ships' path and forward momentum to stay hidden while launching their torpedoes undetected. And the power of Acasta’s ability to single-fire torpedoes thus comes into play; any enemy ship heading straight in a line can and will be struck by the salvo of all eight of her torpedoes, which generally results in a devastating strike.
consumable in exchange for super acceleration. This makes it much easier to quickly react to and evade slow incoming torpedoes that have been detected at proximity detection distance. However, this is only possible if the ship is already in forward motion or stationary, as the acceleration from reversing to forwards is, much like the cruisers of the same nation, painfully slow. Another attribute which Acasta also lacks is a buffer range for using torpedoes; that is, her maximum possible concealment is the same as her torpedo effective range (6.0km). Players will have to utilize the enemy ships' path and forward momentum to stay hidden while launching their torpedoes undetected. And the power of Acasta’s ability to single-fire torpedoes thus comes into play; any enemy ship heading straight in a line can and will be struck by the salvo of all eight of her torpedoes, which generally results in a devastating strike.
Pros:
- Decent main batteries - decent reload speed and turret traverse
- Decent torpedoes - decent speed, range, and alpha damage
- Can single launch torpedoes
- Has superb acceleration similar to the Royal Navy light cruisers
- Decent concealment
Cons:
- Poor survivability - lack of useful Smoke Generator and lack of Engine Boost consumables combined with her low health pool makes disengaging difficult
- Poor shell ballistics - slow velocity and deal little damage
- Poor speed - lack of Engine Boost consumable easily puts Acasta as the slowest destroyer of Tier V
- Poor firing angles for torpedoes
Research
Availability of researchable upgrades for Acasta is as follows:
- Hull: Upgrade to Hull (B) for increased health and better rudder shift. Research of this module unlocks progression to Icarus.
- Gun Fire Control System: Upgrade to Mk V mod. 2 for an extra 10% range on the main battery.
Optimal Configuration
Upgrades
The recommended upgrades for Acasta are as follows:
- Slot 1: Main Armaments Modification 1

- Slot 2: Steering Gears Modification 1

- Slot 3: Aiming Systems Modification 1

Commander Skills
Key skills for Acasta commanders include Last Stand, Basics of Survivability, and Concealment Expert.
| Recommended Commander Skills | ||||||||
|---|---|---|---|---|---|---|---|---|
| Cost (points) |
Endurance | Attack | Support | Versatility | ||||
| 1 |
★★★ |
★★ |
|
Χ |
Χ |
Χ |
|
Χ |
| 2 |
★ |
★★ |
★★ |
★ |
★★ |
Χ |
★★★ |
★★★ |
| 3 |
|
★★ |
★★ |
Χ |
★★ |
★ |
★★ |
|
| 4 |
|
|
★★★ |
Χ |
★ |
|
★★ |
★★★ |
| Key: ★★★ - Extremely Useful ★★ - Frequently Useful ★ - Occasionally Useful No stars - Meh Χ - Not recommended | ||||||||
Consumables
Acasta can equip the following consumables:
- Slot 1: Damage Control Party

- Slot 2: Smoke Generator

Camouflage
Type 1, 2, or 5 camouflage can be equipped for credits; Types 1 or 5 are recommended at a minimum to reduce detectibility range.
Signals
Recommended Signal Flags 
| |||||
|---|---|---|---|---|---|
| Combat | |||||
 ★★★ |

|

|
 ★★ |
 ★★★ |
 ★★★ |
 ★★ |

|

|
 ★★★ |
 ★★ |

|

|

| ||||
Note: Use of the Juliet Charlie signal makes detonation impossible.


.jpg)