Aerial Combat
| Revision as of 20:47, 2 February 2019 updated anti aircraft section | Revision as of 13:13, 4 February 2019 Aircraft Movement Updated to 0.8.0.0 | |||
| Line 1: | Line 1: | |||
| == Aircraft Movement == | == Aircraft Movement == | |||
| ? | === | + | === Squadron Control === | |
| ? | + | Individual squadrons are controlled using the WASD keys and the mouse. Aircraft will automatically retain a set forward throttle, regardless of player input. Squadrons are steered using a combination of the mouse and the "A" and "D" keys. The "W" and "S" keys are used to apply a limited time boost and air braking, respectively. The amount of remaining boost is indicated by the curved bar on the left side of the HUD when controlling a squadron. Boost will automatically regenerate when not being used, but captains can also use the Engine Cooling squadron consumable to immediately replenish the boost bar. | ||
| ? | + | Left-clicking will begin an attack run. While in the attack mode, squadron control remains the same. | ||
| ? | === Catapult Fighter and Spotting Aircraft === | + | Pressing "F" when controlling a squadron will relinquish control of the squadron, returning both the captain and their aircraft to the carrier. Aircraft expended in an attack run will automatically return to their carrier. | |
| + | ||||
| + | === Catapult Fighter, Fighter, Patrol Fighters and Spotting Aircraft === | |||
| {{Catapult Fighter}} and {{Spotting Aircraft}} cannot be controlled by the player, and move around the map automatically. They can go as far as 4.23 km away from the ship for Spotting Aircraft, and 3.24 km for Catapult Fighters. | {{Catapult Fighter}} and {{Spotting Aircraft}} cannot be controlled by the player, and move around the map automatically. They can go as far as 4.23 km away from the ship for Spotting Aircraft, and 3.24 km for Catapult Fighters. | |||
| + | ||||
| + | For aircraft carrier captains, the Fighter consumable is automatically activated when the carrier is spotted by aircraft. Each consumable consists of a squadron of four fighters that rotate around the vessel at a distance of 3 km. They will attempt to engage enemy aircraft within their range. | |||
| + | ||||
| + | Aircraft carrier controlled squadrons have access to the Patrol Fighters consumable. Similar to the Fighter consumable, when activated it will place a squadron of four fighters at the location in which it was activated. The fighters will attempt to engage enemy aircraft within their range. Patrol fighters last for 60 seconds, allowing them to be used as a passive scouting tool by carrier captains. | |||
| == Air-to-Air Combat == | == Air-to-Air Combat == | |||
Revision as of 13:13, 4 February 2019
Aircraft Movement
Squadron Control
Individual squadrons are controlled using the WASD keys and the mouse. Aircraft will automatically retain a set forward throttle, regardless of player input. Squadrons are steered using a combination of the mouse and the "A" and "D" keys. The "W" and "S" keys are used to apply a limited time boost and air braking, respectively. The amount of remaining boost is indicated by the curved bar on the left side of the HUD when controlling a squadron. Boost will automatically regenerate when not being used, but captains can also use the Engine Cooling squadron consumable to immediately replenish the boost bar.
Left-clicking will begin an attack run. While in the attack mode, squadron control remains the same.
Pressing "F" when controlling a squadron will relinquish control of the squadron, returning both the captain and their aircraft to the carrier. Aircraft expended in an attack run will automatically return to their carrier.
Catapult Fighter, Fighter, Patrol Fighters and Spotting Aircraft
Catapult Fighter ![]() and Spotting Aircraft
and Spotting Aircraft ![]() cannot be controlled by the player, and move around the map automatically. They can go as far as 4.23 km away from the ship for Spotting Aircraft, and 3.24 km for Catapult Fighters.
cannot be controlled by the player, and move around the map automatically. They can go as far as 4.23 km away from the ship for Spotting Aircraft, and 3.24 km for Catapult Fighters.
For aircraft carrier captains, the Fighter consumable is automatically activated when the carrier is spotted by aircraft. Each consumable consists of a squadron of four fighters that rotate around the vessel at a distance of 3 km. They will attempt to engage enemy aircraft within their range.
Aircraft carrier controlled squadrons have access to the Patrol Fighters consumable. Similar to the Fighter consumable, when activated it will place a squadron of four fighters at the location in which it was activated. The fighters will attempt to engage enemy aircraft within their range. Patrol fighters last for 60 seconds, allowing them to be used as a passive scouting tool by carrier captains.
Air-to-Air Combat
Fighters
When driving an aircraft carrier, you will most likely (with a few exceptions) have fighter aircraft at your disposal. Fighters are represented by an in-game icon consisting of stacked bullets.
| US Fighter Squadron | Japanese Fighter Squadron |
|---|---|
| |

|
The bullets will be either solid or outlined, where the solid bullets represent remaining ammunition for that fighter squad. After a fighter squad has spent all of its ammunition, it must return to the carrier to re-arm.
The number of fighters in a squadron may vary by nationality. US carriers use 6-aircraft squadrons (exception: Premium Carrier "Saipan" which uses fighter squadrons of 3 planes but got up to 3 squadrons active), while Japanese carriers use 4-aircraft squadrons. The number of fighters in a squadron are represented by a set of bars across the top of the squad icon (green for friendly, red for hostile). Solid colour bars (green or red) indicate fighters, whereas shaded transparent bars represent missing fighters which have either been shot down or where there were not enough aircraft reserves on the carrier to form a complete squadron. The Air Supremacy commander skill will increase the fighters per squadron by 1, making 7 (4 for "Saipan") for the US and 5 for the Japanese.

To engage a fighter squadron, first select the squadron to use for attack by pressing the assigned squadron number. You can select multiple squadrons by holding down CTRL while you select the squadrons. Once the squadron(s) are selected, left-click on the enemy aircraft squadron you wish to attack to plot an intercept course directly to the target and have the fighters automatically engage once in range. You may also optionally plot a series of waypoints with the selected squadrons before clicking on the target enemy squadron. This may be useful to avoid enemy ship-based Anti-Aircraft fire, or perhaps to avoid other enemy aircraft squadrons you do not wish to engage.
Any enemy aircraft you shoot down will be recorded, and a ribbon will be displayed for each downed plane. However, if you lose planes you will not be notified unless the entire squadron has been shot down, at least verbally.

Fighters vs. Fighters
If you attack enemy fighters, all affected squadrons (one or more of your squadrons plus the targeted enemy squadron(s)) will stay in the same location once engaged. This can be used to your advantage if you are engaged within the Anti-Air screen of a nearby friendly ship, or conversely detrimental if you're engaged over enemy ships. Your squadron will continue the attack until the enemy squadron under attack is destroyed or it disengages from the fight. You can disengage from a fight by giving your squadron(s) a new waypoint or a different target. Note that the enemy fighter squadron will still be attacking your squadron if you disengage, even if you choose to engage a different target, until otherwise directed by the enemy fighter squadron's captain. This can be troubling if your planes have run out of ammo, leaving them about as defenseless as bombers.
Fighters vs. Bombers
If you attack enemy bombers, all the affected squadrons will first intercept the target squadron and then cause the squadron under attack to slow down slightly. Bombers cannot target fighters, but they can defend themselves if they have the capability, so it is possible to take losses when fighting enemy bombers. The enemy bombers will continue on their course, or adjust course if directed by their captain, and your fighter squadrons will automatically follow and continue the engagement until the enemy squadron is destroyed, the fighters' ammunition is depleted, or the fighters are given new orders.
While being attacked by fighters, an enemy bomber squadron's accuracy is significantly affected. Depending on whether it is a dive bomber or torpedo bomber squadron, the dispersion indicators for the affected squadrons will be roughly twice as large, meaning it will be much harder for the enemy squadron to accurately place ordnance. This accuracy effect only lasts while the enemy squadron is under active attack. It does not apply until a fighter squadron has reached and engaged an enemy squadron, and the effect will end if you disengage the attack. It can be an effective tactic to target bomber squadrons which have not yet dropped their ordnance in order to mitigate the potential damage to ships in your fleet, as opposed to bombers which have already attacked and are returning to their host carrier. Note that strafing runs do not decrease accuracy, only direct engagements do.
Guarding Squadrons
Fighters can be set to guard friendly squadrons by selecting a fighter squadron, and then Left-click on a friendly squad you wish to guard. Fighters will automatically fly with the guarded squadron for as long as they are assigned to guard it. If the guarded squadron is attacked, the fighters will automatically engage the squadron attacking the guarded friendly squadron. If the guarded squadron is destroyed, the fighters will discontinue the attack on the enemy squadron that had been attacking the guarded squadron and will await further orders. You can assign your fighters to guard any allied aircraft squadron, even if they belong to another player on your team. You can even guard other fighter squadrons if you wish, though it's not usually beneficial to do so.
You can assign other strike planes to follow a squad, but they will not attack the leading squad's target. Instead, you have to manually assign targets.

Strafing
Higher tier fighters have a special ability called strafing. It is a form of manually targeted attack which expends a significant portion of the fighter squadrons ammunition in a concentrated area.
Only aircraft carriers Tier VI and above can engage in strafing runs.
If successfully applied to areas where enemy aircraft squadrons are located, it can quickly reduce enemy squadron strength. However, if it misses it can be easily punishable by an enemy strafing run or making you lose significant distance on a chased squadron.

The strafing ability is applied by holding down the ALT key for a selected squadron(s) and moving the aiming locator to a desired position. Once you have selected a position for a strafing run (as indicated by the green band), you can order the strafing run by left-clicking at the desired location. As with all manually aimed aircraft abilities, you are free to give the squadron different orders until the squadron enters the engagement area of the selected ability identified by the dashed grey circular outline around the strafing zone. Once in the engagement zone, the strafing area will change colour from green to yellow indicating that the squadron is committed to performing the strafing attack. New orders can be given to the squadron while it is performing the strafing run, but the affected squadron will not respond to any commands until the strafing run is complete.

To use this ability successfully you may need to predict where enemy aircraft will be located by the time your fighter squadrons enter the strafing engagement zone. If the enemy aircraft leave the strafing zone before your fighters begin their strafing run, the enemy aircraft won't be affected by the strafe and your fighters will have wasted their ammunition. Enemy strike planes can gain a significant lead if you poorly place your strafing runs, and enemy fighters can potentially line up a counter-strafe that will probably be devastating on your planes. Please note that the strafing run does not decrease the accuracy of enemy strike planes, and sometimes attacking directly is more beneficial to your teammates. It is important to correctly determine where you start your strafing run. If you begin the strafing run too soon, you might miss the target completely. If the strafing run is started too far away, the enemy squadron will have ample time to leave the engagement area.
"Strafe-Out Tactic"
One of your Fighter Squadrons can engage, or be engaged by, an enemy Fighter Squadron via a mouse button left-click which then "locks" your Fighter Squadron into that Fighter engagement. Via the "Strafe-Out Tactic" it is possible to "break the "lock" of a Fighter engagement by giving a "strafe" command in any direction but it will cost the Fighter Squadron ammunition and one of its Fighters in return. When your Fighter Squadron "strafes out" of the Fighter engagement the enemy Fighter Squadron will receive a "stun lock" which prevents them from moving for a few seconds. The "Strafe-Out Tactic" allows a Fighter Squadron to "strafe out" of a Fighter engagement at any time. The tactic is especially useful when a friendly Fighter Squadron is "locked" in a Fighter engagement and is either losing that Fighter engagement, or is in danger of being "strafed" by another enemy Fighter Squadron or in order to prevent the friendly Fighter Squadron from being destroyed when running out of ammunition. The Premium Tier 7 Aircraft Carrier Saipan is currently the only Carrier that can let a Fighter Squadron "strafe out" of a Fighter engagement without losing a Fighter in the process. There is an additional major tactical advantage that the "Stafe-Out Tactic" offers which presents itself when a friendly Fighter Squadron "strafes out" of a Fighter engagement: the enemy Fighter Squadron that remains "stun locked" and thus stationary for a few seconds can be easily "strafed" by another friendly Fighter Squadron during those few seconds.
"Counter-Strafe-Out Tactic"
One of your Fighter Squadrons can engage, or be engaged by, an enemy Fighter Squadron via a mouse button left-click which then "locks" your Fighter Squadron into that Fighter engagement. If the enemy Fighter Squadron then uses the "Strafe-Out Tactic" in order to "strafe out" of that Fighter engagement it is possible to use the so-called "Counter-Strafe-Out Tactic" by selecting your Fighter Squadron and giving ONE movement command (not an attack or "strafing" command) in the direction where the enemy Fighter Squadron is "strafing out", this will allow your Fighter Squadron to get out of the "stun lock" that they normally receive when an enemy Fighter Squadron "strafes out" of a Fighter engagement. Then give your Fighter Squadron a "strafe" command in the same direction so that your Fighter Squadron will start "strafing" the enemy Fighter Squadron either immediately or shortly thereafter. Do not place the "strafe" command too close or your Fighter Squadron will first circle around to get into position. If executed properly the "Counter-Strafe-Out Tactic" will allow your Fighter Squadron to "strafe" the enemy Fighter Squadron as it "strafes out" of the Fighter engagement.
Anti-Surface Combat
All aircraft carriers in World of Warships have at least some planes equipped to attack enemy surface ships (sometimes referred to as "strike planes"), whether they be dive bombers or torpedo bombers or a mix of the two. Strike planes perform similarly to fighters except that they cannot attack enemy planes and their payload is a one-time-use, meaning that once their bombs or torpedoes are launched, they must resupply in order to attack again. Strike planes are almost universally slower than fighters while carrying their strike ordnance, but they gain a speed boost once their payload has dropped.
Torpedo Bombers
Auto-Drop
Clicking an enemy target with the Left Mouse Button will order the torpedo bomber to perform an "auto-drop". This is the only attack mode available to torpedo bombers launched by Tier IV and Tier V aircraft carriers. In this method of attack, the game calculates where to drop the torpedoes for an optimum attack against the enemy target; however, this presumes that the target does not change course and speed. Attentive players will usually note the approach of enemy torpedo bombers and maneuver to avoid the incoming attack, throwing off the automatic aim. Additionally, "auto-drop" drops the torpedoes into the water rather far away from the target, making dodging easier since the torpedoes are spotted almost soon as they go into the water. Very few aircraft carrier captains rely on auto-dropping, since most players can figure out how to react within the long window that the torpedoes give them to dodge.
Manual Drop
By holding down Alt, captains of tier VI and higher CVs can perform a "manual drop" which allows them to command the torpedo squadron to drop the torpedoes in a specific area. Unlike the auto-drop, manual drops require that they be aimed by the player, and dropping too close to a target can cause the torpedoes to fail to arm prior to striking home. Aerial torpedoes take between 3 and 3.5 seconds to arm and be able to detonate on their target, and compensating for that delay is what makes manual dropping difficult for new carrier captains: too close and the torpedoes won't do damage at all, too far away and the target will have a longer window to dodge the torpedoes. Finding the perfect distance to allow aerial torpedoes to arm shortly before hitting requires practice to master, but is only available to torpedo bombers on Tier VI aircraft carriers and higher.
Types of Aerial Torpedoes
There are two types of aerial torpedoes available in World of Warships.
| Icon | Description | Nation |
|---|---|---|

|
Regular Torpedo Bombers drop torpedoes with a fairly shallow running depth. These torpedoes are capable of inflicting damage against any class of enemy ship: destroyer, cruiser, battleship, or aircraft carrier. | |

|
Deep Water Torpedo Bombers drop torpedoes with a much deeper running depth. These torpedoes are only capable of inflicting damage against enemy battleships and aircraft carriers. | |
| Nation | Torpedo Type | Range | Speed | Damage | Arming Distance | Detection Range | Flood Chance | Deployed Aboard |
|---|---|---|---|---|---|---|---|---|
| |
Torpedo Mk.7D | 3.0 km | 35 knots | 3,500 | 282 m | 1.1 km | 33% | |
| |
Torpedo Mk.7 | 3.0 km | 35 knots | 5,567 | 313 m | 1.1 km | 45% | |
| |
Torpedo Mk.7 | 3.0 km | 35 knots | 5,567 | 344 m | 1.1 km | 45% | |
| |
Torpedo Mk.7 mod. 1 | 3.0 km | 43 knots | 3,767 | 577 m | 1.4 km | 37% | |
| |
Torpedo Mk.7 | 3.0 km | 35 knots | 4,667 | 344 m | 1.1 km | 40% | |
| |
Torpedo Mk.13-2 | 3.5 km | 35 knots | 6,467 | 376 m | 1.5 km | 52% | |
| |
Torpedo Mk.13-2 | 3.5 km | 35 knots | 6,467 | 423 m | 1.6 km | 52% | |
| |
Torpedo Mk.13-2 Mod 1 | 3.5 km | 43 knots | 5,067 | 577 m | 1.9 km | 42% | |
| |
Torpedo Mk.13-2 Mod 1 | 3.5 km | 43 knots | 3,633 | 577 m | 1.9 km | 29% | |
| |
Torpedo Mk.13-2 | 3.5 km | 35 knots | 6,467 | 470 m | 1.6 km | 52% | |
| |
Torpedo Mk.7 mod. 1 | 4.0 km | 35 knots | 5,067 | 470 m | 1.1 km | 42% | |
| |
Torpedo Mk.7 mod.1 | 4.0 km | 35 knots | 5,067 | 517 m | 1.1 km | 42% | |
| |
Torpedo Mk.13-2 Mod 2 | 3.5 km | 43 knots | 6,433 | 577 m | 1.9 km | 53% | |
| |
Torpedo Mk.7D | 4.0 km | 35 knots | 4,233 | 517 m | 1.1 km | 33% | |
| |
Torpedo Mk.25 | 4.0 km | 35 knots | 6,133 | 470 m | 1.6 km | 51% | |
| |
Type 91 mod. 0 | 3.0 km | 40 knots | 5,800 | 322 m | 1.3 km | 32% | |
| |
Type 91 mod. 1 | 3.0 km | 50 knots | 5,400 | 447 m | 1.3 km | 30% | |
| |
Type 91 mod. 1 | 5.0 km | 50 knots | 5,400 | 806 m | 1.3 km | 30% | |
| |
Type 91 mod. 3 | 5.0 km | 50 knots | 7,233 | 537 m | 1.3 km | 40% | |
| |
Type 99 No. 80 Mk. 5 | 6.0 km | 50 knots | 9,333 | 671 m | 1.6 km | 40% | |
| |
Type 91 mod. 7 | 6.0 km | 50 knots | 9,333 | 671 m | 1.6 km | 40% | |
| |
Type 91 mod. 8 | 6.0 km | 50 knots | 7,500 | 671 m | 1.6 km | 41% | |
| |
Type 5 | 2.2 km | 35 knots | 2,767 | 376 m | 1.4 km | 17% | |
| |
Type 5 | 2.2 km | 35 knots | 2,767 | 423 m | 1.4 km | 17% | |
| |
TAN-12B | 6.0 km | 41 knots | 3,333 | 661 m | 1.3 km | 28% | |
| |
TAN-12 | 6.0 km | 41 knots | 3,833 | 661 m | 1.3 km | 33% | |
| |
45-36AN-V | 6.0 km | 41 knots | 4,667 | 826 m | 1.3 km | 40% | |
| |
45-36AN-A | 6.0 km | 41 knots | 4,533 | 716 m | 1.3 km | 39% | |
| |
45-36AN-B | 6.0 km | 41 knots | 5,200 | 826 m | 1.3 km | 45% | |
| |
F5c | 2.0 km | 50 knots | 3,000 | 403 m | 1.3 km | 25% | |
| |
F5 | 2.0 km | 50 knots | 3,600 | 403 m | 1.3 km | 31% | |
| |
F5d | 2.5 km | 52 knots | 4,067 | 489 m | 1.3 km | 34% | |
| |
LT F5a | 6.0 km | 32 knots | 4,200 | 387 m | 1.1 km | 23% | |
| |
LT F5b | 6.0 km | 35 knots | 5,333 | 470 m | 1.3 km | 29% | |
| |
BT 1000 | 3.0 km | 55 knots | 4,533 | 591 m | 1.4 km | 39% | |
| |
F5f | 6.0 km | 35 knots | 4,767 | 470 m | 1.3 km | 27% | |
| |
Mark VIII | 2.4 km | 35 knots | 5,200 | 282 m | 1.1 km | 45% | |
| |
Mark VIII | 2.4 km | 35 knots | 5,200 | 329 m | 1.1 km | 45% | |
| |
Mark XII | 2.4 km | 35 knots | 5,933 | 376 m | 1.2 km | 51% | |
| |
Mark VIII | 2.4 km | 35 knots | 5,200 | 329 m | 1.1 km | 45% | |
| |
Mark XII | 2.4 km | 35 knots | 5,933 | 407 m | 1.2 km | 51% | |
| |
Mark XV | 2.4 km | 35 knots | 5,933 | 438 m | 1.3 km | 63% | |
| |
Mark XII | 2.4 km | 35 knots | 5,200 | 329 m | 1.1 km | 45% | |
| |
Mark XVII | 2.4 km | 35 knots | 5,933 | 470 m | 1.3 km | 51% | |
| |
Mark XIX | 2.4 km | 35 knots | 6,533 | 470 m | 1.3 km | 56% | |
| |
Mark XVII | 2.4 km | 35 knots | 5,933 | 493 m | 1.3 km | 51% | |
| |
Mark XVIII | 2.4 km | 40 knots | 7,800 | 564 m | 1.3 km | 66% | |
| |
450 mm F200 | 3.5 km | 30 knots | 7,133 | 403 m | 1.3 km | 61% | |
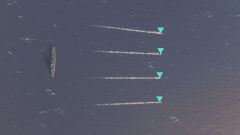
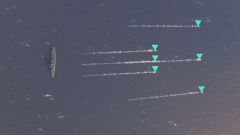
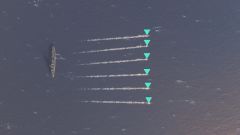
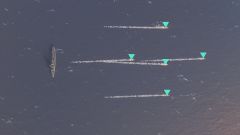
Torpedo Drop Patterns
The drop patterns of aerial torpedoes vary by nation and are sometimes unique to individual carriers. A table with images showing the available torpedo drop patterns is below.
This page refers to the pre-0.8.0 torpedo squadrons. It is obsolete.
| Image | Nation | Ships | Notes |
|---|---|---|---|
|
|
Hosho, Zuiho, Ryujo, Hiryu, Shokaku, Taiho, Hakuryu | The Japanese manual drop is special, since it converges on the end-point of the spread. This allows for potential pincer-torpedo attacks, and landing one is also something hard to master. Most captains focus on giving minimal reaction time to enemy targets; however, some will attempt a long-ranged "snipe" with torpedoes that can potentially be deadly. Such long-ranged snipes work best on disabled ships, such enemies with their engine or rudder incapacitated, who are ramming into an allied ship, or that have run aground. |
|
|
Kaga | Kaga’s torpedo drop is unique in two ways. One, it is made up of two lines of torpedoes: a wide "forward" line, and a narrow "trailing" one. Secondly, she boasts the fastest-moving aerial torpedoes in the game, making avoiding damage from a good drop exceedingly difficult. |
|
|
Langley, Bogue, Independence, Ranger, Lexington, Essex, Midway | The American manual drop is almost the antithesis of the Japanese one: wider, with narrower gaps between the torpedoes that make it more difficult for ships to dodge all of them. It also does not narrow as the Japanese spread does, with all six fish traveling in a straight line — parallel to those on either side — after being dropped. |

|
|
Enterprise | Enterprise’s torpedo drop pattern resembles a "W", and is challenging to use on anything besides large capital ships that will have difficulty dodging all of her torpedoes. In order to hit smaller and more maneuverable targets such as destroyers, captains will have to master the art of manually dropping each squadron on opposite sides of the enemy ship. |
|
|
Graf Zeppelin | The torpedo drop patter of Graf Zeppelin is uniquely suited to punishing ships that aren't maneuvering against her torpedo bombers. With three torpedoes lined up in the center, one right after the other, a practiced captain can easily put down a drop to ensure that a battleship eats at least those three fish and probably one of the flankers as well. |
| Icon | Description |
|---|---|

|
High Explosive Bombs are packed with impact-fused high explosive, with the primary intent of inflicting high amounts of module damage and setting fires. |

|
Armor-Piercing Bombs have armor-piercing caps and are fused to penetrate the extra layers of horizontal armor found on battleships, as well as some cruisers and aircraft carriers. They tend to over-penetrate when used against light ships. |

|
Skip Bombs are also filled with impact-fused high explosive, but are dropped at water-level height. These bombs can either be released several skips away, far from the reach of most anti-aircraft artillery, or directly on top of their targets. |
| Nation | Bomb Type | Damage | Armor Penetrated | Fire Chance | Deployed Aboard |
|---|---|---|---|---|---|
| |
AN-M64 | 7,300 | 42mm | 41% | |
| |
AN-M64 | 7,300 | 53mm | 46% | |
| |
AN-M65 | 9,200 | 53mm | 52% | |
| |
AN-M62 | 5,600 | 42mm | 32% | |
| |
AN-M62 | 4,900 | 244mm | N/A | |
| |
AN-M60 | 3,600 | 328mm | N/A | |
| |
AN-M66 | 11,200 | 67mm | 64% | |
| |
AN-M633 | 5,400 | 42mm | 31% | |
| |
AN-M56A1 | 16,000 | 85mm | 91% | |
| |
Type 99 No. 25 mod. 2 | 2,500 | 174mm | N/A | |
| |
Type 99 No. 25 mod. 1 | 4,600 | 174mm | N/A | |
| |
Type 3 No. 25 Mk. 4 | 5,100 | 228mm | N/A | |
| |
Type 2 No. 50 Mk. 1 | 6,200 | 283mm | N/A | |
| |
Type 90 No. 50 Mk. 2 | 8,800 | 55mm | 50% | |
| |
Type 99 No. 80 Mk. 5 | 6,800 | 351mm | N/A | |
| |
FAB-100 | 6,100 | 32mm | 35% | |
| |
FAB-250 | 6,100 | 32mm | 35% | |
| |
FAB-500 | 8,700 | 55mm | 49% | |
| |
FAB-500B | 7,500 | 55mm | 43% | |
| |
PC 500a | 4,000 | 149mm | N/A | |
| |
SC 1000 | 12,200 | 69mm | 69% | |
| |
PC 500c | 7,000 | 227mm | N/A | |
| |
PD 500 | 5,800 | 344mm | N/A | |
| |
PC 500 | 7,800 | 256mm | N/A | |
| |
PC 1000 | 8,800 | 331mm | N/A | |
| |
SC 1000 | 11,100 | 69mm | 63% | |
| |
40 lb. G.P. Bomb | 2,300 | 18mm | 8.7% | |
| |
40 lb. G.P. Bomb | 2,300 | 19mm | 9% | |
| |
250 lb. G.P. Bomb | 4,700 | 33mm | 27% | |
| |
250 lb G.P. Bomb Mk.I | 5,600 | 33mm | 32% | |
| |
250 lb G.P. Bomb Mk.I | 4,700 | 33mm | 27% | |
| |
500 lb. G.P. Bomb | 6,400 | 41mm | 36% | |
| |
500 lb. G.P. Bomb | 4,300 | 109mm | N/A | |
| |
500 lb G.P. Bomb Mk.I | 6,400 | 52mm | 36% | |
| |
150-kg G.P. Mle 1930 | 3,600 | 219mm | N/A | |
| |
500-kg G.P. Mle 1930 | 6,100 | 32mm | 35% | |
Dive Bombers
Dive bombers are the second type of strike plane, and they are a bit faster than torpedo bombers. Their service time (at least usually) is less than torpedo bombers, and they are a bit faster. There are usually more dive bombers on a carrier than torpedo bombers. On the Japanese side, dive bombers seem like a secondary weapon with their relatively small damage compared to torpedo planes (4500 vs. 8567). However, American dive bombers cause massive damage starting from Tier VI onwards. They use a 500-pound bomb — versus the Japanese 100 kg (250 pounds) — that deals about 3,000 max damage more. Starting from Lexington at Tier VIII, that number is even higher, at 10,800 with the 1,000-pound bomb. The large American bombs will be able to deal heavy damage to any ship they hit, provided they hit. That is the trade-off: American planes suffer from increased dispersion while the Japanese have tighter dispersion with less damage. Note that Enterprise and Graf Zeppelin are unique in that they have access to armor piercing bombs capable of doing tremendous damage to enemy battleships.
Dive bombers are similar to torpedo bombers in almost every way. They can be auto-dropped, which is recommended most of the time since leading dive-bomber squads can be a serious waste of time. Alternatively, they can be manual-dropped and have tighter dispersion. Unlike torpedo bombers, dive bomber hits are based on random chance within the target area. Even if you are almost dead-on in your aim, you can sometimes miss. Tier IV and Tier V aircraft carriers can only auto-drop dive bombers.
Anti-Air (AA) Defense
Please note that the content of this page is using information which have yet to be verified. Slight inaccuracies can occur and will be corrected once more accurate data is available.
Unlike the artillery or torpedo armament in World of Warships, anti aircraft guns do not calculate actual trajectories or have limited fields of fire. This is due to the amount of processing which would occur, and would result in an immense stress on the servers.
Anti aircraft armament works using auras, with each aura having a minimum and maximum range applied. The ranges are adjusted so that no aura will overlap with each other. The three main auras, short range, medium range and long range, differ in the way they deliver damage against enemy aircraft. All guns up to 25mm are considered short range, all guns up to 85mm are considered medium range and all the weapons with a larger caliber are long range. Below are the characteristics of the German Tier 8 Premium Cruiser Prinz Eugen as an example.
Short Range Aura

Prinz Eugen’s short range aura works at a range between 0.1 and 2km. Within that aura 184 damage are being dealt every second. However, this damage is not guaranteed, and a hit percentage is given at 81%. This means that every second there is an 81% chance that this damage is being dealt to the entire squadron. The damage is being applied to the entire squadron, and spread among all planes within its reach.
Medium Range Aura

The medium range aura is active at ranges between 2.0 and 3.5km. Just like the short range aura, a consistent damage of 173 is being dealt every second with a 85% chance. On top of that, the medium range aura is also capable of generating flak clouds. These clouds are constantly being generated and spawn in front of the enemy aviation, and will deal its damage to all aircraft which fly through them. By default Prinz Eugen is capable of generating up to seven clouds, with each cloud having a cooldown before it can be generated again. This cooldown is estimated to be between one and two seconds. The damage each of these flak clouds can deal is significantly higher than the consistent damage with 1190 per second within the explosion radius, meaning that for example the aircraft from the Japanese T8 Carrier Shokaku will not be able to sustain two direct hits. However, since these clouds only deal damage on those planes that fly through them, they can also seem ineffective when the squadron dodges these clouds.
Long Range Aura

The furthest reaching aura is capable of delivering damage at ranges between 3.5 and 5.8km. Following the rules of the short and medium range aura, a consistent damage is being applied. However, this value is noticeably lower than for the other auras with 91 dps and a hit percentage of 85%. What makes up for the low consistent damage are the flak clouds which are generated just like for the medium range aura. Up to six clouds with each dealing 2100 dps stock mean that the same planes from Shokaku would be unable to survive even one direct hit.
Sector Reinforcement
Every ship has the ability to focus the AA firepower on one side of the ship, which will result in the other side having a weaker defense. The screen which allows for the sector assignment is by default the "O" key, and after assigning a side for increased defense a timer starts, after which the sector has been successfully reinforced. The increase in firepower and the timer depend on the ship type.
| Ship | AA Bonus on assigned sector | Switch Time |
|---|---|---|
| Destroyers | +50% | 5 seconds |
| Cruisers | +25% | 10 seconds |
| Battleships | +25% | 12 seconds |
| Aircraft Carriers | +60% | 15 seconds |
| Sims | +80% | 4 seconds |
Using Prinz Eugen as an example again, and only looking at the long range aura. When no sector has been assigned, a plane approaching from the starboard side will be facing the continuous dps of 91 and the six generated flak clouds with each dealing 2,100dps. The player now assigns the starboard side as the reinforced sector, and after ten seconds the damage will be increased to 114dps consistently and 2,625 from every flak cloud. The plane now flies over the ship and enters the zone in which the port side long range AA is active. The damage in that sector is reduced to 68dps consistently and 1575dps from each flak cloud.
Losing AA mounts will reduce the amount of consistent dps your auras will be able to put out, and reduce the amount of flak clouds that can be generated. The location of the destroyed AA mount does not matter in that regard, as each gun works in all directions. This also means that the sector reinforcement remains unaffected aside from the reduced damage dealing.
The usage of Defensive Fire practically takes the damage you would be dealing to the plane and multiplies it with the factor x2.
Other notes:
- Manually designating an AA target (Ctrl-click) will immediately activate AA fire without the need to press P.
- Activating the Defensive AA Fire consumable will also immediately activate AA fire without the need to press P.
- Deactivating AA fire will immediately terminate the Defensive AA Fire consumable if it is active, and begin its cooldown. This can be used to shave a few seconds off until the next charge is ready.