Aerial Combat
| Revision as of 13:23, 4 February 2019 → Air-to-Air Combat Updated to 0.8.0.0 | Revision as of 14:16, 4 February 2019 Anti-Surface Combat Partially updated to 0.8.0.0 | |||
| Line 20: | Line 20: | |||
| == Anti-Surface Combat == | == Anti-Surface Combat == | |||
| ? | + | Aircraft Carriers in World of Warships have three types of anti-surface weapons; Attack Aircraft, Torpedo Bombers, and Dive Bombers. Attack Aircraft utilize a large number of small-caliber rockets to light fires and strike fast, maneuverable vessels that are lightly armored. Torpedo Bombers carry air-dropped torpedoes that can cause floods, and are best suited against slower, less maneuverable targets. Finally, Dive Bombers carry either HE or AP bombs that are released directly above an enemy vessel, and can be used effectively against most targets. | ||
| ? | === | + | === Attack Aircraft === | |
| ? | [[ | + | Attack aircraft are aircraft that carry a large number of HE rockets. The rockets have relatively low penetration values, so their damage output against heavily armored ships is negligible. Their primary use is to start fires on enemy vessels, and to harass lightly armored destroyers. The [[Ship:Commander#Inertia_Fuse_for_HE_Shells|Inertia Fuse for HE Shells]] skill can be used to improve their penetration, although taking this skill is not usually recommended for an aircraft carrier. The carriers of the United States Navy have access to two types of rocket; a small, "traditional" rocket, and the much larger "Tiny Tim" rockets that feature higher damage, penetration and fire chance over their counterparts, at the cost of the number of rockets carried per plane. | |
| + | Attack aircraft are arguable the easiest of the three weapon types to aim, as they have the fastest sight stabilization and a fairly small strike dispersion. They have no arming distance and have an easy to use aiming reticle. | |||
| ? | === | + | === Torpedo Bombers === | |
| ? | + | [[File:99 plane torpedo own selected.png|frameless|left|link=]]Torpedo bombers are the preferred strike weapons of aircraft carriers, as they provide consistent damage against almost any enemy ship in a given match. Aerial torpedoes have universally lower damage and flood chance when compared to their ship-launched counterparts, but otherwise behave similarly. | ||
| ? | + | |||
| ? | + | |||
| ? | + | |||
| ? | + | |||
| ? | + | |||
| ? | + | |||
| ? | + | |||
| ? | + | |||
| ? | | | + | ||
| ? | + | |||
| ? | + | |||
| ? | + | |||
| ? | + | |||
| ? | + | |||
| ? | + | |||
| ? | + | |||
| ? | + | |||
| ? | + | |||
| ? | + | |||
| ? | + | |||
| ? | + | |||
| ? | + | |||
| ? | + | |||
| + | When performing an attack run with torpedo bombers, captains will notice a yellow are in the attack cone; this is the distance in which the torpedoes must travel before they arm. If a torpedo strikes before arming, it will not do damage. The torpedo attack cone also closes quite slowly, so captains should take the time to plan out their attack runs before beginning them. | |||
| ==== Torpedo Drop Patterns ==== | ==== Torpedo Drop Patterns ==== | |||
| Line 62: | Line 41: | |||
| === Dive Bombers === | === Dive Bombers === | |||
| ? | Dive bombers are the | + | Dive bombers are the third and final type of aircraft carried by an aircraft carrier. They come in three forms; HE bombs used by the United States Navy carriers and [[Kaga]], AP bombs carried on Imperial Japanese Navy carriers, [[Graf Zeppelin]] and [[Enterprise]], and a high-altitude HE "carpet bomb" found on Royal Navy carriers. | |
| + | ||||
| + | The traditional dive bombers found on all but the Royal Navy carriers are probably the most difficult weapon type to use, as their aiming reticle is fairly hard to understand, and properly "leading" a target before entering the attack run takes quite a bit of practice to get right. The payoff is extremely high fire chance and good damage. | |||
| ? | + | The Royal Navy aircraft have an aiming system similar to that of Attack Aircraft rockets, and are thus far easier to use. | ||
| == Anti-Air (AA) Defense == | == Anti-Air (AA) Defense == | |||
Revision as of 14:16, 4 February 2019
Aircraft Movement
Squadron Control
Individual squadrons are controlled using the WASD keys and the mouse. Aircraft will automatically retain a set forward throttle, regardless of player input. Squadrons are steered using a combination of the mouse and the "A" and "D" keys. The "W" and "S" keys are used to apply a limited time boost and air braking, respectively. The amount of remaining boost is indicated by the curved bar on the left side of the HUD when controlling a squadron. Boost will automatically regenerate when not being used, but captains can also use the Engine Cooling squadron consumable to immediately replenish the boost bar.
Left-clicking will begin an attack run. While in the attack mode, squadron control remains the same.
Pressing "F" when controlling a squadron will relinquish control of the squadron, returning both the captain and their aircraft to the carrier. Aircraft expended in an attack run will automatically return to their carrier.
Catapult Fighter, Fighter, Patrol Fighters and Spotting Aircraft
Catapult Fighter ![]() and Spotting Aircraft
and Spotting Aircraft ![]() cannot be controlled by the player, and move around the map automatically. They can go as far as 4.23 km away from the ship for Spotting Aircraft, and 3.24 km for Catapult Fighters.
cannot be controlled by the player, and move around the map automatically. They can go as far as 4.23 km away from the ship for Spotting Aircraft, and 3.24 km for Catapult Fighters.
For aircraft carrier captains, the Fighter consumable is automatically activated when the carrier is spotted by aircraft. Each consumable consists of a squadron of four fighters that rotate around the vessel at a distance of 3 km. They will attempt to engage enemy aircraft within their range.
Aircraft carrier controlled squadrons have access to the Patrol Fighters consumable. Similar to the Fighter consumable, when activated it will place a squadron of four fighters at the location in which it was activated. The fighters will attempt to engage enemy aircraft within their range. Patrol fighters last for 60 seconds, allowing them to be used as a passive scouting tool by carrier captains.
Air-to-Air Combat
Air-to-air combat is performed automatically through the usage of the Fighter, Catapult Fighter ![]() and Patrol Fighter consumables. When activated, AI controlled fighters will appear and engage enemy aircraft within their range. The aircraft created from the Catapult Fighter and Fighter consumables will follow their host ship, while Patrol Fighters will remain where they were activated. All three consumables have limited life spans.
and Patrol Fighter consumables. When activated, AI controlled fighters will appear and engage enemy aircraft within their range. The aircraft created from the Catapult Fighter and Fighter consumables will follow their host ship, while Patrol Fighters will remain where they were activated. All three consumables have limited life spans.
Anti-Surface Combat
Aircraft Carriers in World of Warships have three types of anti-surface weapons; Attack Aircraft, Torpedo Bombers, and Dive Bombers. Attack Aircraft utilize a large number of small-caliber rockets to light fires and strike fast, maneuverable vessels that are lightly armored. Torpedo Bombers carry air-dropped torpedoes that can cause floods, and are best suited against slower, less maneuverable targets. Finally, Dive Bombers carry either HE or AP bombs that are released directly above an enemy vessel, and can be used effectively against most targets.
Attack Aircraft
Attack aircraft are aircraft that carry a large number of HE rockets. The rockets have relatively low penetration values, so their damage output against heavily armored ships is negligible. Their primary use is to start fires on enemy vessels, and to harass lightly armored destroyers. The Inertia Fuse for HE Shells skill can be used to improve their penetration, although taking this skill is not usually recommended for an aircraft carrier. The carriers of the United States Navy have access to two types of rocket; a small, "traditional" rocket, and the much larger "Tiny Tim" rockets that feature higher damage, penetration and fire chance over their counterparts, at the cost of the number of rockets carried per plane.
Attack aircraft are arguable the easiest of the three weapon types to aim, as they have the fastest sight stabilization and a fairly small strike dispersion. They have no arming distance and have an easy to use aiming reticle.
Torpedo Bombers
When performing an attack run with torpedo bombers, captains will notice a yellow are in the attack cone; this is the distance in which the torpedoes must travel before they arm. If a torpedo strikes before arming, it will not do damage. The torpedo attack cone also closes quite slowly, so captains should take the time to plan out their attack runs before beginning them.
Torpedo Drop Patterns
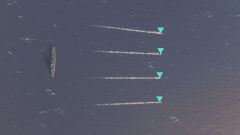
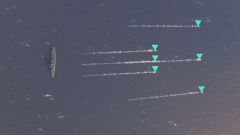
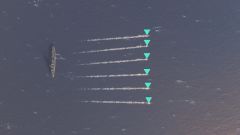
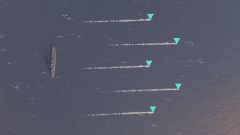
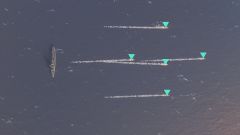
The drop patterns of aerial torpedoes vary by nation and are sometimes unique to individual carriers. A table with images showing the available torpedo drop patterns is below.
This page refers to the pre-0.8.0 torpedo squadrons. It is obsolete.
| Image | Nation | Ships | Notes |
|---|---|---|---|
|
|
Hosho, Zuiho, Ryujo, Hiryu, Shokaku, Taiho, Hakuryu | The Japanese manual drop is special, since it converges on the end-point of the spread. This allows for potential pincer-torpedo attacks, and landing one is also something hard to master. Most captains focus on giving minimal reaction time to enemy targets; however, some will attempt a long-ranged "snipe" with torpedoes that can potentially be deadly. Such long-ranged snipes work best on disabled ships, such enemies with their engine or rudder incapacitated, who are ramming into an allied ship, or that have run aground. |
|
|
Kaga | Kaga’s torpedo drop is unique in two ways. One, it is made up of two lines of torpedoes: a wide "forward" line, and a narrow "trailing" one. Secondly, she boasts the fastest-moving aerial torpedoes in the game, making avoiding damage from a good drop exceedingly difficult. |
|
|
Langley, Bogue, Independence, Ranger, Lexington, Essex, Midway | The American manual drop is almost the antithesis of the Japanese one: wider, with narrower gaps between the torpedoes that make it more difficult for ships to dodge all of them. It also does not narrow as the Japanese spread does, with all six fish traveling in a straight line — parallel to those on either side — after being dropped. |
|
|
Enterprise | Enterprise’s torpedo drop pattern resembles a "W", and is challenging to use on anything besides large capital ships that will have difficulty dodging all of her torpedoes. In order to hit smaller and more maneuverable targets such as destroyers, captains will have to master the art of manually dropping each squadron on opposite sides of the enemy ship. |
|
|
Graf Zeppelin | The torpedo drop patter of Graf Zeppelin is uniquely suited to punishing ships that aren't maneuvering against her torpedo bombers. With three torpedoes lined up in the center, one right after the other, a practiced captain can easily put down a drop to ensure that a battleship eats at least those three fish and probably one of the flankers as well. |
| Nation | Bomb Type | Damage | Armor Penetrated | Fire Chance | Deployed Aboard |
|---|---|---|---|---|---|
| |
AN-M64 | 7,300 | 42mm | 41% | |
| |
AN-M64 | 7,300 | 53mm | 46% | |
| |
AN-M65 | 9,200 | 53mm | 52% | |
| |
AN-M62 | 5,600 | 42mm | 32% | |
| |
AN-M62 | 4,900 | 244mm | N/A | |
| |
AN-M60 | 3,600 | 328mm | N/A | |
| |
AN-M66 | 11,200 | 67mm | 64% | |
| |
AN-M633 | 5,400 | 42mm | 31% | |
| |
AN-M56A1 | 16,000 | 85mm | 91% | |
| |
Type 99 No. 25 mod. 2 | 2,500 | 174mm | N/A | |
| |
Type 99 No. 25 mod. 1 | 4,600 | 174mm | N/A | |
| |
Type 3 No. 25 Mk. 4 | 5,100 | 228mm | N/A | |
| |
Type 2 No. 50 Mk. 1 | 6,200 | 283mm | N/A | |
| |
Type 90 No. 50 Mk. 2 | 8,800 | 55mm | 50% | |
| |
Type 99 No. 80 Mk. 5 | 6,800 | 351mm | N/A | |
| |
FAB-100 | 6,100 | 32mm | 35% | |
| |
FAB-250 | 6,100 | 32mm | 35% | |
| |
FAB-500 | 8,700 | 55mm | 49% | |
| |
FAB-500B | 7,500 | 55mm | 43% | |
| |
PC 500a | 4,000 | 149mm | N/A | |
| |
SC 1000 | 12,200 | 69mm | 69% | |
| |
PC 500c | 7,000 | 227mm | N/A | |
| |
PD 500 | 5,800 | 344mm | N/A | |
| |
PC 500 | 7,800 | 256mm | N/A | |
| |
PC 1000 | 8,800 | 331mm | N/A | |
| |
SC 1000 | 11,100 | 69mm | 63% | |
| |
40 lb. G.P. Bomb | 2,300 | 18mm | 8.7% | |
| |
40 lb. G.P. Bomb | 2,300 | 19mm | 9% | |
| |
250 lb. G.P. Bomb | 4,700 | 33mm | 27% | |
| |
250 lb G.P. Bomb Mk.I | 5,600 | 33mm | 32% | |
| |
250 lb G.P. Bomb Mk.I | 4,700 | 33mm | 27% | |
| |
500 lb. G.P. Bomb | 6,400 | 41mm | 36% | |
| |
500 lb. G.P. Bomb | 4,300 | 109mm | N/A | |
| |
500 lb G.P. Bomb Mk.I | 6,400 | 52mm | 36% | |
| |
150-kg G.P. Mle 1930 | 3,600 | 219mm | N/A | |
| |
500-kg G.P. Mle 1930 | 6,100 | 32mm | 35% | |
Dive Bombers
Dive bombers are the third and final type of aircraft carried by an aircraft carrier. They come in three forms; HE bombs used by the United States Navy carriers and Kaga, AP bombs carried on Imperial Japanese Navy carriers, Graf Zeppelin and Enterprise, and a high-altitude HE "carpet bomb" found on Royal Navy carriers.
The traditional dive bombers found on all but the Royal Navy carriers are probably the most difficult weapon type to use, as their aiming reticle is fairly hard to understand, and properly "leading" a target before entering the attack run takes quite a bit of practice to get right. The payoff is extremely high fire chance and good damage.
The Royal Navy aircraft have an aiming system similar to that of Attack Aircraft rockets, and are thus far easier to use.
Anti-Air (AA) Defense
Please note that the content of this page is using information which have yet to be verified. Slight inaccuracies can occur and will be corrected once more accurate data is available.
Unlike the artillery or torpedo armament in World of Warships, anti aircraft guns do not calculate actual trajectories or have limited fields of fire. This is due to the amount of processing which would occur, and would result in an immense stress on the servers.
Anti aircraft armament works using auras, with each aura having a minimum and maximum range applied. The ranges are adjusted so that no aura will overlap with each other. The three main auras, short range, medium range and long range, differ in the way they deliver damage against enemy aircraft. All guns up to 25mm are considered short range, all guns up to 85mm are considered medium range and all the weapons with a larger caliber are long range. Below are the characteristics of the German Tier 8 Premium Cruiser Prinz Eugen as an example.
Short Range Aura
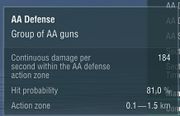
Prinz Eugen’s short range aura works at a range between 0.1 and 2km. Within that aura 184 damage are being dealt every second. However, this damage is not guaranteed, and a hit percentage is given at 81%. This means that every second there is an 81% chance that this damage is being dealt to the entire squadron. The damage is being applied to the entire squadron, and spread among all planes within its reach.
Medium Range Aura
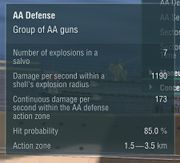
The medium range aura is active at ranges between 2.0 and 3.5km. Just like the short range aura, a consistent damage of 173 is being dealt every second with a 85% chance. On top of that, the medium range aura is also capable of generating flak clouds. These clouds are constantly being generated and spawn in front of the enemy aviation, and will deal its damage to all aircraft which fly through them. By default Prinz Eugen is capable of generating up to seven clouds, with each cloud having a cooldown before it can be generated again. This cooldown is estimated to be between one and two seconds. The damage each of these flak clouds can deal is significantly higher than the consistent damage with 1190 per second within the explosion radius, meaning that for example the aircraft from the Japanese T8 Carrier Shokaku will not be able to sustain two direct hits. However, since these clouds only deal damage on those planes that fly through them, they can also seem ineffective when the squadron dodges these clouds.
Long Range Aura
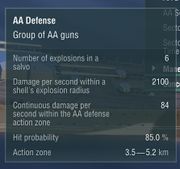
The furthest reaching aura is capable of delivering damage at ranges between 3.5 and 5.8km. Following the rules of the short and medium range aura, a consistent damage is being applied. However, this value is noticeably lower than for the other auras with 91 dps and a hit percentage of 85%. What makes up for the low consistent damage are the flak clouds which are generated just like for the medium range aura. Up to six clouds with each dealing 2100 dps stock mean that the same planes from Shokaku would be unable to survive even one direct hit.
Sector Reinforcement
Every ship has the ability to focus the AA firepower on one side of the ship, which will result in the other side having a weaker defense. The screen which allows for the sector assignment is by default the "O" key, and after assigning a side for increased defense a timer starts, after which the sector has been successfully reinforced. The increase in firepower and the timer depend on the ship type.
| Ship | AA Bonus on assigned sector | Switch Time |
|---|---|---|
| Destroyers | +50% | 5 seconds |
| Cruisers | +25% | 10 seconds |
| Battleships | +25% | 12 seconds |
| Aircraft Carriers | +60% | 15 seconds |
| Sims | +80% | 4 seconds |
Using Prinz Eugen as an example again, and only looking at the long range aura. When no sector has been assigned, a plane approaching from the starboard side will be facing the continuous dps of 91 and the six generated flak clouds with each dealing 2,100dps. The player now assigns the starboard side as the reinforced sector, and after ten seconds the damage will be increased to 114dps consistently and 2,625 from every flak cloud. The plane now flies over the ship and enters the zone in which the port side long range AA is active. The damage in that sector is reduced to 68dps consistently and 1575dps from each flak cloud.
Losing AA mounts will reduce the amount of consistent dps your auras will be able to put out, and reduce the amount of flak clouds that can be generated. The location of the destroyed AA mount does not matter in that regard, as each gun works in all directions. This also means that the sector reinforcement remains unaffected aside from the reduced damage dealing.
The usage of Defensive Fire practically takes the damage you would be dealing to the plane and multiplies it with the factor x2.
Other notes:
- Manually designating an AA target (Ctrl-click) will immediately activate AA fire without the need to press P.
- Activating the Defensive AA Fire consumable will also immediately activate AA fire without the need to press P.
- Deactivating AA fire will immediately terminate the Defensive AA Fire consumable if it is active, and begin its cooldown. This can be used to shave a few seconds off until the next charge is ready.


