Akatsuki
| Revision as of 07:03, 23 January 2017 | Revision as of 22:14, 12 March 2021 CS3 Contrast to Shiratsuyu. | |||
20 intermediate revisions by 10 users not shown | ||||
| Line 3: | Line 3: | |||
| |Anno=<!-- you can write below short description for the ship. it will replace default one. --> | |Anno=<!-- you can write below short description for the ship. it will replace default one. --> | |||
| ? | + | |||
| + | <!-- <br><br> {{Model3DViewer|1c64cc97b3b9464d88d7918667d68cf6}}--> | |||
| |Performance=<!-- write text about performance in battles below --> | |Performance=<!-- write text about performance in battles below --> | |||
| ? | In many ways, '' | + | ''{{#var:ship_name}}'' is the Tier VII entry in the IJN "torpedo boat" tech tree branch. While she can salvo one more torpedo than her "gunboat" counter-part ''[[Shiratsuyu]]'', ironically she cannot equip the latter's Torpedo Reload Booster. ''{{#var:ship_name}}'' also has a larger — and dual-purpose — main battery, raising questions as to which is the gunboat and which the torpedo boat. | |
| + | ||||
| + | In many ways, ''{{#var:ship_name}}'' is a side-grade from ''[[Fubuki]]''. She is largely the same as her immediate predecessor, with a few minor improvements. | |||
| ? | Chief among these is a notable increase in her top speed. One of ''Fubuki''’s more irksome negatives is her maximum speed of 35 knots; '' | + | Chief among these is a notable increase in her top speed. One of ''Fubuki''’s more irksome negatives is her maximum speed of 35 knots; ''{{#var:ship_name}}''’s top speed bumps up to 38 knots. Her handling characteristics are almost the same as ''Fubuki'' as well, retaining her turning circle radius while losing time on rudder shift. Also improving is ''{{#var:ship_name}}''’s main battery. Though her guns are not her main damage dealer, she picks up two more barrels via an additional turret on the aft end of the ship. This makes her a more significant threat when she does decide to open up with her guns. The turrets themselves are the same as those on ''Fubuki'', and they reload a little faster. | |
| ''Akatsuki''’s primary armament is in the same configuration as ''Fubuki''’s — three triple-tube torpedo launchers — while having access to slightly better torpedoes in terms of damage. Her detection radius is slightly higher than her immediate predecessor's as well, so captains will have to be a touch more cautious in their positioning when there are enemy gunboat destroyers — such as ''[[Mahan]]'' or ''[[Kiev]]'' — in the mix. She is as vulnerable to enemy aircraft as most other destroyers as well, so when and enemy carrier is present, cautious play is recommended. | ''Akatsuki''’s primary armament is in the same configuration as ''Fubuki''’s — three triple-tube torpedo launchers — while having access to slightly better torpedoes in terms of damage. Her detection radius is slightly higher than her immediate predecessor's as well, so captains will have to be a touch more cautious in their positioning when there are enemy gunboat destroyers — such as ''[[Mahan]]'' or ''[[Kiev]]'' — in the mix. She is as vulnerable to enemy aircraft as most other destroyers as well, so when and enemy carrier is present, cautious play is recommended. | |||
| ? | While '' | + | While ''{{#var:ship_name}}'' is not a huge upgrade from ''Fubuki'', the upgrades she does get are key to allowing her to remain competitive in her tier. | |
| |Pros=<!-- write list of positive points below. use * as in ordinary wiki-list. --> | |Pros=<!-- write list of positive points below. use * as in ordinary wiki-list. --> | |||
| ? | * Three triple-tube torpedo launchers give her | + | * Six main battery guns. | |
| ? | + | * HE shells have good damage and good fire chance. | ||
| + | * Three triple-tube torpedo launchers give her good flexibility. | |||
| * Excellent top speed. | * Excellent top speed. | |||
| ? | * Good overall handling characteristics | + | * Good overall handling characteristics. | |
| |Cons=<!-- write list of negative points below. use * as in ordinary wiki-list. --> | |Cons=<!-- write list of negative points below. use * as in ordinary wiki-list. --> | |||
| ? | * Large detection radius | + | * Large detection radius. | |
| ? | + | |||
| * Health pool is on the low end for Tier VII destroyers. | * Health pool is on the low end for Tier VII destroyers. | |||
| ? | * Lacks access to the | + | * Main battery has the characteristic low reload and sluggish turrets of IJN DDs. | |
| + | * Lacks access to the {{Torpedo Reload Booster}} consumable that ''[[Shiratsuyu]]'' gets. | |||
| + | * Anti-aircraft suite is weak, but with a dual-purpose main battery it's a big improvement for the IJN. | |||
| |Research=<!-- write text about priority sequence of research below --> | |Research=<!-- write text about priority sequence of research below --> | |||
| ? | '' | + | Hull (B) is the first recommended upgrade. ''{{#var:ship_name}}''’s stock torpedoes are more than sufficient for her to work with initially. Invest in the Torpedo module next, and grab the Fire Control System module last. | |
| |OptimalConfiguration=<!-- write some general text about selection of optimal configuration below (optional)--> | |OptimalConfiguration=<!-- write some general text about selection of optimal configuration below (optional)--> | |||
| |Upgrades=<!-- write text about best upgrades below --> | |Upgrades=<!-- write text about best upgrades below --> | |||
| ? | + | The recommended upgrades for ''{{#var:ship_name}}'' are as follows: | ||
| + | * '''Slot 1''': {{Main Armaments Modification 1}} | |||
| + | * '''Slot 2''': {{Engine Room Protection}} | |||
| + | * '''Slot 3''': {{Aiming Systems Modification 1}} '''or''' {{Main Battery Modification 2}} | |||
| + | * '''Slot 4''': {{Propulsion Modification 1}} | |||
| |CommanderSkills=<!-- write text about best set of Commander Skills below --> | |CommanderSkills=<!-- write text about best set of Commander Skills below --> | |||
| ? | ||||
| ? | + | {{Commander Skills 3 DD | ||
| + | <!-- Ratings 1,2,3 are legit. Others are ignored.--> | |||
| + | | rating11 = 1 <!-- Grease the Gears --> | |||
| + | | rating12 = <!-- Liquidator --> | |||
| + | | rating13 = <!-- Consumables Specialist --> | |||
| + | | rating14 = <!-- Gun Feeder --> | |||
| + | | rating15 = <!-- Incoming Fire Alert --> | |||
| + | | rating16 = 2 <!-- Preventive Maintenance --> | |||
| ? | + | | rating21 = <!-- Pyrotechnician --> | ||
| + | | rating22 = 2 <!-- Swift Fish --> | |||
| + | | rating23 = 2 <!-- Consumables Enhancements --> | |||
| + | | rating24 = <!-- Extra-Heavy AP Shells --> | |||
| + | | rating25 = <!-- Priority Target --> | |||
| + | | rating26 = 3 <!-- Last Stand --> | |||
| ? | + | | rating31 = <!-- Main Battery & AA Specialist --> | ||
| + | | rating32 = 2 <!-- Fill the Tubes --> | |||
| + | | rating33 = 2 <!-- Adrenaline Rush --> | |||
| + | | rating34 = <!-- Inertial Fuse for HE Shells --> | |||
| + | | rating35 = <!-- Superintendent --> | |||
| + | | rating36 = 1 <!-- Survivability Expert --> | |||
| ? | + | | rating41 = <!-- Main Battery & AA Expert --> | ||
| ? | | | + | | rating42 = 2 <!-- Swift in Silence --> | |
| ? | + | | rating43 = 1 <!-- Radio Location --> | ||
| ? | + | | rating44 = <!-- Fearless Brawler --> | ||
| ? | | | + | | rating45 = 3 <!-- Concealment Expert --> | |
| ? | + | | rating46 = <!-- Dazzle --> | ||
| ? | + | |||
| ? | + | |||
| ? | + | |||
| ? | + | |||
| ? | + | |||
| ? | + | |||
| ? | | | + | ||
| ? | | | + | ||
| ? | | | + | ||
| ? | + | |||
| ? | + | |||
| ? | + | |||
| ? | + | |||
| ? | + | |||
| ? | | | + | ||
| ? | + | |||
| ? | + | |||
| ? | + | |||
| ? | + | |||
| ? | + | |||
| ? | + | |||
| ? | + | |||
| ? | + | |||
| ? | + | |||
| ? | + | |||
| ? | + | |||
| ? | + | |||
| ? | + | |||
| ? | + | |||
| ? | + | |||
| }} | }} | |||
| |Consumables=<!-- write text about selection of Consumables below --> | |Consumables=<!-- write text about selection of Consumables below --> | |||
| ? | + | ''{{#var:ship_name}}'' equips the following consumables: | ||
| + | * '''Slot 1:''' {{Damage Control Party}} | |||
| + | * '''Slot 2:''' {{Smoke Generator}} | |||
| + | * '''Slot 3:''' {{Engine Boost}} | |||
| |Camouflage=<!-- write text about useful camouflage below --> | |Camouflage=<!-- write text about useful camouflage below --> | |||
| ? | [[Ship:Camouflage#Standard Camouflage|Type 1, 2, or 5 camouflage]] can be equipped for credits; Types 1 or 5 are recommended at a minimum to reduce | + | [[Ship:Camouflage#Standard Camouflage|Type 1, 2, or 5 camouflage]] can be equipped for credits; Types 1 or 5 are recommended at a minimum to reduce detectability range. | |
| ? | Players who wish to spend doubloons can equip '' | + | Players who wish to spend doubloons can equip ''{{#var:ship_name}}'' with [[Ship:Camouflage#Permanent_Camouflage|Type 17 camouflage]] that lowers her detection radius, reduces the accuracy of incoming shells, reduces her repair costs, and increases the amount of experience she earns. | |
| |Signals=<!-- write text about best set of signals below --> | |Signals=<!-- write text about best set of signals below --> | |||
| '''For players looking for a competitive playstyle,''' it is highly recommended to mount the following signals: Juliet Charlie, Sierra Mike, November Foxtrot, Victor Lima, India X-Ray, and Juliet Whiskey Unaone. | '''For players looking for a competitive playstyle,''' it is highly recommended to mount the following signals: Juliet Charlie, Sierra Mike, November Foxtrot, Victor Lima, India X-Ray, and Juliet Whiskey Unaone. | |||
| ? | Juliet Charlie protects the player from the increased potential detonation chances which India X-Ray and Juliet Whiskey Unaone give. In exchange, the two flags provide a potential increase in damage (+0.5% fire chance and +15% chance to causing flooding respectively). There is no need to worry about Victor Lima's debuff (+4% chance of getting flooding), as '' | + | Juliet Charlie protects the player from the increased potential detonation chances which India X-Ray and Juliet Whiskey Unaone give. In exchange, the two flags provide a potential increase in damage (+0.5% fire chance and +15% chance to causing flooding respectively). There is no need to worry about Victor Lima's debuff (+4% chance of getting flooding), as ''{{#var:ship_name}}'' is a destroyer and will most likely not survive a torpedo strike. | |
| ? | Sierra Mike provides '' | + | Sierra Mike provides ''{{#var:ship_name}}'' a healthy boost to her speed (38 kts to 40 kts), and November Foxtrot provides that small but potentially life-saving decrease in cooldown timer for the mounted consumables. | |
| '''Players looking for a more relaxed play or simply grinding down the line''' are highly recommended to mount the following signals: Equal Speed Charlie London, Juliet Charlie, Sierra Mike, Zulu, November Foxtrot, and Zulu Hotel. | '''Players looking for a more relaxed play or simply grinding down the line''' are highly recommended to mount the following signals: Equal Speed Charlie London, Juliet Charlie, Sierra Mike, Zulu, November Foxtrot, and Zulu Hotel. | |||
| Again, Equal Speed Charlie London will help speed up the player's XP grind and Zulu will help make a little extra credits for the player during the grind. Sierra Mike will give a more comfortable speed for players who wish to be able to cruise to their next target location during a battle. Juliet Charlie is optional for players who dislike being detonated. November Foxtrot is also optional, but if the player dislikes dealing with a disabled engine, rudder, or other vital module, then this can be coupled with premium Damage Control Party II for a more relaxing play. Zulu Hotel will increase commander training and retraining (if the player chose to use his captain from the preceding Tier VI destroyer ''Fubuki''). | Again, Equal Speed Charlie London will help speed up the player's XP grind and Zulu will help make a little extra credits for the player during the grind. Sierra Mike will give a more comfortable speed for players who wish to be able to cruise to their next target location during a battle. Juliet Charlie is optional for players who dislike being detonated. November Foxtrot is also optional, but if the player dislikes dealing with a disabled engine, rudder, or other vital module, then this can be coupled with premium Damage Control Party II for a more relaxing play. Zulu Hotel will increase commander training and retraining (if the player chose to use his captain from the preceding Tier VI destroyer ''Fubuki''). | |||
| + | ||||
| + | {{Signal Flags | |||
| + | ||||
| + | | November Echo Setteseven = | |||
| + | | Mike Yankee Soxisix = | |||
| + | | India X-Ray = 2 | |||
| + | | Juliet Yankee Bissotwo = | |||
| + | | Victor Lima = 2 | |||
| + | | Hotel Yankee = | |||
| + | ||||
| + | | November Foxtrot = 3 | |||
| + | | Sierra Mike = 3 | |||
| + | | India Delta = | |||
| + | | Juliet Whiskey Unaone = 3 | |||
| + | | India Yankee = | |||
| + | | Juliet Charlie = 2 | |||
| + | ||||
| + | | Zulu = 1 | |||
| + | | India Bravo Terrathree = | |||
| + | | Equal Speed Charlie London = 2 | |||
| + | | Zulu Hotel = 1 | |||
| + | | Papa Papa = | |||
| + | ||||
| + | | Wyvern = 1 | |||
| + | | Red Dragon = 2 | |||
| + | | Dragon Flag = 1 | |||
| + | | Ouroboros = | |||
| + | | Hydra = 2 | |||
| + | ||||
| + | }} | |||
| |Gallery=<!-- write below list of files with description (if necessary) separated with | --><gallery> | |Gallery=<!-- write below list of files with description (if necessary) separated with | --><gallery> | |||
| Line 144: | Line 172: | |||
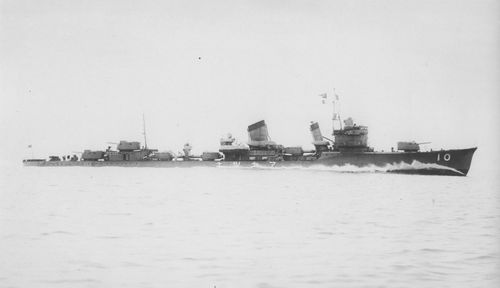
| ====Design==== | ====Design==== | |||
| ? | ''Akatsuki'' (暁 Dawn?) was the twenty-first ''[[Fubuki]]''-class destroyer, or the lead ship of the ''Akatsuki'' class (if that sub-class is regarded as a separate class), built for the Imperial Japanese Navy in the inter-war period. When introduced into service, these ships were the most powerful destroyers in the world. They remained formidable weapons systems well into the Pacific War. | + | ''Akatsuki'' (暁 Dawn?) was the twenty-first ''[[Fubuki]]''-class destroyer, or the lead ship of the ''Akatsuki'' class (if that sub-class is regarded as a separate class), built for the Imperial Japanese Navy in the inter-war period. Due to more efficient boilers, only 3, rather than 4, where installed, giving a distinctive look with a smaller round forefunnel. Subsequent Imperial Japanese Navy destroyers would later use 3 boilers for the same configuration of 2 steam turbines driving two shafts. When introduced into service, these ships were the most powerful destroyers in the world. They remained formidable weapons systems well into the Pacific War. | |
| ====Service==== | ====Service==== | |||
| Line 166: | Line 194: | |||
| |Video=<!-- put below video clips with using template VideoYT. You can use html-tags for formatting. --> | |Video=<!-- put below video clips with using template VideoYT. You can use html-tags for formatting. --> | |||
| + | {{VideoYT|CYQaQF4Q2W4}} | |||
| |Ref= <!-- write below --> | |Ref= <!-- write below --> | |||
| + | # [https://en.wikipedia.org/wiki/Japanese_destroyer_Akatsuki_(1932) Japanese destroyer ''Akatsuki'' (1932) - Wikipedia] | |||
| + | # [https://en.wikipedia.org/wiki/Akatsuki-class_destroyer_(1931) ''Akatsuki''-class destroyer (1931) - Wikipedia] | |||
| + | # [https://worldofwarships.com/en/news/history/armada-akatsuki/ Armada: IJN Akatsuki (no YouTube video) - News - World of Warships] | |||
| + | # [https://www.youtube.com/watch?v=CYQaQF4Q2W4 Japanese Destroyers - Akatsuki - World of Warships Official Channel - YouTube] | |||
| }}<!-- DO NOT DELETE THIS LINE. DO NOT INSERT ANYTHING BELOW THIS LINE --> | }}<!-- DO NOT DELETE THIS LINE. DO NOT INSERT ANYTHING BELOW THIS LINE --> | |||
Revision as of 22:14, 12 March 2021

| Research price63000 exp |
| Purchase price5,100,000 |
| Hit Points11,600 |
| 127 mm/50 3rd Year Type on a Type B mount3 х 2 pcs. |
| Rate of Fire8 shots/min. |
| Reload Time7.5 sec. |
| Rotation Speed6.9 deg./sec. |
| 180 Degree Turn Time26.09 sec. |
| Firing Range9.43 km. |
| Maximum Dispersion92 m. |
| HE Shell127 mm HE Type1 |
| Maximum HE Shell Damage2,150 |
| Chance of Fire on Target Caused by HE Shell9 % |
| Initial HE Shell Velocity915 m./s. |
| HE Shell Weight23 kg. |
| AP Shell127 mm AP Type0 |
| Maximum AP Shell Damage2,200 |
| Initial AP Shell Velocity915 m./s. |
| AP Shell Weight23 kg. |
| 610 mm Triple3 х 3 pcs. |
| Rate of Fire0.86 shots/min. |
| Reload Time70 sec. |
| Rotation Speed25 deg./sec. |
| 180 Degree Turn Time7.2 sec. |
| TorpedoType8 mod. 2 |
| Maximum Damage16,267 |
| Torpedo Speed59 knot |
| Torpedo Range9.99 km. |
| 127 mm/50 3rd Year Type on a Type B mount3 х 2 pcs. |
| . . . Average Damage per Second30.3 |
| . . . Firing Range5.01 km. |
| 25 mm/60 Type 96 on a single mount4 х 1 pcs. |
| . . . Average Damage per Second7.2 |
| . . . Firing Range2.49 km. |
| Maximum Speed38 knot |
| Turning Circle Radius640 m. |
| Rudder Shift Time4.5 sec. |
| Surface Detectability Range7.16 km. |
| Air Detectability Range3.02 km. |

Akatsuki — Japanese Tier VII destroyer.
The third batch of "special type" destroyers featured a slightly shorter hull and reduced displacement. This was achieved by boosting the steam capacity of the boilers, which in turn led to a reduction in their quantity. Akatsuki was laid down in February 1930 and was assigned to Destroyer Division 6 two years later. During World War II, she covered the Japanese landings in Malaya, the Dutch East Indies, and the Philippines, and she participated in the Solomon Islands campaign. In 1942, Akatsuki was sunk during the Battle of Guadalcanal by a task force comprising U.S. Navy cruisers and destroyers.
Modules
 |
Rate of Fire (shots/min) | 180° Turn Time (sec) | Maximum Dispersion (m) | Maximum HE Shell Damage (HP) | Chance of Fire on Target Caused by HE Shell (%) | Maximum AP Shell Damage (HP) |
Research price (exp) |
Purchase price ( | |
|---|---|---|---|---|---|---|---|---|---|
| 127 mm/50 3rd Year Type on a Type B mount | 8 | 26.1 | 92 | 2,150 | 9 | 2,200 | 0 | 390,000 |
 |
Hit Points (HP) | Armor (mm) | Armor (mm) | Main Turrets (pcs.) | Secondary Gun Turrets (pcs.) | AA Mounts (pcs.) | Torpedo Tubes (pcs.) | Hangar Capacity (pcs.) |
Research price (exp) |
Purchase price ( | |
|---|---|---|---|---|---|---|---|---|---|---|---|
| Akatsuki (A) | 11,600 | 6 | 20 | 3 | 4/3 | 3 | 0 | 500,000 | |||
| Akatsuki (B) | 13,100 | 6 | 20 | 3 | 2/1/4/3 | 3 | 12,400 | 1,100,000 |
 |
Rate of Fire (shots/min) | Torpedo Tubes Reload Time (sec) | 180° Turn Time (sec) | Maximum Damage (HP) | Torpedo Speed (knot) | Torpedo Range (km) |
Research price (exp) |
Purchase price ( | |
|---|---|---|---|---|---|---|---|---|---|
| Type8 mod. 2 | 0.9 | 70 | 7.2 | 16,266 | 59 | 10 | 0 | 400,000 | |
| Type90 mod. 1 | 0.8 | 76 | 7.2 | 17,233 | 62 | 10 | 16,400 | 1,300,000 |
 |
IDS_SHIP_PARAM_SUO_INCREASE_DIST (%) | Maximum Firing Range (km) |
Research price (exp) |
Purchase price ( | |
|---|---|---|---|---|---|
| Type7 mod. 1 | 0 | 0 | 235,000 | ||
| Type7 mod. 2 | 0 | 6,200 | 500,000 |
 |
Maximum Speed (knot) |
Research price (exp) |
Purchase price ( | |
|---|---|---|---|---|
| Propulsion: 50,000 hp | 38 | 0 | 350,000 |
Compatible Upgrades
| Slot 1 |
|||||
|---|---|---|---|---|---|
| Slot 2 |
|||||
| Slot 3 |
|||||
| Slot 4 |
Player Opinion
Performance
Akatsuki is the Tier VII entry in the IJN "torpedo boat" tech tree branch. While she can salvo one more torpedo than her "gunboat" counter-part Shiratsuyu, ironically she cannot equip the latter's Torpedo Reload Booster. Akatsuki also has a larger — and dual-purpose — main battery, raising questions as to which is the gunboat and which the torpedo boat.
In many ways, Akatsuki is a side-grade from Fubuki. She is largely the same as her immediate predecessor, with a few minor improvements.
Chief among these is a notable increase in her top speed. One of Fubuki’s more irksome negatives is her maximum speed of 35 knots; Akatsuki’s top speed bumps up to 38 knots. Her handling characteristics are almost the same as Fubuki as well, retaining her turning circle radius while losing time on rudder shift. Also improving is Akatsuki’s main battery. Though her guns are not her main damage dealer, she picks up two more barrels via an additional turret on the aft end of the ship. This makes her a more significant threat when she does decide to open up with her guns. The turrets themselves are the same as those on Fubuki, and they reload a little faster.
Akatsuki’s primary armament is in the same configuration as Fubuki’s — three triple-tube torpedo launchers — while having access to slightly better torpedoes in terms of damage. Her detection radius is slightly higher than her immediate predecessor's as well, so captains will have to be a touch more cautious in their positioning when there are enemy gunboat destroyers — such as Mahan or Kiev — in the mix. She is as vulnerable to enemy aircraft as most other destroyers as well, so when and enemy carrier is present, cautious play is recommended.
While Akatsuki is not a huge upgrade from Fubuki, the upgrades she does get are key to allowing her to remain competitive in her tier.Pros:
- Six main battery guns.
- HE shells have good damage and good fire chance.
- Three triple-tube torpedo launchers give her good flexibility.
- Excellent top speed.
- Good overall handling characteristics.
Cons:
- Large detection radius.
- Health pool is on the low end for Tier VII destroyers.
- Main battery has the characteristic low reload and sluggish turrets of IJN DDs.
- Lacks access to the Torpedo Reload Booster
 consumable that Shiratsuyu gets.
- Anti-aircraft suite is weak, but with a dual-purpose main battery it's a big improvement for the IJN.
Research
Optimal Configuration
Upgrades
The recommended upgrades for Akatsuki are as follows:
- Slot 1: Main Armaments Modification 1

- Slot 2: Engine Room Protection

- Slot 3: Aiming Systems Modification 1
 or Main Battery Modification 2
- Slot 4: Propulsion Modification 1

Commander Skills
| Recommended Commander Skills | ||||||
|---|---|---|---|---|---|---|
| Cost (points) |
Attack | Defense | ||||
| 1 |
★ |
|
|
|
|
★★ |
| 2 |
|
★★ |
★★ |
|
|
★★★ |
| 3 |
|
★★ |
★★ |
|
|
★ |
| 4 |
|
★★ |
★ |
|
★★★ |
|
| Key: ★★★ - Extremely Useful ★★ - Frequently Useful ★ - Occasionally Useful No stars - Not Useful | ||||||
Consumables
Akatsuki equips the following consumables:
- Slot 1: Damage Control Party

- Slot 2: Smoke Generator

- Slot 3: Engine Boost

Camouflage
Type 1, 2, or 5 camouflage can be equipped for credits; Types 1 or 5 are recommended at a minimum to reduce detectability range.
Players who wish to spend doubloons can equip Akatsuki with Type 17 camouflage that lowers her detection radius, reduces the accuracy of incoming shells, reduces her repair costs, and increases the amount of experience she earns.
Signals
For players looking for a competitive playstyle, it is highly recommended to mount the following signals: Juliet Charlie, Sierra Mike, November Foxtrot, Victor Lima, India X-Ray, and Juliet Whiskey Unaone.
Juliet Charlie protects the player from the increased potential detonation chances which India X-Ray and Juliet Whiskey Unaone give. In exchange, the two flags provide a potential increase in damage (+0.5% fire chance and +15% chance to causing flooding respectively). There is no need to worry about Victor Lima's debuff (+4% chance of getting flooding), as Akatsuki is a destroyer and will most likely not survive a torpedo strike.
Sierra Mike provides Akatsuki a healthy boost to her speed (38 kts to 40 kts), and November Foxtrot provides that small but potentially life-saving decrease in cooldown timer for the mounted consumables.
Players looking for a more relaxed play or simply grinding down the line are highly recommended to mount the following signals: Equal Speed Charlie London, Juliet Charlie, Sierra Mike, Zulu, November Foxtrot, and Zulu Hotel.
Again, Equal Speed Charlie London will help speed up the player's XP grind and Zulu will help make a little extra credits for the player during the grind. Sierra Mike will give a more comfortable speed for players who wish to be able to cruise to their next target location during a battle. Juliet Charlie is optional for players who dislike being detonated. November Foxtrot is also optional, but if the player dislikes dealing with a disabled engine, rudder, or other vital module, then this can be coupled with premium Damage Control Party II for a more relaxing play. Zulu Hotel will increase commander training and retraining (if the player chose to use his captain from the preceding Tier VI destroyer Fubuki).
Recommended Signal Flags 
| |||||
|---|---|---|---|---|---|
| Combat | |||||
 ★★ |

|

|

|
 ★★ |
 ★★ |
 ★★★ |

|

|
 ★★★ |
 ★★★ |

|

|

| ||||
Note: Use of the Juliet Charlie signal makes detonation impossible.
Gallery
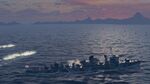
Akatsuki fires torpedoes at incoming battleships.
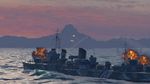
Akatsuki engages another enemy Akatsuki.
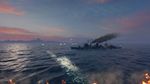
Under enemy fire, Akatsuki attempts to dodge enemy torpedoes.
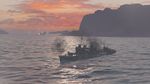
Akatsuki fires at an enemy Atago from within her smokescreen.


Historical Info
Historical Gallery


Video
References
- Japanese destroyer Akatsuki (1932) - Wikipedia
- Akatsuki-class destroyer (1931) - Wikipedia
- Armada: IJN Akatsuki (no YouTube video) - News - World of Warships
- Japanese Destroyers - Akatsuki - World of Warships Official Channel - YouTube