Aoba
| Revision as of 03:05, 2 August 2018 Removed reference to Cleveland as Tier VI cruiser and added links for Furutaka and Mogami | Revision as of 02:08, 16 January 2019 Edited reference to Cleveland in cons which was no longer applicable | |||
| Line 36: | Line 36: | |||
| * Slow speed of the torpedoes. | * Slow speed of the torpedoes. | |||
| * Deck armor can be smashed even with destroyer guns. | * Deck armor can be smashed even with destroyer guns. | |||
| ? | * Slower firing rate of guns compared to equivalent tier cruisers means it can set fires | + | * Slower firing rate of guns compared to many equivalent tier cruisers means that while it can still set fires, it will not do so as frequently. | |
| |Research=<!-- write text about priority sequence of research below --> | |Research=<!-- write text about priority sequence of research below --> | |||
Revision as of 02:08, 16 January 2019

| Research price30000 exp |
| Purchase price2,660,000 |
| Hit Points30,500 |
| 203 mm/50 3rd Year Type No.2 in a Model C turret3 х 2 pcs. |
| Rate of Fire5.45 shots/min. |
| Reload Time11 sec. |
| Rotation Speed5 deg./sec. |
| 180 Degree Turn Time36 sec. |
| Firing Range13.55 km. |
| Maximum Dispersion116 m. |
| HE Shell203 mm HE Type0 |
| Maximum HE Shell Damage3,300 |
| Chance of Fire on Target Caused by HE Shell17 % |
| Initial HE Shell Velocity840 m./s. |
| HE Shell Weight125.85 kg. |
| AP Shell203 mm AP Type91 |
| Maximum AP Shell Damage4,700 |
| Initial AP Shell Velocity840 m./s. |
| AP Shell Weight125.85 kg. |
| 120 mm/45 10th Year Type on a Model B2 mount4 х 1 pcs. |
| Firing Range4.96 km. |
| Rate of Fire10 shots/min. |
| Reload Time6 sec. |
| HE Shell120 mm HE Type0 |
| Maximum HE Shell Damage2,000 |
| Initial HE Shell Velocity825 m./s. |
| Chance of Fire on Target Caused by HE Shell8 % |
| 610 mm Quad2 х 4 pcs. |
| Rate of Fire0.59 shots/min. |
| Reload Time102 sec. |
| Rotation Speed25 deg./sec. |
| 180 Degree Turn Time7.2 sec. |
| TorpedoType8 mod. 2 |
| Maximum Damage16,267 |
| Torpedo Speed59 knot |
| Torpedo Range9.99 km. |
| 120 mm/45 10th Year Type on a Model B2 mount4 х 1 pcs. |
| . . . Average Damage per Second20.4 |
| . . . Firing Range4.5 km. |
| 13 mm/76 Type 93 on a twin mount15 х 2 pcs. |
| . . . Average Damage per Second30 |
| . . . Firing Range1.2 km. |
| 25 mm/60 Type 96 on a twin mount2 х 2 pcs. |
| . . . Average Damage per Second5.4 |
| . . . Firing Range2.49 km. |
| Maximum Speed35 knot |
| Turning Circle Radius710 m. |
| Rudder Shift Time8.4 sec. |
| Surface Detectability Range11.7 km. |
| Air Detectability Range5.78 km. |

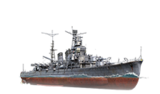
Aoba — Japanese Tier VI cruiser.
Aoba represented a further development of Furutaka with main battery guns placed in twin turrets to achieve a longer gun range. Moreover, she outstripped her predecessor in torpedo armament power and AA defense capabilities.
Modules
 |
Rate of Fire (shots/min) | 180° Turn Time (sec) | Maximum Dispersion (m) | Maximum HE Shell Damage (HP) | Chance of Fire on Target Caused by HE Shell (%) | Maximum AP Shell Damage (HP) |
Research price (exp) |
Purchase price ( | |
|---|---|---|---|---|---|---|---|---|---|
| 203 mm/50 3rd Year Type No.2 in a Model C turret | 5.5 | 36 | 116 | 3,300 | 17 | 4,700 | 0 | 240,000 |
 |
Hit Points (HP) | Armor (mm) | Armor (mm) | Main Turrets (pcs.) | Secondary Gun Turrets (pcs.) | AA Mounts (pcs.) | Torpedo Tubes (pcs.) | Hangar Capacity (pcs.) |
Research price (exp) |
Purchase price ( | |
|---|---|---|---|---|---|---|---|---|---|---|---|
| Aoba (A) | 30,500 | 6 | 105 | 3 | 4 | 15/2/4 | 2 | 0 | 380,000 | ||
| Aoba (B) | 31,900 | 6 | 105 | 3 | 4 | 15/2/4 | 2 | 14,000 | 980,000 |
 |
Rate of Fire (shots/min) | Torpedo Tubes Reload Time (sec) | 180° Turn Time (sec) | Maximum Damage (HP) | Torpedo Speed (knot) | Torpedo Range (km) |
Research price (exp) |
Purchase price ( | |
|---|---|---|---|---|---|---|---|---|---|
| Type8 mod. 2 | 0.6 | 102 | 7.2 | 16,266 | 59 | 10 | 0 | 400,000 |
 |
IDS_SHIP_PARAM_SUO_INCREASE_DIST (%) | Maximum Firing Range (km) |
Research price (exp) |
Purchase price ( | |
|---|---|---|---|---|---|
| Type6 mod. 1 | 0 | 0 | 240,000 | ||
| Type6 mod. 2 | 0 | 6,000 | 520,000 |
 |
Maximum Speed (knot) |
Research price (exp) |
Purchase price ( | |
|---|---|---|---|---|
| Propulsion: 102,000 hp | 35 | 0 | 180,000 |
Compatible Upgrades
| Slot 1 |
|||||
|---|---|---|---|---|---|
| Slot 2 |
|||||
| Slot 3 |
|||||
| Slot 4 |
Player Opinion
Performance
The Aoba isn't really much of a departure from her predecessor the Furutaka. In fact, ever since the addition of the Hull C upgrade to the Furutaka, which gives the Furutaka the exact same loadout as the Aoba, the Aoba's role as a 'seat adjuster' to get you accustomed to the aspects of the Japanese heavy cruiser has become redundant. That being said, if the Furutaka is the seat, then Aoba is still pretty much you sinking into the seat as it solidifies aspects of the Japanese cruisers introduced in the Furutaka. It's still an anti-ship combatant, it's still a skirmisher that specializes in medium to long ranges, it's still a ship that requires other ships to draw fire or to support in order to do well in. It's still a very good vessel to be a captain in, so long as you know her well.
One of the things you will notice is the slightly less responsive(but common to the next two tiers, culminating in the Mogami's superslow 155 mm gun turrets) turrets and improved loading time of 4 seconds at best over her predecessor. Her responsiveness to fluid situations is also vastly improved for a Japanese cruiser. This allows you to be where you are needed and support when it is asked. It is with this that the Aoba can smash tier V light cruisers with ease and be a wary force for other heavy cruisers and battleships but not so much with carriers as her AA suite is sufficient to only defend herself alone.
Her torpedoes are nothing special with the addition of the C hull for Furutaka and the much older 10 km torpedo addition, but, perplexingly, their reload is longer. Unfortunately, the positioning of them at the rear of the ship is a sort of downgrade from the Furutaka. Granted, this makes the Aoba a dangerous ship to chase, but it also makes it more obvious for enemy players to figure out when you launch torpedoes, as the rear mounts require you to turn the ship quite hard. Annoyingly enough, these rear mounted torpedoes also creates a blind spot where you cannot spot friendly ships trying to pass close to you.
It's best that you let the Aoba behave as an anti-ship combatant rather than a solid AA screen. Yet, considering how useless Hydroacoustic search is in detecting destroyers, it's simply better to stick with the Defensive Fire cooldown and use it to at least disrupt enemy torpedo and dive bombers. The Aoba retains the narrow hull of the Furutaka and thus can bow in and expect to not be hit by battleship guns at longer ranges allowing continued fire. Combined with her excellent maneuverability and fast reverse speed of 17 knots holding that head on is rather easy and can still allow to you dodge the occasional torpedo salvo if coming from the front and the rear.
Pros:
- Retains the narrow hull of Furutaka making this ship a beast in head on situations
- Additional armor compared to Furutaka.
- Rate of fire beats any Japanese heavy cruiser.
- Few researchable modules.
- Good torpedo range for a heavy cruiser.
- Reasonable AA suite.
- Good anti-destroyer and anti-cruiser screen.
- Guns beat the equivalent ships of other nations, much better for dealing with cruisers of the equivalent tier.
- Fast. It can make 35 knots and has fairly quick acceleration, allowing it to keep up, outrun and support destroyers.
- Better turning circle than Furutaka makes it slightly easier to re-position and dodge shells.
- Gains Upgrade Slot 4. This is very helpful as Aoba frequently is up-tiered in Tier VIII battles, where battleships get seriously more threatening with better accuracy and of course shell damage.
Cons:
- Retains the same ergonomics as her predecessor such as citadel size.
- The armor is thicker, but it's still a Japanese cruiser making it dangerous to go toe to toe in prolonged engagements.
- Torpedo tubes have a very limited launching arc. In fact, the rear mounted torpedoes make it obvious to experienced players when you're shooting them and necessitate the ship to show it's broadside to enemies.
- Slow speed of the torpedoes.
- Deck armor can be smashed even with destroyer guns.
- Slower firing rate of guns compared to many equivalent tier cruisers means that while it can still set fires, it will not do so as frequently.
Research
Optimal Configuration
Upgrades
- Slot 1: Main Armaments Modification 1
 keeps the guns and torpedo tubes active and firing.
- Slot 1: Damage Control System Modification 1
 makes the ship more resistant to fires and flooding.
- Slot 3: Aiming Systems Modification 1
 gives her guns more accuracy.
- Slot 4: Steering Gears Modification 2
 allows for a faster rudder shift to dodge incoming fire.
Commander Skills
The key skills for Aoba are nearly identical to those used on Furutaka. They include Expert Loader at Level 1, Expert Marksman at Level 2, Demolition Expert at Level 3, and Concealment Expert at Level 4. Captains who use the ship’s torpedoes often may find Torpedo Armament Expertise useful for reducing the reload time of the launchers. Last Stand is recommended to those who often find their engine or rudder incapacitated. Lastly, Basic Firing Training and Advanced Firing Training can be taken to improve upon the ship’s anti-aircraft armament.
| Recommended Commander Skills | ||||||||
|---|---|---|---|---|---|---|---|---|
| Cost (points) |
Endurance | Attack | Support | Versatility | ||||
| 1 |
★★ |
★★ |
★★★ |
|
|
|
★ |
|
| 2 |
★★ |
★ |
★★★ |
★ |
|
|
★★ |
★★ |
| 3 |
★★ |
|
★★ |
|
★ |
★★ |
★★ |
★★ |
| 4 |
|
|
|
|
★★ |
|
★★ |
★★★ |
| Key: ★★★ - Extremely Useful ★★ - Frequently Useful ★ - Occasionally Useful No stars - Meh Χ - Not recommended | ||||||||
Consumables
Aoba can equip the following consumables:
- Slot 1: Damage Control Party

- Slot 2: Defensive AA Fire
 or Hydroacoustic Search
- Slot 3: Catapult Fighter

Premium version of all consumables are useful to reduce the cooldowns.
Camouflage
Type 1, 2, or 5 camouflage can be equipped for credits; Types 2 or 5 are recommended at a minimum to reduce the accuracy of incoming shells.
Players who wish to spend doubloons can equip Aoba with Type 16 camouflage that lowers her detection radius, reduces the accuracy of incoming shells and increases the amount of experience she earns.
Signals
Aoba captains should mount the standard flags to improve the ship's performance in battle. To improve upon the ship's armaments, India X-Ray (![]() ), Victor Lima (
), Victor Lima (![]() ), and Juliet Whiskey Unaone (
), and Juliet Whiskey Unaone (![]() ) flags are recommended to increase the fire chance and flooding chances respectively. To improve the ship’s survivability, captains should mount November Foxtrot (
) flags are recommended to increase the fire chance and flooding chances respectively. To improve the ship’s survivability, captains should mount November Foxtrot (![]() ) and India Yankee (
) and India Yankee (![]() ) flags. Sierra Mike (
) flags. Sierra Mike (![]() ) flags are recommended to increase the ship’s already high top speed. Lastly, economic and special signal flags can be mounted to improve the ship’s economic gains per battle.
) flags are recommended to increase the ship’s already high top speed. Lastly, economic and special signal flags can be mounted to improve the ship’s economic gains per battle.
Recommended Signal Flags 
| |||||
|---|---|---|---|---|---|
| Combat | |||||
 ★ |

|
 ★★ |
 ★ |
 ★★★ |
 ★★ |
 ★ |
 ★ |
 ★★ |
 ★★★ |
 ★★ |

|

|

| ||||
Note: Use of the Juliet Charlie signal makes detonation impossible.
Gallery
Historical Info
Historical Gallery

