Asashio
| Revision as of 13:58, 19 April 2018 Added service history. | Revision as of 16:05, 19 April 2018 Polish of historical section. | |||
| Line 10: | Line 10: | |||
| |Performance=<!-- write text about performance in battles below --> | |Performance=<!-- write text about performance in battles below --> | |||
| ? | ||||
| ? | ||||
| ? | ||||
| ? | ||||
| ? | ||||
| ? | ||||
| ? | ||||
| ''{{#var:ship_name}}'' is externally very comparable to her tier eight compatriot ''[[Ship:Kagero|Kagero]]''. They share nigh identical or very close concealment ratings, maneuverability statistics, guns, and health. The two ships are ''extremely'' similar, but ''{{#var:ship_name}}'' is saved from being a strict clone but her unique torpedo armaments, and by having the {{Torpedo Reload Booster}} occupying a separate consumable slot—as in ''[[Ship:Akizuki|Akizuki's]]'' case. | ''{{#var:ship_name}}'' is externally very comparable to her tier eight compatriot ''[[Ship:Kagero|Kagero]]''. They share nigh identical or very close concealment ratings, maneuverability statistics, guns, and health. The two ships are ''extremely'' similar, but ''{{#var:ship_name}}'' is saved from being a strict clone but her unique torpedo armaments, and by having the {{Torpedo Reload Booster}} occupying a separate consumable slot—as in ''[[Ship:Akizuki|Akizuki's]]'' case. | |||
| Line 36: | Line 29: | |||
| |Research=<!-- write text about priority sequence of research below --> | |Research=<!-- write text about priority sequence of research below --> | |||
| ? | + | As a premium ship, ''{{#var:ship_name}}'' doesn't have any upgrades to research. | ||
| ? | + | |||
| ? | + | |||
| ? | + | |||
| ? | + | |||
| ? | + | |||
| ? | + | |||
| ? | + | |||
| ? | + | |||
| ? | As a premium ship, ''{{#var:ship_name}}'' doesn't have any upgrades to research. | + | ||
| |OptimalConfiguration=<!-- write some general text about selection of optimal configuration below (optional)--> | |OptimalConfiguration=<!-- write some general text about selection of optimal configuration below (optional)--> | |||
| Line 117: | Line 101: | |||
| |Camouflage=<!-- write text about useful camouflage below --> | |Camouflage=<!-- write text about useful camouflage below --> | |||
| ? | + | As a premium ship, ''{{#var:ship_name}}'' comes included with [[Ship:Camouflage#Premium_Camouflage|Type 10 camouflage]] that lowers her detection radius, reduces the accuracy of incoming shells, reduces her repair costs, and increases the amount of experience she earns. | ||
| ? | + | |||
| ? | + | |||
| ? | + | |||
| ? | + | |||
| ? | + | |||
| ? | + | |||
| ? | + | |||
| ? | + | |||
| ? | + | |||
| ? | + | |||
| ? | + | |||
| ? | + | |||
| ? | + | |||
| ? | As a premium ship, ''{{#var:ship_name}}'' comes included with [[Ship:Camouflage#Premium_Camouflage|Type | + | ||
| ? | + | |||
| |Signals=<!-- write text about best set of signals below --> | |Signals=<!-- write text about best set of signals below --> | |||
| Line 228: | Line 197: | |||
| ===Design=== | ===Design=== | |||
| ? | In order to correct the deficiencies found in previous Japanese destroyers, the designers of the ''[[Shiratsuyu]]''-class sacrificed performance for design integrity, a decision they were unable to rectify until Japan withdrew from the London Naval Treaties. The ''Asashio''-class of destroyers | + | In order to correct the deficiencies found in previous Japanese destroyers, the designers of the ''[[Shiratsuyu]]''-class sacrificed performance for design integrity, a decision they were unable to rectify until Japan withdrew from the London Naval Treaties. The ''Asashio''-class of destroyers — part of the 1934 Navy program — were borne out of that necessity of improvement, and history would venerate this class of 10 destroyers to be proficient and capable vessels; they would be the template for all future Japanese destroyer designs till the end of the Second World War. | |
| ? | With | + | With the shackles of treaty limitations cast aside, the designers opted to push standard displacement past 2,000 tons; the first native destroyer design to do so. The increase in length had the positive ramification of improving crew quarters. While the propulsion set-up was identical to the previous class — 3 Kampon boilers feeding into two turbines, each driving a shaft — the designers opted to use the latest available machinery that ran at higher temperatures and pressures. The outcome was an increase of output to about 50,000 shaft horsepower. Despite the increase of tonnage, the class managed to attain speeds to 35 knots. The setup was not perfect, however; ''Asashio'' showed instabilities while turning, which prompted the installation of a modified stern and rudder for the remaining vessels in the class that managed to decrease the turning radius. Other troubles included teething issues with the turbines, which took years to rectify. | |
| ? | The most striking feature was the return to | + | The most striking feature was the return to the dual-gun only armament setup pioneered on the ''[[Fubuki]]''-class. ''Asashio'' featured six 127mm guns found in three turrets: one forward with a super firing pair aft. Unlike her predecessors the 'X'-turret was placed elevated on the shelter deck. The design called for the reuse of the Type C turret mounts, which traded gun elevation angle for a lighter, yet fully enclosed, armor shell. As well, the class retained the improved torpedo layout of their predecessors: two (2) quadruple-tube torpedo launchers positioned along the centerline, with a reload stored for each pack in a deck house. For anti-aircraft defense, the destroyers were armed with a meager pair of the new Type 96 25mm cannons in dual-mounts. | |
| ? | The | + | The bulk of wartime modifications bolstered the sub-par anti-aircraft abilities of the class. The first phase of refits in late 1942 replaced the dual-mounted 25mm guns with triple mounts. The largest refit saw the removal of 'X'-turret in order to install a further pair of triple-mount 25mm guns, and was completed in mid-1944. Late 1944 saw the addition of single-mount 25mm guns all across the forward superstructure. Additionally, all ships of the class received the No. 22 and No. 13 radar sets, installed on the fore and mainmasts, respectively. | |
| ''Asashio'' (朝潮, lit. "Morning Tide"), the lead ship of the class, was the first ship to be laid down on 7 September 1935 at the Sasebo Naval Arsenal. Launched 16 December 1936, she was completed 31 August 1937. | ''Asashio'' (朝潮, lit. "Morning Tide"), the lead ship of the class, was the first ship to be laid down on 7 September 1935 at the Sasebo Naval Arsenal. Launched 16 December 1936, she was completed 31 August 1937. | |||
| ===Service=== | ===Service=== | |||
| ? | + | ''{{#var:ship_name}}'' was the first destroyer of the IJN to have a displacement greater than 2,000 tons. During her initial trials, she suffered from steering problems and issues with her unreliable new 50,000 shaft horsepower turbines, but these flaws were ironed out for the class as a whole by the beginning of the Second World War. Issues aside, the overall design for ''Asashio'' was considered successful, and her design was repeated in the later ''[[Kagero]]'' and ''[[Yūgumo]]'' classes. ''Asashio'' herself spent her pre-war service in training and modernization to fix her outstanding issues, before Japan joined the war. | ||
| ? | At the time of Pearl Harbour, ''Asashio'' was the lead ship of the 8th Destroyer Division, consisting of ''Asashio'', ''Ooshio'', ''Michishio'' and ''Arashio'', stationed in the South China Sea | + | At the time of Pearl Harbour, ''Asashio'' was the lead ship of the 8th Destroyer Division, consisting of ''Asashio'', ''Ooshio'', ''Michishio'' and ''Arashio'', stationed in the South China Sea escorting transports bound for British Malaya and the Dutch East Indies. On 19 February 1942, while DesDiv8 were escorting two transports near Bali in the Dutch East Indies, the destroyers came under attack from a combined Dutch-American-British force consisting of two submarines, seven destroyers, and three cruisers. While the three Dutch light cruisers were decently modern vessels, the American ''[[Clemson]]''-class destroyers were sorely outdated compared to the four ''Asashio''-class destroyers. In the resulting Battle of Badung Strait, ''Asashio'' herself successfully struck the Dutch destroyer HNLMS ''Piet Hein'' with a 61cm torpedo, sinking the Dutch destroyer immediately, suffering only light damage in return. She continued to serve around the Dutch East Indies until late May, when she and her division transferred to the central Pacific. She was present at the Battle of Midway, escorting the Support Group that was covering the troop convoys to Midway. On 6 June during the battle, she came under attack by US planes, taking a hit from a 500-pound bomb and sustaining medium damage. She and sister-ship ''Arashio'' rescued 240 survivors from the sinking heavy cruiser ''Mikuma'', and then escorted badly-damaged ''[[Mogami]]'' back to Truk on 14 June. | |
| ? | Following repairs that stretched into late October 1942, ''Asashio'' returned to the | + | Following repairs that stretched into late October 1942, ''Asashio'' returned to the front lines to take part in the Guadalcanal campaign. She saw no combat during her time serving in the Solomon Islands, making several successful transport runs in the area for the rest of 1942. During this time, she helped light cruiser ''Isuzu'' limp back to port after suffering damage from the Second Naval Battle of Guadalcanal, then towed ''[[Shiratsuyu]]''-class destroyer ''Umikaze'' back to the island of Rabaul for repairs, and later escorted ''Zuikaku'', ''[[Mutsu]]'', and ''Suzuya'' from Truk to mainland Japan. By mid-February 1943 she was back on duty in the southwestern Pacific. While escorting a troop convoy in the Bismarck Sea, she came under attack by a joint US-AUS air strike. The first wave of attacks was devastating: all seven transports took hits that left them burning or sinking, and destroyers ''Tokitsukaze'', ''Shirayuki'' and ''Arashio'' were sunk. The fourth destroyer and final destroyer to sink was ''Asashio''. While picking up survivors from ''Arashio'' the following morning of the strike, a second wave attacked, with a B-17 striking her amidships with a 500-pound bomb, damaging her beyond repair. She sank quickly, going down with roughly 200 of her crew of 226 enlisted men and officers. | |
| |HistoricalGallery=<!-- write below list of files with description (if necessary) separated with | --><gallery> | |HistoricalGallery=<!-- write below list of files with description (if necessary) separated with | --><gallery> | |||
Revision as of 16:05, 19 April 2018

| Purchase price9,300 |
| Hit Points15,100 |
| 127 mm/50 3rd Year Type on a Type C mount3 х 2 pcs. |
| Rate of Fire8.51 shots/min. |
| Reload Time7.05 sec. |
| Rotation Speed6.9 deg./sec. |
| 180 Degree Turn Time26.09 sec. |
| Firing Range10.95 km. |
| Maximum Dispersion97 m. |
| HE Shell127 mm HE Type1 |
| Maximum HE Shell Damage2,150 |
| Chance of Fire on Target Caused by HE Shell9 % |
| Initial HE Shell Velocity915 m./s. |
| HE Shell Weight23 kg. |
| AP Shell127 mm AP Type0 |
| Maximum AP Shell Damage2,200 |
| Initial AP Shell Velocity915 m./s. |
| AP Shell Weight23 kg. |
| 610 mm Quad2 х 4 pcs. |
| Rate of Fire0.54 shots/min. |
| Reload Time112 sec. |
| Rotation Speed25 deg./sec. |
| 180 Degree Turn Time7.2 sec. |
| TorpedoIDS_PJPT032_610_ASASHIO |
| Maximum Damage20,967 |
| Torpedo Speed67 knot |
| Torpedo Range20.01 km. |
| 25 mm/60 Type 96 on a twin mount2 х 2 pcs. |
| . . . Average Damage per Second5.4 |
| . . . Firing Range2.49 km. |
| Maximum Speed35 knot |
| Turning Circle Radius640 m. |
| Rudder Shift Time3.6 sec. |
| Surface Detectability Range6.63 km. |
| Air Detectability Range3.02 km. |

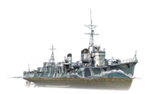
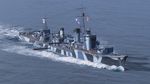
Asashio — Japanese premium Tier VIII destroyer.
Japanese destroyer Asashio was the ultimate ship of this type in Japan, built after the launch of the Fubuki-class ships. The absence of constraints on displacement allowed naval architects to find a good balance between speed, armament, and hull size. Due to a good overall layout, Asashio served as a prototype for the majority of subsequent Japanese destroyers.
Modules
 |
Rate of Fire (shots/min) | 180° Turn Time (sec) | Maximum Dispersion (m) | Maximum HE Shell Damage (HP) | Chance of Fire on Target Caused by HE Shell (%) | Maximum AP Shell Damage (HP) |
Research price (exp) |
Purchase price ( | |
|---|---|---|---|---|---|---|---|---|---|
| 127 mm/50 3rd Year Type on a Type C mount | 8.5 | 26.1 | 97 | 2,150 | 9 | 2,200 | 0 | 0 |
 |
Hit Points (HP) | Armor (mm) | Armor (mm) | Main Turrets (pcs.) | Secondary Gun Turrets (pcs.) | AA Mounts (pcs.) | Torpedo Tubes (pcs.) | Hangar Capacity (pcs.) |
Research price (exp) |
Purchase price ( | |
|---|---|---|---|---|---|---|---|---|---|---|---|
| Asashio | 15,100 | 13 | 20 | 3 | 2 | 2 | 0 | 0 |
 |
Rate of Fire (shots/min) | Torpedo Tubes Reload Time (sec) | 180° Turn Time (sec) | Maximum Damage (HP) | Torpedo Speed (knot) | Torpedo Range (km) |
Research price (exp) |
Purchase price ( | |
|---|---|---|---|---|---|---|---|---|---|
| Type93 mod. 2 dw | 0.5 | 112 | 7.2 | 0 | 0 |
 |
IDS_SHIP_PARAM_SUO_INCREASE_DIST (%) | Maximum Firing Range (km) |
Research price (exp) |
Purchase price ( | |
|---|---|---|---|---|---|
| Type8 mod. 1 | 0 | 0 | 0 |
 |
Maximum Speed (knot) |
Research price (exp) |
Purchase price ( | |
|---|---|---|---|---|
| Propulsion: 50,000 hp | 35 | 0 | 0 |
Compatible Upgrades
| Slot 1 |
|||||
|---|---|---|---|---|---|
| Slot 2 |
|||||
| Slot 3 |
|||||
| Slot 4 |
|||||
| Slot 5 |
Player Opinion
Performance
Asashio is externally very comparable to her tier eight compatriot Kagero. They share nigh identical or very close concealment ratings, maneuverability statistics, guns, and health. The two ships are extremely similar, but Asashio is saved from being a strict clone but her unique torpedo armaments, and by having the Torpedo Reload Booster ![]() occupying a separate consumable slot—as in Akizuki's case.
occupying a separate consumable slot—as in Akizuki's case.
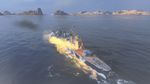
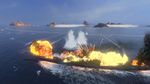
Technically speaking, Asashio is the stealthiest destroyer in her matchmaking spread, having a slightly smaller air detection radius than Kagero and HSF Harekaze. This allows her to do vision control exceedingly well, utilising her stealth as another layer of armor against enemy vessels. Armor she needs, as Asashio's main weapons are her torpedoes, though her guns can be used in certain situations. And it is her torpedoes which make this ship unique, owing to a few unique properties they posses. Namely, Asashio is equipped with deepwater torpedoes somewhat similar to those found on the Pan-Asian destroyer line. They have increased flooding chance, are stealthier, can only hit battleships and aircraft carriers, and have a whooping 20 kilometer range while still retaining 67 knots of speed.
As a result of Asashio only being able to damage battleships and the rare aircraft carrier with her torpedoes, she is highly specialised towards these things. She only has her guns to deal with cruisers and fellow destroyers, leaving her quite vulnerable to both ship types. However, do not be afraid to use Asashio's guns, as strategically engaging certain targets for a capture point can lead to the difference between a win and a loss. Using her concealment to avoid unwinnable fights is also a valid strategy, and can keep her in the game for longer.Pros:
Cons:
Research
Optimal Configuration
Commander Skills
Asashio, like most other Japanese destroyers, makes use of the "standard" destroyer skills; Priority Target, Last Stand, Torpedo Armament Expertise and Concealment Expert. After those four skills, captains can start customizing her to their preferences. The two 3-point skills, Survivability Expert and Superintendent are useful for increasing Asashio's survival and offensive capabilities, while the 1-point skill, Preventative Maintenance, proves to be another common destroyer skill.
Asashio is somewhat unique in that she is one of only a few destroyers that can make good use of the 2-point skill, Torpedo Acceleration, as the -20% range debuff that the skill gives brings her 20 km torpedoes down to 16 km; more than enough range for almost any engagement. The 5 knot boost they give her torpedoes in exchange give them one of the lowest reaction times in-game.
If Torpedo Acceleration isn't to your fancy, all the other 2-point skills, with the exception of Expert Rear Gunner could be used instead.
| Recommended Commander Skills | ||||||||
|---|---|---|---|---|---|---|---|---|
| Cost (points) |
Endurance | Attack | Support | Versatility | ||||
| 1 |
★★★ |
★★ |
★ |
|
|
|
★★ |
|
| 2 |
★ |
★★ |
★★ |
★★★ |
★ |
|
★★ |
★★★ |
| 3 |
★ |
★★★ |
★★★ |
|
★ |
★★ |
★★ |
★ |
| 4 |
|
|
|
|
★ |
|
★ |
★★★ |
| Key: ★★★ - Extremely Useful ★★ - Frequently Useful ★ - Occasionally Useful No stars - Meh Χ - Not recommended | ||||||||
Camouflage
As a premium ship, Asashio comes included with Type 10 camouflage that lowers her detection radius, reduces the accuracy of incoming shells, reduces her repair costs, and increases the amount of experience she earns.Gallery
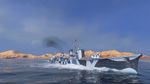
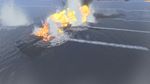
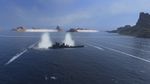
Asashio's deep water torpedoes catch the enemy battleship by surprise.
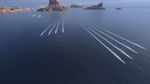
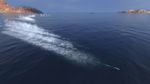
Asashio unleashes two full torpedo salvos in a matter of seconds.


Historical Info
Historical Gallery


