Asashio
| Revision as of 13:49, 23 April 2018 Final polish. | Revision as of 05:10, 10 July 2021 Added mention of being removed for purchase | |||
24 intermediate revisions by 9 users not shown | ||||
| Line 3: | Line 3: | |||
| {{WoWs_Ship | {{WoWs_Ship | |||
| |Promo=<!-- in case of gift or promo ship write conditions to get it. (optional)--> | |Promo=<!-- in case of gift or promo ship write conditions to get it. (optional)--> | |||
| ? | ||||
| |Anno=<!-- you can write below short description for the ship. it will replace default once. --> | |Anno=<!-- you can write below short description for the ship. it will replace default once. --> | |||
| ? | Japanese destroyer ''Asashio'' was the ultimate ship of this type in Japan, built after the launch of the ''[[Fubuki]]''-class ships. The absence of constraints on displacement allowed naval architects to find a good balance between speed, armament, and hull size. Due to a good overall layout, ''Asashio'' served as a prototype for the majority of subsequent Japanese destroyers.<br><br>{{Model3DViewer|ee9ca77320014158a42f5496bae11eaa}} | + | Japanese destroyer ''Asashio'' was the ultimate ship of this type in Japan, built after the launch of the ''[[Fubuki]]''-class ships. The absence of constraints on displacement allowed naval architects to find a good balance between speed, armament, and hull size. Due to a good overall layout, ''Asashio'' served as a prototype for the majority of subsequent Japanese destroyers.<br><br>''{{#var:ship_name}}'' was first released for sale worldwide on 27 April 2018. As of the 0.10.5 update (June 2021) She is no longer available. <br> | |
| ? | + | <!-- br>{{Model3DViewer|ee9ca77320014158a42f5496bae11eaa}} --> | ||
| |Performance=<!-- write text about performance in battles below --> | |Performance=<!-- write text about performance in battles below --> | |||
| ? | ''{{#var:ship_name}}'' is externally very comparable to her Tier VIII tech tree compatriot ''[[Kagero]]''. They share nearly identical concealment ratings, maneuverability statistics, guns, and health. The two ships are ''extremely'' similar, but ''{{#var:ship_name}}'' | + | ''{{#var:ship_name}}'' is externally very comparable to her Tier VIII tech tree compatriot ''[[Kagero]]''. They share nearly identical concealment ratings, maneuverability statistics, guns, and health. The two ships are ''extremely'' similar, but ''{{#var:ship_name}}'' plays completely differently due to her unique torpedo armaments, and by having the {{Torpedo Reload Booster}} occupying a separate consumable slot (as with ''[[Akizuki]]''). | |
| ? | Technically speaking, ''{{#var:ship_name}}'' is the stealthiest destroyer in her matchmaking spread, having a slightly smaller air detection radius than ''[[Kagero]]'' and ''[[HSF Harekaze]]''. This allows her to control vision and spotting ranges exceedingly well, utilizing her stealth as another layer of armor against enemy vessels. It is armor she desperately needs, as ''{{#var:ship_name}}''’s main weapons are her torpedoes, though her guns can be used in certain situations. | + | Technically speaking, ''{{#var:ship_name}}'' is the stealthiest destroyer in her matchmaking spread, having a slightly smaller air detection radius than ''[[Kagero]]'' and ''[[HSF Harekaze]]''. This allows her to control vision and spotting ranges exceedingly well, utilizing her stealth as another layer of armor against enemy vessels. It is armor she desperately needs, as ''{{#var:ship_name}}''’s main weapons are her torpedoes, though her guns can be used in certain situations. It's her torpedoes which make her truly unique: ''{{#var:ship_name}}'' is equipped with a deep water variant of the same Type 93 mod. 2 torpedoes found aboard other Tier VIII and IX Japanese ships, and similar to those found in the Pan-Asian destroyer line. They have increased flooding chance, are harder for enemies to detect, and have a whopping 20 kilometer range while still retaining 67 knots of speed... '''but can only hit battleships and aircraft carriers'''. | |
| ? | As a result of ''{{#var:ship_name}}'' only being able to damage battleships and the rare aircraft carrier with her torpedoes, she is highly specialized | + | As a result of ''{{#var:ship_name}}'' only being able to damage battleships and the rare aircraft carrier with her torpedoes, she is a highly specialized ship: designed to really only do one thing, but to do it exceptionally well. She has only her guns with which to combat enemy cruisers and destroyers, a state of affairs that leaves her highly vulnerable to both ship types. Captains should not be afraid to use ''{{#var:ship_name}}''’s guns, however, as strategically engaging key targets can lead to the difference between a win and a loss. Using her concealment to avoid unwinnable fights is also a valid strategy, and can keep her in the game for longer. | |
| |Pros=<!-- write list of positive points below. use * as in ordinary wiki-list. --> | |Pros=<!-- write list of positive points below. use * as in ordinary wiki-list. --> | |||
| Line 19: | Line 18: | |||
| * Torpedoes are extremely powerful against battleships. | * Torpedoes are extremely powerful against battleships. | |||
| * Has access to both {{Torpedo Reload Booster}} and {{Smoke Generator}} at the same time. | * Has access to both {{Torpedo Reload Booster}} and {{Smoke Generator}} at the same time. | |||
| + | * Thanks to incredible 20km torpedo range, the "Torpedo Acceleration" skill works favorably (+5mph -20%range), leaving you with more than enough range (16km!) | |||
| |Cons=<!-- write list of negative points below. use * as in ordinary wiki-list. --> | |Cons=<!-- write list of negative points below. use * as in ordinary wiki-list. --> | |||
| ? | * Slow | + | * Slow turret traverse [Expert Marksman is a must] and slow reload hinder her ability to gunfight other ships, especially destroyers. | |
| * Torpedoes can only hit battleships and aircraft carriers, limiting her target selection. | * Torpedoes can only hit battleships and aircraft carriers, limiting her target selection. | |||
| * Slow speed for a destroyer at only 35 knots. | * Slow speed for a destroyer at only 35 knots. | |||
| * The torpedo's long range can make hitting allies a possibility. Her captain needs to keep an eye out for allied ships. | * The torpedo's long range can make hitting allies a possibility. Her captain needs to keep an eye out for allied ships. | |||
| * No AA defense to speak of. | * No AA defense to speak of. | |||
| + | <br /> | |||
| + | {{AnnoWiki|content= | |||
| + | '''[https://forum.worldofwarships.com/topic/156299-premium-ship-review-asashio/ LittleWhiteMouse's Premium Ship Review: Asashio] from the NA forums'''}} | |||
| |Research=<!-- write text about priority sequence of research below --> | |Research=<!-- write text about priority sequence of research below --> | |||
| ? | As a | + | As a Premium ship, ''{{#var:ship_name}}'' doesn't have any upgrades to research. | |
| |OptimalConfiguration=<!-- write some general text about selection of optimal configuration below (optional)--> | |OptimalConfiguration=<!-- write some general text about selection of optimal configuration below (optional)--> | |||
| Line 36: | Line 39: | |||
| The recommended upgrades for ''{{#var:ship_name}}'' are as follows: | The recommended upgrades for ''{{#var:ship_name}}'' are as follows: | |||
| * '''Slot 1''': {{Main Armaments Modification 1}} | * '''Slot 1''': {{Main Armaments Modification 1}} | |||
| ? | * '''Slot 2''': | + | * '''Slot 2''': {{Engine Room Protection}} | |
| * '''Slot 3''': {{Aiming Systems Modification 1}} | * '''Slot 3''': {{Aiming Systems Modification 1}} | |||
| ? | * '''Slot 4''': {{Propulsion Modification | + | * '''Slot 4''': {{Propulsion Modification 1}} | |
| * '''Slot 5''': {{Concealment System Modification 1}} | * '''Slot 5''': {{Concealment System Modification 1}} | |||
| |CommanderSkills=<!-- write text about best set of Commander Skills below --> | |CommanderSkills=<!-- write text about best set of Commander Skills below --> | |||
| ? | ||||
| ? | + | {{Commander Skills 3 DD | ||
| + | | rating11 = 1 <!-- Grease the Gears --> | |||
| + | | rating12 = <!-- Liquidator --> | |||
| + | | rating13 = <!-- Consumables Specialist --> | |||
| + | | rating14 = <!-- Gun Feeder --> | |||
| + | | rating15 = <!-- Incoming Fire Alert --> | |||
| + | | rating16 = 2 <!-- Preventive Maintenance --> | |||
| ? | + | | rating21 = <!-- Pyrotechnician --> | ||
| ? | | | + | | rating22 = 2 <!-- Swift Fish --> | |
| ? | | | + | | rating23 = 2 <!-- Consumables Enhancements --> | |
| ? | | | + | | rating24 = <!-- Extra-Heavy AP Shells --> | |
| ? | | | + | | rating25 = <!-- Priority Target --> | |
| ? | | | + | | rating26 = 3 <!-- Last Stand --> | |
| ? | | | + | ||
| ? | + | |||
| ? | + | |||
| ? | | | + | | rating31 = <!-- Main Batter and AA Specialist --> | |
| ? | | | + | | rating32 = 2 <!-- Fill the Tubes --> | |
| ? | | | + | | rating33 = 2 <!-- Adrenaline Rush --> | |
| ? | | | + | | rating34 = <!-- Inertia Fuse for HE Shells --> | |
| ? | | | + | | rating35 = <!-- Superintendent --> | |
| ? | | Expert | + | | rating36 = 1 <!-- Survivability Expert --> | |
| ? | + | |||
| ? | + | |||
| ? | | | + | | rating41 = <!-- Main Battery and AA Expert --> | |
| ? | + | | rating42 = 2 <!-- Swift in Silence --> | ||
| ? | | | + | | rating43 = 1 <!-- Radio Location --> | |
| ? | + | | rating44 = <!-- Fearless Brawler --> | ||
| ? | + | | rating45 = 3 <!-- Concealment Expert --> | ||
| ? | + | | rating46 = <!-- Dazzle --> | ||
| ? | | | + | ||
| ? | + | |||
| ? | + | |||
| ? | | | + | ||
| ? | | | + | ||
| ? | | | + | ||
| ? | + | |||
| ? | + | |||
| ? | + | |||
| ? | + | |||
| ? | + | |||
| }} | }} | |||
| |Consumables=<!-- write text about selection of Consumables below --> | |Consumables=<!-- write text about selection of Consumables below --> | |||
| ? | ''{{#var:ship_name}}'' | + | ''{{#var:ship_name}}'' equips the following consumables: | |
| * '''Slot 1:''' {{Damage Control Party}} | * '''Slot 1:''' {{Damage Control Party}} | |||
| * '''Slot 2:''' {{Smoke Generator}} | * '''Slot 2:''' {{Smoke Generator}} | |||
| * '''Slot 3:''' {{Engine Boost}} | * '''Slot 3:''' {{Engine Boost}} | |||
| * '''Slot 4:''' {{Torpedo Reload Booster}} | * '''Slot 4:''' {{Torpedo Reload Booster}} | |||
| ? | ||||
| ? | ||||
| |Camouflage=<!-- write text about useful camouflage below --> | |Camouflage=<!-- write text about useful camouflage below --> | |||
| ? | As a | + | As a Premium ship, ''{{#var:ship_name}}'' comes with [[Ship:Camouflage#Premium_Camouflage|Type 10 camouflage]] that lowers her detection radius, reduces the accuracy of incoming shells, reduces her repair costs, and increases the amount of experience she earns. | |
| |Signals=<!-- write text about best set of signals below --> | |Signals=<!-- write text about best set of signals below --> | |||
| ? | ''Asashio'' captains should mount standard signal flags to improve the ship’s performance in battle. Captains looking to improve upon the ship’s armament should mount Victor Lima ({{Victor Lima|Size=18px}}), Juliet Whiskey Unaone ({{Juliet Whiskey Unaone|Size=18px}}), and November Foxtrot ({{November Foxtrot|Size=18px}})signal flags. Sierra Mike ({{Sierra Mike|Size=18px}}) signal flags are recommended to increase the ships top speed. Juliet Charlie ({{Juliet Charlie|Size=18px}}) flags are also recommended to prevent detonations. Lastly, economic and special signal flags can be mounted to increase the ship’s economic gains per battle. | + | ''Asashio'' captains should mount standard signal flags to improve the ship’s performance in battle. Captains looking to improve upon the ship’s armament should mount Victor Lima ({{Victor Lima|Size=18px}}), Juliet Whiskey Unaone ({{Juliet Whiskey Unaone|Size=18px}}), and November Foxtrot ({{November Foxtrot|Size=18px}}) signal flags. Sierra Mike ({{Sierra Mike|Size=18px}}) signal flags are recommended to increase the ships top speed. Juliet Charlie ({{Juliet Charlie|Size=18px}}) flags are also recommended to prevent detonations. Lastly, economic and special signal flags can be mounted to increase the ship’s economic gains per battle. | |
| {{Signal Flags | {{Signal Flags | |||
| Line 188: | Line 178: | |||
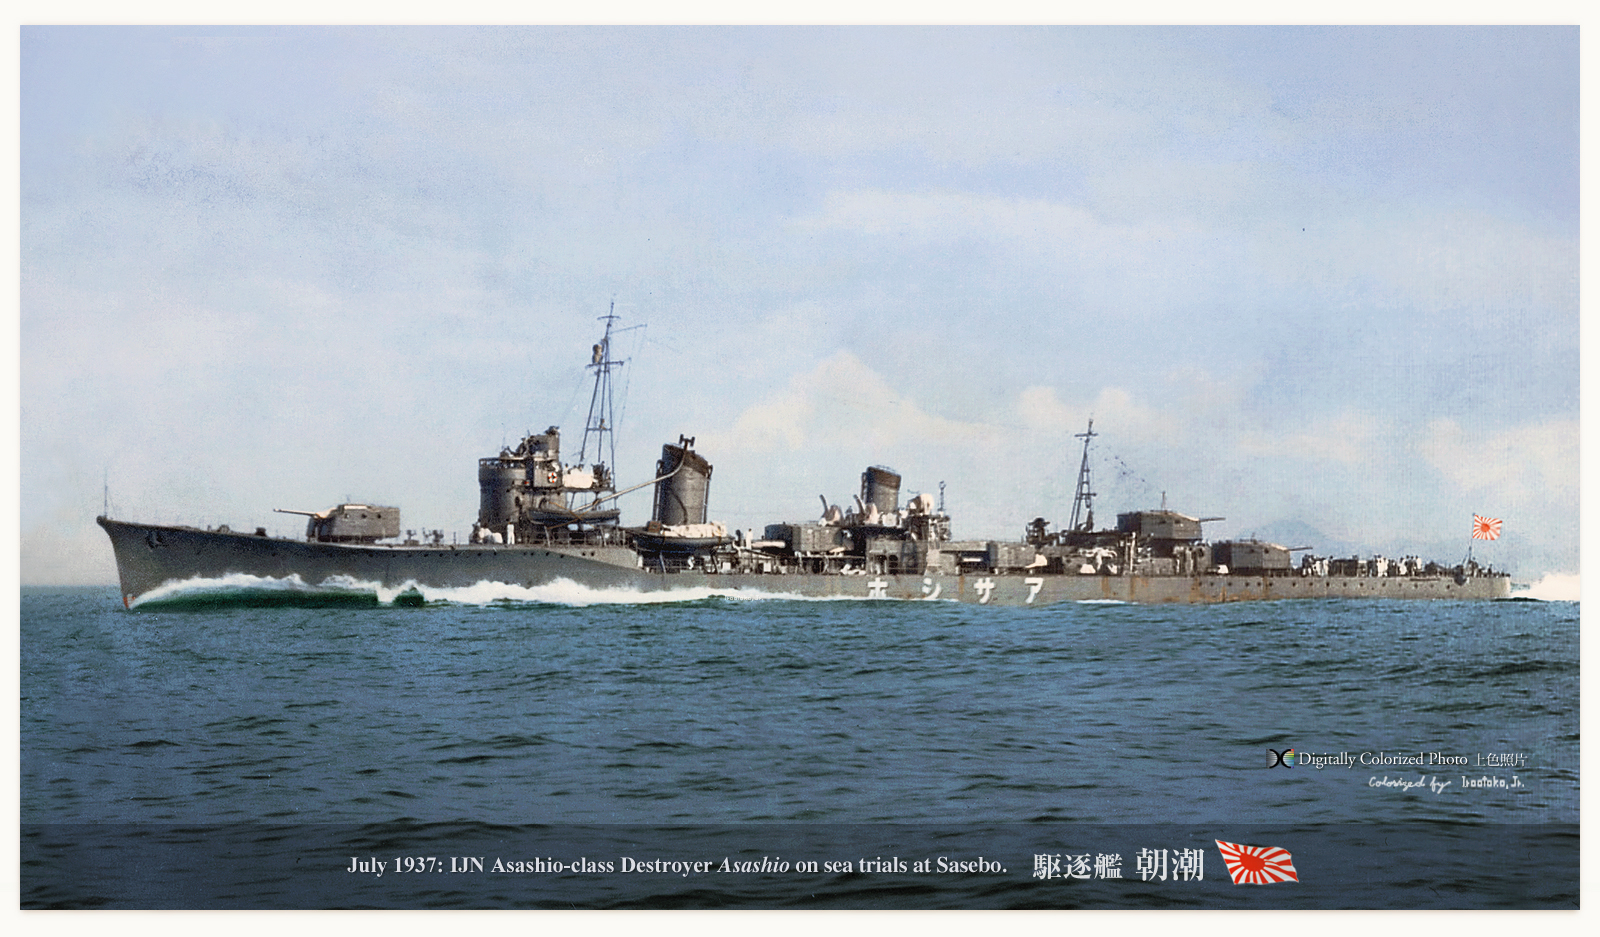
| ''{{#var:ship_name}}'' was the first destroyer of the IJN to have a displacement greater than 2,000 tons. During her initial trials, she suffered from steering problems and issues with her unreliable new 50,000 shaft horsepower turbines, but these flaws were ironed out for the class as a whole by the beginning of the Second World War. Issues aside, the overall design for ''Asashio'' was considered successful, and her design was repeated in the later ''[[Kagero]]'' and ''[[Yūgumo]]'' classes. ''Asashio'' herself spent her pre-war service in training and modernization to fix her outstanding issues, before Japan joined the war. | ''{{#var:ship_name}}'' was the first destroyer of the IJN to have a displacement greater than 2,000 tons. During her initial trials, she suffered from steering problems and issues with her unreliable new 50,000 shaft horsepower turbines, but these flaws were ironed out for the class as a whole by the beginning of the Second World War. Issues aside, the overall design for ''Asashio'' was considered successful, and her design was repeated in the later ''[[Kagero]]'' and ''[[Yūgumo]]'' classes. ''Asashio'' herself spent her pre-war service in training and modernization to fix her outstanding issues, before Japan joined the war. | |||
| ? | At the time of Pearl | + | At the time of Pearl Harbor, ''Asashio'' was the lead ship of the 8th Destroyer Division, consisting of ''Asashio'', ''Ōshio'', ''Michishio'' and ''Arashio'', stationed in the South China Sea escorting transports bound for British Malaya and the Dutch East Indies. On 19 February 1942, while DesDiv8 were escorting two transports near Bali in the Dutch East Indies, the destroyers came under attack from a combined Dutch-American-British force consisting of two submarines, seven destroyers, and three cruisers. While the three Dutch light cruisers were decently modern vessels, the American ''[[Clemson]]''-class destroyers were sorely outdated compared to the four ''Asashio''-class destroyers. In the resulting Battle of Badung Strait, ''Asashio'' herself successfully struck the Dutch destroyer HNLMS ''Piet Hein'' with a 61cm torpedo, sinking the Dutch destroyer immediately, suffering only light damage in return. She continued to serve around the Dutch East Indies until late May, when she and her division transferred to the central Pacific. She was present at the Battle of Midway, escorting the Support Group that was covering the troop convoys to Midway. On 6 June during the battle, she came under attack by US planes, taking a hit from a 500-pound bomb and sustaining medium damage. She and sister-ship ''Arashio'' rescued 240 survivors from the sinking heavy cruiser ''Mikuma'', and then escorted badly-damaged ''[[Mogami]]'' back to Truk on 14 June. | |
| Following repairs that stretched into late October 1942, ''Asashio'' returned to the front lines to take part in the Guadalcanal campaign. She saw no combat during her time serving in the Solomon Islands, making several successful transport runs in the area for the rest of 1942. During this time, she helped light cruiser ''Isuzu'' limp back to port after suffering damage from the Second Naval Battle of Guadalcanal, then towed ''[[Shiratsuyu]]''-class destroyer ''Umikaze'' back to the island of Rabaul for repairs, and later escorted ''Zuikaku'', ''[[Mutsu]]'', and ''Suzuya'' from Truk to mainland Japan. By mid-February 1943 she was back on duty in the southwestern Pacific. While escorting a troop convoy in the Bismarck Sea, she came under attack by a joint US-AUS air strike. The first wave of attacks was devastating: all seven transports took hits that left them burning or sinking, and destroyers ''Tokitsukaze'', ''Shirayuki'' and ''Arashio'' were sunk. The fourth destroyer and final destroyer to sink was ''Asashio''. While picking up survivors from ''Arashio'' the following morning of the strike, a second wave attacked, with a B-17 striking her amidships with a 500-pound bomb, damaging her beyond repair. She sank quickly, going down with roughly 200 of her crew of 226 enlisted men and officers. | Following repairs that stretched into late October 1942, ''Asashio'' returned to the front lines to take part in the Guadalcanal campaign. She saw no combat during her time serving in the Solomon Islands, making several successful transport runs in the area for the rest of 1942. During this time, she helped light cruiser ''Isuzu'' limp back to port after suffering damage from the Second Naval Battle of Guadalcanal, then towed ''[[Shiratsuyu]]''-class destroyer ''Umikaze'' back to the island of Rabaul for repairs, and later escorted ''Zuikaku'', ''[[Mutsu]]'', and ''Suzuya'' from Truk to mainland Japan. By mid-February 1943 she was back on duty in the southwestern Pacific. While escorting a troop convoy in the Bismarck Sea, she came under attack by a joint US-AUS air strike. The first wave of attacks was devastating: all seven transports took hits that left them burning or sinking, and destroyers ''Tokitsukaze'', ''Shirayuki'' and ''Arashio'' were sunk. The fourth destroyer and final destroyer to sink was ''Asashio''. While picking up survivors from ''Arashio'' the following morning of the strike, a second wave attacked, with a B-17 striking her amidships with a 500-pound bomb, damaging her beyond repair. She sank quickly, going down with roughly 200 of her crew of 226 enlisted men and officers. | |||
| + | ||||
| + | ===Historical Inaccuracies=== | |||
| + | * ''Asashio'' was only painted in overall IJN gray. | |||
| + | * ''Asashio''’s name written in katakana on both sides of the hull are missing. | |||
| + | * The Type 93 mod. 2 torpedo was actually an experimental type designed in 1935 to meet a staff requirement for a higher speed torpedo for destroyers. It was discontinued in 1941 and did not enter service. | |||
| |HistoricalGallery=<!-- write below list of files with description (if necessary) separated with | --><gallery> | |HistoricalGallery=<!-- write below list of files with description (if necessary) separated with | --><gallery> | |||
| Line 199: | Line 194: | |||
| |Video=<!-- put below video clips with using template VideoYT. You can use html-tags for formatting. --> | |Video=<!-- put below video clips with using template VideoYT. You can use html-tags for formatting. --> | |||
| + | {{VideoYT|ZRv4tWfdB40}} | |||
| + | {{VideoYT|hmHLv6KtgzA}} | |||
| + | {{VideoYT|4hNwV1hlA24}} | |||
| |Ref= <!-- write below --> | |Ref= <!-- write below --> | |||
| ? | + | # [https://en.wikipedia.org/wiki/Japanese_destroyer_Asashio_(1936) Japanese destroyer ''Asashio'' (1936) - Wikipedia] | ||
| ? | + | # [https://en.wikipedia.org/wiki/Asashio-class_destroyer ''Asashio''-class destroyer - Wikipedia] | ||
| ? | + | # [https://worldofwarships.com/en/news/sales-and-events/bb-qq/ Asashio Arrives for a Golden Week Celebration - ASASHIO - ARMADA - News - World of Warships] | ||
| + | # [https://worldofwarships.com/en/news/history/asashio-history-1/ Asashio: Fleet-based Destroyers’ Milestone - News - World of Warships] | |||
| + | # [https://worldofwarships.com/en/news/history/asashio-history-2/ Asashio: Between Courage and Recklessness - News - World of Warships] | |||
| + | # [https://www.youtube.com/watch?v=ZRv4tWfdB40 Asashio - Armada - World of Warships Official Channel - YouTube] | |||
| + | # [https://www.combinedfleet.com/asashi_n.htm CombinedFleet.com, Asashio Class Notes; Allyn Nevitt] | |||
| + | # [https://www.globalsecurity.org/military/world/japan/asashio-dd.htm Globalsecurity.org, IJN Shiratsuyu class destroyers] | |||
| + | # [https://www.midway1942.com/ships/ijn_dd_asashio.shtml Midway1942.com, Asashio class] | |||
| }}<!-- DO NOT DELETE THIS LINE. DO NOT INSERT ANYTHING BELOW THIS LINE --> | }}<!-- DO NOT DELETE THIS LINE. DO NOT INSERT ANYTHING BELOW THIS LINE --> | |||
Revision as of 05:10, 10 July 2021

| Purchase price9,300 |
| Hit Points15,100 |
| 127 mm/50 3rd Year Type on a Type C mount3 х 2 pcs. |
| Rate of Fire8.51 shots/min. |
| Reload Time7.05 sec. |
| Rotation Speed6.9 deg./sec. |
| 180 Degree Turn Time26.09 sec. |
| Firing Range10.95 km. |
| Maximum Dispersion97 m. |
| HE Shell127 mm HE Type1 |
| Maximum HE Shell Damage2,150 |
| Chance of Fire on Target Caused by HE Shell9 % |
| Initial HE Shell Velocity915 m./s. |
| HE Shell Weight23 kg. |
| AP Shell127 mm AP Type0 |
| Maximum AP Shell Damage2,200 |
| Initial AP Shell Velocity915 m./s. |
| AP Shell Weight23 kg. |
| 610 mm Quad2 х 4 pcs. |
| Rate of Fire0.54 shots/min. |
| Reload Time112 sec. |
| Rotation Speed25 deg./sec. |
| 180 Degree Turn Time7.2 sec. |
| TorpedoIDS_PJPT032_610_ASASHIO |
| Maximum Damage20,967 |
| Torpedo Speed67 knot |
| Torpedo Range20.01 km. |
| 25 mm/60 Type 96 on a twin mount2 х 2 pcs. |
| . . . Average Damage per Second5.4 |
| . . . Firing Range2.49 km. |
| Maximum Speed35 knot |
| Turning Circle Radius640 m. |
| Rudder Shift Time3.6 sec. |
| Surface Detectability Range6.63 km. |
| Air Detectability Range3.02 km. |

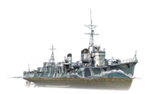
Asashio — Japanese premium Tier VIII destroyer.
Japanese destroyer Asashio was the ultimate ship of this type in Japan, built after the launch of the Fubuki-class ships. The absence of constraints on displacement allowed naval architects to find a good balance between speed, armament, and hull size. Due to a good overall layout, Asashio served as a prototype for the majority of subsequent Japanese destroyers.
Asashio was first released for sale worldwide on 27 April 2018. As of the 0.10.5 update (June 2021) She is no longer available.
Modules
 |
Rate of Fire (shots/min) | 180° Turn Time (sec) | Maximum Dispersion (m) | Maximum HE Shell Damage (HP) | Chance of Fire on Target Caused by HE Shell (%) | Maximum AP Shell Damage (HP) |
Research price (exp) |
Purchase price ( | |
|---|---|---|---|---|---|---|---|---|---|
| 127 mm/50 3rd Year Type on a Type C mount | 8.5 | 26.1 | 97 | 2,150 | 9 | 2,200 | 0 | 0 |
 |
Hit Points (HP) | Armor (mm) | Armor (mm) | Main Turrets (pcs.) | Secondary Gun Turrets (pcs.) | AA Mounts (pcs.) | Torpedo Tubes (pcs.) | Hangar Capacity (pcs.) |
Research price (exp) |
Purchase price ( | |
|---|---|---|---|---|---|---|---|---|---|---|---|
| Asashio | 15,100 | 13 | 20 | 3 | 2 | 2 | 0 | 0 |
 |
Rate of Fire (shots/min) | Torpedo Tubes Reload Time (sec) | 180° Turn Time (sec) | Maximum Damage (HP) | Torpedo Speed (knot) | Torpedo Range (km) |
Research price (exp) |
Purchase price ( | |
|---|---|---|---|---|---|---|---|---|---|
| Type93 mod. 2 dw | 0.5 | 112 | 7.2 | 0 | 0 |
 |
IDS_SHIP_PARAM_SUO_INCREASE_DIST (%) | Maximum Firing Range (km) |
Research price (exp) |
Purchase price ( | |
|---|---|---|---|---|---|
| Type8 mod. 1 | 0 | 0 | 0 |
 |
Maximum Speed (knot) |
Research price (exp) |
Purchase price ( | |
|---|---|---|---|---|
| Propulsion: 50,000 hp | 35 | 0 | 0 |
Compatible Upgrades
| Slot 1 |
|||||
|---|---|---|---|---|---|
| Slot 2 |
|||||
| Slot 3 |
|||||
| Slot 4 |
|||||
| Slot 5 |
Player Opinion
Performance
Asashio is externally very comparable to her Tier VIII tech tree compatriot Kagero. They share nearly identical concealment ratings, maneuverability statistics, guns, and health. The two ships are extremely similar, but Asashio plays completely differently due to her unique torpedo armaments, and by having the Torpedo Reload Booster ![]() occupying a separate consumable slot (as with Akizuki).
occupying a separate consumable slot (as with Akizuki).
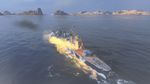
Technically speaking, Asashio is the stealthiest destroyer in her matchmaking spread, having a slightly smaller air detection radius than Kagero and HSF Harekaze. This allows her to control vision and spotting ranges exceedingly well, utilizing her stealth as another layer of armor against enemy vessels. It is armor she desperately needs, as Asashio’s main weapons are her torpedoes, though her guns can be used in certain situations. It's her torpedoes which make her truly unique: Asashio is equipped with a deep water variant of the same Type 93 mod. 2 torpedoes found aboard other Tier VIII and IX Japanese ships, and similar to those found in the Pan-Asian destroyer line. They have increased flooding chance, are harder for enemies to detect, and have a whopping 20 kilometer range while still retaining 67 knots of speed... but can only hit battleships and aircraft carriers.
As a result of Asashio only being able to damage battleships and the rare aircraft carrier with her torpedoes, she is a highly specialized ship: designed to really only do one thing, but to do it exceptionally well. She has only her guns with which to combat enemy cruisers and destroyers, a state of affairs that leaves her highly vulnerable to both ship types. Captains should not be afraid to use Asashio’s guns, however, as strategically engaging key targets can lead to the difference between a win and a loss. Using her concealment to avoid unwinnable fights is also a valid strategy, and can keep her in the game for longer.Pros:
- Stealthy, with a 5.4km surface detection range when fully kitted out.
- Torpedoes are extremely powerful against battleships.
- Has access to both Torpedo Reload Booster
 and Smoke Generator
  at the same time.
- Thanks to incredible 20km torpedo range, the "Torpedo Acceleration" skill works favorably (+5mph -20%range), leaving you with more than enough range (16km!)
Cons:
- Slow turret traverse [Expert Marksman is a must] and slow reload hinder her ability to gunfight other ships, especially destroyers.
- Torpedoes can only hit battleships and aircraft carriers, limiting her target selection.
- Slow speed for a destroyer at only 35 knots.
- The torpedo's long range can make hitting allies a possibility. Her captain needs to keep an eye out for allied ships.
- No AA defense to speak of.
LittleWhiteMouse's Premium Ship Review: Asashio from the NA forums
Research
Optimal Configuration
Upgrades
The recommended upgrades for Asashio are as follows:
- Slot 1: Main Armaments Modification 1

- Slot 2: Engine Room Protection

- Slot 3: Aiming Systems Modification 1

- Slot 4: Propulsion Modification 1

- Slot 5: Concealment System Modification 1

Commander Skills
| Recommended Commander Skills | ||||||
|---|---|---|---|---|---|---|
| Cost (points) |
Attack | Defense | ||||
| 1 |
★ |
|
|
|
|
★★ |
| 2 |
|
★★ |
★★ |
|
|
★★★ |
| 3 |
|
★★ |
★★ |
|
|
★ |
| 4 |
|
★★ |
★ |
|
★★★ |
|
| Key: ★★★ - Extremely Useful ★★ - Frequently Useful ★ - Occasionally Useful No stars - Not Useful | ||||||
Consumables
Asashio equips the following consumables:
- Slot 1: Damage Control Party

- Slot 2: Smoke Generator
- Slot 3: Engine Boost

- Slot 4: Torpedo Reload Booster
Camouflage
As a Premium ship, Asashio comes with Type 10 camouflage that lowers her detection radius, reduces the accuracy of incoming shells, reduces her repair costs, and increases the amount of experience she earns.
Signals
Asashio captains should mount standard signal flags to improve the ship’s performance in battle. Captains looking to improve upon the ship’s armament should mount Victor Lima (![]() ), Juliet Whiskey Unaone (
), Juliet Whiskey Unaone (![]() ), and November Foxtrot (
), and November Foxtrot (![]() ) signal flags. Sierra Mike (
) signal flags. Sierra Mike (![]() ) signal flags are recommended to increase the ships top speed. Juliet Charlie (
) signal flags are recommended to increase the ships top speed. Juliet Charlie (![]() ) flags are also recommended to prevent detonations. Lastly, economic and special signal flags can be mounted to increase the ship’s economic gains per battle.
) flags are also recommended to prevent detonations. Lastly, economic and special signal flags can be mounted to increase the ship’s economic gains per battle.
Recommended Signal Flags 
| |||||
|---|---|---|---|---|---|
| Combat | |||||
 ★★ |

|
 ★ |

|
 ★ |
 ★★ |
 ★★ |

|
 ★ |
 ★★★ |
 ★★★ |

|

|

| ||||
Note: Use of the Juliet Charlie signal makes detonation impossible.
Gallery
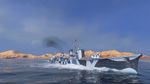
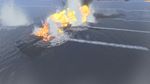
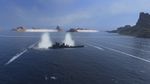
Asashio's deep water torpedoes catch the enemy battleship by surprise.
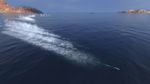
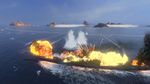
Asashio unleashes two full torpedo salvos in a matter of seconds.


Historical Info
Historical Gallery


Video
References
- Japanese destroyer Asashio (1936) - Wikipedia
- Asashio-class destroyer - Wikipedia
- Asashio Arrives for a Golden Week Celebration - ASASHIO - ARMADA - News - World of Warships
- Asashio: Fleet-based Destroyers’ Milestone - News - World of Warships
- Asashio: Between Courage and Recklessness - News - World of Warships
- Asashio - Armada - World of Warships Official Channel - YouTube
- CombinedFleet.com, Asashio Class Notes; Allyn Nevitt
- Globalsecurity.org, IJN Shiratsuyu class destroyers
- Midway1942.com, Asashio class