Azuma
| Revision as of 00:18, 20 December 2018 added historical info and image | Revision as of 22:06, 14 September 2020 Undo revision 298607 by I_Like_Turtles222:na (talk) | |||
25 intermediate revisions by 21 users not shown | ||||
| Line 3: | Line 3: | |||
| {{WoWs_Ship | {{WoWs_Ship | |||
| |Promo=<!-- in case of gift or promo ship write conditions to get it. (optional)--> | |Promo=<!-- in case of gift or promo ship write conditions to get it. (optional)--> | |||
| ? | ||||
| |Anno=<!-- you can write below short description for the ship. it will replace default once. --> | |Anno=<!-- you can write below short description for the ship. it will replace default once. --> | |||
| ? | A powerful high-speed ship (Project B-65) designed to destroy American heavy cruisers and confront ''[[Alaska]]''-class "large cruisers". Some design solutions were borrowed from ''[[Yamato]]''-class battleships. She was armed with nine 310 mm guns and had good anti-torpedo protection.< | + | A powerful high-speed ship (Project B-65) designed to destroy American heavy cruisers and confront ''[[Alaska]]''-class "large cruisers". Some design solutions were borrowed from ''[[Yamato]]''-class battleships. She was armed with nine 310 mm guns and had good anti-torpedo protection. | |
| + | <br><br>''{{#var:ship_name}}'' was first released for sale worldwide on 1 April 2019.<br><br>{{Model3DViewer|ff234d84c37b46f9acbe2b40abbf42a4}} | |||
| |Performance=<!-- write text about performance in battles below --> | |Performance=<!-- write text about performance in battles below --> | |||
| ? | + | Tier IX Premium Japanese cruiser ''{{#var:ship_name}}'' is in the same "large cruiser" category as her counterparts ''[[Alaska]]'' and ''[[Kronshtadt]]''. ''{{#var:ship_name}}'' is well suited for long range fights, featuring nine 310mm guns in a 3x3 layout that have high velocity, flat arcs, and strong performance from her high explosive rounds. The main battery performance is the primary strength of the ship. | ||
| ? | + | |||
| ? | + | ''Azmua''’s 310mm guns are the longest-ranged of the large cruisers found at Tier IX, clocking in at a base range of 19.1km before {{Gun Fire Control System Modification 2}} or {{Spotting Aircraft}}. Though they still lag behind ''Kronshtadt'' some, her shell velocities are noticeably better than ''Alaska'', making her gunnery fairly comfortable to use all the way out to her maximum range. Befitting her Japanese origins, she has the best HE alpha damage and fire chance of all the 12-inch armed cruisers, though her AP shell damage lacks slightly to that of her peers. The penetration values of her armor-piercing shells run about 10-15% lower than ''Kronshtadt'' at all ranges, but are pretty comparable to ''Alaska'' along the same curve. Overall, her main battery performance is a nice middle ground between the large cruisers already in the game: better HE performance than the rest, and comparable AP performance (though she lacks ''Alaska''’s improved auto-bounce angles). | ||
| ? | 2. | + | ||
| ? | + | It's a good thing ''Azuma'' has all that main battery range to play with: of the Tier IX large cruisers, ''{{#var:ship_name}}'' is by far the least durable, featuring no plating thicker than 25mm other than her internal belt and deck armor. This means she is exceedingly vulnerable to high explosive rounds at nearly all ranges and angles — as well as being overmatched by all 380mm class or larger battleship guns — in addition to her citadel spaces extending above the waterline. ''{{#var:ship_name}}'' also has a fairly mediocre anti-aircraft suite, with the majority of its strength concentrated in long-range flak bursts that a skilled carrier player will easily dodge. ''Azuma'' has decent mobility, with a top speed of 34 knots and average rudder shift and turning circle for her class of ships, and can reduce her concealment to 11.8km when fully built for it. Consumable wise, ''{{#var:ship_name}}'' features standard cruiser consumables with the exception of her {{Repair Party}}, which has a reduced cooldown compared to the usual version. | ||
| ? | + | |||
| + | These characteristics combine to make ''{{#var:ship_name}}'' very one-dimensional to play. She is very good at farming damage at range, but her armor scheme and thin plating make her vulnerable at close quarters, forcing her into a long-range, kiting play style that has lower influence on the outcome of games. She is unable to approach close to key capture areas until late game situations where there are fewer ships to focus fire her, but given her armor scheme and detection radius, surviving into the late game will be a challenge for most captains. | |||
| |Pros=<!-- write list of positive points below. use * as in ordinary wiki-list. --> | |Pros=<!-- write list of positive points below. use * as in ordinary wiki-list. --> | |||
| ? | * | + | * Large health pool. | |
| ? | * | + | * Good HE shells like most other Japanese cruisers. | |
| ? | * | + | * Good concealment for a large cruiser. | |
| ? | * | + | * Good maneuverability for a large cruiser. | |
| |Cons=<!-- write list of negative points below. use * as in ordinary wiki-list. --> | |Cons=<!-- write list of negative points below. use * as in ordinary wiki-list. --> | |||
| ? | * | + | * Exterior plating is almost entirely 25mm, making her very weak to any and all battleships. | |
| ? | * | + | * Poor rear turret angles make getting all guns on target quite dangerous. | |
| ? | * | + | * Slow turret traverse. | |
| ? | * | + | * Unlike every other Japanese cruiser, ''Azuma'' does not have any torpedoes. | |
| + | * Although she is more accurate than her American and Soviet counterparts, her dispersion is still quite poor. | |||
| |Research=<!-- write text about priority sequence of research below --> | |Research=<!-- write text about priority sequence of research below --> | |||
| ? | + | As a premium ship, ''{{#var:ship_name}}'' doesn't have any upgrades to research. | ||
| ? | + | |||
| ? | + | |||
| ? | + | |||
| ? | + | |||
| ? | + | |||
| ? | + | |||
| ? | + | |||
| ? | + | |||
| ? | As a premium ship, ''{{#var:ship_name}}'' doesn't have any upgrades to research. | + | ||
| |OptimalConfiguration=<!-- write some general text about selection of optimal configuration below (optional)--> | |OptimalConfiguration=<!-- write some general text about selection of optimal configuration below (optional)--> | |||
| |Upgrades=<!-- write text about best upgrades below, add * after upgrade link to designate that another upgrade may be viable --> | |Upgrades=<!-- write text about best upgrades below, add * after upgrade link to designate that another upgrade may be viable --> | |||
| + | The recommended upgrades for ''{{#var:ship_name}}'' are as follows: | |||
| + | * '''Slot 1''': {{Main Armaments Modification 1}} | |||
| + | * '''Slot 2''': {{Steering Gears Modification 1}} | |||
| + | * '''Slot 3''': {{Aiming Systems Modification 1}} | |||
| + | * '''Slot 4''': {{Steering Gears Modification 2}} | |||
| + | * '''Slot 5''': {{Concealment System Modification 1}} | |||
| + | * '''Slot 6''': {{Main Battery Modification 3}} | |||
| ? | + | '''Upgrade Slot 1''' grants players with access to {{Main Armaments Modification 1}} which is recommended to increase the durability of her main battery. | ||
| ? | + | |||
| ? | + | '''Upgrade Slot 2''' allows players to increase the durability of their rudder against incoming fire while also reducing the repair time. | ||
| ? | + | |||
| ? | + | '''Upgrade Slot 3''' provides players with the opportunity to increase accuracy through {{Aiming Systems Modification 1}}, this helps to improve her performance at further ranges. | ||
| ? | + | |||
| ? | + | '''Upgrade Slot 4''' gives players a choice between {{Steering Gears Modification 2}} or {{Propulsion Modification 2}} to better increase the mobility of ''{{#var:ship_name}}'' however, some players may opt to mount {{Damage Control System Modification 2}} for increased survivability. | ||
| ? | + | |||
| + | '''Upgrade Slot 5''' allows players to increase the already good concealment of ''{{#var:ship_name}}'' by mounting {{Concealment System Modification 1}} however some players may opt to mount {{Steering Gears Modification 3}} to further their ability to dodge incoming fire. | |||
| + | ||||
| + | '''Upgrade Slot 6''' provides players with another choice to make dependent upon their play style. {{Main Battery Modification 3}} provides players an opportunity to reduce the reload of their main guns, while some players may instead opt to take {{Gun Fire Control System Modification 2}} to increase their main battery firing range. | |||
| |CommanderSkills=<!-- write text about best set of Commander Skills below --> | |CommanderSkills=<!-- write text about best set of Commander Skills below --> | |||
| ? | ||||
| ? | {{Commander Skills | + | {{Commander Skills 2 | |
| ? | | Priority Target | + | <!-- This version enables a '0' rating. Use it for skills that have no effect (e.g. Improved Engines on a non-CV) or are detrimental to the ship. They should mirror what appears in the game client. --> | |
| ? | | | + | | rating11 = 3 <!-- Priority Target --> | |
| ? | | Expert Loader | + | | rating12 = 1 <!-- Preventive Maint --> | |
| ? | | | + | | rating13 = 2 <!-- Expert Loader --> | |
| ? | | Direction Center for | + | | rating14 = 0 <!-- Air Supremacy --> | |
| ? | | | + | | rating15 = 0 <!-- Direction Center for Fighters --> | |
| ? | | Incoming Fire Alert | + | | rating16 = 0 <!-- Improved Engine Boost --> | |
| ? | | | + | | rating17 = 1 <!-- Incoming Fire Alert --> | |
| + | | rating18 = 0 <!-- Last Gasp --> | |||
| ? | | High Alert | + | | rating21 = 1 <!-- High Alert --> | |
| ? | | Jack of All Trades | + | | rating22 = <!-- Jack of All Trades --> | |
| ? | | Expert Marksman | + | | rating23 = 3 <!-- Expert Marksman --> | |
| ? | | Torpedo Acceleration | + | | rating24 = 0 <!-- Torpedo Acceleration --> | |
| ? | | Smoke Screen Expert | + | | rating25 = 0 <!-- Smoke Screen Expert --> | |
| ? | | | + | | rating26 = 0 <!-- Improved Engines --> | |
| ? | | Adrenaline Rush | + | | rating27 = 3 <!-- Adrenaline Rush --> | |
| ? | | Last Stand | + | | rating28 = 1 <!-- Last Stand --> | |
| ? | | Basics of Survivability | + | | rating31 = 3 <!-- Basics of Survivability --> | |
| ? | | Survivability Expert | + | | rating32 = <!-- Survivability Expert--> | |
| ? | | Torpedo Armament Expertise | + | | rating33 = 0 <!-- Torpedo Armament Expertise--> | |
| ? | | | + | | rating34 = 0 <!-- Aircraft Armor --> | |
| ? | | Basic Firing Training | + | | rating35 = <!-- Basic Firing Training --> | |
| ? | | | + | | rating36 = 3 <!-- Superintendent --> | |
| ? | | Demolition Expert | + | | rating37 = 2 <!-- Demolition Expert --> | |
| ? | | | + | | rating38 = <!-- Vigilance --> | |
| ? | | Manual Fire Control for Secondary Armament | + | | rating41 = 0 <!-- Manual Fire Control for Secondary Armament --> | |
| ? | | Fire Prevention | + | | rating42 = 2 <!-- Fire Prevention --> | |
| ? | | Inertia Fuse for HE Shells | + | | rating43 = 0 <!-- Inertia Fuse for HE Shells --> | |
| ? | | | + | | rating44 = 0 <!-- Sight Stabilization --> | |
| ? | | Advanced Firing Training | + | | rating45 = 1 <!-- Advanced Firing Training --> | |
| ? | | | + | | rating46 = <!-- Massive AA Fire --> | |
| ? | | Radio Position Finding | + | | rating47 = 1 <!-- Radio Position Finding --> | |
| ? | | Concealment Expert | + | | rating48 = 3 <!-- Concealment Expert --> | |
| ? | + | }} | ||
| |Consumables=<!-- write text about selection of Consumables below --> | |Consumables=<!-- write text about selection of Consumables below --> | |||
| ? | + | ''{{#var:ship_name}}'' can equip the following consumables: | ||
| * '''Slot 1:''' {{Damage Control Party}} | * '''Slot 1:''' {{Damage Control Party}} | |||
| ? | * | + | * '''Slot 2:''' {{Defensive AA Fire}} '''or''' {{Hydroacoustic Search}} | |
| ? | + | * '''Slot 3:''' {{Spotting Aircraft}} | ||
| ? | + | * '''Slot 4:''' {{Repair Party}} | ||
| ? | * {{ | + | ||
| ? | * | + | ||
| ? | + | |||
| ? | + | |||
| ? | + | |||
| ? | + | |||
| |Camouflage=<!-- write text about useful camouflage below --> | |Camouflage=<!-- write text about useful camouflage below --> | |||
| ? | + | As a premium ship, ''{{#var:ship_name}}'' comes included with [[Ship:Camouflage#Premium_Camouflage|Type 10 camouflage]] that lowers her detection radius, reduces the accuracy of incoming shells, reduces her repair costs, and increases the amount of experience she earns. | ||
| ? | + | |||
| ? | + | |||
| ? | + | |||
| ? | + | |||
| ? | + | |||
| ? | + | |||
| ? | + | |||
| ? | + | |||
| ? | + | |||
| ? | + | |||
| ? | As a premium ship, ''{{#var:ship_name}}'' comes included with [[Ship:Camouflage#Premium_Camouflage|Type | + | ||
| ? | + | |||
| |Signals=<!-- write text about best set of signals below --> | |Signals=<!-- write text about best set of signals below --> | |||
| ? | + | {{Signal Flags | ||
| ? | | November Echo Setteseven = | + | | November Echo Setteseven = 2 | |
| | Mike Yankee Soxisix = | | Mike Yankee Soxisix = | |||
| ? | | India X-Ray = | + | | India X-Ray = 3 | |
| ? | | Juliet Whiskey Unaone = | + | | Juliet Whiskey Unaone = 1 | |
| ? | | Victor Lima = | + | | Victor Lima = 3 | |
| ? | | Hotel Yankee = | + | | Hotel Yankee = 1 | |
| ? | | November Foxtrot = | + | | November Foxtrot = 2 | |
| ? | | Sierra Mike = | + | | Sierra Mike = 3 | |
| ? | | India Delta = | + | | India Delta = 3 | |
| | Juliet Yankee Bissotwo = | | Juliet Yankee Bissotwo = | |||
| ? | | India Yankee = | + | | India Yankee = 2 | |
| ? | | Juliet Charlie = | + | | Juliet Charlie = 2 | |
| ? | | Zulu = | + | | Zulu = 2 | |
| ? | | India Bravo Terrathree = | + | | India Bravo Terrathree = 2 | |
| ? | | Equal Speed Charlie London = | + | | Equal Speed Charlie London = 2 | |
| ? | | Zulu Hotel = | + | | Zulu Hotel = 2 | |
| ? | | Papa Papa = | + | | Papa Papa = 2 | |
| ? | | Wyvern = | + | | Wyvern = 2 | |
| ? | | Red Dragon = | + | | Red Dragon = 2 | |
| ? | | Dragon Flag = | + | | Dragon Flag = 2 | |
| ? | | Ouroboros = | + | | Ouroboros = 2 | |
| ? | | Hydra = | + | | Hydra = 2 | |
| ? | | Basilisk = | + | | Basilisk = 2 | |
| ? | | Leviathan = | + | | Leviathan = 2 | |
| ? | | Scylla = | + | | Scylla = 2 | |
| ? | }} | + | }} | |
| |Gallery=<!-- write below list of files with description (if necessary) separated with | --><gallery> | |Gallery=<!-- write below list of files with description (if necessary) separated with | --><gallery> | |||
| ? | + | File:AzuStart.jpg | ||
| + | File:AzuRear.jpg | |||
| + | File:AzuDFAA.jpg | |||
| + | File:AzuIzu.jpg | |||
| + | File:AzuRekt.jpg | |||
| + | File:AzuDead.jpg | |||
| </gallery> | </gallery> | |||
| Line 163: | Line 153: | |||
| <div class="thumb tright"> | <div class="thumb tright"> | |||
| {{AnnoWiki|content= | {{AnnoWiki|content= | |||
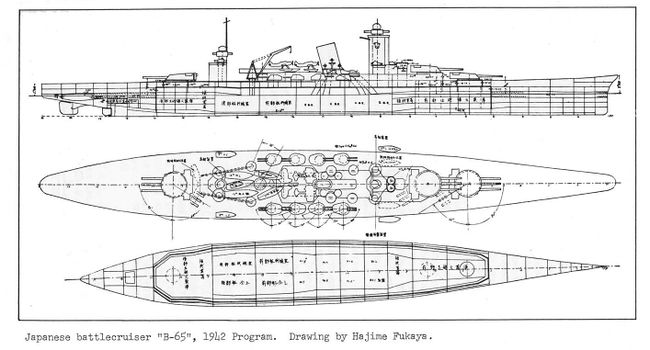
| ? | <h2> | + | <h2>Design B-65 Cruiser, 1942</h2> | |
| ? | + | |||
| ? | + | |||
| ? | + | |||
| ? | + | |||
| ? | + | |||
| ? | + | |||
| ===Specifications=== | ===Specifications=== | |||
| ? | : | + | :34,800 tons displacement, standard | |
| ? | : | + | :240m length | |
| ? | : | + | :27.2m beam | |
| ? | : | + | :8.8m draft | |
| ---- | ---- | |||
| ====Machinery==== | ====Machinery==== | |||
| ? | : | + | :8 Kampon boilers | |
| + | :4 geared turbines | |||
| ---- | ---- | |||
| ====Performance==== | ====Performance==== | |||
| ? | : | + | :33 knots at 160,000 shaft horsepower | |
| ? | : | + | :8,000 nm at 18 knots | |
| ---- | ---- | |||
| ====Armor==== | ====Armor==== | |||
| ? | :Main belt: | + | :Main belt: 190-200mm | |
| ? | + | :Decks: 125mm | ||
| ? | + | :Bulkheads: 190mm | ||
| ? | :Decks: | + | :Barbettes and Turrets: 180mm | |
| ? | :Bulkheads: | + | :Conning tower: 125-180mm | |
| ? | :Barbettes and Turrets: | + | ||
| ? | :Conning tower: | + | ||
| ---- | ---- | |||
| ====Armament==== | ====Armament==== | |||
| =====Main===== | =====Main===== | |||
| ? | : | + | :Nine (3x3) 310mm/50 caliber guns | |
| =====Secondary===== | =====Secondary===== | |||
| ? | : | + | :Sixteen (8x2) 100mm/65 caliber Type 98 | |
| =====Anti-aircraft===== | =====Anti-aircraft===== | |||
| ? | : | + | :Twelve (6x2) 25mm Type 96 | |
| ? | + | :Four (2x2) 13mm Hotchkiss | ||
| ? | : | + | ||
| ---- | ---- | |||
| ====Aircraft==== | ====Aircraft==== | |||
| ? | + | :One (1) flexible catapult | ||
| ? | : | + | :Three (3) Aichi E13A floatplanes | |
| ? | + | |||
| ? | + | |||
| ? | + | |||
| ? | : | + | ||
| }}</div> | }}</div> | |||
| ? | [[File: | + | [[File:Warship_international_1969-1_winter-49.jpg|none|frame|x350px|link=|Line drawings of proposed Japanese cruiser design B-65.]] | |
| ===History=== | ===History=== | |||
| ? | ||||
| ? | ||||
| ====Design==== | ====Design==== | |||
| + | The decisive victory over the Imperial Russian Navy at the Battle of Tsushima in the Russo-Japanese War of 1904-1905 was the catalyst of what became the Imperial Japanese Navy’s “Decisive Battle” doctrine. This strategy consisted of four primary components; a decisive surface fleet engagement with big guns, attrition tactics, quality over quantity, and nighttime torpedo attacks. When the Washington Naval Treaty was signed in 1922 limiting the size of Japan’s fleet to be greater than that of Italy and France, while lesser than that their more likely enemies of the United Kingdom and the United States, the emphasis of the Decisive Battle doctrine became all-encompassing in the Imperial Japanese Navy. | |||
| ? | + | In 1936, the IJN formed the Night Battle Force. This force would attack the enemy’s outer defense ring of cruisers and destroyers at night to break through and launch torpedo attacks on the enemy’s battleships. What remained of the enemy fleet would be defeated by the IJN’s battle fleet the following day. To protect the Night Battle Force, a division of fast battleships or battlecruisers were assigned to the force. Initially the ''[[Kongo]]''-class battlecruisers were chosen, and were modernized to fast battleships during the 1930s. The Japanese plans, however, intended to eventually replace the ''Kongo''’s with four heavy and brand-new ‘super’ cruisers. | ||
| + | As originally envisioned in 1936, these ships — what would later become the B-64 and B-65 cruisers — would carry 12” guns, be protected by armor against 8” shells, and be capable of speeds up to 40 knots. These ships were designated as the “Super Type A” cruisers, and a total of six were planned to be ordered, two in the Circle Five Program production order set to begin in 1942, and the remaining four in the Circle Six Program production order that was abandoned in the early stages of planning due to the Japanese entry into World War II and shifting priorities. Ultimately, no ships of this type were ever ordered or laid down. | |||
| + | ||||
| + | B-65’s hull was planned to be 240m long with a beam of 27.2m, with a designed draft of 8.8m. The planned maximum displacement was 34,800 metric tons. The planned machinery was to consist of eight Kampon boilers, which would produce steam for four turbines for a maximum output of 160,000 shp. This would allow B-65 to reach a maximum speed of 33 knots. With 4,545 tons of fuel oil on board the calculated cruising range was 8,000 nautical miles at 18 knots. | |||
| + | ||||
| + | B-65’s main armament was planned with nine 310mm/50 guns, which were to be mounted in three triple turrets along the centerline, two forward, one aft. These guns were still undergoing development for the battlecruisers of both the B-64 and B-65 class, and could fire a 561kg heavy projectile at ranges up to 32.9km. Depending on the combat range the rate of fire could reach three rounds per minute and gun, while at higher elevations the reload times would be longer. The secondary armament was planned to consist of sixteen 100mm/65 guns, mounted in eight twin turrets with four on each side of the ship. Each gun was capable of firing a 13kg HE shell at sea targets 19.5km away, or at planes at an altitude of up to 13km. Unlike many other guns no other shells were provided. The rate of fire was usually around 15 rounds per minute and gun. | |||
| + | ||||
| + | Anti-aircraft-armament did not differ from other ships, relying on four twin mounts with 25mm guns, and two 13.2mm twin machine guns. Unlike the heavy cruisers that preceded her, no torpedo armament was envisioned. A centerline mounted catapult would allow B-65 to carry up to three seaplanes. | |||
| + | ||||
| + | B-65's armor was designed to be resilient against cruiser fire primarily, while also being strong enough to repel air attacks. The main belt was 190mm thick, and inclined at 20° to add further protection, which was supposed to protect against large caliber shells at ranges until 20km. The thickness was also used for the forward and rear bulkhead, while the deck armor and deck slopes were thinner at 125mm, which was deemed sufficient to resist an 800kg bomb and large caliber shells at ranges up to 30km. As protection against underwater explosions the torpedo defense system was designed to withstand an underwater explosion of 400kg. | |||
| + | ||||
| + | ===Historical Inaccuracies=== | |||
| + | * ''Azuma'' is actually the name of an armored cruiser that was built in 1898 and fought in the Russo-Japanese War. No other ship in the Imperial Japanese Navy ever inherited the name. | |||
| + | * ''Azuma''’s enhanced anti-aircraft suite in-game is envisioned in a late-war configuration that was not a part of her original design. | |||
| |HistoricalGallery=<!-- write below list of files with description (if necessary) separated with | --><gallery> | |HistoricalGallery=<!-- write below list of files with description (if necessary) separated with | --><gallery> | |||
| ? | File:Design B-65.svg| | + | File:Design B-65.svg|Artist's rendering of Design B-65. | |
| + | File:Image00.jpg|Artist's rendering of Design B-65. | |||
| </gallery> | </gallery> | |||
| |Video=<!-- put below video clips with using template VideoYT. You can use html-tags for formatting. --> | |Video=<!-- put below video clips with using template VideoYT. You can use html-tags for formatting. --> | |||
| ? | + | {{VideoYT|ge66gOmBXx4}} | ||
| |Ref= <!-- write below --> | |Ref= <!-- write below --> | |||
| + | # [https://en.wikipedia.org/wiki/Design_B-65_cruiser Design B-65 cruiser - Wikipedia] | |||
| + | # [https://worldofwarships.com/en/news/history/armada-azuma/ Armada: Azuma (no video) - News - World of Warships] | |||
| }}<!-- DO NOT DELETE THIS LINE. DO NOT INSERT ANYTHING BELOW THIS LINE --> | }}<!-- DO NOT DELETE THIS LINE. DO NOT INSERT ANYTHING BELOW THIS LINE --> | |||
Revision as of 22:06, 14 September 2020

| Purchase priceSpecial |
| Hit Points58,350 |
| 310 mm/50 Type 0 in a triple turret3 х 3 pcs. |
| Rate of Fire3 shots/min. |
| Reload Time20 sec. |
| Rotation Speed5 deg./sec. |
| 180 Degree Turn Time36 sec. |
| Firing Range19.09 km. |
| Maximum Dispersion196 m. |
| HE Shell310 mm HE Type92 |
| Maximum HE Shell Damage5,100 |
| Chance of Fire on Target Caused by HE Shell27 % |
| Initial HE Shell Velocity836 m./s. |
| HE Shell Weight448.8 kg. |
| AP Shell310 mm AP Type92 |
| Maximum AP Shell Damage8,650 |
| Initial AP Shell Velocity836 m./s. |
| AP Shell Weight448.8 kg. |
| 100 mm/65 Type 98 on a Model A mount8 х 2 pcs. |
| Firing Range6.95 km. |
| Rate of Fire20 shots/min. |
| Reload Time3 sec. |
| HE Shell100 mm HE Type98 |
| Maximum HE Shell Damage1,700 |
| Initial HE Shell Velocity1000 m./s. |
| Chance of Fire on Target Caused by HE Shell6 % |
| 100 mm/65 Type 98 on a Model A mount8 х 2 pcs. |
| . . . Average Damage per Second166.4 |
| . . . Firing Range5.01 km. |
| 25 mm/60 Type 96 on a triple mount18 х 3 pcs. |
| . . . Average Damage per Second59.4 |
| . . . Firing Range2.49 km. |
| 25 mm/60 Type 96 on a twin mount6 х 2 pcs. |
| . . . Average Damage per Second16.2 |
| . . . Firing Range2.49 km. |
| 25 mm/60 Type 96 on a triple mount6 х 3 pcs. |
| . . . Average Damage per Second19.8 |
| . . . Firing Range2.49 km. |
| Maximum Speed34 knot |
| Turning Circle Radius920 m. |
| Rudder Shift Time13.9 sec. |
| Surface Detectability Range14.67 km. |
| Air Detectability Range10.73 km. |

Azuma — Japanese special premium Tier IX cruiser.
A powerful high-speed ship (Project B-65) designed to destroy American heavy cruisers and confront Alaska-class "large cruisers". Some design solutions were borrowed from Yamato-class battleships. She was armed with nine 310 mm guns and had good anti-torpedo protection.
Azuma was first released for sale worldwide on 1 April 2019.
Modules
 |
Rate of Fire (shots/min) | 180° Turn Time (sec) | Maximum Dispersion (m) | Maximum HE Shell Damage (HP) | Chance of Fire on Target Caused by HE Shell (%) | Maximum AP Shell Damage (HP) |
Research price (exp) |
Purchase price ( | |
|---|---|---|---|---|---|---|---|---|---|
| 310 mm/50 Type 0 in a triple turret | 3 | 36 | 196 | 5,100 | 27 | 8,650 | 0 | 0 |
 |
Hit Points (HP) | Armor (mm) | Armor (mm) | Main Turrets (pcs.) | Secondary Gun Turrets (pcs.) | AA Mounts (pcs.) | Torpedo Tubes (pcs.) | Hangar Capacity (pcs.) |
Research price (exp) |
Purchase price ( | |
|---|---|---|---|---|---|---|---|---|---|---|---|
| Azuma | 58,350 | 13 | 305 | 3 | 8 | 6/24/8 | 0 | 0 |
 |
IDS_SHIP_PARAM_SUO_INCREASE_DIST (%) | Maximum Firing Range (km) |
Research price (exp) |
Purchase price ( | |
|---|---|---|---|---|---|
| Type10 mod. 1 | 0 | 0 | 0 |
 |
Maximum Speed (knot) |
Research price (exp) |
Purchase price ( | |
|---|---|---|---|---|
| Propulsion: 170,000 hp | 34 | 0 | 0 |
Compatible Upgrades
| Slot 1 |
|||||
|---|---|---|---|---|---|
| Slot 2 |
|||||
| Slot 3 |
|||||
| Slot 4 |
|||||
| Slot 5 |
|||||
| Slot 6 |
Player Opinion
Performance
Tier IX Premium Japanese cruiser Azuma is in the same "large cruiser" category as her counterparts Alaska and Kronshtadt. Azuma is well suited for long range fights, featuring nine 310mm guns in a 3x3 layout that have high velocity, flat arcs, and strong performance from her high explosive rounds. The main battery performance is the primary strength of the ship.
Azmua’s 310mm guns are the longest-ranged of the large cruisers found at Tier IX, clocking in at a base range of 19.1km before Gun Fire Control System Modification 2 ![]() or Spotting Aircraft
or Spotting Aircraft ![]() . Though they still lag behind Kronshtadt some, her shell velocities are noticeably better than Alaska, making her gunnery fairly comfortable to use all the way out to her maximum range. Befitting her Japanese origins, she has the best HE alpha damage and fire chance of all the 12-inch armed cruisers, though her AP shell damage lacks slightly to that of her peers. The penetration values of her armor-piercing shells run about 10-15% lower than Kronshtadt at all ranges, but are pretty comparable to Alaska along the same curve. Overall, her main battery performance is a nice middle ground between the large cruisers already in the game: better HE performance than the rest, and comparable AP performance (though she lacks Alaska’s improved auto-bounce angles).
. Though they still lag behind Kronshtadt some, her shell velocities are noticeably better than Alaska, making her gunnery fairly comfortable to use all the way out to her maximum range. Befitting her Japanese origins, she has the best HE alpha damage and fire chance of all the 12-inch armed cruisers, though her AP shell damage lacks slightly to that of her peers. The penetration values of her armor-piercing shells run about 10-15% lower than Kronshtadt at all ranges, but are pretty comparable to Alaska along the same curve. Overall, her main battery performance is a nice middle ground between the large cruisers already in the game: better HE performance than the rest, and comparable AP performance (though she lacks Alaska’s improved auto-bounce angles).
It's a good thing Azuma has all that main battery range to play with: of the Tier IX large cruisers, Azuma is by far the least durable, featuring no plating thicker than 25mm other than her internal belt and deck armor. This means she is exceedingly vulnerable to high explosive rounds at nearly all ranges and angles — as well as being overmatched by all 380mm class or larger battleship guns — in addition to her citadel spaces extending above the waterline. Azuma also has a fairly mediocre anti-aircraft suite, with the majority of its strength concentrated in long-range flak bursts that a skilled carrier player will easily dodge. Azuma has decent mobility, with a top speed of 34 knots and average rudder shift and turning circle for her class of ships, and can reduce her concealment to 11.8km when fully built for it. Consumable wise, Azuma features standard cruiser consumables with the exception of her Repair Party ![]() , which has a reduced cooldown compared to the usual version.
, which has a reduced cooldown compared to the usual version.
Pros:
- Large health pool.
- Good HE shells like most other Japanese cruisers.
- Good concealment for a large cruiser.
- Good maneuverability for a large cruiser.
Cons:
- Exterior plating is almost entirely 25mm, making her very weak to any and all battleships.
- Poor rear turret angles make getting all guns on target quite dangerous.
- Slow turret traverse.
- Unlike every other Japanese cruiser, Azuma does not have any torpedoes.
- Although she is more accurate than her American and Soviet counterparts, her dispersion is still quite poor.
Research
Optimal Configuration
Upgrades
The recommended upgrades for Azuma are as follows:
- Slot 1: Main Armaments Modification 1

- Slot 2: Steering Gears Modification 1

- Slot 3: Aiming Systems Modification 1

- Slot 4: Steering Gears Modification 2

- Slot 5: Concealment System Modification 1

- Slot 6: Main Battery Modification 3

Upgrade Slot 1 grants players with access to Main Armaments Modification 1 ![]() which is recommended to increase the durability of her main battery.
which is recommended to increase the durability of her main battery.
Upgrade Slot 2 allows players to increase the durability of their rudder against incoming fire while also reducing the repair time.
Upgrade Slot 3 provides players with the opportunity to increase accuracy through Aiming Systems Modification 1 ![]() , this helps to improve her performance at further ranges.
, this helps to improve her performance at further ranges.
Upgrade Slot 4 gives players a choice between Steering Gears Modification 2 ![]() or Propulsion Modification 1 (
or Propulsion Modification 1 (![]() ) to better increase the mobility of Azuma however, some players may opt to mount Damage Control System Modification 2
) to better increase the mobility of Azuma however, some players may opt to mount Damage Control System Modification 2 ![]() for increased survivability.
for increased survivability.
Upgrade Slot 5 allows players to increase the already good concealment of Azuma by mounting Concealment System Modification 1 ![]() however some players may opt to mount Steering Gears Modification 2 (
however some players may opt to mount Steering Gears Modification 2 (![]() ) to further their ability to dodge incoming fire.
) to further their ability to dodge incoming fire.
Upgrade Slot 6 provides players with another choice to make dependent upon their play style. Main Battery Modification 3 ![]() provides players an opportunity to reduce the reload of their main guns, while some players may instead opt to take Gun Fire Control System Modification 2
provides players an opportunity to reduce the reload of their main guns, while some players may instead opt to take Gun Fire Control System Modification 2 ![]() to increase their main battery firing range.
to increase their main battery firing range.
Commander Skills
| Recommended Commander Skills | ||||||||
|---|---|---|---|---|---|---|---|---|
| Cost (points) |
Endurance | Attack | Support | Versatility | ||||
| 1 |
★★★ |
★ |
★★ |
Χ |
Χ |
Χ |
★ |
Χ |
| 2 |
★ |
|
★★★ |
Χ |
Χ |
Χ |
★★★ |
★ |
| 3 |
★★★ |
|
Χ |
Χ |
|
★★★ |
★★ |
|
| 4 |
Χ |
★★ |
Χ |
Χ |
★ |
|
★ |
★★★ |
| Key: ★★★ - Extremely Useful ★★ - Frequently Useful ★ - Occasionally Useful No stars - Meh Χ - Not recommended | ||||||||
Consumables
Azuma can equip the following consumables:
- Slot 1: Damage Control Party

- Slot 2: Defensive AA Fire
 or Hydroacoustic Search
- Slot 3: Spotting Aircraft

- Slot 4: Repair Party

Camouflage
As a premium ship, Azuma comes included with Type 10 camouflage that lowers her detection radius, reduces the accuracy of incoming shells, reduces her repair costs, and increases the amount of experience she earns.
Signals
Recommended Signal Flags 
| |||||
|---|---|---|---|---|---|
| Combat | |||||
 ★★ |

|
 ★★ |
 ★ |
 ★★★ |
 ★★★ |
 ★ |

|
 ★★ |
 ★★★ |
 ★★ |
 ★★★ |

|

| ||||
Note: Use of the Juliet Charlie signal makes detonation impossible.