Bismarck
| Revision as of 04:00, 26 January 2021 WG skill recommendations | Revision as of 00:11, 24 May 2021 Replaced dead eye and added reference tag | |||
5 intermediate revisions by 2 users not shown | ||||
| Line 22: | Line 22: | |||
| * Outstanding secondary battery. With the right upgrades and commander skills, her secondary battery range can be extended past 11.0 km, allowing ''{{#var:ship_name}}'' to whittle down enemy ships before closing in for the kill. | * Outstanding secondary battery. With the right upgrades and commander skills, her secondary battery range can be extended past 11.0 km, allowing ''{{#var:ship_name}}'' to whittle down enemy ships before closing in for the kill. | |||
| * Has access to the {{Hydroacoustic Search}} consumable, making her very difficult to torpedo from long range. | * Has access to the {{Hydroacoustic Search}} consumable, making her very difficult to torpedo from long range. | |||
| ? | ||||
| * Above average anti-aircraft suite. | * Above average anti-aircraft suite. | |||
| * Surprisingly nimble for a battleship of her size, with an excellent top speed (30 knots). | * Surprisingly nimble for a battleship of her size, with an excellent top speed (30 knots). | |||
| ? | * Exceptionally durable with a good armor layout; has the vaunted "turtleback" armor making her almost immune to citadel damage except from super-battleship guns (i.e. Yamato, Shikishima). | + | * Exceptionally durable with a good armor layout; has the vaunted "turtleback" armor making her almost immune to citadel damage except from super-battleship guns (i.e. [[Yamato]], [[Shikishima]]). | |
| ? | * Secondaries can take a destroyer down fairly quickly if it doesn't dodge. | + | * Secondaries can take a [[Destroyers|destroyer]] down fairly quickly if it doesn't dodge. | |
| + | * Many hit points | |||
| + | ||||
| |Cons=<!-- write list of negative points below. use * as in ordinary wiki-list. --> | |Cons=<!-- write list of negative points below. use * as in ordinary wiki-list. --> | |||
| ? | * No torpedoes like those found on her sister | + | * No torpedoes like those found on her sister [[Tirpitz]]. | |
| * Only has eight (8) barrels, while nearly every other ship at this tier has nine (9) or more of a higher caliber. | * Only has eight (8) barrels, while nearly every other ship at this tier has nine (9) or more of a higher caliber. | |||
| ? | ||||
| ? | ||||
| ? | ||||
| * Armor scheme remains vulnerable to full penetrations by armor-piercing shells when showing the flat broadside of the ship to the enemy; ''{{#var:ship_name}}'' may not take citadel damage, but a lot of regular penetration damage hurts just as badly. | * Armor scheme remains vulnerable to full penetrations by armor-piercing shells when showing the flat broadside of the ship to the enemy; ''{{#var:ship_name}}'' may not take citadel damage, but a lot of regular penetration damage hurts just as badly. | |||
| * Main guns' accuracy can be disappointing at times, especially without Aiming System Modification upgrade. | * Main guns' accuracy can be disappointing at times, especially without Aiming System Modification upgrade. | |||
| ? | ||||
| * Despite her secondaries' range, their reliability can be inconsistent even with a proper build. They also don't work well against another battleship at extremely close range (i.e. 6km or less). | * Despite her secondaries' range, their reliability can be inconsistent even with a proper build. They also don't work well against another battleship at extremely close range (i.e. 6km or less). | |||
| Line 45: | Line 42: | |||
| |Upgrades=<!-- write text about best upgrades below --> | |Upgrades=<!-- write text about best upgrades below --> | |||
| The recommended upgrades for ''{{#var:ship_name}}'' are as follows: | The recommended upgrades for ''{{#var:ship_name}}'' are as follows: | |||
| ? | * '''Slot 1:''' | + | * '''Slot 1:''' {{Auxiliary Armaments Modification 1}} for more survivability of the [[Ship:Anti-Aircraft_Fire|AA mounts]] and of the [[Ship:Secondary Armament|secondary battery]]. | |
| * '''Slot 2:''' {{Damage Control System Modification 1}} to improve her overall survival in battle. | * '''Slot 2:''' {{Damage Control System Modification 1}} to improve her overall survival in battle. | |||
| ? | * '''Slot 3:''' {{ | + | * '''Slot 3:''' {{Secondary Battery Modification 1}} for better accuracy and more range for the [[Ship:Secondary Armament|secondary battery guns]] | |
| * '''Slot 4:''' {{Damage Control System Modification 2}} to further improve her overall survival. {{Steering Gears Modification 1}} is also an option to improve her maneuverability. | * '''Slot 4:''' {{Damage Control System Modification 2}} to further improve her overall survival. {{Steering Gears Modification 1}} is also an option to improve her maneuverability. | |||
| ? | * '''Slot 5:''' {{Concealment System Modification 1}} to reduce her detection range | + | * '''Slot 5:''' {{Concealment System Modification 1}} to reduce her detection range. | |
| |CommanderSkills= | |CommanderSkills= | |||
| '''Secondary Battery Build:''' Following along with the theme of maximizing the punishment dished out by ''Bismarck''’s secondaries, captains should invest in Basic Firing Training, Adrenaline Rush, Superintendent, and Advanced Firing Training. Manual Control for Secondary Armament is a strong skill in this build, but it only allows the ship's secondaries to fire at a single target at a time. Some captains will prefer this skill; others will not. Extra skill points should be invested in either Basics of Survivability, High Alert, or Vigilance, as desired. | '''Secondary Battery Build:''' Following along with the theme of maximizing the punishment dished out by ''Bismarck''’s secondaries, captains should invest in Basic Firing Training, Adrenaline Rush, Superintendent, and Advanced Firing Training. Manual Control for Secondary Armament is a strong skill in this build, but it only allows the ship's secondaries to fire at a single target at a time. Some captains will prefer this skill; others will not. Extra skill points should be invested in either Basics of Survivability, High Alert, or Vigilance, as desired. | |||
| ? | ||||
| {{Commander Skills 3 BB | {{Commander Skills 3 BB | |||
| Line 73: | Line 69: | |||
| | rating31 = <!-- Super-Heavy AP Shells --> | | rating31 = <!-- Super-Heavy AP Shells --> | |||
| ? | | rating32 = | + | | rating32 = 3 <!-- Long-Range Secondary Battery Shells --> | |
| | rating33 = 2 <!-- Adrenaline Rush --> | | rating33 = 2 <!-- Adrenaline Rush --> | |||
| ? | | rating34 = | + | | rating34 = 2 <!-- Basics of Survivability --> | |
| | rating35 = <!-- Enhanced Anti-Torpedo Protection --> | | rating35 = <!-- Enhanced Anti-Torpedo Protection --> | |||
| | rating36 = <!-- Expert AA Marksman --> | | rating36 = <!-- Expert AA Marksman --> | |||
| ? | | rating41 = <!-- | + | | rating41 = <!-- Swift in Silence --> | |
| | rating42 = 2 <!-- Improved Secondary Battery Aiming --> | | rating42 = 2 <!-- Improved Secondary Battery Aiming --> | |||
| | rating43 = 2 <!-- Close Quarters Combat --> | | rating43 = 2 <!-- Close Quarters Combat --> | |||
| ? | | rating44 = | + | | rating44 = 3 <!-- Emergency Repair Expert --> | |
| | rating45 = <!-- Concealment Expert --> | | rating45 = <!-- Concealment Expert --> | |||
| | rating46 = 2 <!-- Fire Prevention Expert --> | | rating46 = 2 <!-- Fire Prevention Expert --> | |||
| Line 253: | Line 249: | |||
| # https://en.wikipedia.org/wiki/Ernst_Lindemann<br /> | # https://en.wikipedia.org/wiki/Ernst_Lindemann<br /> | |||
| # https://en.wikipedia.org/wiki/G%C3%BCnther_L%C3%BCtjens | # https://en.wikipedia.org/wiki/G%C3%BCnther_L%C3%BCtjens | |||
| ? | + | <references /> | ||
| }}<!-- DO NOT DELETE THIS LINE. DO NOT INSERT ANYTHING BELOW THIS LINE --> | }}<!-- DO NOT DELETE THIS LINE. DO NOT INSERT ANYTHING BELOW THIS LINE --> | |||
Revision as of 00:11, 24 May 2021

| Research price135000 exp |
| Purchase price11,000,000 |
| Hit Points64,500 |
| 380 mm/52 SK C/34 on a Drh LC/34 mount4 х 2 pcs. |
| Rate of Fire2.31 shots/min. |
| Reload Time26 sec. |
| Rotation Speed5 deg./sec. |
| 180 Degree Turn Time36 sec. |
| Firing Range19.28 km. |
| Maximum Dispersion272 m. |
| HE Shell380 mm Spr.Gr. L/4.6 |
| Maximum HE Shell Damage4,400 |
| Chance of Fire on Target Caused by HE Shell34 % |
| Initial HE Shell Velocity820 m./s. |
| HE Shell Weight800 kg. |
| AP Shell380 mm P.Spr.Gr. L/4.4 |
| Maximum AP Shell Damage11,600 |
| Initial AP Shell Velocity820 m./s. |
| AP Shell Weight800 kg. |
| 105 mm/65 SK C/33 on a Dop. L. C/31 mount4 х 2 pcs. |
| Firing Range7.6 km. |
| Rate of Fire17.91 shots/min. |
| Reload Time3.35 sec. |
| HE Shell105 mm Spr.Gr. Kz. |
| Maximum HE Shell Damage1,200 |
| Initial HE Shell Velocity900 m./s. |
| Chance of Fire on Target Caused by HE Shell5 % |
| 105 mm/65 SK C/33 on a Dop. L. C/37 mount4 х 2 pcs. |
| Firing Range7.6 km. |
| Rate of Fire17.91 shots/min. |
| Reload Time3.35 sec. |
| HE Shell105 mm Spr.Gr. Kz. |
| Maximum HE Shell Damage1,200 |
| Initial HE Shell Velocity900 m./s. |
| Chance of Fire on Target Caused by HE Shell5 % |
| 150 mm/55 SK C/28 on a Dop. L. C/34 mount2 х 2 pcs. |
| Firing Range7.6 km. |
| Rate of Fire8 shots/min. |
| Reload Time7.5 sec. |
| HE Shell150 mm Spr.Gr. L/4.5 |
| Maximum HE Shell Damage1,700 |
| Initial HE Shell Velocity875 m./s. |
| Chance of Fire on Target Caused by HE Shell8 % |
| 150 mm/55 SK C/28 on a Dop. L. C/34 mount4 х 2 pcs. |
| Firing Range7.6 km. |
| Rate of Fire8 shots/min. |
| Reload Time7.5 sec. |
| HE Shell150 mm Spr.Gr. L/4.5 |
| Maximum HE Shell Damage1,700 |
| Initial HE Shell Velocity875 m./s. |
| Chance of Fire on Target Caused by HE Shell8 % |
| 105 mm/65 SK C/33 on a Dop. L. C/31 mount4 х 2 pcs. |
| . . . Average Damage per Second66.4 |
| . . . Firing Range4.5 km. |
| 105 mm/65 SK C/33 on a Dop. L. C/37 mount4 х 2 pcs. |
| . . . Average Damage per Second66.8 |
| . . . Firing Range4.5 km. |
| 37 mm/83 SK C/30 on a Dopp LC/30 mount8 х 2 pcs. |
| . . . Average Damage per Second20.8 |
| . . . Firing Range3.51 km. |
| 20 mm/65 C/38 on a Flak 35 Vierling L/38 mount2 х 4 pcs. |
| . . . Average Damage per Second12 |
| . . . Firing Range2.01 km. |
| 20 mm/65 C/38 on an L/30 single mount12 х 1 pcs. |
| . . . Average Damage per Second36 |
| . . . Firing Range2.01 km. |
| Maximum Speed28.52 knot |
| Turning Circle Radius850 m. |
| Rudder Shift Time22.4 sec. |
| Surface Detectability Range15.89 km. |
| Air Detectability Range11.74 km. |

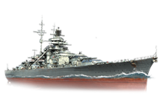
Bismarck — German Tier VIII battleship.
By the start of World War II, Bismarck was one of the mightiest battleships in the world, owing to her advanced gun fire control system and powerful artillery. Rugged construction — coupled with elaborate subdivision into compartments and a vast expanse of armor — ensured a high level of endurance.
Modules
 |
Rate of Fire (shots/min) | 180° Turn Time (sec) | Maximum Dispersion (m) | Maximum HE Shell Damage (HP) | Chance of Fire on Target Caused by HE Shell (%) | Maximum AP Shell Damage (HP) |
Research price (exp) |
Purchase price ( | |
|---|---|---|---|---|---|---|---|---|---|
| 380 mm/52 SK C/34 on a Drh LC/34 mount | 2.3 | 36 | 272 | 4,400 | 34 | 11,600 | 0 | 1,100,000 |
 |
Hit Points (HP) | Armor (mm) | Armor (mm) | Main Turrets (pcs.) | Secondary Gun Turrets (pcs.) | AA Mounts (pcs.) | Torpedo Tubes (pcs.) | Hangar Capacity (pcs.) |
Research price (exp) |
Purchase price ( | |
|---|---|---|---|---|---|---|---|---|---|---|---|
| Bismarck (A) | 64,500 | 19 | 360 | 4 | 8/6 | 12/2/8/8 | 0 | 1,650,000 | |||
| Bismarck (B) | 69,200 | 19 | 360 | 4 | 8/6 | 14/16/10 | 52,000 | 3,900,000 |
 |
IDS_SHIP_PARAM_SUO_INCREASE_DIST (%) | Maximum Firing Range (km) |
Research price (exp) |
Purchase price ( | |
|---|---|---|---|---|---|
| FKS Typ 8 Mod. 1 | 0 | 0 | 600,000 | ||
| FKS Typ 8 Mod. 2 | 0 | 23,500 | 1,500,000 |
 |
Maximum Speed (knot) |
Research price (exp) |
Purchase price ( | |
|---|---|---|---|---|
| Propulsion: 150,100 hp | 28.5 | 0 | 380,000 | |
| Propulsion: 163,000 hp | 31 | 15,500 | 900,000 |
Compatible Upgrades
| Slot 1 |
|||||
|---|---|---|---|---|---|
| Slot 2 |
|||||
| Slot 3 |
|||||
| Slot 4 |
|||||
| Slot 5 |
Player Opinion
Performance
The historical pinnacle of German battleship construction, Bismarck stands as one of the heartiest battleships at Tier VIII. While her main battery may not look as impressive as that of Amagi, and doesn't have North Carolina’s range — or even her sister Tirpitz’s torpedoes — Bismarck has the perfect mix of ingredients to make her an excellent brawler.
For starters, her secondary battery is the most impressive of all the Tier VIII battleships. It comes with a stock range of 7.5km, and with the right mix of modules and commander skills can be pushed to a range of over 11.0 km, farther than the range of a similarly-equipped Yamato. This creates a large radius around her which enemy units must respect or pay a hefty price. Additionally, her handling is superb for a ship her size; she's quick to respond to rudder commands, and her turning circle is better than that of Amagi. Easily the most impressive thing about Bismarck is her survivability. Like her sister Tirpitz, she is exceptionally difficult to land citadel hits against; only long-range plunging fire has a good chance of doing so. The closer she gets, the better her armor scheme protects her from incoming fire. She will take more than her fair share of regular penetration damage from enemy armor-piercing rounds, but that damage repairs better than citadel damage.
Bismarck has another trick up her sleeve that sets her apart from Tirpitz: access to the Hydroacoustic Search ![]() consumable. This provides her with large windows of time where she is functionally immune to long range torpedoes, and also provides detection of enemy ships hidden in smoke screens when pushing into capture zones.
consumable. This provides her with large windows of time where she is functionally immune to long range torpedoes, and also provides detection of enemy ships hidden in smoke screens when pushing into capture zones.
When all of that is paired with an above-average anti-aircraft suite, Bismarck is a very well-rounded, highly survivable battleship that is friendly to players of all skill levels.
Pros:
- Fast turret traverse and main battery reload time (26 seconds) for a battleship.
- Outstanding secondary battery. With the right upgrades and commander skills, her secondary battery range can be extended past 11.0 km, allowing Bismarck to whittle down enemy ships before closing in for the kill.
- Has access to the Hydroacoustic Search
 consumable, making her very difficult to torpedo from long range.
- Above average anti-aircraft suite.
- Surprisingly nimble for a battleship of her size, with an excellent top speed (30 knots).
- Exceptionally durable with a good armor layout; has the vaunted "turtleback" armor making her almost immune to citadel damage except from super-battleship guns (i.e. Yamato, Shikishima).
- Secondaries can take a destroyer down fairly quickly if it doesn't dodge.
- Many hit points
Cons:
- No torpedoes like those found on her sister Tirpitz.
- Only has eight (8) barrels, while nearly every other ship at this tier has nine (9) or more of a higher caliber.
- Armor scheme remains vulnerable to full penetrations by armor-piercing shells when showing the flat broadside of the ship to the enemy; Bismarck may not take citadel damage, but a lot of regular penetration damage hurts just as badly.
- Main guns' accuracy can be disappointing at times, especially without Aiming System Modification upgrade.
- Despite her secondaries' range, their reliability can be inconsistent even with a proper build. They also don't work well against another battleship at extremely close range (i.e. 6km or less).
Research
Optimal Configuration
Upgrades
The recommended upgrades for Bismarck are as follows:
- Slot 1: Auxiliary Armaments Modification 1
 for more survivability of the AA mounts and of the secondary battery.
- Slot 2: Damage Control System Modification 1
 to improve her overall survival in battle.
- Slot 3: Secondary Battery Modification 1
 for better accuracy and more range for the secondary battery guns
- Slot 4: Damage Control System Modification 2
 to further improve her overall survival. Steering Gears Modification 1
  is also an option to improve her maneuverability.
- Slot 5: Concealment System Modification 1
 to reduce her detection range.
Commander Skills
Secondary Battery Build: Following along with the theme of maximizing the punishment dished out by Bismarck’s secondaries, captains should invest in Basic Firing Training, Adrenaline Rush, Superintendent, and Advanced Firing Training. Manual Control for Secondary Armament is a strong skill in this build, but it only allows the ship's secondaries to fire at a single target at a time. Some captains will prefer this skill; others will not. Extra skill points should be invested in either Basics of Survivability, High Alert, or Vigilance, as desired.
| Recommended Commander Skills | ||||||
|---|---|---|---|---|---|---|
| Cost (points) |
Attack | Defense | ||||
| 1 |
|
★★ |
|
|
|
|
| 2 |
★★ |
|
|
|
|
|
| 3 |
|
★★★ |
★★ |
★★ |
|
|
| 4 |
|
★★ |
★★ |
★★★ |
|
★★ |
| Key: ★★★ - Extremely Useful ★★ - Frequently Useful ★ - Occasionally Useful No stars - Not Useful | ||||||
Consumables
Bismarck can equip the following consumables:
- Slot 1: Damage Control Party

- Slot 2: Repair Party

- Slot 3: Spotting Aircraft
 or Catapult Fighter
- Slot 4: Hydroacoustic Search
Catapult Fighter is recommended, since Bismarck's range is already quite good.
Camouflage
Type 1, 2, or 5 camouflage can be equipped for credits; Types 2 or 5 are recommended at a minimum to reduce the accuracy of incoming shells.
Players who wish to spend doubloons can equip Bismarck with Type 18 camouflage that lowers her detection radius, reduces the accuracy of incoming shells, reduces her repair costs, and increases the amount of experience she earns.
Players who completed "The Hunt for Bismarck" collection were awarded a pair of alternate permanent camouflages depicting the ship as it appeared during the Battle of the Denmark Strait. A Halloween camouflage, "Varg", also exists that displays the ship as it appears in the Halloween 2017 scenario, "Sunray in the Darkness".
Signals
Players who have followed the Secondary Battery Build above will want to equip Mike Yankee Soxisix (![]() ) and India Delta (
) and India Delta (![]() ) signals in order to further boost the effectiveness of their secondaries and Repair Party
) signals in order to further boost the effectiveness of their secondaries and Repair Party ![]() consumable, respectively.
consumable, respectively.
Players following the Anti-Aircraft Build may wish to equip November Echo Setteseven (![]() ) for the bonus to AA gun damage.
) for the bonus to AA gun damage.
Recommended Signal Flags 
| |||||
|---|---|---|---|---|---|
| Combat | |||||

|
 ★★ |
 ★★ |
 ★ |
 ★ |
 ★ |

|
 ★★★ |
 ★★ |
 ★★★ |
 ★★ |
 ★★★ |

|

| ||||
Note: Use of the Juliet Charlie signal makes detonation impossible.
Gallery
Historical Info
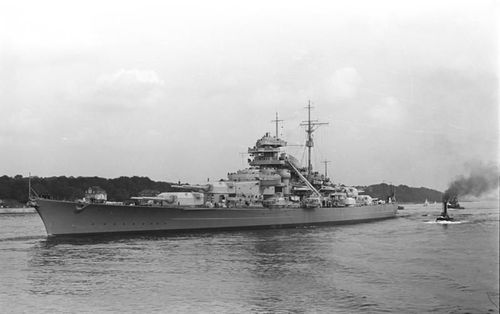
Historical Gallery


.jpg)


Video
References
- German battleship Bismarck - Wikipedia
- Bismarck-class battleship - Wikipedia
- Chasing Bismarck - News - World of Warships
- Dry Dock: Bismarck - News - World of Warships
- Sabaton Pays Tribute to Bismarck - News - World of Warships
- The History of Günther Lütjens - News - World of Warships
- Bismarck. A musical tribute from Sabaton and World of Warships - World of Warships Official Channel - YouTube
- Dry Dock: Bismarck - World of Warships Official Channel - YouTube
- German Commander Günther Lütjens - World of Warships Official Channel - YouTube
- https://en.wikipedia.org/wiki/Ernst_Lindemann
- https://en.wikipedia.org/wiki/G%C3%BCnther_L%C3%BCtjens