Chengan
| Revision as of 19:33, 14 November 2017 | Revision as of 18:27, 1 March 2021 WG skill recommendations | |||
19 intermediate revisions by 8 users not shown | ||||
| Line 4: | Line 4: | |||
| |Promo=<!-- in case of gift or promo ship write conditions to get it. (optional)--> | |Promo=<!-- in case of gift or promo ship write conditions to get it. (optional)--> | |||
| ? | |Anno=<!-- you can write below short description for the ship. it will replace default | + | |Anno=<!-- you can write below short description for the ship. it will replace default. --> | |
| ? | [[File:Wows flag ROC.png|50px|frameless|right|link=]]This small escort ship (''kaibōkan'') was built during World War II for the Imperial Japanese Navy. In 1947, she was transferred to the Republic of China. | + | [[File:Wows flag ROC.png|50px|frameless|right|link=]]This small escort ship (''kaibōkan'') was built during World War II for the Imperial Japanese Navy. In 1947, she was transferred to the Republic of China.<br><br>{{Model3DViewer|794b1341ec094e7eb2be2a2bc7b024d1}} | |
| ? | + | |||
| |Performance=<!-- write text about performance in battles below --> | |Performance=<!-- write text about performance in battles below --> | |||
| + | The start of the Pan-Asian tech tree, ''{{#var:ship_name}}'' is best played at medium to long range. She is the smallest ship at her tier, and compensates for a lack of armor with agility and concealment. Her small size and fast rudder shift make her a difficult target to hit. When under fire, captains should use evasive maneuvers such as weaving and try to maintain 7 to 8 kilometers of distance between themselves and the enemy. | |||
| + | ||||
| + | If ''{{#var:ship_name}}'' finds herself in a close-range engagement, she will struggle to penetrate the citadel armor belt of ''[[Erie]], [[Hashidate]]'', and ''[[Hermelin]]''. If this occurs, aim for the bow, stern, or superstructure to avoid non-penetrations. Despite her inability to hit the citadel of those ships, ''{{#var:ship_name}}'' is capable of penetrating the citadel armor belt of ''[[Black Swan]], [[Bougainville]]'', and ''[[Orlan]]''. If any of those three ships show their broadside, captains should aim for the waterline under the smoke stack to inflict severe damage. Captains should also utilize ''{{#var:ship_name}}'''s excellent concealment to dictate the engagement. When fully specialized, ''{{#var:ship_name}}'' will not be out spotted by any of the other Tier I ships. This stealthiness enables her to set up ambush-style attacks or disengage from a greater enemy force. | |||
| |Pros=<!-- write list of positive points below. use * as in ordinary wiki-list. --> | |Pros=<!-- write list of positive points below. use * as in ordinary wiki-list. --> | |||
| ? | * | + | * Very small and agile (lowest turning circle radius and rudder shift time of all Tier I ships). | |
| ? | * | + | * Excellent concealment (lowest detectability range of all Tier I ships). | |
| ? | * | + | * Fastest turret rotation of all Tier I ships. | |
| ? | * | + | * Small and therefore difficult to hit. | |
| |Cons=<!-- write list of negative points below. use * as in ordinary wiki-list. --> | |Cons=<!-- write list of negative points below. use * as in ordinary wiki-list. --> | |||
| ? | * | + | * Weak citadel armor belt. | |
| ? | * | + | * Shortest main battery firing range of all Tier I ships. | |
| ? | * | + | * Sluggish main battery reload time. | |
| ? | * | + | * Slow top speed (slowest Tier I ship together with ''[[Black Swan]]'' and ''[[Bougainville]]''). | |
| + | ||||
| + | ||||
| + | ''See also'': [[Ship:Comparison of Tier I Cruisers|Comparison of Tier I Cruisers]]. | |||
| + | ||||
| |Research=<!-- write text about priority sequence of research below --> | |Research=<!-- write text about priority sequence of research below --> | |||
| + | Availability of researchable upgrades for ''{{#var:ship_name}}'' is as follows: | |||
| + | * '''Main Battery''': No available upgrades. | |||
| + | * '''Hull''': Progression to consecutive ship, [[Ship:Longjiang|''Longjiang'']]. | |||
| + | * '''Gun Fire Control System''': Type 1 Mod. 1 can be upgraded to Type 1 Mod. 2 for a 10% firing range increase. | |||
| + | * '''Engine''': No available upgrades. | |||
| + | ||||
| + | ||||
| + | Players wishing to progress further in the line should prioritize research and purchase of ''Longjiang''. For players who enjoy playing ''{{#var:ship_name}}'', GFCS Type 1 Mod. 2 is an inexpensive upgrade to research and mount. | |||
| |OptimalConfiguration=<!-- write some general text about selection of optimal configuration below (optional)--> | |OptimalConfiguration=<!-- write some general text about selection of optimal configuration below (optional)--> | |||
| Line 28: | Line 42: | |||
| |Upgrades=<!-- write text about best upgrades below, add * after upgrade link to designate that another upgrade may be viable --> | |Upgrades=<!-- write text about best upgrades below, add * after upgrade link to designate that another upgrade may be viable --> | |||
| ? | + | The recommended upgrades for ''{{#var:ship_name}}'' are as follows: | ||
| ? | *'''Slot 1''': | + | *'''Slot 1''': [[Ship:Upgrades#Main_Armaments_Modification.C2.A01|Main Armaments Modification 1]] | |
| ? | + | |||
| ? | + | |||
| ? | + | |||
| ? | + | |||
| ? | + | |||
| ? | + | |||
| |CommanderSkills=<!-- write text about best set of Commander Skills below --> | |CommanderSkills=<!-- write text about best set of Commander Skills below --> | |||
| ? | + | Key skills for ''{{#var:ship_name}}'' commanders include Advanced Firing Training and Concealment Expert. With extended firing range and better detection range, ''{{#var:ship_name}}'' can engage from greater distances and slip back into concealment if she encounters accurate enemy fire. | ||
| ? | {{Commander Skills | + | {{Commander Skills 3 CR | |
| ? | + | <!-- Ratings 1,2,3 are legit. Others are ignored.--> | ||
| ? | | | + | | rating11 = <!-- Grease the Gears --> | |
| ? | | | + | | rating12 = <!-- Swift Fish --> | |
| ? | | | + | | rating13 = <!-- Consumables Specialist --> | |
| ? | | | + | | rating14 = <!-- Gun Feeder --> | |
| ? | | | + | | rating15 = <!-- Incoming Fire Alert --> | |
| ? | + | | rating16 = 2 <!-- Last Stand --> | ||
| ? | | | + | ||
| ? | | | + | | rating21 = 2 <!-- Pyrotechnician --> | |
| ? | | | + | | rating22 = <!-- Fill the Tubes --> | |
| ? | | | + | | rating23 = <!-- Consumables Enhancements --> | |
| ? | | | + | | rating24 = <!-- Eye in the Sky --> | |
| ? | | | + | | rating25 = <!-- Priority Target --> | |
| ? | | Expert | + | | rating26 = <!-- Expert AA Marksman --> | |
| ? | + | |||
| ? | + | |||
| ? | | | + | | rating31 = 2 <!-- Heavy HE and SAP Shells --> | |
| ? | | | + | | rating32 = <!-- Enhanced Torpedo Explosive Charge --> | |
| ? | | | + | | rating33 = 2 <!-- Adrenaline Rush --> | |
| ? | | | + | | rating34 = <!-- Heavy AP Shells --> | |
| ? | | | + | | rating35 = <!-- Superintendent --> | |
| ? | | | + | | rating36 = <!-- Survivability Expert --> | |
| ? | + | |||
| ? | + | |||
| ? | | | + | | rating41 = 2 <!-- Top Grade Gunner --> | |
| ? | | | + | | rating42 = 2 <!-- Outnumbered --> | |
| ? | | | + | | rating43 = <!-- Radio Location --> | |
| ? | | | + | | rating44 = <!-- Inertial Fuse for HE Shells --> | |
| ? | + | | rating45 = 2 <!-- Concealment Expert --> | ||
| ? | + | | rating46 = <!-- AA Gunner --> | ||
| ? | | | + | }} | |
| ? | + | |||
| ? | + | |||
| |Consumables=<!-- write text about selection of Consumables below --> | |Consumables=<!-- write text about selection of Consumables below --> | |||
| ? | + | ''{{#var:ship_name}}'' can equip the following consumables: | ||
| * '''Slot 1:''' {{Damage Control Party}} | * '''Slot 1:''' {{Damage Control Party}} | |||
| ? | ||||
| ? | ||||
| ? | ||||
| ? | ||||
| ? | ||||
| ? | ||||
| ? | ||||
| |Camouflage=<!-- write text about useful camouflage below --> | |Camouflage=<!-- write text about useful camouflage below --> | |||
| ? | + | [[Ship:Camouflage#Standard Camouflage|Type 1, 2, or 5 camouflage]] can be equipped for credits; Types 1 or 5 are recommended at a minimum to reduce detectability range. | ||
| ? | [[Ship:Camouflage#Standard Camouflage|Type 1, 2, or 5 camouflage]] can be equipped for credits; | + | ||
| ? | + | |||
| ? | + | |||
| ? | Types 1 or 5 are recommended at a minimum to reduce | + | ||
| ? | + | |||
| ? | + | |||
| ? | + | |||
| ? | + | |||
| ? | + | |||
| ? | + | |||
| ? | + | |||
| ? | + | |||
| ? | + | |||
| ? | + | |||
| ? | + | |||
| ? | + | |||
| |Signals=<!-- write text about best set of signals below --> | |Signals=<!-- write text about best set of signals below --> | |||
| + | ''{{#var:ship_name}}'' will benefit from flying Sierra Mike ({{Sierra Mike|Size=18px}}) flags which increase her top speed to be more competitive. | |||
| {{Signal Flags | {{Signal Flags | |||
| | November Echo Setteseven = | | November Echo Setteseven = | |||
| | Mike Yankee Soxisix = | | Mike Yankee Soxisix = | |||
| ? | | India X-Ray = | + | | India X-Ray = 1 | |
| | Juliet Whiskey Unaone = | | Juliet Whiskey Unaone = | |||
| ? | | Victor Lima = | + | | Victor Lima = 1 | |
| ? | | Hotel Yankee = | + | | Hotel Yankee = 1 | |
| | November Foxtrot = | | November Foxtrot = | |||
| ? | | Sierra Mike = | + | | Sierra Mike = 3 | |
| | India Delta = | | India Delta = | |||
| | Juliet Yankee Bissotwo = | | Juliet Yankee Bissotwo = | |||
| ? | | India Yankee = | + | | India Yankee = 1 | |
| ? | | Juliet Charlie = | + | | Juliet Charlie = 2 | |
| ? | | Zulu = | + | | Zulu = 1 | |
| ? | | India Bravo Terrathree = | + | | India Bravo Terrathree = 1 | |
| ? | | Equal Speed Charlie London = | + | | Equal Speed Charlie London = 2 | |
| ? | | Zulu Hotel = | + | | Zulu Hotel = 2 | |
| ? | | Papa Papa = | + | | Papa Papa = 1 | |
| | Wyvern = | | Wyvern = | |||
| Line 139: | Line 118: | |||
| |Gallery=<!-- write below list of files with description (if necessary) separated with | --><gallery> | |Gallery=<!-- write below list of files with description (if necessary) separated with | --><gallery> | |||
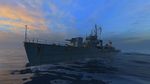
| ? | + | File:Chengan gallery 1.jpg | ||
| + | File:Chengan gallery 3.jpg|Size comparison with ''Hermelin''. | |||
| + | File:Chengan gallery 4.jpg | |||
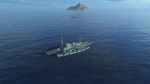
| + | File:Chengan gallery 5.jpg|''Chengan'' accelerates into action. | |||
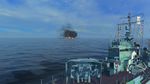
| + | File:Chengan gallery 6.jpg|View overlooking the forward turret. | |||
| </gallery> | </gallery> | |||
| ? | + | <!-- | ||
| + | |History= | |||
| <div class="thumb tright"> | <div class="thumb tright"> | |||
| {{AnnoWiki|content= | {{AnnoWiki|content= | |||
| ? | <h2>''{{#var:ship_name}}''</h2> | + | <h2>''{{#var:ship_name}}'', 1947</h2> | |
| ===Construction=== | ===Construction=== | |||
| :Fujinagata Shipyard; Osaka, Japan | :Fujinagata Shipyard; Osaka, Japan | |||
| Line 176: | Line 160: | |||
| :1 × 81 mm (3.2 in) mortar | :1 × 81 mm (3.2 in) mortar | |||
| =====Anti-aircraft===== | =====Anti-aircraft===== | |||
| ? | ||||
| :2 × 120 mm (4.7 in)/45 cal DP guns | :2 × 120 mm (4.7 in)/45 cal DP guns | |||
| :6 × Type 96 25 mm (0.98 in) AA machine guns (2×3) | :6 × Type 96 25 mm (0.98 in) AA machine guns (2×3) | |||
| ? | ||||
| ? | ||||
| ? | ||||
| ? | ||||
| ? | ||||
| ? | ||||
| ? | ||||
| ? | ||||
| ? | ||||
| ? | ||||
| ? | ||||
| ? | ||||
| }}</div> | }}</div> | |||
| + | [[File:Type_D_No__22.jpg|none|frame|x300px|link=|Type D Escort ''No. 22'' underway, date and location unknown.]] | |||
| ===History=== | ===History=== | |||
| ? | + | |||
| ===Design=== | ===Design=== | |||
| ? | The | + | The Type D escorts (''kaibōkan'') were laid down from October 1943 under the 1943-44 Programme and completed between March 1944 and the end of the war. The design was very similar to Type C, but because of a shortage of diesel motors, turbine machinery was installed, slightly increasing maximum speed but greatly reducing endurance. (4500nm instead of 6500nm, at 16kts). The building time was between four and nine months. The class received even numbers, in sequence. Building yards were Mitsubishi, Nagasaki; Kawasaki, Kobe; Ishikawajima, Tokyo (a complete list of the builders of particular units is not available). As with the Type C units, the light AA armament was increased in 1944-45 to 12 and later 16-25mm, and there was one 3 inch depth charge thrower. The hulls of ''Nos. 70, 80'' and ''122'' were demolished on the slipways in 1945. A further 72 units were cancelled in 1944 before construction began (''Nos 86-100, 108, 110, 114, 120, 128, 136, 140, 146, 148, 152, 162-184, 188'', and ''206-286''), as were another 60 projected in the 1944-45 Programme (''No 288'' onwards).<ref name="Conway">[Sturton, Ian. Conway's All the World's Fighting Ships. ser. 1922-1946, Conway Maritime Press Ltd, 1980.]</ref> | |
| ? | + | |||
| ? | + | |||
| ? | + | ===Service=== | ||
| + | ''CD-40'' was a Type D Escort Ship (丁型海防艦 ''Tei-gata Kaibōkan'') constructed at Fujinagata Shipyards in Osaka, Japan, and completed on 12 December 1944. Her career with the Imperial Japanese Navy lasted barely a year, as she escorted convoys of war materiel and supplies throughout Japanese-held territory. She had several run-ins with U.S. Navy submarines, including USS ''Balao'' and USS ''Tirante'', failing to defend her escorts on a few occasions. | |||
| ? | + | She was damaged by an aerial mine dropped by a B-29 "Superfortress" off Futaoi Island in the Sea of Japan on 13 April 1945 and was laid up for a month for repairs. Following her return to active duty on 20 May, she saw no additional action or convoy duty for the remainder of the war. She was struck from the list of the Imperial Japanese Navy on 30 November 1945 and assigned to mine sweeping duties for the Allied Occupation Force. | ||
| ? | + | |||
| ? | + | |||
| ? | + | |||
| ? | + | |||
| ? | + | |||
| + | ''CD-40'' was ceded to China on 29 August 1947. She was renamed ''Chengan'' (成安) and commissioned into the service of the Republic of China, along with former ''CD-104'' and former ''CD-192''. ''Chengan'' was decommissioned in 1963.<ref name="Combined Fleet">[Bob Hackett, Sander Kingsepp and Peter Cundall. Imperial Japanese Navy Page. https://www.combinedfleet.com/CD-40_t.htm]</ref> | |||
| + | ===References=== | |||
| + | <references /> | |||
| + | --> | |||
| |HistoricalGallery=<!-- write below list of files with description (if necessary) separated with | --><gallery> | |HistoricalGallery=<!-- write below list of files with description (if necessary) separated with | --><gallery> | |||
| ? | + | File:Type D Escort No 8 Feb 1944.jpg|''No. 8'' underway in Tokyo Bay, 26 February 1944. | ||
| + | File:Type D No__34.jpg|''No. 34'' at anchor, date and location unknown. | |||
| + | File:Type D No__42.jpg|''No. 42'' underway, date and location unknown. | |||
| </gallery> | </gallery> | |||
| Line 218: | Line 190: | |||
| |Ref= <!-- write below --> | |Ref= <!-- write below --> | |||
| + | # [https://en.wikipedia.org/wiki/Mikura-class_escort_ship ''Mikura''-class escort ship - Wikipedia] | |||
| }}<!-- DO NOT DELETE THIS LINE. DO NOT INSERT ANYTHING BELOW THIS LINE --> | }}<!-- DO NOT DELETE THIS LINE. DO NOT INSERT ANYTHING BELOW THIS LINE --> | |||
Revision as of 18:27, 1 March 2021

| Hit Points4,900 |
| 127 mm/40 Type 89 on a Model A1 Mod.1 mount2 х 2 pcs. |
| Rate of Fire10.91 shots/min. |
| Reload Time5.5 sec. |
| Rotation Speed12 deg./sec. |
| 180 Degree Turn Time15 sec. |
| Firing Range8.54 km. |
| Maximum Dispersion79 m. |
| HE Shell127 mm HE Type1 |
| Maximum HE Shell Damage1,050 |
| Chance of Fire on Target Caused by HE Shell8 % |
| Initial HE Shell Velocity725 m./s. |
| HE Shell Weight23.45 kg. |
| 127 mm/40 Type 89 on a Model A1 Mod.1 mount2 х 2 pcs. |
| . . . Average Damage per Second4 |
| . . . Firing Range5.01 km. |
| 25 mm/60 Type 96 on a triple mount2 х 3 pcs. |
| . . . Average Damage per Second2 |
| . . . Firing Range2.49 km. |
| Maximum Speed19 knot |
| Turning Circle Radius240 m. |
| Rudder Shift Time2 sec. |
| Surface Detectability Range5.94 km. |
| Air Detectability Range6.44 km. |

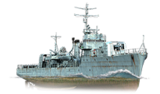
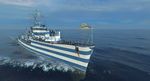
Chengan — Pan-Asian Tier I cruiser.
Modules
 |
Rate of Fire (shots/min) | 180° Turn Time (sec) | Maximum Dispersion (m) | Maximum HE Shell Damage (HP) | Chance of Fire on Target Caused by HE Shell (%) | Maximum AP Shell Damage (HP) |
Research price (exp) |
Purchase price ( | |
|---|---|---|---|---|---|---|---|---|---|
| 127 mm/40 Type 89 on a Model A1 Mod.1 mount | 10.9 | 15 | 79 | 1,050 | 8 | 0 | 0 |
 |
Hit Points (HP) | Armor (mm) | Armor (mm) | Main Turrets (pcs.) | Secondary Gun Turrets (pcs.) | AA Mounts (pcs.) | Torpedo Tubes (pcs.) | Hangar Capacity (pcs.) |
Research price (exp) |
Purchase price ( | |
|---|---|---|---|---|---|---|---|---|---|---|---|
| Chengan (A) | 4,900 | 6 | 13 | 2 | 2/2 | 0 | 0 |
 |
IDS_SHIP_PARAM_SUO_INCREASE_DIST (%) | Maximum Firing Range (km) |
Research price (exp) |
Purchase price ( | |
|---|---|---|---|---|---|
| Type1 mod. 1 | 0 | 0 | 0 |
 |
Maximum Speed (knot) |
Research price (exp) |
Purchase price ( | |
|---|---|---|---|---|
| Propulsion: 2,500 hp | 19 | 0 | 0 |
Compatible Upgrades
| Slot 1 |
|---|
Player Opinion
Performance
The start of the Pan-Asian tech tree, Chengan is best played at medium to long range. She is the smallest ship at her tier, and compensates for a lack of armor with agility and concealment. Her small size and fast rudder shift make her a difficult target to hit. When under fire, captains should use evasive maneuvers such as weaving and try to maintain 7 to 8 kilometers of distance between themselves and the enemy.
If Chengan finds herself in a close-range engagement, she will struggle to penetrate the citadel armor belt of Erie, Hashidate, and Hermelin. If this occurs, aim for the bow, stern, or superstructure to avoid non-penetrations. Despite her inability to hit the citadel of those ships, Chengan is capable of penetrating the citadel armor belt of Black Swan, Bougainville, and Orlan. If any of those three ships show their broadside, captains should aim for the waterline under the smoke stack to inflict severe damage. Captains should also utilize Chengan's excellent concealment to dictate the engagement. When fully specialized, Chengan will not be out spotted by any of the other Tier I ships. This stealthiness enables her to set up ambush-style attacks or disengage from a greater enemy force.Pros:
- Very small and agile (lowest turning circle radius and rudder shift time of all Tier I ships).
- Excellent concealment (lowest detectability range of all Tier I ships).
- Fastest turret rotation of all Tier I ships.
- Small and therefore difficult to hit.
Cons:
- Weak citadel armor belt.
- Shortest main battery firing range of all Tier I ships.
- Sluggish main battery reload time.
- Slow top speed (slowest Tier I ship together with Black Swan and Bougainville).
See also: Comparison of Tier I Cruisers.
Research
Availability of researchable upgrades for Chengan is as follows:
- Main Battery: No available upgrades.
- Hull: Progression to consecutive ship, Longjiang.
- Gun Fire Control System: Type 1 Mod. 1 can be upgraded to Type 1 Mod. 2 for a 10% firing range increase.
- Engine: No available upgrades.
Optimal Configuration
Upgrades
The recommended upgrades for Chengan are as follows:
- Slot 1: Main Armaments Modification 1
Commander Skills
Key skills for Chengan commanders include Advanced Firing Training and Concealment Expert. With extended firing range and better detection range, Chengan can engage from greater distances and slip back into concealment if she encounters accurate enemy fire.
| Recommended Commander Skills | ||||||
|---|---|---|---|---|---|---|
| Cost (points) |
Attack | Defense | ||||
| 1 |
|
|
|
|
|
★★ |
| 2 |
★★ |
|
|
|
|
|
| 3 |
★★ |
|
★★ |
|
|
|
| 4 |
★★ |
★★ |
|
|
★★ |
|
| Key: ★★★ - Extremely Useful ★★ - Frequently Useful ★ - Occasionally Useful No stars - Not Useful | ||||||
Consumables
Chengan can equip the following consumables:
- Slot 1: Damage Control Party

Camouflage
Type 1, 2, or 5 camouflage can be equipped for credits; Types 1 or 5 are recommended at a minimum to reduce detectability range.
Signals
Chengan will benefit from flying Sierra Mike (![]() ) flags which increase her top speed to be more competitive.
) flags which increase her top speed to be more competitive.
Recommended Signal Flags 
| |||||
|---|---|---|---|---|---|
| Combat | |||||
 ★★ |

|
 ★ |
 ★ |
 ★ |
 ★ |

|

|

|
 ★★★ |

|

|

|

| ||||
Note: Use of the Juliet Charlie signal makes detonation impossible.
Gallery
Size comparison with Hermelin.
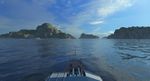
Chengan accelerates into action.
View overlooking the forward turret.


Historical Gallery


References
| Destroyers | II Longjiang • III Phra Ruang • IV Shenyang • V Jianwei • VI Fushun • VI Anshan |
| Cruisers | I Chengan • III Ning Hai |
| Battleships | IX Bajie |
| Aircraft Carriers | VIII Sanzang |