Commander
| Revision as of 19:37, 4 April 2019 __NOEDITSECTION__ | Revision as of 16:57, 11 August 2020 | |||
12 intermediate revisions by 6 users not shown | ||||
| Line 17: | Line 17: | |||
| When a ship is purchased from the tech tree, it can be with a newly recruited commander or without one. The latter option is useful when you intend to assign a commander from Reserve or another ship. | When a ship is purchased from the tech tree, it can be with a newly recruited commander or without one. The latter option is useful when you intend to assign a commander from Reserve or another ship. | |||
| <br><br> | <br><br> | |||
| + | A Commander can be Dismissed at any time. This will free up a reserve slot. A dismissed commander can be recalled within 60 minutes. After that the dismissal is permanent. | |||
| == Managing Commanders == | == Managing Commanders == | |||
| Line 24: | Line 25: | |||
| The currently selected Commander is shown in the top right; the Commander skills trained are shown in the center. The drop down menu next to the Commander's name allows players to assign the Commander to another ship, send him to Reserve, dismiss him, or Go to their Personal File. Directly below the currently selected Commander is shown other Commanders that are eligible for use on the selected ship. The toggle at the top shows either commanders currently assigned to other ships, or those that are in Reserve. | The currently selected Commander is shown in the top right; the Commander skills trained are shown in the center. The drop down menu next to the Commander's name allows players to assign the Commander to another ship, send him to Reserve, dismiss him, or Go to their Personal File. Directly below the currently selected Commander is shown other Commanders that are eligible for use on the selected ship. The toggle at the top shows either commanders currently assigned to other ships, or those that are in Reserve. | |||
| ? | The center of the Commander Interface displays the Commander skill tree — discussed in detail below — with currently trained skills highlighted. At the far left is the Redistribute function, that allows players to "respec" their Commanders by clearing their skill selections | + | The center of the Commander Interface displays the Commander skill tree — discussed in detail below — with currently trained skills highlighted. At the far left is the Redistribute function, that allows players to "respec" their Commanders by clearing their skill selections, thus allowing skill points to be assigned again. | |
| {| class="wikitable" style="text-align:center; float:right; margin-left: 20px; margin-top: 20px;" | {| class="wikitable" style="text-align:center; float:right; margin-left: 20px; margin-top: 20px;" | |||
| |+ Commander Skill Progression | |+ Commander Skill Progression | |||
| Line 129: | Line 130: | |||
| === Spending Commander Experience === | === Spending Commander Experience === | |||
| ? | Each commander displays his skill points | + | Each commander displays his skill points overlaid on his portrait as available/total. Thus a commander with 15 points, only 3 assigned, would show "12/15" on the lower left of his portrait. Clicking on the commander's portrait brings up the Commander Interface screen (see the [[#Managing Commanders|graphic above]]), where a new skill may be selected. The interface will ask for confirmation. | |
| Some skills are only useful to certain classes or to ships with certain weapon systems. Skills that are not useful to the current ship are marked as such. They may still be selected. (If a skill is not useful on the current ship, it may become so when the commander is moved to a different ship.) However, considering the amount of time it takes to train a highly skilled Commander, it is best to focus his skills on ones that are immediately useful. A complete list of skills, their point costs and effects, appears below.<ref>With Update 0.8.0, a number of skills have changed. See this and nearby WoWS News articles: https://worldofwarships.com/en/news/development/cv8-how-to-tune/#customization</ref> | Some skills are only useful to certain classes or to ships with certain weapon systems. Skills that are not useful to the current ship are marked as such. They may still be selected. (If a skill is not useful on the current ship, it may become so when the commander is moved to a different ship.) However, considering the amount of time it takes to train a highly skilled Commander, it is best to focus his skills on ones that are immediately useful. A complete list of skills, their point costs and effects, appears below.<ref>With Update 0.8.0, a number of skills have changed. See this and nearby WoWS News articles: https://worldofwarships.com/en/news/development/cv8-how-to-tune/#customization</ref> | |||
| Line 136: | Line 137: | |||
| {{AnnoWiki|content=<center>[[File:Wows-icon.png|link=]]<big> [https://worldofwarships.com/en/content/captains-skills/ Try the World of Warships Commander Skill Builder] </big>[[File:Wows-icon.png|link=]]</center>}} | {{AnnoWiki|content=<center>[[File:Wows-icon.png|link=]]<big> [https://worldofwarships.com/en/content/captains-skills/ Try the World of Warships Commander Skill Builder] </big>[[File:Wows-icon.png|link=]]</center>}} | |||
| ? | + | Note that the skill '''Direction Center for Fighters''' does NOT add one fighter to the '''Patrol Fighters''' consumable on aircraft carrier squadrons. | ||
| ? | + | |||
| {{Ship:Commander Skills}} | {{Ship:Commander Skills}} | |||
| ? | ||||
| {| class="wikitable" style="text-align:center; float:right; margin-left: 20px; margin-top: 20px;" | {| class="wikitable" style="text-align:center; float:right; margin-left: 20px; margin-top: 20px;" | |||
| Line 217: | Line 216: | |||
| Reserve slots — (shown highlighted in <span style="color:#22B14C">'''green'''</span> on the [[#Managing Commanders|graphic above]]) — hold unassigned commanders. Commanders in the Reserve can be assigned to any ship (of the same nation) as normal, subject to re-training costs (see below). | Reserve slots — (shown highlighted in <span style="color:#22B14C">'''green'''</span> on the [[#Managing Commanders|graphic above]]) — hold unassigned commanders. Commanders in the Reserve can be assigned to any ship (of the same nation) as normal, subject to re-training costs (see below). | |||
| ? | Each player starts with four (4) Reserve slots. Additional Reserve slots can be purchased with doubloons -- normally four (4) slots for 100{{Doubloons}}. Slots are very rarely available | + | Each player starts with four (4) Reserve slots. Additional Reserve slots can be purchased with doubloons -- normally four (4) slots for 100{{Doubloons}}. Slots are very rarely available through other means. | |
| + | ||||
| + | If a player receives a ship with a Commander, either from Premium shop, Armory, or a Container, the player receive an extra Reserve slot for that Commander. | |||
| == Retraining Commanders == | == Retraining Commanders == | |||
| Line 241: | Line 242: | |||
| === Using Elite Commander XP === | === Using Elite Commander XP === | |||
| Elite Commander XP{{ECXP}} can be: | Elite Commander XP{{ECXP}} can be: | |||
| ? | *Applied to any non-elite commander to gain additional skill | + | * Applied to any non-elite commander to gain additional skill points. | |
| ? | *Used to retrain any | + | * Used to retrain any commander moved to a different, non-premium ship (instead of spending doubloons). | |
| ? | *Used to [[#Redistribute Commander Skills|redistribute]] skill points (in lieu of using doubloons) | + | * Used to [[#Redistribute Commander Skills|redistribute]] skill points (in lieu of using doubloons). | |
| ? | *Converted into Free XP{{FXP}} for [[Ship:Economy#Doubloons|doubloons]]{{Doubloons}}. | + | * Converted into Free XP{{FXP}} for [[Ship:Economy#Doubloons|doubloons]]{{Doubloons}}. | |
| === Spending Free XP on Commanders === | === Spending Free XP on Commanders === | |||
| ? | ''After all ECXP is spent'', Free XP{{FXP}} can be used instead of Elite Commander XP{{ECXP}}.<ref>Free XP becomes available at [[Ship:Account_Level#Account_Level_5|Account Level 5]]. Commander operations and ECXP become available at [[Ship:Account_Level#Account_Level_7|Account Level 7]]. Since at that point the account will have no ECXP, | + | ''After all ECXP is spent'', Free XP{{FXP}} can be used instead of Elite Commander XP{{ECXP}}.<ref>Free XP becomes available at [[Ship:Account_Level#Account_Level_5|Account Level 5]]. Commander operations and ECXP become available at [[Ship:Account_Level#Account_Level_7|Account Level 7]]. Since at that point the account will have no ECXP, accumulated FXP may be used in its place.</ref> | |
| For a single operation, Elite Commander XP{{ECXP}} and Free XP{{FXP}} can be spent together, just as Ship XP and Free XP can be spent together researching ships and ship modules. When Elite Commander XP and Free XP are spent, the following rules apply: | For a single operation, Elite Commander XP{{ECXP}} and Free XP{{FXP}} can be spent together, just as Ship XP and Free XP can be spent together researching ships and ship modules. When Elite Commander XP and Free XP are spent, the following rules apply: | |||
| Line 272: | Line 273: | |||
| |- | |- | |||
| ! style="vertical-align:middle; width:60px" | Skill Points | ! style="vertical-align:middle; width:60px" | Skill Points | |||
| ? | ! style="vertical-align:middle; width: | + | ! style="vertical-align:middle; width:140px" | [[File:Wows_flag_Japan.png|50 px|frameless|link=Ship:Ships_of_Japan]]<br>Japan | |
| ? | + | ! style="vertical-align:middle; width:140px" | [[File:Wows_flag_USA.png|50 px|frameless|link=Ship:Ships_of_U.S.A.]]<br>USA | ||
| ? | ! style="vertical-align:middle; width: | + | ! style="vertical-align:middle; width:140px" | [[File:СССР_флаг_ВМС_с_тенью.png|50 px|frameless|link=Ship:Ships_of_U.S.S.R.]]<br>USSR | |
| ? | ! style="vertical-align:middle; width: | + | ! style="vertical-align:middle; width:140px" | [[File:Третий_рейх_флаг_ВМС_с_тенью.png|50 px|frameless|link=Ship:Ships_of_Germany]]<br>Germany | |
| ? | ! style="vertical-align:middle; width: | + | ! style="vertical-align:middle; width:140px" | [[File:Великобритания_флаг_ВМС_с_тенью.png|50 px|frameless|link=Ship:Ships_of_U.K.]]<br>UK | |
| ? | ! style="vertical-align:middle; width: | + | ! style="vertical-align:middle; width:140px" | [[File:Франция_флаг_ВМС_с_тенью.png|50 px|frameless|link=Ship:Ships_of_France]]<br>France | |
| ? | ! style="vertical-align:middle; width: | + | ! style="vertical-align:middle; width:140px" | [[File:Wows_flag_Pan_Asia.png|50 px|frameless|link=Ship:Ships_of_Pan-Asia]]<br>Pan-Asia | |
| ? | ! style="vertical-align:middle; width: | + | ! style="vertical-align:middle; width:140px" | [[File:Королевство Италия флаг ВМС с тенью.png|50 px|frameless|link=Ship:Ships_of_Italy]]<br>Italy | |
| ? | ! style="vertical-align:middle; width: | + | ||
| |- style="height:50px" | |- style="height:50px" | |||
| ! style="vertical-align:middle;" | 0 | ! style="vertical-align:middle;" | 0 | |||
| ? | ||||
| | style="vertical-align:middle;" | Kaigun Shōi Kōhosei | | style="vertical-align:middle;" | Kaigun Shōi Kōhosei | |||
| + | | style="vertical-align:middle;" | Warrant Officer | |||
| | style="vertical-align:middle;" | Michman | | style="vertical-align:middle;" | Michman | |||
| ? | ||||
| | style="vertical-align:middle;" | Oberfähnrich zur See | | style="vertical-align:middle;" | Oberfähnrich zur See | |||
| + | | style="vertical-align:middle;" | Warrant Officer | |||
| | style="vertical-align:middle;" | Aspirant | | style="vertical-align:middle;" | Aspirant | |||
| + | | style="vertical-align:middle;" | Midshipman | |||
| | style="vertical-align:middle;" | Aspirante Guardiamarina | | style="vertical-align:middle;" | Aspirante Guardiamarina | |||
| ? | ||||
| ? | ||||
| |- style="height:50px" | |- style="height:50px" | |||
| ! style="vertical-align:middle;" | 1 - 2 | ! style="vertical-align:middle;" | 1 - 2 | |||
| + | | style="vertical-align:middle;" | Kaigun Shōi | |||
| | style="vertical-align:middle;" | Lieutenant Junior Grade | | style="vertical-align:middle;" | Lieutenant Junior Grade | |||
| ? | ||||
| | style="vertical-align:middle;" | Leytenant | | style="vertical-align:middle;" | Leytenant | |||
| + | | style="vertical-align:middle;" | Leutnant zur See | |||
| | style="vertical-align:middle;" | Sub-Lieutenant | | style="vertical-align:middle;" | Sub-Lieutenant | |||
| ? | ||||
| | style="vertical-align:middle;" | Enseigne de deuxième classe | | style="vertical-align:middle;" | Enseigne de deuxième classe | |||
| + | | style="vertical-align:middle;" | Sub-Lieutenant | |||
| | style="vertical-align:middle;" | Guardiamarina | | style="vertical-align:middle;" | Guardiamarina | |||
| ? | ||||
| ? | ||||
| |- style="height:50px" | |- style="height:50px" | |||
| ! style="vertical-align:middle;" | 3 - 4 | ! style="vertical-align:middle;" | 3 - 4 | |||
| ? | ||||
| | style="vertical-align:middle;" | Kaigun Chūi | | style="vertical-align:middle;" | Kaigun Chūi | |||
| ? | ||||
| | style="vertical-align:middle;" | Lieutenant | | style="vertical-align:middle;" | Lieutenant | |||
| + | | style="vertical-align:middle;" | Starshiy-Leytenant | |||
| | style="vertical-align:middle;" | Oberleutnant zur See | | style="vertical-align:middle;" | Oberleutnant zur See | |||
| + | | style="vertical-align:middle;" | Lieutenant | |||
| | style="vertical-align:middle;" | Enseigne de première classe | | style="vertical-align:middle;" | Enseigne de première classe | |||
| + | | style="vertical-align:middle;" | Lieutenant | |||
| | style="vertical-align:middle;" | Sottotenente di Vascello | | style="vertical-align:middle;" | Sottotenente di Vascello | |||
| ? | ||||
| ? | ||||
| |- style="height:50px" | |- style="height:50px" | |||
| ! style="vertical-align:middle;" | 5 - 6 | ! style="vertical-align:middle;" | 5 - 6 | |||
| ? | ||||
| | style="vertical-align:middle;" | Kaigun Daii | | style="vertical-align:middle;" | Kaigun Daii | |||
| + | | style="vertical-align:middle;" | Lieutenant Commander | |||
| | style="vertical-align:middle;" | Kapitan-Leytenant | | style="vertical-align:middle;" | Kapitan-Leytenant | |||
| ? | ||||
| | style="vertical-align:middle;" | Kapitänleutnant | | style="vertical-align:middle;" | Kapitänleutnant | |||
| + | | style="vertical-align:middle;" | Lieutenant Commander | |||
| | style="vertical-align:middle;" | Lieutenant de vaisseau | | style="vertical-align:middle;" | Lieutenant de vaisseau | |||
| + | | style="vertical-align:middle;" | Lieutenant Commander | |||
| | style="vertical-align:middle;" | Tenente di Vascello | | style="vertical-align:middle;" | Tenente di Vascello | |||
| ? | ||||
| ? | ||||
| |- style="height:50px" | |- style="height:50px" | |||
| ! style="vertical-align:middle;" | 7 - 8 | ! style="vertical-align:middle;" | 7 - 8 | |||
| ? | ||||
| | style="vertical-align:middle;" | Kaigun Shōsa | | style="vertical-align:middle;" | Kaigun Shōsa | |||
| + | | style="vertical-align:middle;" | Commander | |||
| | style="vertical-align:middle;" | Kapitan 3 Ranga | | style="vertical-align:middle;" | Kapitan 3 Ranga | |||
| ? | ||||
| | style="vertical-align:middle;" | Korvettenkapitän | | style="vertical-align:middle;" | Korvettenkapitän | |||
| + | | style="vertical-align:middle;" | Commander | |||
| | style="vertical-align:middle;" | Capitaine de corvette | | style="vertical-align:middle;" | Capitaine de corvette | |||
| + | | style="vertical-align:middle;" | Commander | |||
| | style="vertical-align:middle;" | Capitano di Corvetta | | style="vertical-align:middle;" | Capitano di Corvetta | |||
| ? | ||||
| ? | ||||
| |- style="height:50px" | |- style="height:50px" | |||
| ! style="vertical-align:middle;" | 9 - 10 | ! style="vertical-align:middle;" | 9 - 10 | |||
| ? | ||||
| | style="vertical-align:middle;" | Kaigun Chūsa | | style="vertical-align:middle;" | Kaigun Chūsa | |||
| + | | style="vertical-align:middle;" | Captain | |||
| | style="vertical-align:middle;" | Kapitan 2 Ranga | | style="vertical-align:middle;" | Kapitan 2 Ranga | |||
| + | | style="vertical-align:middle;" | Fregattenkapitän | |||
| | style="vertical-align:middle;" | Captain | | style="vertical-align:middle;" | Captain | |||
| ? | ||||
| | style="vertical-align:middle;" | Capitaine de frégate | | style="vertical-align:middle;" | Capitaine de frégate | |||
| + | | style="vertical-align:middle;" | Captain | |||
| | style="vertical-align:middle;" | Capitano di Fregata | | style="vertical-align:middle;" | Capitano di Fregata | |||
| ? | ||||
| ? | ||||
| |- style="height:50px" | |- style="height:50px" | |||
| ! style="vertical-align:middle;" | 11 - 12 | ! style="vertical-align:middle;" | 11 - 12 | |||
| + | | style="vertical-align:middle;" | Kaigun Daisa | |||
| | style="vertical-align:middle;" | Commodore | | style="vertical-align:middle;" | Commodore | |||
| ? | ||||
| | style="vertical-align:middle;" | Kapitan 1 Ranga | | style="vertical-align:middle;" | Kapitan 1 Ranga | |||
| + | | style="vertical-align:middle;" | Kapitän zur See | |||
| | style="vertical-align:middle;" | Commodore | | style="vertical-align:middle;" | Commodore | |||
| ? | ||||
| | style="vertical-align:middle;" | Capitaine de vaisseau | | style="vertical-align:middle;" | Capitaine de vaisseau | |||
| + | | style="vertical-align:middle;" | Commodore | |||
| | style="vertical-align:middle;" | Capitano di Vascello | | style="vertical-align:middle;" | Capitano di Vascello | |||
| ? | ||||
| ? | ||||
| |- style="height:50px" | |- style="height:50px" | |||
| ! style="vertical-align:middle;" | 13 - 14 | ! style="vertical-align:middle;" | 13 - 14 | |||
| + | | style="vertical-align:middle;" | Kaigun Shōshō | |||
| | style="vertical-align:middle;" | Rear Admiral | | style="vertical-align:middle;" | Rear Admiral | |||
| ? | ||||
| | style="vertical-align:middle;" | Kontr-Admiral | | style="vertical-align:middle;" | Kontr-Admiral | |||
| + | | style="vertical-align:middle;" | Konteradmiral | |||
| | style="vertical-align:middle;" | Rear Admiral | | style="vertical-align:middle;" | Rear Admiral | |||
| ? | ||||
| | style="vertical-align:middle;" | Contre-amiral | | style="vertical-align:middle;" | Contre-amiral | |||
| + | | style="vertical-align:middle;" | Rear Admiral | |||
| | style="vertical-align:middle;" | Contrammiraglio | | style="vertical-align:middle;" | Contrammiraglio | |||
| ? | ||||
| ? | ||||
| |- style="height:50px" | |- style="height:50px" | |||
| ! style="vertical-align:middle;" | 15 - 16 | ! style="vertical-align:middle;" | 15 - 16 | |||
| ? | ||||
| | style="vertical-align:middle;" | Kaigun Chūjo | | style="vertical-align:middle;" | Kaigun Chūjo | |||
| ? | ||||
| | style="vertical-align:middle;" | Vice Admiral | | style="vertical-align:middle;" | Vice Admiral | |||
| + | | style="vertical-align:middle;" | Vitse-Admiral | |||
| | style="vertical-align:middle;" | Vizeadmiral | | style="vertical-align:middle;" | Vizeadmiral | |||
| + | | style="vertical-align:middle;" | Vice Admiral | |||
| | style="vertical-align:middle;" | Vice-amiral | | style="vertical-align:middle;" | Vice-amiral | |||
| ? | ||||
| ? | ||||
| | style="vertical-align:middle;" | Vice Admiral | | style="vertical-align:middle;" | Vice Admiral | |||
| + | | style="vertical-align:middle;" | Ammiraglio di Divisione | |||
| |- style="height:50px" | |- style="height:50px" | |||
| ! style="vertical-align:middle;" | 17 - 18 | ! style="vertical-align:middle;" | 17 - 18 | |||
| ? | ||||
| | style="vertical-align:middle;" | Kaigun Taishō | | style="vertical-align:middle;" | Kaigun Taishō | |||
| + | | style="vertical-align:middle;" | Admiral | |||
| | style="vertical-align:middle;" | Admiral | | style="vertical-align:middle;" | Admiral | |||
| | style="vertical-align:middle;" | Admiral | | style="vertical-align:middle;" | Admiral | |||
| | style="vertical-align:middle;" | Admiral | | style="vertical-align:middle;" | Admiral | |||
| | style="vertical-align:middle;" | Vice-amiral d'escadre | | style="vertical-align:middle;" | Vice-amiral d'escadre | |||
| ? | ||||
| ? | ||||
| | style="vertical-align:middle;" | Admiral | | style="vertical-align:middle;" | Admiral | |||
| + | | style="vertical-align:middle;" | Ammiraglio | |||
| |- style="height:50px" | |- style="height:50px" | |||
| ! style="vertical-align:middle;" | 19 | ! style="vertical-align:middle;" | 19 | |||
| ? | ||||
| | style="vertical-align:middle;" | Gensui Kaigun Taishō | | style="vertical-align:middle;" | Gensui Kaigun Taishō | |||
| + | | style="vertical-align:middle;" | Fleet Admiral | |||
| | style="vertical-align:middle;" | Admiral flota | | style="vertical-align:middle;" | Admiral flota | |||
| ? | ||||
| | style="vertical-align:middle;" | Großadmiral | | style="vertical-align:middle;" | Großadmiral | |||
| + | | style="vertical-align:middle;" | Admiral of the Fleet | |||
| | style="vertical-align:middle;" | Amiral | | style="vertical-align:middle;" | Amiral | |||
| + | | style="vertical-align:middle;" | Admiral of the Fleet | |||
| | style="vertical-align:middle;" | Ammiraglio di Armata | | style="vertical-align:middle;" | Ammiraglio di Armata | |||
| ? | | style="vertical-align:middle;" | Admirał | + | |} | |
| + | ||||
| + | ||||
| + | {| class="wikitable" style="text-align:center; margin: auto;" | |||
| + | |- | |||
| + | ! style="vertical-align:middle; width:60px" rowspan="2" | Skill Points | |||
| + | ! style="vertical-align:middle; width:150px" rowspan="2" | [[File:Содружество_Наций_флаг_ВМС_с_тенью.png|50 px|frameless|link=Ship:Ships_of_Commonwealth]]<br>Commonwealth | |||
| + | ! style="vertical-align:middle; width:450px" colspan="4" | [[File:Wows_flag_Europe.png|50 px|frameless|link=Ship:Ships_of_Europe]] Europe | |||
| + | ! style="vertical-align:middle; width:150px" rowspan="2" | [[File:Wows_flag_Pan_America.png|50 px|frameless|link=Ship:Ships_of_Pan-America]]<br>Pan-America | |||
| + | |- | |||
| + | ! style="vertical-align:middle; width:150px" | [[File:Австро-Венгрия флаг ВМС с тенью.png|50 px|frameless]]<br>Austro-Hungary | |||
| + | ! style="vertical-align:middle; width:150px" | [[File:Польша_флаг_ВМС_с_тенью.png|50 px|frameless]]<br>Poland | |||
| + | ! style="vertical-align:middle; width:150px" | [[File:Нидерланды_флаг_ВМС_с_тенью.png|50 px|frameless]]<br>Netherlands | |||
| + | ! style="vertical-align:middle; width:150px" | [[File:Швеция_флаг_ВМС_с_тенью.png|50 px|frameless]]<br>Sweden | |||
| + | |- style="height:50px" | |||
| + | ! style="vertical-align:middle;" | 0 | |||
| + | | style="vertical-align:middle;" | Warrant Officer | |||
| + | | style="vertical-align:middle;" | Seefähnrich | |||
| + | | style="vertical-align:middle;" | Chorąży marynarki | |||
| + | | style="vertical-align:middle;" | Adjudant-Onderofficier | |||
| + | | style="vertical-align:middle;" | Fänrik | |||
| + | | style="vertical-align:middle;" | Guardiamarina | |||
| + | |- style="height:50px" | |||
| + | ! style="vertical-align:middle;" | 1 - 2 | |||
| + | | style="vertical-align:middle;" | Sub-Lieutenant | |||
| + | | style="vertical-align:middle;" | Korvettenleutnant | |||
| + | | style="vertical-align:middle;" | Podporucznik marynarki | |||
| + | | style="vertical-align:middle;" | Luitenant ter Zee<br>der 3e klasse | |||
| + | | style="vertical-align:middle;" | Underlöjtnant | |||
| + | | style="vertical-align:middle;" | Teniente de Corbeta | |||
| + | |- style="height:50px" | |||
| + | ! style="vertical-align:middle;" | 3 - 4 | |||
| + | | style="vertical-align:middle;" | Lieutenant | |||
| + | | style="vertical-align:middle;" | Fregattenleutnant | |||
| + | | style="vertical-align:middle;" | Porucznik marynarki | |||
| + | | style="vertical-align:middle;" | Luitenant ter Zee<br>der 2e klasse | |||
| + | | style="vertical-align:middle;" | Löjtnant | |||
| + | | style="vertical-align:middle;" | Teniente de Fragata | |||
| + | |- style="height:50px" | |||
| + | ! style="vertical-align:middle;" | 5 - 6 | |||
| + | | style="vertical-align:middle;" | Lieutenant Commander | |||
| + | | style="vertical-align:middle;" | Linienschiffsleutnant | |||
| + | | style="vertical-align:middle;" | Kapitan marynarki | |||
| + | | style="vertical-align:middle;" | Luitenant ter Zee<br>der 1e klasse | |||
| + | | style="vertical-align:middle;" | Kapten | |||
| + | | style="vertical-align:middle;" | Teniente de Navío | |||
| + | |- style="height:50px" | |||
| + | ! style="vertical-align:middle;" | 7 - 8 | |||
| + | | style="vertical-align:middle;" | Commander | |||
| + | | style="vertical-align:middle;" | Korvettenkapitän | |||
| + | | style="vertical-align:middle;" | Komandor podporucznik | |||
| + | | style="vertical-align:middle;" | Kapitein-Luitenant ter Zee | |||
| + | | style="vertical-align:middle;" | Kommendörkapten<br>av 2 graden | |||
| + | | style="vertical-align:middle;" | Capitán de Corbeta | |||
| + | |- style="height:50px" | |||
| + | ! style="vertical-align:middle;" | 9 - 10 | |||
| + | | style="vertical-align:middle;" | Captain | |||
| + | | style="vertical-align:middle;" | Fregattenkapitän | |||
| + | | style="vertical-align:middle;" | Komandor porucznik | |||
| + | | style="vertical-align:middle;" | Kapitein ter Zee | |||
| + | | style="vertical-align:middle;" | Kommendörkapten<br>av 1 graden | |||
| + | | style="vertical-align:middle;" | Capitán de Fragata | |||
| + | |- style="height:50px" | |||
| + | ! style="vertical-align:middle;" | 11 - 12 | |||
| + | | style="vertical-align:middle;" | Commodore | |||
| + | | style="vertical-align:middle;" | Linienschiffkapitän | |||
| + | | style="vertical-align:middle;" | Komandor | |||
| + | | style="vertical-align:middle;" | Commandeur | |||
| + | | style="vertical-align:middle;" | Kommendör | |||
| + | | style="vertical-align:middle;" | Capitán de Navío | |||
| + | |- style="height:50px" | |||
| + | ! style="vertical-align:middle;" | 13 - 14 | |||
| + | | style="vertical-align:middle;" | Rear Admiral | |||
| + | | style="vertical-align:middle;" | Kontreadmiral | |||
| + | | style="vertical-align:middle;" | Kontradmirał | |||
| + | | style="vertical-align:middle;" | Schout-bij-Nacht | |||
| + | | style="vertical-align:middle;" | Konteramiral | |||
| + | | style="vertical-align:middle;" | Contralmirante | |||
| + | |- style="height:50px" | |||
| + | ! style="vertical-align:middle;" | 15 - 16 | |||
| + | | style="vertical-align:middle;" | Vice Admiral | |||
| + | | style="vertical-align:middle;" | Vizeadmiral | |||
| + | | style="vertical-align:middle;" | Wiceadmirał | |||
| + | | style="vertical-align:middle;" | Viceadmiraal | |||
| + | | style="vertical-align:middle;" | Viceamiral | |||
| + | | style="vertical-align:middle;" | Vicealmirante | |||
| + | |- style="height:50px" | |||
| + | ! style="vertical-align:middle;" | 17 - 18 | |||
| + | | style="vertical-align:middle;" | Admiral | |||
| + | | style="vertical-align:middle;" | Admiral | |||
| + | | style="vertical-align:middle;" | Admirał floty | |||
| + | | style="vertical-align:middle;" | Luitenant-Admiraal | |||
| + | | style="vertical-align:middle;" | Amiral | |||
| + | | style="vertical-align:middle;" | Almirante de Escuadra | |||
| + | |- style="height:50px" | |||
| + | ! style="vertical-align:middle;" | 19 | |||
| | style="vertical-align:middle;" | Admiral of the Fleet | | style="vertical-align:middle;" | Admiral of the Fleet | |||
| + | | style="vertical-align:middle;" | Großadmiral | |||
| + | | style="vertical-align:middle;" | Admirał | |||
| + | | style="vertical-align:middle;" | Admiraal | |||
| + | | style="vertical-align:middle;" | Amiral | |||
| + | | style="vertical-align:middle;" | Almirante | |||
| |} | |} | |||
| == Notes == | == Notes == | |||
| + | *[https://worldofwarships.eu/en/news/game-guides/all-about-commanders/ Everything You Need to Know About Commanders]. 3 Mar 2020. | |||
| <references/> | <references/> | |||
Revision as of 16:57, 11 August 2020

Contents
- 1 Recruiting
- 2 Managing Commanders
- 3 Commander Skill Points
- 3.1 Earning Commander Experience
- 3.2 Example Commander Experience Calculation
- 3.3 Spending Commander Experience
- 3.4 Battleship Skills
- 3.4.1 Gun Feeder
- 3.4.2 Demolition Expert
- 3.4.3 Consumables Specialist
- 3.4.4 Emergency Repair Specialist
- 3.4.5 Incoming Fire Alert
- 3.4.6 Preventive Maintenance
- 3.4.7 Grease the Gears
- 3.4.8 Inertia Fuse for HE Shells
- 3.4.9 Brisk
- 3.4.10 Vigilance
- 3.4.11 Priority Target
- 3.4.12 AA Defense and ASW Expert
- 3.4.13 Super-Heavy AP Shells
- 3.4.14 Long-Range Secondary Battery Shells
- 3.4.15 Adrenaline Rush
- 3.4.16 Basics of Survivability
- 3.4.17 Improved Repair Party Readiness
- 3.4.18 Focus Fire Training
- 3.4.19 Furious
- 3.4.20 Manual Secondary Battery Aiming
- 3.4.21 Close Quarters Combat
- 3.4.22 Emergency Repair Expert
- 3.4.23 Concealment Expert
- 3.4.24 Fire Prevention Expert
- 3.5 Cruiser Skills
- 3.5.1 Grease the Gears
- 3.5.2 Swift Fish
- 3.5.3 Consumables Specialist
- 3.5.4 Gun Feeder
- 3.5.5 Incoming Fire Alert
- 3.5.6 Last Stand
- 3.5.7 Demolition Expert
- 3.5.8 Fill the Tubes
- 3.5.9 Consumables Enhancements
- 3.5.10 Eye in the Sky
- 3.5.11 Priority Target
- 3.5.12 Focus Fire Training
- 3.5.13 Heavy HE and SAP Shells
- 3.5.14 Pack A Punch
- 3.5.15 Adrenaline Rush
- 3.5.16 Heavy AP Shells
- 3.5.17 Superintendent
- 3.5.18 Survivability Expert
- 3.5.19 Top Grade Gunner
- 3.5.20 Outnumbered
- 3.5.21 Radio Location
- 3.5.22 Inertia Fuse for HE Shells
- 3.5.23 Concealment Expert
- 3.5.24 AA Defense and ASW Expert
- 3.6 Destroyer Skills
- 3.6.1 Grease the Gears
- 3.6.2 Liquidator
- 3.6.3 Consumables Specialist
- 3.6.4 Gun Feeder
- 3.6.5 Incoming Fire Alert
- 3.6.6 Preventive Maintenance
- 3.6.7 Demolition Expert
- 3.6.8 Swift Fish
- 3.6.9 Consumables Enhancements
- 3.6.10 Extra-Heavy Ammunition
- 3.6.11 Priority Target
- 3.6.12 Last Stand
- 3.6.13 Main Battery and AA Specialist
- 3.6.14 Fill the Tubes
- 3.6.15 Adrenaline Rush
- 3.6.16 Inertia Fuse for HE Shells
- 3.6.17 Superintendent
- 3.6.18 Survivability Expert
- 3.6.19 Main Battery and AA Expert
- 3.6.20 Swift in Silence
- 3.6.21 Radio Location
- 3.6.22 Fearless Brawler
- 3.6.23 Concealment Expert
- 3.6.24 Dazzle
- 3.7 Aircraft Carrier Skills
- 3.7.1 Last Gasp
- 3.7.2 Improved Engine Boost
- 3.7.3 Engine Techie
- 3.7.4 Air Supremacy
- 3.7.5 Direction Center for Fighters
- 3.7.6 Search and Destroy
- 3.7.7 Torpedo Bomber
- 3.7.8 Swift Fish
- 3.7.9 Improved Engines
- 3.7.10 Repair Specialist
- 3.7.11 Secondary Armament Expert
- 3.7.12 Patrol Group Leader
- 3.7.13 Sight Stabilization
- 3.7.14 Enhanced Armor-Piercing Ammunition
- 3.7.15 Pyrotechnician
- 3.7.16 Aircraft Armor
- 3.7.17 Survivability Expert
- 3.7.18 Interceptor
- 3.7.19 Bomber Flight Control
- 3.7.20 Proximity Fuze
- 3.7.21 Close Quarters Expert
- 3.7.22 Enhanced Aircraft Armor
- 3.7.23 Hidden Menace
- 3.7.24 Enhanced Reactions
- 3.8 Submarine Skills
- 3.8.1 Enhanced Sonar
- 3.8.2 Liquidator
- 3.8.3 Helmsman
- 3.8.4 Priority Target
- 3.8.5 Incoming Fire Alert
- 3.8.6 Improved Battery Capacity
- 3.8.7 Torpedo Crew Training
- 3.8.8 Consumables Enhancements
- 3.8.9 Preventive Maintenance
- 3.8.10 Last Stand
- 3.8.11 Enhanced Impulse Generator
- 3.8.12 Sonarman
- 3.8.13 Consumables Specialist
- 3.8.14 Watchful
- 3.8.15 Superintendent
- 3.8.16 Adrenaline Rush
- 3.8.17 Torpedo Aiming Master
- 3.8.18 Sonarman Expert
- 3.8.19 Improved Battery Efficiency
- 3.8.20 Enlarged Propeller Shaft
- 4 Redistribute Commander Skills
- 5 Reserve Slots
- 6 Retraining Commanders
- 7 Elite Commander Experience
- 8 Unique Commanders
- 9 Commander Ranks
- 10 Notes
Recruiting
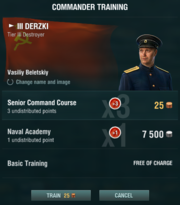
Once Account Level 7 is unlocked, a ship may not be queued for battle without a commander assigned to it. Thereafter, a commander can be recruited for a ship without one.[1] There are several options offered when recruiting a new commander:
- Send to a Senior Commanders Course for 25
 to earn three (3) skill points.
- Send to the Naval Academy for 7,500
 to earn one (1) skill point.
- Be content with Basic Training at no cost for zero (0) skill points.
- Clicking the small, circular icon below the commander's name (middle left) in the recruitment window generates a new name and portrait for the commander. This can be repeated until the player is satisfied with the combination.
- Send to a Senior Commanders Course for 25
Recruiting is not the only way to obtain commanders. Certain missions, campaigns, and Scenarios award commanders. Experienced commanders can be bought in the Arsenal for Coal or Doubloons, or from the Premium Shop for real money. Awarded ships and some purchased ship bundles include experienced commanders.
When a ship is purchased from the tech tree, it can be with a newly recruited commander or without one. The latter option is useful when you intend to assign a commander from Reserve or another ship.
A Commander can be Dismissed at any time. This will free up a reserve slot. A dismissed commander can be recalled within 60 minutes. After that the dismissal is permanent.
Managing Commanders
Clicking on the Commander portrait in the top right of the Port screen brings up the Commander interface. This screen allows players to manage their Commanders in various ways.

The currently selected Commander is shown in the top right; the Commander skills trained are shown in the center. The drop down menu next to the Commander's name allows players to assign the Commander to another ship, send him to Reserve, dismiss him, or Go to their Personal File. Directly below the currently selected Commander is shown other Commanders that are eligible for use on the selected ship. The toggle at the top shows either commanders currently assigned to other ships, or those that are in Reserve.
The center of the Commander Interface displays the Commander skill tree — discussed in detail below — with currently trained skills highlighted. At the far left is the Redistribute function, that allows players to "respec" their Commanders by clearing their skill selections, thus allowing skill points to be assigned again.
| Skill Points | Total Commander XP Required | XP Required for Next Level |
|---|---|---|
| 0 | 0 | 1,500 |
| 1 | 1,500 | 2,500 |
| 2 | 4,000 | 4,000 |
| 3 | 8,000 | 6,000 |
| 4 | 14,000 | 9,000 |
| 5 | 23,000 | 14,000 |
| 6 | 37,000 | 21,000 |
| 7 | 58,000 | 30,000 |
| 8 | 88,000 | 41,000 |
| 9 | 129,000 | 54,000 |
| 10 | 183,000 | 69,000 |
| 11 | 252,000 | 87,000 |
| 12 | 339,000 | 108,000 |
| 13 | 447,000 | 132,000 |
| 14 | 579,000 | 159,000 |
| 15 | 738,000 | 189,000 |
| 16 | 927,000 | 222,000 |
| 17 | 1,149,000 | 259,000 |
| 18 | 1,408,000 | 300,000 |
| 19 | 1,708,000 | — |
Commander Skill Points
The crux of the Commander system — and the main portion of the Commander interface — revolves around the various skills available to train. Players accomplish this by earning Commander experience, then spending that experience on Commander skills.
Earning Commander Experience
Commanders earn commander experience (CXP) in the same way that ships do, including any bonuses to ship XP![]() earnings. Additional bonuses that affect only commander XP — such as from Restless Fire
earnings. Additional bonuses that affect only commander XP — such as from Restless Fire ![]() camo or the Zulu Hotel 🚫 signal — are added on top of this number. Therefore, it is possible to earn considerably more commander XP in a match than ship XP. See the Economics article for details of how CXP is calculated. Players can view how much commander XP they earned in a given match on the 'Credits and XP' tab of the post-battle report.
camo or the Zulu Hotel 🚫 signal — are added on top of this number. Therefore, it is possible to earn considerably more commander XP in a match than ship XP. See the Economics article for details of how CXP is calculated. Players can view how much commander XP they earned in a given match on the 'Credits and XP' tab of the post-battle report.
The table at right shows the experience requirements for a Commander to buy skill points.
Example Commander Experience Calculation
A player with a WG Premium account earns 2,233 base experience in a game. He has Zulu Hotel 🚫 and Equal Speed Charlie London 🚫 signals mounted, and has hoisted the Military Month Contributor ![]() flag over his ship (the MMC flag grants both ship XP and commander XP bonuses). He earns:
flag over his ship (the MMC flag grants both ship XP and commander XP bonuses). He earns:
- 2,233 + [2,233 x 0.5 (for Premium)] = 3,350 modified base experience
- 3,350 + [3,350 x 0.5 (for Equal Speed Charlie London)] + [3,350 x 0.05 (for Military Month Contributor)] = 5,193 ship experience
- 5,193 + [3,350 x 0.5 (for Zulu Hotel)] + [3,350 x 0.05 (for Military Month Contributor)] = 7,036 Commander experience
Spending Commander Experience
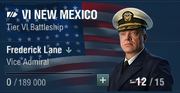
Each commander displays his skill points overlaid on his portrait as available/total. Thus a commander with 15 points, only 3 assigned, would show "12/15" on the lower left of his portrait. Clicking on the commander's portrait brings up the Commander Interface screen (see the graphic above), where a new skill may be selected. The interface will ask for confirmation.
Some skills are only useful to certain classes or to ships with certain weapon systems. Skills that are not useful to the current ship are marked as such. They may still be selected. (If a skill is not useful on the current ship, it may become so when the commander is moved to a different ship.) However, considering the amount of time it takes to train a highly skilled Commander, it is best to focus his skills on ones that are immediately useful. A complete list of skills, their point costs and effects, appears below.[2]
When training skills in Rows 2, 3 or 4, Commanders must have at least one skill trained from the previous row. Commanders are free to train any skill in a row before selecting any skill in the subsequent row; they are not confined to skills only within the sub-groupings shown below (and in the skill tree in the Commander interface).
Note that the skill Direction Center for Fighters does NOT add one fighter to the Patrol Fighters consumable on aircraft carrier squadrons.
While a commander is re-training (specializing to a new tech-tree ship), his skills will not function on that ship. They will function on premium and special ships.
Further, while he earns Commander XP, he does not earn 5% Elite Commander XP ![]() .
.
Base Skills
| Icon | Skill Name | Skill Point Cost | Description | Effect | Notes |
|---|---|---|---|---|---|
| |
Situational Awareness |
Free. | An alert to the commander that the ship has been spotted by the enemy. | An indicator is displayed when your ship is detected by an enemy ship or aircraft. | Functions during commander re-training and on ships without a commander. |
Battleship Skills
| Icon | Skill Name | Skill Point Cost | Description | Effect | Notes |
|---|---|---|---|---|---|
| |
Gun Feeder |
1 | Accelerates shell-type switching of main battery guns. | −40% to the ship's minimum shell-type switching time. | It's complicated. See Shell-type switching time. |
| |
Demolition Expert |
1 | A better chance of causing fires on enemy ships or damage to submarines. | +1% chance of main and secondary HE shells causing a fire. +15% to the underwater explosion radius of main and secondary battery shells when attacking submarines. |
|
| |
Consumables Specialist |
1 | Better availability of consumables. | −7.5% cooldown time of all Consumables |
Specialized Repair Teams, Heavy Repair Teams, and Fast Damage Control Teams are also unaffected. |
| |
Emergency Repair Specialist |
1 | More efficient damage control and repair parties. | −3% cooldown time of Damage Control Party and Repair Party. | |
| |
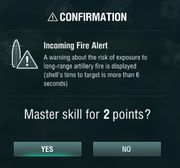
Incoming Fire Alert |
1 | Provides a warning of long-range main battery fire. | Receive a warning of a salvo fired at your ship from a distance of more than 4.5 km. | Think of this as a "turn now!" warning. |
| |
Preventive Maintenance |
1 | Reduces the risk of main turrets, torpedo tubes, steering gear, and engine becoming incapacitated. | −30% to the risk of incapacitation of modules. +15% to the HP of secondary and AA guns. |
|
| |
Grease the Gears |
2 | Faster turret rotation. | +20% main battery turrets traverse speed. | |
| |
Inertia Fuse for HE Shells |
2 | Increases the armor penetration of high explosive (HE) main and secondary shells, while decreasing their chance of setting the enemy ship on fire. | +25% armor penetration of HE shells. Base fire chance reduced by half. |
The mechanics for HE penetration can be found in the Armor Penetration article. Also see Armor thresholds and Fire. This skill is frequently paired with Demolition Expert. |
| |
Brisk |
2 | Activated if the ship is undetected. | When activated: 10% increase in speed. |
This skill allows the ship to re-position more rapidly during a battle. |
| |
Vigilance |
2 | Extends ship's torpedo acquisition range and improves torpedo protection. | +25% detection range of enemy torpedoes. +7% to the ship's torpedo protection. |
Provides additional time to react to incoming torpedoes. Stacks with both Torpedo Lookout System |
| |
Priority Target |
2 | The detection indicator displays the number of opponents that are currently aiming at your ship. | The detection indicator will show the number of enemies targeting you with main battery. | Used skillfully, can detect the launch of a torpedo salvo at you (the number will temporarily decrease by one). |
| |
AA Defense and ASW Expert |
2 | Increased anti-aircraft fire effectiveness. Bigger depth charges. Decreased consumable reload while AAA is active. | +15% damage from continuous AAA and flak. +10% to damage inflicted by depth charges. While AA defenses are operating: −40% ship consumables reload time. |
|
| |
Super-Heavy AP Shells |
3 | Increase AP shell damage in exchange for vulnerability to fire and flood. | +7.5% AP shell damage −10% fire and flood damage received +25% fire and flood duration. |
Does not increase shell penetration. Recall that fire and flood damage is 100% repairable. |
| |
Long-Range Secondary Battery Shells |
3 | Longer range secondaries. | +20% secondary battery firing range. | Does not affect the range of anti-aircraft fire. |
| |
Adrenaline Rush |
3 | Increases reload speed of all armament as the ship's health decreases. | For each 1% HP lost: −0.2% reload time of all armaments +0.2% AA continuous damage. |
|
| |
Basics of Survivability |
3 | Quicker firefighting, flooding control, and module repair teams. | −15% to time of module restoration, firefighting, and recovery from flooding. | Has no effect on consumables. |
| |
Improved Repair Party Readiness |
3 | Activated when the ship takes potential damage equal to 100% of its base HP. | For each potential damage multiple: −0.8% reload time of the Repair Party After receiving 2M HP potential damage: +1 charge of Repair Party |
The effect increases with every multiple of base HP. |
| |
Focus Fire Training |
3 | Decreased aircraft and airstrike reload time. More AA explosions. When Sector Reinforcement is activated, stronger damage shift to the priority sector. |
−10% aircraft preparation time. −15% reload time of Airstrike armament. In an active priority AA sector: +1.5% (to 5%) immediate damage. +25% continuous damage.[4] +1 flak burst per salvo. |
A flak burst is not added to a ship with no long-range AAA. Stacks with Air Groups Modification 3. |
| |
Furious |
4 | Activated if the ship is on fire or flooding. | 1st fire / flood −10% Main battery reload time 2nd etc. (up to 5), each −5% Main battery reload time. |
Fire is motivational. Maximum -35% MB reload time with 4 fires and 2 floods. |
| |
Manual Secondary Battery Aiming |
4 | Greatly increases the accuracy of secondary guns against a designated target (if any) over time. Guns that cannot bear on a designated target will fire with improved reload and accuracy. |
−10% secondary battery reload time. −10% secondary battery dispersion. When firing at the designated target: dispersion will decrease to −50% over 45 sec. Some focus is retained when pausing or shifting targets.
|
This is not manual aim; the guns still aim automatically. To activate, the player must manually designate a target by holding down Ctrl and left-clicking on it.[5] See here for a complete description. |
| |
Close Quarters Combat |
4 | When an enemy ship is spotted within the range of the secondary batteries, a main battery bonus is activated. | When activated: −10% reload time of main battery. |
|
| |
Emergency Repair Expert |
4 | Better damage control and repair. | Damage Control Party and Repair Party: +1 charge (each). +10% action time. |
Damage Control Party already has unlimited charges on most ships. |
| |
Concealment Expert |
4 | Reduces detectability range. | −10% detectability range of the ship. | Stacks with other detection range reduction bonuses such as Concealment System Modification 1. |
| |
Fire Prevention Expert |
4 | Reduces the risk of catching fire. The maximum number of fires on a ship is reduced to three. | −10% to the risk of fire. −1 maximum number of fires burning at one time. |
Caps the number of fires in the superstructure of a ship at one (normally there are two fire zones there). See the Fire article. |
Cruiser Skills
| Icon | Skill Name | Skill Point Cost | Description | Effect | Notes |
|---|---|---|---|---|---|
| |
Grease the Gears |
1 | Faster turret rotation to help turrets keep up with maneuvers. | +15% main battery turrets traverse speed. | |
| |
Swift Fish |
1 | Faster torpedoes means less reaction time at the target. | +5% torpedo speed. +5% aerial torpedo speed. |
|
| |
Consumables Specialist |
1 | Better availability of consumables. | −7.5% cooldown time of all Consumables |
Specialized Repair Teams, Heavy Repair Teams, and Fast Damage Control Teams are also unaffected. |
| |
Gun Feeder |
1 | Accelerates shell-type switching of main battery guns. | −40% to the ship's minimum shell-type switching time. | It's complicated. See Shell-type switching time. |
| |
Incoming Fire Alert |
1 | Provides a warning of long-range main battery fire. | Receive a warning of a salvo fired at your ship from a distance of more than 4.5 km. | Think of this as a "turn now!" warning. |
| |
Last Stand |
1 | When the engine or steering gears are incapacitated, they continue to operate (but with a penalty). | The ship remains able to move and maneuver - slowly - while the engine or steering gears are incapacitated. | As of Update 0.10.0, all ships retain 20% propulsion and 0% steering when the modules are incapacitated. Ships with Last Stand retain 50% of each. |
| |
Demolition Expert |
2 | A better chance of causing fires on enemy ships. | +1% chance of main and secondary HE shells causing a fire. +15% to the underwater explosion radius of main and secondary battery shells when attacking submarines. |
See Fire. |
| |
Fill the Tubes |
2 | Faster torpedo rack reloads. Put more metal fish into the water. | −10% torpedo tubes reload time. | |
| |
Consumables Enhancements |
2 | Longer-lasting consumables. | +10% action time of: | |
| |
Eye in the Sky |
2 | A quick-response spotter plane. | Spotting Aircraft: +2 charges −50% cooldown time |
|
| |
Priority Target |
2 | The detection indicator displays the number of opponents that are currently aiming at your ship. | The detection indicator will show the number of enemies targeting you with main battery. | |
| |
Focus Fire Training |
2 | Faster aircraft preparation. Quicker Air Strikes. More AA explosions. When Sector Reinforcement is activated, stronger damage shift to the priority sector. |
−10% aircraft preparation time. −15% reload time of Airstrike armament. In an active priority AA sector: +1.5% (to 5%) immediate damage. +25% continuous damage.[4] +1 flak burst per salvo. |
A flak burst is not added to a ship with no long-range AAA. Stacks with Air Groups Modification 3. |
| |
Heavy HE and SAP Shells |
3 | More ship damage from penetrating non-AP shells, potentially with a cost. | +10% main battery HE and SAP shell damage. +15% detectability of ships with a main battery caliber of 149 mm and above. |
This skill will be useful to small-gun cruisers, of questionable value to most. Note, that HE and SAP shells cause ship damage only when they penetrate. See here. |
| |
Pack A Punch |
3 | Improved performance of secondary armament. | +20% secondary battery range. +15% torpedo damage. |
|
| |
Adrenaline Rush |
3 | Increases reload speed of all armament as the ship's health decreases. | For each 1% HP lost: −0.2% reload time of all armaments +0.2% AA continuous damage. |
|
| |
Heavy AP Shells |
3 | More damage for penetrating AP shells of heavy cruisers. | +5% damage for AP shells 190mm and larger. | Does not increase penetration. Does not function on light cruisers. |
| |
Superintendent |
3 | Increases capacity of consumables. | +1 additional charge to all consumables mounted on a ship. | |
| |
Survivability Expert |
3 | Increases the size of the ship's Health Pool. | +450 ship HP for each ship tier. | Example: a Tier V ship would gain 2,250 (5x450) additional HP. Has greater value on smaller ships. |
| |
Top Grade Gunner |
4 | If an enemy ship is spotted within the ship's standard detectability range,[6] this skill is activated. | −10% reload time of secondary batteries. When activated: −8% reload time of the main battery. |
Thus concealment bonuses would seem to decrease the utility of this skill. |
| |
Outnumbered |
4 | When there are as many or more visible hostile ships than allies within the ship's standard main battery firing range, this skill is activated.[6] | When activated: +8% ship speed −10% main battery dispersion. |
The speed bonus also applies when there are no enemies or allies within your ship's main battery firing range. |
| |
Radio Location |
4 | Shows the direction to the nearest enemy ship, detected or not. | In battle, an azimuth range arc appears. The enemy is alerted that a bearing has been taken. |
Locates submarines at all depths except maximum. |
| |
Inertia Fuse for HE Shells |
4 | Increases the armor penetration of high explosive (HE) main and secondary shells, while decreasing their chance of setting the enemy ship on fire. | +25% armor penetration of HE shells. Base fire chance reduced by half. |
The mechanics for HE penetration can be found in the Armor Penetration article. Also see Armor thresholds and Fire. This skill is frequently paired with Demolition Expert. |
| |
Concealment Expert |
4 | Reduces detectability range. | −10% detectability range of the ship. | Stacks with other detection range reduction bonuses such as Concealment System Modification 1. |
| |
AA Defense and ASW Expert |
4 | Increased anti-aircraft and ASW effectiveness. Quicker consumable reload while AAA is active. | +25% damage from continuous AAA and flak. +15% damage from depth charges. While AA defenses are operating: −50% ship consumables reload time. |
Destroyer Skills
| Icon | Skill Name | Skill Point Cost | Description | Effect | Notes |
|---|---|---|---|---|---|
| |
Grease the Gears |
1 | Faster turret rotation to help turrets keep up with maneuvers. | +15% main battery turrets traverse speed. | |
| |
Liquidator |
1 | Increased chance to cause flooding on a torpedo strike. | +30% chance (multiplicative) of causing flooding. | See Flooding. |
| |
Consumables Specialist |
1 | Shorter cooldown time of certain consumables. | −7.5% cooldown time of all Consumables |
Specialized Repair Teams, Heavy Repair Teams, and Fast Damage Control Teams are also unaffected. |
| |
Gun Feeder |
1 | Accelerates shell-type switching of main battery guns. | −40% to the ship's minimum shell-type switching time. | It's complicated. See Shell-type switching time. |
| |
Incoming Fire Alert |
1 | Provides a warning of long-range main battery fire. | Receive a warning of a salvo fired at your ship from a distance of more than 4.5 km. | Think of this as a "turn now!" warning. |
| |
Preventive Maintenance |
1 | Reduces the risk of main turrets, torpedo tubes, steering gears, and engine becoming incapacitated. | −30% to the risk of incapacitation of modules. +15% to the HP of secondary and AA guns. |
|
| |
Demolition Expert |
2 | A better chance of causing fires on ships. | +1% chance of main and secondary HE shells causing a fire. +15% to the underwater explosion radius of main and secondary battery shells when attacking submarines. |
The effect of this bonus might be surprising. See Fire. |
| |
Swift Fish |
2 | Faster torpedoes. | +5% torpedo speed. +5% aerial torpedo speed. |
More speed means less reaction time. |
| |
Consumables Enhancements |
2 | Longer action time of certain consumables. | +10% action time of: | |
| |
Extra-Heavy Ammunition |
2 | More damage from armor-piercing penetrations and from ASW depth charges. | +7.5% main battery AP shell damage. +10% to damage inflicted by depth charges. |
Does not increase armor penetration. |
| |
Priority Target |
2 | The detection indicator displays the number of opponents that are currently aiming at your ship. | The detection indicator will show the number of enemies targeting you with main battery. | |
| |
Last Stand |
2 | When the engine or steering gears are incapacitated, they continue to operate (but with a penalty). | The ship remains able to move and maneuver - slowly - while the engine or steering gears are incapacitated. | As of Update 0.10.0, all ships retain 20% propulsion and 0% steering when the modules are incapacitated. Ships with Last Stand retain 50% of each. |
| |
Main Battery and AA Specialist |
3 | Improved firepower. | −5% main battery reload time. +10% continuous AA damage. |
|
| |
Fill the Tubes |
3 | Put more metal fish in the water. | −10% torpedo tubes reload time. | |
| |
Adrenaline Rush |
3 | Increases reload speed of all armament as the ship's health decreases. | For each 1% HP lost: −0.2% reload time of all armaments +0.2% AA continuous damage. |
|
| |
Inertia Fuse for HE Shells |
3 | Increases the armor penetration of high explosive (HE) main and secondary shells, while decreasing their chance of setting the enemy ship on fire. | +25% armor penetration of HE shells. Base fire chance reduced by half. |
The mechanics for HE penetration can be found in the Armor Penetration article. Also see Armor thresholds and Fire. This skill is frequently paired with Demolition Expert. |
| |
Superintendent |
3 | Increases capacity of consumables. | +1 charge to all consumables mounted on a ship. | |
| |
Survivability Expert |
3 | Increases the size of the ship's Health Pool. | +350 ship HP for each ship tier. | Example: a Tier V ship would gain 1,750 (5x350) additional HP. Has greater value on smaller ships. |
| |
Main Battery and AA Expert |
4 | Even more firepower. | +20% main battery range. +15% flak damage. |
|
| |
Swift in Silence |
4 | So long as the ship remains undetected, the speed bonus is activated. | +5% main battery reload time. While undetected: +8% ship speed. |
The skill is especially suitable for stealthy torpedo destroyers. |
| |
Radio Location |
4 | Shows the direction to the nearest enemy ship, detected or not. | In battle, an azimuth range arc appears. The enemy is alerted that a bearing has been taken. |
Locates submarines at all depths except maximum. |
| |
Fearless Brawler |
4 | When the ship is detected, the main battery reload bonus is activated. | +1 flak burst per salvo. When activated: -10% main battery reload time. |
A flak burst is not added to ships with no long-range AAA. "The skill is especially useful for artillery destroyers — French and Soviet — as well as when fighting for Key Areas." - WG |
| |
Concealment Expert |
4 | Reduces detectability range. | −10% detectability range of the ship. | Stacks with other detection range reduction bonuses such as Concealment System Modification 1. |
| |
Dazzle |
4 | When an undetected ship is spotted, reduces the accuracy of hostile fire directed at it, and kicks up the speed. | When activated, for 15 seconds: +20% dispersion of enemy shells. +8% ship speed. |
The shell dispersion effect is applied when the guns are fired. |
Aircraft Carrier Skills
| Icon | Skill Name | Skill Point Cost | Description | Effect | Notes |
|---|---|---|---|---|---|
| |
Last Gasp |
1 | Completely restores engine boost for the last attack flight of a carrier's planes. | Restores engine boost. | |
| |
Improved Engine Boost |
1 | Increases the engine boost time for a carrier's squadrons. | +5% aircraft engine boost duration. | Stacks with Aircraft Engines Modification 1 |
| |
Engine Techie |
1 | Faster Engine Cooling consumable reload time. | −20% Engine Cooling cooldown time. | |
| |
Air Supremacy |
1 | Decreases aircraft servicing time to get your planes back in the air. | −5% aircraft restoration time. | |
| |
Direction Center for Fighters |
1 | When the carrier's CAP Fighter |
+1 Fighter. | Does not apply to Patrol Fighter |
| |
Search and Destroy |
1 | Extends the patrol radius of Patrol Fighter or Interceptor squadrons. | +10% patrol radius. | |
| |
Torpedo Bomber |
2 | Enables torpedo bombers to drop closer to the target for better accuracy. | −10% torpedo arming distance. | |
| |
Swift Fish |
2 | Faster aerial torpedoes == less reaction time at the target. | +5% to torpedo speed. | |
| |
Improved Engines |
2 | Increases the cruising speed of a carrier's squadrons. | +2.5% Squadron speed. | Stacks with Flight Control Modification 2 |
| |
Repair Specialist |
2 | Improves the In-flight Repair consumable | +1 charge. +10% the action time of the consumable. |
|
| |
Secondary Armament Expert |
2 | Improves anti-surface, anti-air and anti-submarine firepower. | −10% secondary battery reload time. +10% flak and continuous AA damage. +10% depth charge damage. |
Interesting combination. |
| |
Patrol Group Leader |
2 | More fighter squadrons on call. | +1 charge to Patrol Fighter or Interceptor consumable. | |
| |
Sight Stabilization |
3 | Speeds up the aiming of a carrier's attack squadrons. | +7.5% Aiming speed for all type attack squadrons. | |
| |
Enhanced Armor-Piercing Ammunition |
3 | Increased damage from airborne armor-piercing munitions. | +3% damage from AP bombs and rockets. | Does not increase penetration. |
| |
Pyrotechnician |
3 | Increases the chance of causing a fire on the target. | +1% for HE rockets. +5% for HE bombs. |
See Fire to explore explore how effective this is. |
| |
Aircraft Armor |
3 | Reduces continuous damage to aircraft in all AA defense zones. | −10% to continuous AA damage | See the Anti-Aircraft Fire article. |
| |
Survivability Expert |
3 | A more survivable aircraft is a more effective aircraft. Has no effect on the carrier's health pool. |
+25 aircraft HP per ship tier. | Carrier-based aircraft HP ranges roughly 1500-2400. |
| |
Interceptor |
3 | The Patrol Fighters consumable is replaced by Interceptor. | +10% patrol radius. Invulnerable to fighters. Cannot attack fighters. Cannot spot ships. |
Interceptors are called to defend friendlies against incoming enemy attack squadrons. |
| |
Bomber Flight Control |
4 | Faster bombers. | +5% cruising speed of bombers. | Does not affect torpedo bombers. |
| |
Proximity Fuze |
4 | Partially negates the effect of a ship's Torpedo Protection System (TPS), increasing damage and the chance of flooding. | −10 percentage points to the target's torpedo protection. | Has no effect on ships with no TPS (destroyers). See Flooding. |
| |
Close Quarters Expert |
4 | Much more dangerous anti-surface batteries. | Secondary batteries:
|
|
| |
Enhanced Aircraft Armor |
4 | Flak vest. | −25% damage from flak. | |
| |
Hidden Menace |
4 | Makes the ship more capable of operating close to the front at the cost of making the ship harder for returning planes to find. | −15% ship detectability range. −20% Damage Control Party cooldown. −50% Safe flight altitude. −50% speed of returning squadrons. |
Aircraft do not receive concealment benefits. Currently affects squadron climb-out speed as well as return cruise. This effect can be partially offset by Air Groups Modification 1. |
| |
Enhanced Reactions |
4 | With the Patrol Fighters or Interceptor consumables activated, the time it takes to start attacking enemy aircraft is reduced. | −80% time before attack. +25% action time of the consumable. +50% arrival time. |
Effectiveness TBD. |
Submarine Skills
| Icon | Skill Name | Skill Point Cost | Description | Effect | Notes |
|---|---|---|---|---|---|
| |
Enhanced Sonar |
1 | Activated if your ship is detected by the enemy. | When activated: -10% Sonar reload time. |
|
| |
Liquidator |
1 | Increased chance to cause flooding on a torpedo strike. | +30% chance (multiplicative) of causing flooding. | See Flooding. |
| |
Helmsman |
1 | Reduces rudder shift time within 15 seconds of using the Hydrophone consumable. | When activated: −10% rudder shift time. |
|
| |
Priority Target |
1 | The detection indicator displays the number of opponents that are currently aiming at your ship. | The detection indicator will show the number of enemies targeting you with main battery. | |
| |
Incoming Fire Alert |
1 | Provides a warning of long-range main battery fire. | Receive a warning of a salvo fired at your ship from a distance of more than 4.5 km. | Think of this as a "turn now!" warning. |
| |
Improved Battery Capacity |
2 | +10% dive capacity. -20% dive capacity recharge rate on the surface. |
||
| |
Torpedo Crew Training |
2 | Activated if your ship is detected by the enemy. | When activated: -15% torpedo tube reload time. |
|
| |
Consumables Enhancements |
2 | +5% action time of the ship's consumables. | ||
| |
Preventive Maintenance |
2 | Reduces the risk of main turrets, torpedo tubes, steering gear, and engine becoming incapacitated. | −30% to the risk of incapacitation of modules. | This skill does not apply to secondary or AA batteries, or a submarine's sonar. |
| |
Last Stand |
2 | When the engine or steering gears are incapacitated, they continue to operate (but with a penalty). | The ship remains able to move and maneuver - slowly - while the engine or steering gears are incapacitated. | As of Update 0.10.0, all ships retain 20% propulsion and 0% steering when the modules are incapacitated. Ships with Last Stand retain 50% of each. |
| |
Enhanced Impulse Generator |
3 | Increases ping velocity if less than 33% of the maximum dive capacity remains. | When activated: +15% sonar ping velocity. |
|
| |
Sonarman |
3 | +25% duration of a ping effect on a sector highlighted once. -15% duration of a ping effect on a sector highlighted twice. |
||
| |
Consumables Specialist |
3 | Improved consumables preperation and cooldown time. | −15% preparation and reload time of ship's consumables. | |
| |
Watchful |
3 | Displays the warning "in detection range" when the undetected submarine is in the range of an activated Submarine Surveillance |
The warning "in detection range" is displayed. | Submarines are detected by Hydroacoustic Search at all depths but at maximum depth only within 2 km. Submarines are detected by Surveillance Radar only at the surface level. Submarines are detected by Submarine Surveillance at periscope and maximum depth. |
| |
Superintendent |
3 | Increases capacity of consumables. | +1 charge to all consumables mounted on a ship. | |
| |
Adrenaline Rush |
4 | Increases reload speed of all armament as the ship's health decreases. | For each 1% HP lost: −0.25% torpedo tubes reload time. −0.25% Sonar reload time. −0.25% Secondary battery reload time. −0.25% Main battery reload time. |
|
| |
Torpedo Aiming Master |
4 | [tl/dr: On active double ping sector before launching torpedoes] | When activated: +15% torpedo damage. |
Only works with homing torpedoes. |
| |
Sonarman Expert |
4 | Increases the ping effect after hydrophone use. Activated if a sector was highlighted within 30 seconds of using the Hydrophone consumable. |
When activated: +25% duration of a ping effect on a sector highlighted once. +25% duration of a ping effect on a sector highlighted twice. |
|
| |
Improved Battery Efficiency |
4 | Activated if less than 50% of the maximum dive capacity remains. | When activated: +25% dive capacity recharge rate on the surface. |
|
| |
Enlarged Propeller Shaft |
4 | Activated if less than 50% of the maximum dive capacity remains. | When activated: +18% speed at surface and periscope depth. |
Does not work at maximum depth. |
| Skill Points | XP Required to Retrain |
|---|---|
| 0 | 0 |
| 1 | 1,000 |
| 2 | 1,500 |
| 3 | 2,000 |
| 4 | 3,500 |
| 5 | 5,000 |
| 6 | 7,500 |
| 7 | 10,000 |
| 8 | 15,000 |
| 9 | 20,000 |
| 10 | 25,000 |
| 11 | 30,000 |
| 12 | 40,000 |
| 13 | 50,000 |
| 14 | 75,000 |
| 15 | 100,000 |
| 16 | 125,000 |
| 17 | 150,000 |
| 18 | 175,000 |
| 19 | 250,000 |
Redistribute Commander Skills
Players will sometimes want to change the skill selections on one of their Commanders. This is accomplished in the Commander Interface by utilizing the "Redistribute" button (shown highlighted in orange on the graphic above). Redistributing Commander skill points costs either 25![]() or 10,000 Elite Commander XP
or 10,000 Elite Commander XP![]() per spent skill point; players are not charged to redistribute unspent skill points. Upon confirming the redistribution, all currently trained Commander skills are cleared, the corresponding skill points are refunded, and players may begin assigning those skill points again as they see fit.
per spent skill point; players are not charged to redistribute unspent skill points. Upon confirming the redistribution, all currently trained Commander skills are cleared, the corresponding skill points are refunded, and players may begin assigning those skill points again as they see fit.
Note that when using Elite Commander XP![]() , up to level 7 it is cheaper to recruit a new commander and accelerate their training than to redistribute skills of an existing commander. This will also result in two commanders instead of one.
, up to level 7 it is cheaper to recruit a new commander and accelerate their training than to redistribute skills of an existing commander. This will also result in two commanders instead of one.
On occasion — such as Christmas or other holidays — Wargaming offers sales on redistribution. Clan Battle participants have been enjoying one week of free redistribution at the beginning and at the end of Clan Battle seasons.
Reserve Slots
Reserve slots — (shown highlighted in green on the graphic above) — hold unassigned commanders. Commanders in the Reserve can be assigned to any ship (of the same nation) as normal, subject to re-training costs (see below).
Each player starts with four (4) Reserve slots. Additional Reserve slots can be purchased with doubloons -- normally four (4) slots for 100![]() . Slots are very rarely available through other means.
. Slots are very rarely available through other means.
If a player receives a ship with a Commander, either from Premium shop, Armory, or a Container, the player receive an extra Reserve slot for that Commander.
Retraining Commanders
Once trained to a non-premium ship from the tech tree, a Commander's skills can be fully utilized only on that ship. Transferring to a new tech tree ship requires the commander to re-training to that ship, which is usually accomplished by earning a certain amount of Commander XP in his new ship (see the table to the right). Normal commander training resumes once re-training has been accomplished.
When re-training is required, players are offered several options. Commanders can spend:
- 500, completing re-training instantly.
- 200,000, requiring them to earn 1/2 the Commander XP normally required (see table) to completely re-train (or spend the full amount of doubloons).
- nothing, requiring them to earn Commander XP in order to fully re-train for their new ships.
- 500
Commanders can also spend Elite Commander XP![]() (and/or Free XP) equal to the remaining cost of re-training, finishing re-training instantly. This can be combined with the 200,000
(and/or Free XP) equal to the remaining cost of re-training, finishing re-training instantly. This can be combined with the 200,000![]() option in order to save ECXP.
option in order to save ECXP.
Remember that while a Commander is re-training, skill effects are reduced by 50% and skills with a binary (on or off) effect are disabled.
Premium Ships
A commander can be assigned to a premium ship of the same nation at any time without undergoing re-training. His skills will continue to work at full strength on the premium ship. Commander XP earned while assigned to a premium ship counts toward re-training on his specialized ship. This makes premium ships a great way to re-train commanders while avoiding retraining penalties. The commander can be moved back to his specialized ship without penalty.
Elite Commander Experience
A commander who earns nineteen (19) Skill Points becomes an Elite Commander. Elite Commanders continue to earn experience as do lower-ranked commanders. However, an Elite Commander no longer accumulates CXP; his experience is earned as Elite Commander Experience![]() (ECXP) that accumulates in a common pool (like Free XP). (The current ECXP balance is shown highlighted in purple on the graphic above).
(ECXP) that accumulates in a common pool (like Free XP). (The current ECXP balance is shown highlighted in purple on the graphic above).

As Free XP is available to all ships, Elite Commander XP![]() is available to all commanders on a player account.
is available to all commanders on a player account.
Using Elite Commander XP
Elite Commander XP![]() can be:
can be:
- Applied to any non-elite commander to gain additional skill points.
- Used to retrain any commander moved to a different, non-premium ship (instead of spending doubloons).
- Used to redistribute skill points (in lieu of using doubloons).
- Converted into Free XP
 for doubloons.
Spending Free XP on Commanders
After all ECXP is spent, Free XP![]() can be used instead of Elite Commander XP
can be used instead of Elite Commander XP![]() .[8]
.[8]
For a single operation, Elite Commander XP![]() and Free XP
and Free XP![]() can be spent together, just as Ship XP and Free XP can be spent together researching ships and ship modules. When Elite Commander XP and Free XP are spent, the following rules apply:
can be spent together, just as Ship XP and Free XP can be spent together researching ships and ship modules. When Elite Commander XP and Free XP are spent, the following rules apply:
- To retrain a commander, promote him to a new rank, or redistribute his skill points, the available ECXP and/or FXP must be sufficient to fully complete the operation (no partial operations).
- When an operation can be completed, Elite Commander XP is spent first then Free XP is used only if there is not enough ECXP.
Example using both Elite Commander XP and Free XP
A commander with 7 Skill Points and 100 CXP is assigned to a non-premium ship for which he is not trained. 10,000 XP is required to fully re-train him. The player decides to accelerate re-training by 50%, spending 200,000 Credits![]() . Consequently, 5000 more XP is required to finish re-training. 8000 Elite Commander XP
. Consequently, 5000 more XP is required to finish re-training. 8000 Elite Commander XP![]() is available. The player completes re-training by spending 5000 ECXP. 3000 ECXP remains. (Note that CXP cannot be spent for re-training.)
is available. The player completes re-training by spending 5000 ECXP. 3000 ECXP remains. (Note that CXP cannot be spent for re-training.)
Now the player chooses to promote this commander to the maximum attainable rank using all types of XP. He has 100 CXP, 3000 ECXP, and 40,000 Free XP.
The cost of the next commander rank (8) is 30,000 XP. To reach it, he spends 100 CXP, 3000 ECXP, and 26,900 Free XP (total 30,000). To reach the next rank (9), 41,000 XP is required. Since he has no CXP or ECXP and only 13,100 Free XP remaining, he cannot promote this commander to rank (9).Converting Elite Commander XP to Free XP
Elite Commander XP can be converted to Free XP in the same way as Elite (ship) XP — ( 25 ECXP![]() + 1
+ 1![]() => 25 Free XP
=> 25 Free XP![]() ). Free XP cannot be converted to Elite Commander XP.
). Free XP cannot be converted to Elite Commander XP.
Unique Commanders
Some commanders have unique talents or modified commander skills. Check out the list of unique commanders to learn more.
Commander Ranks
As a Commander gains levels, they are given ranks based on their nation. These roughly correspond to the historical ranks awarded to officers of their nation's respective navies. The table below lists these ranks as they appear in game.
| Skill Points | Japan |
USA |
USSR |
Germany |
UK |
France |
Pan-Asia |
Italy |
|---|---|---|---|---|---|---|---|---|
| 0 | Kaigun Shōi Kōhosei | Warrant Officer | Michman | Oberfähnrich zur See | Warrant Officer | Aspirant | Midshipman | Aspirante Guardiamarina |
| 1 - 2 | Kaigun Shōi | Lieutenant Junior Grade | Leytenant | Leutnant zur See | Sub-Lieutenant | Enseigne de deuxième classe | Sub-Lieutenant | Guardiamarina |
| 3 - 4 | Kaigun Chūi | Lieutenant | Starshiy-Leytenant | Oberleutnant zur See | Lieutenant | Enseigne de première classe | Lieutenant | Sottotenente di Vascello |
| 5 - 6 | Kaigun Daii | Lieutenant Commander | Kapitan-Leytenant | Kapitänleutnant | Lieutenant Commander | Lieutenant de vaisseau | Lieutenant Commander | Tenente di Vascello |
| 7 - 8 | Kaigun Shōsa | Commander | Kapitan 3 Ranga | Korvettenkapitän | Commander | Capitaine de corvette | Commander | Capitano di Corvetta |
| 9 - 10 | Kaigun Chūsa | Captain | Kapitan 2 Ranga | Fregattenkapitän | Captain | Capitaine de frégate | Captain | Capitano di Fregata |
| 11 - 12 | Kaigun Daisa | Commodore | Kapitan 1 Ranga | Kapitän zur See | Commodore | Capitaine de vaisseau | Commodore | Capitano di Vascello |
| 13 - 14 | Kaigun Shōshō | Rear Admiral | Kontr-Admiral | Konteradmiral | Rear Admiral | Contre-amiral | Rear Admiral | Contrammiraglio |
| 15 - 16 | Kaigun Chūjo | Vice Admiral | Vitse-Admiral | Vizeadmiral | Vice Admiral | Vice-amiral | Vice Admiral | Ammiraglio di Divisione |
| 17 - 18 | Kaigun Taishō | Admiral | Admiral | Admiral | Admiral | Vice-amiral d'escadre | Admiral | Ammiraglio |
| 19 | Gensui Kaigun Taishō | Fleet Admiral | Admiral flota | Großadmiral | Admiral of the Fleet | Amiral | Admiral of the Fleet | Ammiraglio di Armata |
| Skill Points | Commonwealth |
|
Pan-America | |||
|---|---|---|---|---|---|---|
| Austro-Hungary |
Poland |
Netherlands |
Sweden | |||
| 0 | Warrant Officer | Seefähnrich | Chorąży marynarki | Adjudant-Onderofficier | Fänrik | Guardiamarina |
| 1 - 2 | Sub-Lieutenant | Korvettenleutnant | Podporucznik marynarki | Luitenant ter Zee der 3e klasse |
Underlöjtnant | Teniente de Corbeta |
| 3 - 4 | Lieutenant | Fregattenleutnant | Porucznik marynarki | Luitenant ter Zee der 2e klasse |
Löjtnant | Teniente de Fragata |
| 5 - 6 | Lieutenant Commander | Linienschiffsleutnant | Kapitan marynarki | Luitenant ter Zee der 1e klasse |
Kapten | Teniente de Navío |
| 7 - 8 | Commander | Korvettenkapitän | Komandor podporucznik | Kapitein-Luitenant ter Zee | Kommendörkapten av 2 graden |
Capitán de Corbeta |
| 9 - 10 | Captain | Fregattenkapitän | Komandor porucznik | Kapitein ter Zee | Kommendörkapten av 1 graden |
Capitán de Fragata |
| 11 - 12 | Commodore | Linienschiffkapitän | Komandor | Commandeur | Kommendör | Capitán de Navío |
| 13 - 14 | Rear Admiral | Kontreadmiral | Kontradmirał | Schout-bij-Nacht | Konteramiral | Contralmirante |
| 15 - 16 | Vice Admiral | Vizeadmiral | Wiceadmirał | Viceadmiraal | Viceamiral | Vicealmirante |
| 17 - 18 | Admiral | Admiral | Admirał floty | Luitenant-Admiraal | Amiral | Almirante de Escuadra |
| 19 | Admiral of the Fleet | Großadmiral | Admirał | Admiraal | Amiral | Almirante |
Notes
- Everything You Need to Know About Commanders. 3 Mar 2020.
- ↑ To recruit a commander to Reserve, temporarily move the commander of a ship to reserve, recruit a new commander, then swap back.
- ↑ With Update 0.8.0, a number of skills have changed. See this and nearby WoWS News articles: https://worldofwarships.com/en/news/development/cv8-how-to-tune/#customization
- ↑ Aircraft Carrier skills do not apply to hybrid ships such as Ise and Tone.
- ↑ 4.0 4.1 When activated, the continuous AA damage in the priority sector instantly gains 25% and rises to its default maximum plus 25%. Meanwhile, the weak side loses an additional 25%.
- ↑ Secondary target designation can be tricky at first. To make it more sure, with the Alternate Interface Mode set to Full (highly recommended on the Settings.Controls panel) <ctrl-left click> on the red damage bar just above the range number. A target icon will appear above the ship.
- ↑ 6.0 6.1 The standard main battery firing range or standard detectability range are those values shown in port. They are not changed by in-battle effects such as gun bloom, spotting aircraft, smoke, or weather.
- ↑ This means:
- If the submarine gets the warning on the surface, it is in the range of an activated Submarine Surveillance.
- If the submarine gets the warning at periscope depth, it is in the range of an activated Surveillance Radar.
- If the submarine gets the warning at maximum depth, it is either in the range of an activated Surveillance Radar or Hydroacoustic Search (but more than 2 km away).
- ↑ Free XP becomes available at Account Level 5. Commander operations and ECXP become available at Account Level 7. Since at that point the account will have no ECXP, accumulated FXP may be used in its place.