Conqueror
| Revision as of 13:08, 31 July 2017 Protected "Ship:Conqueror" ([Edit=Allow only administrators] (expires 13:08, 31 August 2017 (UTC)) [Move=Allow only administrators] (indefinite)) | Revision as of 10:46, 15 August 2017 | |||
| Line 1: | Line 1: | |||
| ? | <!-- DO NOT EDIT OR DELETE LINES WITH COMMENTS (it's look like as this or next line) | + | <!-- DO NOT EDIT OR DELETE LINES WITH COMMENTS (it's look like as this or next line) | |
| -->{{WoWs_Ship | -->{{WoWs_Ship | |||
| |Promo=<!-- in case of gift or promo ship write conditions to get it. (optional)--> | |Promo=<!-- in case of gift or promo ship write conditions to get it. (optional)--> | |||
| Line 6: | Line 6: | |||
| |Performance=<!-- write text about performance in battles below --> | |Performance=<!-- write text about performance in battles below --> | |||
| ? | + | ''Conqueror'' is a worthy successor to ''[[Lion]]'', sitting atop the tech tree at Tier X. Like ''Lion'', she can sneak around the map by taking advantage of her low detectability range. ''Conqueror''<nowiki>'</nowiki> s size means that she will take quite a few hits in a gunfight. Due to this, it is important to position properly and use concealment when faced with overwhelming odds. When this isn’t possible, ''Conqueror'' is capable of holding her own. Her high-explosive (HE) shells are extremely powerful and sport a high fire chance. This is useful when engaging multiple ships because she can burn her enemies at range and switch to armor piercing (AP) for more devastating hits at close range. However, her HE shells are powerful enough that some captains may choose to use it exclusively. After slugging it out with the other heavy hitting ships at Tier X, ''Conqueror'' can use a [[Ship:Consumables#Repair_Party|Repair Party Consumable]] which is capable of restoring tens of thousands of hit points (HP). This allows her to stay in the fight, continuing to punish her enemies. By combining her strengths and finding support from friendly ships, ''Conqueror'' becomes one of the most powerful ships in the game. | ||
| |Pros=<!-- write list of positive points below. use * as in ordinary wiki-list. --> | |Pros=<!-- write list of positive points below. use * as in ordinary wiki-list. --> | |||
| + | *'''Excellent AP and HE Shell Performance''' -- ''Conqueror'' is capable of destroying her enemies at any range. | |||
| + | ||||
| + | *'''High HE Fire Chance''' -- A salvo with multiple hits almost guarantees a fire. | |||
| + | ||||
| + | *'''Low Detectability''' – She can sneak around a flank or disengage in order to repair the damage she has sustained in battle. | |||
| + | ||||
| + | *'''Excellent Repair Party Consumable''' – Capable of repairing huge amounts of damage; rivaled only by those found on high tier [[Ship:Cruisers|British cruisers]]. | |||
| + | ||||
| + | *'''Excellent Anti-Aircraft Armament''' – When fully specialized, ''Conqueror'' maintains a no-fly zone that is capable of shredding enemy aircraft. | |||
| + | ||||
| + | *'''Rudder Shift & Turning Radius''' – With an above average stock rudder shift time and turning radius, ''Conqueror'' is capable of outmaneuvering ''[[Montana]]'' and ''[[Großer Kurfürst]]''. ''[[Yamato]]'' has a smaller turning radius but has a slower rudder shift time. | |||
| |Cons=<!-- write list of negative points below. use * as in ordinary wiki-list. --> | |Cons=<!-- write list of negative points below. use * as in ordinary wiki-list. --> | |||
| + | *'''Armor''' – Despite a thick armor belt that is capable of stopping small-medium caliber shells, ''Conqueror'' is susceptible to high caliber AP shells at certain angles. | |||
| ? | + | *'''Size''' – ''Conqueror'' is a massive ship, which makes it hard to operate in close quarters. It is also a large target for enemy destroyers to hit with torpedoes. | ||
| + | *'''Top Speed''' – Slightly slower than ''Großer Kurfürst'' and ''Montana''. | |||
| + | ||||
| + | *'''Size of HP Pool''' – Her HP pool is lower than all other Tier X battleships; however, she is capable of restoring large amounts of HP with her repair party consumable. | |||
| + | ||||
| + | *'''Secondary Armament''' -- Even when fully specialized, ''Conqueror''<nowiki>'</nowiki>s secondary armament is underwhelming due to its sluggish reload and low firepower. | |||
| + | ||||
| + | |Research=<!-- write text about priority sequence of research below --> | |||
| + | ''Conqueror'' has one researchable upgrade for her main battery. The stock gun configuration is 4 turrets with 3 rifles each. By researching and upgrading, her configuration will be changed to 4 turrets with 2 rifles each, but they are of a higher caliber. With this upgrade, AP and HE shell damage is increased and the chance of fire for HE shells is increased. The main battery upgrade is recommended for players who wish to engage battleships and heavy cruisers, but some players may opt to keep the stock configuration in order to retain the extra gun barrels. Additionally, the smaller gun caliber is more suited to engaging destroyers and light cruisers. | |||
| |OptimalConfiguration=<!-- write some general text about selection of optimal configuration below (optional)--> | |OptimalConfiguration=<!-- write some general text about selection of optimal configuration below (optional)--> | |||
| |Upgrades=<!-- write text about best upgrades below --> | |Upgrades=<!-- write text about best upgrades below --> | |||
| + | The recommended upgrades for HMS ''Conqueror'' are as follows: | |||
| + | *'''Slot 1''': [[Ship:Upgrades#Main_Armaments_Modification.C2.A01|Main Armaments Modification 1]]<nowiki>*</nowiki> | |||
| + | *'''Slot 2''': [[Ship:Upgrades#Aiming_Systems_Modification.C2.A01|Aiming Systems Modification 1]]<nowiki>*</nowiki> | |||
| + | *'''Slot 3''': [[Ship:Upgrades#Main_Battery_Modification.C2.A03|Main Battery Modification 3]]<nowiki>*</nowiki> | |||
| + | *'''Slot 4''': [[Ship:Upgrades#Damage_Control_System_Modification.C2.A01|Damage Control System Modification 1]] | |||
| + | *'''Slot 5''': [[Ship:Upgrades#Damage_Control_System_Modification.C2.A02|Damage Control System Modification 2]] | |||
| + | *'''Slot 6''': [[Ship:Upgrades#Concealment_System_Modification.C2.A01|Concealment System Modification 1]] | |||
| + | ||||
| + | ||||
| + | '''Upgrade Slot 1''' provides a useful alternative to '''Main Armaments Modification 1'''. For players who wish to specialize for anti-aircraft duties, [[Ship:Upgrades#Auxiliary_Armaments_Modification.C2.A01|Auxiliary Armaments Modification 1]] should be mounted. | |||
| + | ||||
| + | '''Upgrade Slot 2''' provides options with different benefits. '''Aiming Systems Modification 1''' is typically recommended for increased accuracy in long range gunnery. For increased turret traverse in a brawl, [[Ship:Upgrades#Main_Battery_Modification.C2.A02|Main Battery Modification 2]] is a useful upgrade. For specialization in anti-aircraft duties, [[Ship:Upgrades#AA_Guns_Modification.C2.A02|AA Guns Modification 2]] should be mounted. | |||
| + | ||||
| + | '''Upgrade Slot 3''' provides two useful options for specialization in different roles. [[Ship:Upgrades#Main_Battery_Modification.C2.A03|Main Battery Modification 3]] reduces reload time, but there is a tradeoff of increased turret traverse time. This upgrade is recommended for players who wish to specialize in gunnery. [[Ship:Upgrades#AA_Guns_Modification.C2.A03|AA Guns Modification 3]] increases the damage output of AA guns, and is the useful option for anti-aircraft duties. | |||
| <!--[[Ship:Upgrades#Tier_I.2B_Equipment_.28Slot_1.29|Upgrade Slot 1]] | <!--[[Ship:Upgrades#Tier_I.2B_Equipment_.28Slot_1.29|Upgrade Slot 1]] | |||
| Line 27: | Line 61: | |||
| {{Commander Skills | {{Commander Skills | |||
| ? | | Priority Target = | + | | Priority Target = 3 | |
| ? | | Preventative Maintenance = | + | | Preventative Maintenance = 1 | |
| ? | | Expert Loader = | + | | Expert Loader = 1 | |
| | Aircraft Servicing Expert = | | Aircraft Servicing Expert = | |||
| | Direction Center for Catapult Aircraft = | | Direction Center for Catapult Aircraft = | |||
| | Dogfighting Expert = | | Dogfighting Expert = | |||
| ? | | Incoming Fire Alert = | + | | Incoming Fire Alert = 1 | |
| | Evasive Maneuver = | | Evasive Maneuver = | |||
| ? | | High Alert = | + | | High Alert = 2 | |
| ? | | Jack of All Trades = | + | | Jack of All Trades = 3 | |
| ? | | Expert Marksman = | + | | Expert Marksman = 3 | |
| | Torpedo Acceleration = | | Torpedo Acceleration = | |||
| | Smoke Screen Expert = | | Smoke Screen Expert = | |||
| | Expert Rear Gunner = | | Expert Rear Gunner = | |||
| ? | | Adrenaline Rush = | + | | Adrenaline Rush = 3 | |
| | Last Stand = | | Last Stand = | |||
| ? | | Basics of Survivability = | + | | Basics of Survivability = 3 | |
| ? | | Survivability Expert = | + | | Survivability Expert = 2 | |
| | Torpedo Armament Expertise = | | Torpedo Armament Expertise = | |||
| | Emergency Takeoff = | | Emergency Takeoff = | |||
| ? | | Basic Firing Training = | + | | Basic Firing Training = 2 | |
| ? | | Superintendent = | + | | Superintendent = 3 | |
| ? | | Demolition Expert = | + | | Demolition Expert = 1 | |
| ? | | Vigilance = | + | | Vigilance = 2 | |
| ? | | Manual Fire Control for Secondary Armament = | + | | Manual Fire Control for Secondary Armament = 1 | |
| ? | | Fire Prevention = | + | | Fire Prevention = 3 | |
| | Inertia Fuse for HE Shells = | | Inertia Fuse for HE Shells = | |||
| | Air Supremacy = | | Air Supremacy = | |||
| ? | | Advanced Firing Training = | + | | Advanced Firing Training = 2 | |
| ? | | Manual Fire Control for AA Armament = | + | | Manual Fire Control for AA Armament = 2 | |
| ? | | Radio Position Finding = | + | | Radio Position Finding = 1 | |
| ? | | Concealment Expert = | + | | Concealment Expert = 3 | |
| }} | }} | |||
| |Consumables=<!-- write text about selection of Consumables below --> | |Consumables=<!-- write text about selection of Consumables below --> | |||
| + | ''Conqueror''<nowiki>'</nowiki>s key strength is access to its powerful '''Repair Party''' consumable. The premium version of this consumable should be mounted, paired with the commander skill [[Ship:Commander#List_of_Support_Skills|Superintendent]] in order to gain two additional charges with reduced cooldown time. The premium version of '''Damage Control Party''' should be mounted to reduce cooldown time between uses. | |||
| |Camouflage=<!-- write text about useful camouflage below --> | |Camouflage=<!-- write text about useful camouflage below --> | |||
| ? | + | ''Conqueror'' should never be sent into battle without camouflage. [[Ship:Camouflage#Standard_Camouflage|Type 1, 2, 5, or 6 camouflage]] can be purchased for a small amount of credits or doubloons. This is recommended at a minimum to increase the dispersion of enemy shells or increase slightly improve the detectability range. For players who wish to make the investment, [[Ship:Camouflage#Permanent_Camouflage|Type 20 camouflage]] can be purchased for 5000 doubloons. This camouflage provides many benefits and is recommended for players who wish to play ''Conqueror'' frequently. | ||
| |Signals=<!-- write text about best set of signals below --> | |Signals=<!-- write text about best set of signals below --> | |||
| {{Signal Flags | {{Signal Flags | |||
| ? | | November Echo Setteseven = | + | | November Echo Setteseven = 2 | |
| ? | | Mike Yankee Soxisix = | + | | Mike Yankee Soxisix = 2 | |
| ? | | India X-Ray = | + | | India X-Ray = 1 | |
| | Juliet Yankee Bissotwo = | | Juliet Yankee Bissotwo = | |||
| ? | | Victor Lima = | + | | Victor Lima = 1 | |
| ? | | Hotel Yankee = | + | | Hotel Yankee = 2 | |
| | November Foxtrot = | | November Foxtrot = | |||
| ? | | Sierra Mike = | + | | Sierra Mike = 2 | |
| ? | | India Delta = | + | | India Delta = 3 | |
| ? | | Juliet Whiskey Unaone = | + | | Juliet Whiskey Unaone = 1 | |
| ? | | India Yankee = | + | | India Yankee = 3 | |
| ? | | Juliet Charlie = | + | | Juliet Charlie = 3 | |
| ? | | Zulu = | + | | Zulu = 2 | |
| ? | | India Bravo Terrathree = | + | | India Bravo Terrathree = 2 | |
| ? | | Equal Speed Charlie London = | + | | Equal Speed Charlie London = 2 | |
| ? | | Zulu Hotel = | + | | Zulu Hotel = 2 | |
| ? | | Papa Papa = | + | | Papa Papa = 2 | |
| ? | | Wyvern = | + | | Wyvern = 2 | |
| ? | | Red Dragon = | + | | Red Dragon = 2 | |
| ? | | Dragon Flag = | + | | Dragon Flag = 2 | |
| ? | | Ouroboros = | + | | Ouroboros = 2 | |
| ? | | Hydra = | + | | Hydra = 2 | |
| }} | }} | |||
Revision as of 10:46, 15 August 2017

| Research price255000 exp |
| Purchase price20,600,000 |
| Hit Points82,900 |
| 419 mm/45 Mk.I on a Type C mount4 х 3 pcs. |
| Rate of Fire2 shots/min. |
| Reload Time30 sec. |
| Rotation Speed4 deg./sec. |
| 180 Degree Turn Time45 sec. |
| Firing Range24.25 km. |
| Maximum Dispersion302 m. |
| HE Shell419 mm HE Mk I |
| Maximum HE Shell Damage7,200 |
| Chance of Fire on Target Caused by HE Shell48 % |
| Initial HE Shell Velocity792 m./s. |
| HE Shell Weight995 kg. |
| AP Shell419 mm AP Mk II |
| Maximum AP Shell Damage13,000 |
| Initial AP Shell Velocity747 m./s. |
| AP Shell Weight1157 kg. |
| 133 mm/50 QF Mk.I on an RP10 Mk.I mount8 х 2 pcs. |
| Firing Range7.3 km. |
| Rate of Fire9 shots/min. |
| Reload Time6.67 sec. |
| HE Shell133 mm HE Mk IC |
| Maximum HE Shell Damage1,900 |
| Initial HE Shell Velocity792 m./s. |
| Chance of Fire on Target Caused by HE Shell8 % |
| 133 mm/50 QF Mk.I on an RP10 Mk.I mount8 х 2 pcs. |
| . . . Average Damage per Second68 |
| . . . Firing Range5.19 km. |
| 40 mm/56 OQF Mk.III on a Mk.VII mount12 х 1 pcs. |
| . . . Average Damage per Second104.4 |
| . . . Firing Range3.51 km. |
| 40 mm/56 OQF Mk.X on a STAAG Mk.2 mount4 х 2 pcs. |
| . . . Average Damage per Second53.6 |
| . . . Firing Range3.51 km. |
| 40 mm/56 OQF Mk.IX on a Mk.VI mount11 х 6 pcs. |
| . . . Average Damage per Second222.2 |
| . . . Firing Range3.51 km. |
| Maximum Speed29.5 knot |
| Turning Circle Radius940 m. |
| Rudder Shift Time17.4 sec. |
| Surface Detectability Range15.19 km. |
| Air Detectability Range12.53 km. |

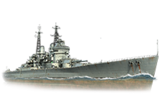
Conqueror — British Tier X battleship.
After battleship Vanguard was laid down, the plan was to develop British battleships in such a way as to increase their dimensions while maintaining the layout design of their predecessors. One of the options was to switch to three-gun turrets and increase the caliber to 419 mm.
Modules
 |
Rate of Fire (shots/min) | 180° Turn Time (sec) | Maximum Dispersion (m) | Maximum HE Shell Damage (HP) | Chance of Fire on Target Caused by HE Shell (%) | Maximum AP Shell Damage (HP) |
Research price (exp) |
Purchase price ( | |
|---|---|---|---|---|---|---|---|---|---|
| 419 mm/45 Mk.I on a Type C/D mount | 2 | 45 | 302 | 7,200 | 48 | 13,000 | 0 | 2,000,000 |
 |
Hit Points (HP) | Armor (mm) | Armor (mm) | Main Turrets (pcs.) | Secondary Gun Turrets (pcs.) | AA Mounts (pcs.) | Torpedo Tubes (pcs.) | Hangar Capacity (pcs.) |
Research price (exp) |
Purchase price ( | |
|---|---|---|---|---|---|---|---|---|---|---|---|
| Conqueror | 82,900 | 19 | 406 | 2/2 | 8 | 12/4/11/8 | 0 | 3,500,000 |
 |
IDS_SHIP_PARAM_SUO_INCREASE_DIST (%) | Maximum Firing Range (km) |
Research price (exp) |
Purchase price ( | |
|---|---|---|---|---|---|
| Mk X mod. 1 | 0 | 0 | 2,000,000 |
 |
Maximum Speed (knot) |
Research price (exp) |
Purchase price ( | |
|---|---|---|---|---|
| Propulsion: 135,650 hp | 29.5 | 0 | 1,500,000 |
Compatible Upgrades
| Slot 1 |
||||
|---|---|---|---|---|
| Slot 2 |
||||
| Slot 3 |
||||
| Slot 4 |
||||
| Slot 5 |
||||
| Slot 6 |
Player Opinion
Performance
Pros:
- Excellent AP and HE Shell Performance -- Conqueror is capable of destroying her enemies at any range.
- High HE Fire Chance -- A salvo with multiple hits almost guarantees a fire.
- Low Detectability – She can sneak around a flank or disengage in order to repair the damage she has sustained in battle.
- Excellent Repair Party Consumable – Capable of repairing huge amounts of damage; rivaled only by those found on high tier British cruisers.
- Excellent Anti-Aircraft Armament – When fully specialized, Conqueror maintains a no-fly zone that is capable of shredding enemy aircraft.
- Rudder Shift & Turning Radius – With an above average stock rudder shift time and turning radius, Conqueror is capable of outmaneuvering Montana and Großer Kurfürst. Yamato has a smaller turning radius but has a slower rudder shift time.
Cons:
- Armor – Despite a thick armor belt that is capable of stopping small-medium caliber shells, Conqueror is susceptible to high caliber AP shells at certain angles.
- Size – Conqueror is a massive ship, which makes it hard to operate in close quarters. It is also a large target for enemy destroyers to hit with torpedoes.
- Top Speed – Slightly slower than Großer Kurfürst and Montana.
- Size of HP Pool – Her HP pool is lower than all other Tier X battleships; however, she is capable of restoring large amounts of HP with her repair party consumable.
- Secondary Armament -- Even when fully specialized, Conqueror's secondary armament is underwhelming due to its sluggish reload and low firepower.
Research
Optimal Configuration
Upgrades
The recommended upgrades for HMS Conqueror are as follows:
- Slot 1: Main Armaments Modification 1*
- Slot 2: Aiming Systems Modification 1*
- Slot 3: Main Battery Modification 3*
- Slot 4: Damage Control System Modification 1
- Slot 5: Damage Control System Modification 2
- Slot 6: Concealment System Modification 1
Upgrade Slot 1 provides a useful alternative to Main Armaments Modification 1. For players who wish to specialize for anti-aircraft duties, Auxiliary Armaments Modification 1 should be mounted.
Upgrade Slot 2 provides options with different benefits. Aiming Systems Modification 1 is typically recommended for increased accuracy in long range gunnery. For increased turret traverse in a brawl, Main Battery Modification 2 is a useful upgrade. For specialization in anti-aircraft duties, AA Guns Modification 2 should be mounted.
Upgrade Slot 3 provides two useful options for specialization in different roles. Main Battery Modification 3 reduces reload time, but there is a tradeoff of increased turret traverse time. This upgrade is recommended for players who wish to specialize in gunnery. AA Guns Modification 3 increases the damage output of AA guns, and is the useful option for anti-aircraft duties.
Commander Skills
| Recommended Commander Skills | ||||||||
|---|---|---|---|---|---|---|---|---|
| Cost (points) |
Endurance | Attack | Support | Versatility | ||||
| 1 |
★★★ |
★ |
★ |
|
|
|
★ |
|
| 2 |
★★ |
★★★ |
★★★ |
|
|
|
★★★ |
|
| 3 |
★★★ |
★★ |
|
|
★★ |
★★★ |
★ |
★★ |
| 4 |
★ |
★★★ |
|
|
★★ |
|
★ |
★★★ |
| Key: ★★★ - Extremely Useful ★★ - Frequently Useful ★ - Occasionally Useful No stars - Meh Χ - Not recommended | ||||||||
Consumables
Conqueror's key strength is access to its powerful Repair Party consumable. The premium version of this consumable should be mounted, paired with the commander skill Superintendent in order to gain two additional charges with reduced cooldown time. The premium version of Damage Control Party should be mounted to reduce cooldown time between uses.
Camouflage
Conqueror should never be sent into battle without camouflage. Type 1, 2, 5, or 6 camouflage can be purchased for a small amount of credits or doubloons. This is recommended at a minimum to increase the dispersion of enemy shells or increase slightly improve the detectability range. For players who wish to make the investment, Type 20 camouflage can be purchased for 5000 doubloons. This camouflage provides many benefits and is recommended for players who wish to play Conqueror frequently.
Signals
Recommended Signal Flags 
| |||||
|---|---|---|---|---|---|
| Combat | |||||
 ★★★ |

|
 ★★★ |
 ★★ |
 ★ |
 ★ |
 ★ |
 ★★ |
 ★★ |
 ★★ |

|
 ★★★ |

|

| ||||
Note: Use of the Juliet Charlie signal makes detonation impossible.
Gallery
Historical Info
Historical Gallery