Conqueror
| Revision as of 13:08, 31 July 2017 Protected "Ship:Conqueror" ([Edit=Allow only administrators] (expires 13:08, 31 August 2017 (UTC)) [Move=Allow only administrators] (indefinite)) | Revision as of 08:59, 19 February 2019 AA Guns Modification 3 et al. | |||
32 intermediate revisions by 12 users not shown | ||||
| Line 1: | Line 1: | |||
| ? | <!-- DO NOT EDIT OR DELETE LINES WITH COMMENTS (it's look like as this or next line) | + | <!-- DO NOT EDIT OR DELETE LINES WITH COMMENTS (it's look like as this or next line) | |
| -->{{WoWs_Ship | -->{{WoWs_Ship | |||
| |Promo=<!-- in case of gift or promo ship write conditions to get it. (optional)--> | |Promo=<!-- in case of gift or promo ship write conditions to get it. (optional)--> | |||
| |Anno=<!-- you can write below short description for the ship. it will replace default once. --> | |Anno=<!-- you can write below short description for the ship. it will replace default once. --> | |||
| + | This ship was designed as a battleship with increased firepower on the basis of the British experience in ship construction gained during World War II. The project was notable for the 457 mm main guns, which were developed in the early 1920s and were the most powerful British naval artillery systems.<br><br>{{Model3DViewer|9ad40a6c97ca40e9b7d65b8f736fff4c}} | |||
| |Performance=<!-- write text about performance in battles below --> | |Performance=<!-- write text about performance in battles below --> | |||
| + | Perched atop the British battleship tech tree at Tier X, ''Conqueror'' is a worthy successor to ''[[Lion]]''. | |||
| + | ||||
| + | Like ''Lion'', ''Conqueror'' can sneak around the map by taking advantage of her low detectability range, which is among the lowest of all Tier X battleship's, even beating that of a ''[[Hindenburg]]'' fully kitted out for concealment. Her size means that she will take quite a few hits in a gunfight. As such, it is important to position properly and use concealment when faced with overwhelming odds. When this isn’t possible, ''Conqueror'' is capable of holding her own. Her high-explosive (HE) shells are extremely powerful and sport a high fire chance. This is useful when engaging multiple ships because she can burn her enemies at range and switch to armor piercing (AP) for more devastating hits at close range. However, her HE shells are powerful enough that some captains may choose to use it exclusively. | |||
| + | ||||
| + | After slugging it out with the other heavy hitting ships at Tier X, ''Conqueror'' can use a {{Repair Party}} consumable which is capable of restoring tens of thousands of hit points (HP). This allows her to stay in the fight, continuing to punish her enemies, but she is still relatively fragile if she is unable to disengage and heal. ''Conqureror''’s anti-aircraft armament, while powerful for self-defense — especially the mid-range ring — is concentrated into a relatively small number of mounts, meaning it can be disabled fairly quickly. By combining her strengths and finding support from friendly ships, ''Conqueror'' becomes one of the most powerful ships in the game. | |||
| |Pros=<!-- write list of positive points below. use * as in ordinary wiki-list. --> | |Pros=<!-- write list of positive points below. use * as in ordinary wiki-list. --> | |||
| + | * Excellent AP and HE shell performance. ''Conqueror'' is capable of destroying her enemies at any range. | |||
| + | * 457mm gun option gains an accuracy boost. | |||
| + | * Highest AP shell damage in the game (when equipped with 457mm guns). | |||
| + | * High HE fire chance means that a salvo with multiple hits almost guarantees a fire, making her extremely effective against aircraft carriers. | |||
| + | * Armor-piercing shells have short-fuse, allowing for less overpenetrations on cruisers, aircraft carriers and destroyers. | |||
| + | * Amazing concealment, rivaling most cruisers and even beating some. ''Conqueror'' can sneak around a flank or disengage in order to repair the damage she has sustained in battle. | |||
| + | * Access to the same crazy {{Repair Party}} consumable found on high tier [[Ship:Cruisers|British cruisers]], capable of repairing huge amounts of damage. | |||
| + | * Very low citadel means critical hits are extremely rare, even when broadside. | |||
| + | * Excellent anti-aircraft suite. When fully specialized for it, ''Conqueror'' is capable of shredding enemy aircraft. | |||
| + | * Solid handling characteristics. With an above average stock rudder shift time and turning radius, ''Conqueror'' is capable of outmaneuvering ''[[Montana]]'' and ''[[Großer Kurfürst]]''. ''[[Yamato]]'' has a smaller turning radius but has a slower rudder shift time. | |||
| |Cons=<!-- write list of negative points below. use * as in ordinary wiki-list. --> | |Cons=<!-- write list of negative points below. use * as in ordinary wiki-list. --> | |||
| + | * Despite a thick armor belt that is capable of stopping small-medium caliber shells, ''Conqueror'' is susceptible to high caliber AP shells at certain angles. | |||
| + | * Even though her citadel sits low in the water, it is poorly armored: only 76mm. | |||
| + | * No protection against HE shells; her entire deck is basically unarmored besides the minimum armor for the tier. | |||
| + | * Same short-fuse on the AP leads to poor performance against battleships at medium-to-long range. | |||
| + | * 457mm gun option is still unreliable to hit targets, even with the boosted accuracy, due to less shells being fired per salvo. | |||
| + | * ''Conqueror'' is a massive ship, which makes it hard to operate in close quarters. She is also a large target for enemy destroyers to hit with torpedoes, combined with the fact she has very poor torpedo protection compared to other Tier X battleships. | |||
| + | * Slower than ''Großer Kurfürst'' and ''Montana'', though not by much. | |||
| + | * Health pool is the lowest among all Tier X battleships; however, she is capable of restoring large amounts of HP with her {{Repair Party}} consumable, but this consumable has a longer-than-normal cooldown and has a smaller number of charges than normal, with only 2. | |||
| + | * Even when fully specialized, ''Conqueror''’s secondary armament is underwhelming due to its sluggish reload and low firepower. | |||
| + | * ''Conqueror'' has her anti-aircraft armament concentrated into a relatively low number of mounts that are grouped on her superstructure, leading to many of them becoming incapacitated fairly quickly by high-explosive shells from enemy ships and making its high initial DPS a bit deceptive. | |||
| + | * Lacks access to either {{Spotting Aircraft}} or {{Catapult Fighter}} consumables. | |||
| |Research=<!-- write text about priority sequence of research below --> | |Research=<!-- write text about priority sequence of research below --> | |||
| + | ''Conqueror'' has one researchable upgrade for her main battery. The stock gun configuration is four (4) turrets with three (3) 419mm rifles each. By researching and upgrading, her configuration changes to four (4) turrets with two (2) 457mm rifles each. Her AP and HE shell damage is similarly increased and the chance of fire for HE shells ticks upward. | |||
| + | ||||
| + | It's difficult to recommend investing in the 457mm guns. Some players may wish to purchase the upgrade in order to engage battleships more readily, but the small difference between ''Conqueror''’s 457mm shells and ''[[Yamato]]''’s 460mm ones is significant due to the way the armor overmatching mechanics work in World of Warships: ''Conqueror''’s 457mm shells cannot automatically penetrate the bow armor of every other ship in the game the way ''Yamato'' can. This is not to say that they are bad, only that the main advantage of ''Yamato''’s guns of approximately the same size does not transfer to ''Conqueror''. The upgrade however, drastically reduces ''Conqueror''’s potential alpha damage by nearly 40,000 points. Also, since the stock guns have similar caliber to ''[[Großer Kurfürst]]''’s upgraded guns with the same number of rifles as well as a better reload, it is mostly a better choice to stay with the stock guns rather than spend credits and experience on the upgrade. | |||
| |OptimalConfiguration=<!-- write some general text about selection of optimal configuration below (optional)--> | |OptimalConfiguration=<!-- write some general text about selection of optimal configuration below (optional)--> | |||
| |Upgrades=<!-- write text about best upgrades below --> | |Upgrades=<!-- write text about best upgrades below --> | |||
| + | The recommended upgrades for ''{{#var:ship_name}}'' are as follows: | |||
| + | * '''Slot 1''': {{Main Armaments Modification 1}}<nowiki>*</nowiki> | |||
| + | * '''Slot 2''': {{Damage Control System Modification 1}} | |||
| + | * '''Slot 3''': {{Aiming Systems Modification 1}}<nowiki>*</nowiki> | |||
| + | * '''Slot 4''': {{Damage Control System Modification 2}} | |||
| + | * '''Slot 5''': {{Concealment System Modification 1}} | |||
| + | * '''Slot 6''': {{Main Battery Modification 3}}<nowiki>*</nowiki> | |||
| ? | + | '''Upgrade Slot 1''' provides a useful alternative to '''Main Armaments Modification 1'''. For players who wish to specialize for anti-aircraft duties, {{Auxiliary Armaments Modification 1}} should be mounted. | ||
| ? | + | |||
| ? | + | '''Upgrade Slot 3''' provides options with different benefits. '''Aiming Systems Modification 1''' is typically recommended for increased accuracy in long range gunnery. For increased turret traverse in a brawl, {{Main Battery Modification 2}} is a useful upgrade. For specialization in anti-aircraft duties, {{AA Guns Modification 1}} should be mounted. | ||
| ? | + | |||
| ? | + | '''Upgrade Slot 6''' provides two useful options for specialization in different roles. '''Main Battery Modification 3''' reduces reload time, but there is a trade-off of increased turret traverse time. This upgrade is recommended for players who wish to specialize in gunnery. {{AA Guns Modification 2}} increases the damage output of AA guns, and is the useful option for anti-aircraft duties. | ||
| ? | + | |||
| |CommanderSkills=<!-- write text about best set of Commander Skills below --> | |CommanderSkills=<!-- write text about best set of Commander Skills below --> | |||
| + | As with most battleships, commander skill points for ''{{#var:ship_name}}'' are best invested into skills that will keep her alive. Level 1's Priority Target, Level 2's High Alert, Level 3's Basics of Survivability, and Level 4's Fire Prevention all earn a recommendation on this basis. Other key skills include: Concealment Expert to maximize stealth; Advanced Firing Training to intensify AA gunfire; and Adrenaline Rush to get the most out of her main battery, particularly given how soft she is. Expert Loader at Level 1 is also a good place to consider investing a single point, given how attractive her HE shells are. | |||
| {{Commander Skills | {{Commander Skills | |||
| ? | | Priority Target = | + | | Priority Target = 3 | |
| ? | | Preventative Maintenance = | + | | Preventative Maintenance = 1 | |
| ? | | Expert Loader = | + | | Expert Loader = 2 | |
| | Aircraft Servicing Expert = | | Aircraft Servicing Expert = | |||
| | Direction Center for Catapult Aircraft = | | Direction Center for Catapult Aircraft = | |||
| | Dogfighting Expert = | | Dogfighting Expert = | |||
| ? | | Incoming Fire Alert = | + | | Incoming Fire Alert = | |
| | Evasive Maneuver = | | Evasive Maneuver = | |||
| ? | | High Alert = | + | | High Alert = 3 | |
| ? | | Jack of All Trades = | + | | Jack of All Trades = 2 | |
| ? | | Expert Marksman = | + | | Expert Marksman = 3 | |
| | Torpedo Acceleration = | | Torpedo Acceleration = | |||
| | Smoke Screen Expert = | | Smoke Screen Expert = | |||
| | Expert Rear Gunner = | | Expert Rear Gunner = | |||
| ? | | Adrenaline Rush = | + | | Adrenaline Rush = 3 | |
| | Last Stand = | | Last Stand = | |||
| ? | | Basics of Survivability = | + | | Basics of Survivability = 3 | |
| | Survivability Expert = | | Survivability Expert = | |||
| | Torpedo Armament Expertise = | | Torpedo Armament Expertise = | |||
| | Emergency Takeoff = | | Emergency Takeoff = | |||
| ? | | Basic Firing Training = | + | | Basic Firing Training = 2 | |
| ? | | Superintendent = | + | | Superintendent = 3 | |
| | Demolition Expert = | | Demolition Expert = | |||
| ? | | Vigilance = | + | | Vigilance = 2 | |
| ? | | Manual Fire Control for Secondary Armament = | + | | Manual Fire Control for Secondary Armament = | |
| ? | | Fire Prevention = | + | | Fire Prevention = 3 | |
| | Inertia Fuse for HE Shells = | | Inertia Fuse for HE Shells = | |||
| | Air Supremacy = | | Air Supremacy = | |||
| ? | | Advanced Firing Training = | + | | Advanced Firing Training = 3 | |
| ? | | Manual Fire Control for AA Armament = | + | | Manual Fire Control for AA Armament = 1 | |
| ? | | Radio Position Finding = | + | | Radio Position Finding = 1 | |
| ? | | Concealment Expert = | + | | Concealment Expert = 3 | |
| }} | }} | |||
| |Consumables=<!-- write text about selection of Consumables below --> | |Consumables=<!-- write text about selection of Consumables below --> | |||
| + | ''{{#var:ship_name}}'' can equip the following consumables: | |||
| + | * '''Slot 1:''' {{Damage Control Party}} | |||
| + | * '''Slot 2:''' {{Repair Party}} | |||
| + | ||||
| + | ''Conqueror''’s key strength is access to its powerful {{Repair Party}} consumable. The premium version of this consumable — {{Repair Party II}} — should be mounted, paired with the commander skill [[Ship:Commander#List_of_Support_Skills|Superintendent]] in order to gain two additional charges with reduced cooldown time. {{Damage Control Party II}} should likewise be mounted to reduce cooldown time between uses. | |||
| |Camouflage=<!-- write text about useful camouflage below --> | |Camouflage=<!-- write text about useful camouflage below --> | |||
| + | [[Ship:Camouflage#Standard Camouflage|Type 1, 2, or 5 camouflage]] can be equipped for credits; Types 2 or 5 are recommended at a minimum to reduce the accuracy of incoming shells. | |||
| + | Players who wish to spend doubloons can equip ''{{#var:ship_name}}'' with [[Ship:Camouflage#Permanent_Camouflage|Type 20 camouflage]] that lowers her detection radius, reduces the accuracy of incoming shells, reduces her repair costs, and increases the amount of experience she earns. | |||
| + | ||||
| |Signals=<!-- write text about best set of signals below --> | |Signals=<!-- write text about best set of signals below --> | |||
| + | Critically important signal flags for ''{{#var:ship_name}}'' include: India Delta ({{India Delta|Size=18px}}), India Yankee ({{India Yankee|Size=18px}}), and Juliet Yankee Bissotwo ({{Juliet Yankee Bissotwo|Size=18px}}). Players are also encouraged to equip November Echo Setteseven ({{November Echo Setteseven|Size=18px}}) to maximize ''{{#var:ship_name}}''’s AA bubble and India Bravo Terrathree ({{India Bravo Terrathree|Size=18px}}) to keep her operational costs more manageable. | |||
| {{Signal Flags | {{Signal Flags | |||
| ? | | November Echo Setteseven = | + | | November Echo Setteseven = 2 | |
| ? | | Mike Yankee Soxisix = | + | | Mike Yankee Soxisix = 2 | |
| ? | | India X-Ray = | + | | India X-Ray = 1 | |
| ? | + | |||
| ? | + | |||
| ? | + | |||
| ? | + | |||
| ? | + | |||
| ? | + | |||
| ? | + | |||
| | Juliet Whiskey Unaone = | | Juliet Whiskey Unaone = | |||
| ? | | | + | | Victor Lima = 1 | |
| ? | | | + | | Hotel Yankee = 1 | |
| ? | | | + | | November Foxtrot = 2 | |
| ? | | India | + | | Sierra Mike = 2 | |
| ? | | | + | | India Delta = 3 | |
| ? | | | + | | Juliet Yankee Bissotwo = 3 | |
| ? | | | + | | India Yankee = 3 | |
| + | | Juliet Charlie = 2 | |||
| ? | | Wyvern = | + | | Zulu = 2 | |
| ? | | Red Dragon = | + | | India Bravo Terrathree = 3 | |
| ? | | Dragon Flag = | + | | Equal Speed Charlie London = 1 | |
| ? | | Ouroboros = | + | | Zulu Hotel = 2 | |
| + | | Papa Papa = 1 | |||
| + | ||||
| + | | Wyvern = 2 | |||
| + | | Red Dragon = 1 | |||
| + | | Dragon Flag = 2 | |||
| + | | Ouroboros = | |||
| | Hydra = | | Hydra = | |||
| }} | }} | |||
| |Gallery=<!-- write below list of files with description (if necessary) separated with | --><gallery> | |Gallery=<!-- write below list of files with description (if necessary) separated with | --><gallery> | |||
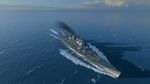
| ? | + | File:Hms conqueror front right.jpg|''Conqueror'' sails the open ocean while sporting the stock gun configuration. | ||
| + | File:Hms conqueror front left.jpg|''Conqueror'' aims at a new target with her upgraded guns. | |||
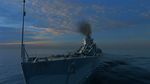
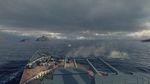
| + | File:Hms conqueror bridge.jpg|View from the bridge overlooking the bow and forward turrets. | |||
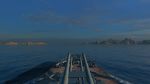
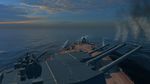
| + | File:Hms conqueror rear turrets.jpg|View overlooking the stern and rear turrets. | |||
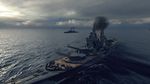
| + | File:Hms conqueror anti aircraft.jpg|''Conqueror's'' formidable anti-aircraft armament repels Aichi B7A2 torpedo bombers. | |||
| + | File:Hms conqueror salvo.jpg|''Conqueror'' fires a salvo at an enemy ''[[Friedrich der Große]]''. | |||
| + | File:Hms conqueror burns FDG.jpg|''Conqueror'' burns ''Friedrich der Große'' with fires set by her HE shells. | |||
| + | File:Conqueror sails in formation.jpeg|''Conqueror'' sails in formation with a friendly ''[[Neptune]]''. | |||
| + | File:Conqueror GKurfurst.jpeg|''Conqueror'' sizes up with ''[[Großer Kurfürst]]''. | |||
| </gallery> | </gallery> | |||
| |History=<!-- write text below --> | |History=<!-- write text below --> | |||
| ? | + | * ''Conqueror'' in game is a hypothetical design created by Wargaming, based around the concept of building a large battleship around eight 457mm (18 inch) guns that were suggested for Royal Navy battleships in the early 1920's, before the Washington Navy Treaty stepped in. Therefore, the ship bears a few similarities to the historical HMS ''Vanguard'', which was built using spare 15-inch barrels from WWI era ships. The 419mm guns were also proposed for 1920's designs, though these were a later addition to the ship during its development by Wargaming. | ||
| ? | + | * The given date of the design or it's completion is 1949, making the lattice masts viable, unlike with ''Monarch''. This also means that the AA suite of ''Conqueror'' is filled with late 1940's 40mm mounts like the sextuple barrelled Mk. VI 40mm Bofors and STAAG mounts for the 40mm Bofors. | ||
| ? | + | * The name ''Conqueror'' is taken from the third of the cancelled ''Lion'' class battleships that preceded ''Vanguard''. | ||
| ? | + | |||
| |Video=<!-- put below video clips with using template VideoYT. You can use html-tags for formatting. --> | |Video=<!-- put below video clips with using template VideoYT. You can use html-tags for formatting. --> | |||
Revision as of 08:59, 19 February 2019

| Research price255000 exp |
| Purchase price20,600,000 |
| Hit Points82,900 |
| 419 mm/45 Mk.I on a Type C mount4 х 3 pcs. |
| Rate of Fire2 shots/min. |
| Reload Time30 sec. |
| Rotation Speed4 deg./sec. |
| 180 Degree Turn Time45 sec. |
| Firing Range24.25 km. |
| Maximum Dispersion302 m. |
| HE Shell419 mm HE Mk I |
| Maximum HE Shell Damage7,200 |
| Chance of Fire on Target Caused by HE Shell48 % |
| Initial HE Shell Velocity792 m./s. |
| HE Shell Weight995 kg. |
| AP Shell419 mm AP Mk II |
| Maximum AP Shell Damage13,000 |
| Initial AP Shell Velocity747 m./s. |
| AP Shell Weight1157 kg. |
| 133 mm/50 QF Mk.I on an RP10 Mk.I mount8 х 2 pcs. |
| Firing Range7.3 km. |
| Rate of Fire9 shots/min. |
| Reload Time6.67 sec. |
| HE Shell133 mm HE Mk IC |
| Maximum HE Shell Damage1,900 |
| Initial HE Shell Velocity792 m./s. |
| Chance of Fire on Target Caused by HE Shell8 % |
| 133 mm/50 QF Mk.I on an RP10 Mk.I mount8 х 2 pcs. |
| . . . Average Damage per Second68 |
| . . . Firing Range5.19 km. |
| 40 mm/56 OQF Mk.III on a Mk.VII mount12 х 1 pcs. |
| . . . Average Damage per Second104.4 |
| . . . Firing Range3.51 km. |
| 40 mm/56 OQF Mk.X on a STAAG Mk.2 mount4 х 2 pcs. |
| . . . Average Damage per Second53.6 |
| . . . Firing Range3.51 km. |
| 40 mm/56 OQF Mk.IX on a Mk.VI mount11 х 6 pcs. |
| . . . Average Damage per Second222.2 |
| . . . Firing Range3.51 km. |
| Maximum Speed29.5 knot |
| Turning Circle Radius940 m. |
| Rudder Shift Time17.4 sec. |
| Surface Detectability Range15.19 km. |
| Air Detectability Range12.53 km. |

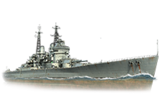
Conqueror — British Tier X battleship.
This ship was designed as a battleship with increased firepower on the basis of the British experience in ship construction gained during World War II. The project was notable for the 457 mm main guns, which were developed in the early 1920s and were the most powerful British naval artillery systems.
Modules
 |
Rate of Fire (shots/min) | 180° Turn Time (sec) | Maximum Dispersion (m) | Maximum HE Shell Damage (HP) | Chance of Fire on Target Caused by HE Shell (%) | Maximum AP Shell Damage (HP) |
Research price (exp) |
Purchase price ( | |
|---|---|---|---|---|---|---|---|---|---|
| 419 mm/45 Mk.I on a Type C/D mount | 2 | 45 | 302 | 7,200 | 48 | 13,000 | 0 | 2,000,000 |
 |
Hit Points (HP) | Armor (mm) | Armor (mm) | Main Turrets (pcs.) | Secondary Gun Turrets (pcs.) | AA Mounts (pcs.) | Torpedo Tubes (pcs.) | Hangar Capacity (pcs.) |
Research price (exp) |
Purchase price ( | |
|---|---|---|---|---|---|---|---|---|---|---|---|
| Conqueror | 82,900 | 19 | 406 | 2/2 | 8 | 12/4/11/8 | 0 | 3,500,000 |
 |
IDS_SHIP_PARAM_SUO_INCREASE_DIST (%) | Maximum Firing Range (km) |
Research price (exp) |
Purchase price ( | |
|---|---|---|---|---|---|
| Mk X mod. 1 | 0 | 0 | 2,000,000 |
 |
Maximum Speed (knot) |
Research price (exp) |
Purchase price ( | |
|---|---|---|---|---|
| Propulsion: 135,650 hp | 29.5 | 0 | 1,500,000 |
Compatible Upgrades
| Slot 1 |
||||
|---|---|---|---|---|
| Slot 2 |
||||
| Slot 3 |
||||
| Slot 4 |
||||
| Slot 5 |
||||
| Slot 6 |
Player Opinion
Performance
Perched atop the British battleship tech tree at Tier X, Conqueror is a worthy successor to Lion.
Like Lion, Conqueror can sneak around the map by taking advantage of her low detectability range, which is among the lowest of all Tier X battleship's, even beating that of a Hindenburg fully kitted out for concealment. Her size means that she will take quite a few hits in a gunfight. As such, it is important to position properly and use concealment when faced with overwhelming odds. When this isn’t possible, Conqueror is capable of holding her own. Her high-explosive (HE) shells are extremely powerful and sport a high fire chance. This is useful when engaging multiple ships because she can burn her enemies at range and switch to armor piercing (AP) for more devastating hits at close range. However, her HE shells are powerful enough that some captains may choose to use it exclusively.
After slugging it out with the other heavy hitting ships at Tier X, Conqueror can use a Repair PartyPros:
- Excellent AP and HE shell performance. Conqueror is capable of destroying her enemies at any range.
- 457mm gun option gains an accuracy boost.
- Highest AP shell damage in the game (when equipped with 457mm guns).
- High HE fire chance means that a salvo with multiple hits almost guarantees a fire, making her extremely effective against aircraft carriers.
- Armor-piercing shells have short-fuse, allowing for less overpenetrations on cruisers, aircraft carriers and destroyers.
- Amazing concealment, rivaling most cruisers and even beating some. Conqueror can sneak around a flank or disengage in order to repair the damage she has sustained in battle.
- Access to the same crazy Repair Party
 consumable found on high tier British cruisers, capable of repairing huge amounts of damage.
- Very low citadel means critical hits are extremely rare, even when broadside.
- Excellent anti-aircraft suite. When fully specialized for it, Conqueror is capable of shredding enemy aircraft.
- Solid handling characteristics. With an above average stock rudder shift time and turning radius, Conqueror is capable of outmaneuvering Montana and Großer Kurfürst. Yamato has a smaller turning radius but has a slower rudder shift time.
Cons:
- Despite a thick armor belt that is capable of stopping small-medium caliber shells, Conqueror is susceptible to high caliber AP shells at certain angles.
- Even though her citadel sits low in the water, it is poorly armored: only 76mm.
- No protection against HE shells; her entire deck is basically unarmored besides the minimum armor for the tier.
- Same short-fuse on the AP leads to poor performance against battleships at medium-to-long range.
- 457mm gun option is still unreliable to hit targets, even with the boosted accuracy, due to less shells being fired per salvo.
- Conqueror is a massive ship, which makes it hard to operate in close quarters. She is also a large target for enemy destroyers to hit with torpedoes, combined with the fact she has very poor torpedo protection compared to other Tier X battleships.
- Slower than Großer Kurfürst and Montana, though not by much.
- Health pool is the lowest among all Tier X battleships; however, she is capable of restoring large amounts of HP with her Repair Party consumable, but this consumable has a longer-than-normal cooldown and has a smaller number of charges than normal, with only 2.
- Even when fully specialized, Conqueror’s secondary armament is underwhelming due to its sluggish reload and low firepower.
- Conqueror has her anti-aircraft armament concentrated into a relatively low number of mounts that are grouped on her superstructure, leading to many of them becoming incapacitated fairly quickly by high-explosive shells from enemy ships and making its high initial DPS a bit deceptive.
- Lacks access to either Spotting Aircraft
 or Catapult Fighter
  consumables.
Research
Conqueror has one researchable upgrade for her main battery. The stock gun configuration is four (4) turrets with three (3) 419mm rifles each. By researching and upgrading, her configuration changes to four (4) turrets with two (2) 457mm rifles each. Her AP and HE shell damage is similarly increased and the chance of fire for HE shells ticks upward.
It's difficult to recommend investing in the 457mm guns. Some players may wish to purchase the upgrade in order to engage battleships more readily, but the small difference between Conqueror’s 457mm shells and Yamato’s 460mm ones is significant due to the way the armor overmatching mechanics work in World of Warships: Conqueror’s 457mm shells cannot automatically penetrate the bow armor of every other ship in the game the way Yamato can. This is not to say that they are bad, only that the main advantage of Yamato’s guns of approximately the same size does not transfer to Conqueror. The upgrade however, drastically reduces Conqueror’s potential alpha damage by nearly 40,000 points. Also, since the stock guns have similar caliber to Großer Kurfürst’s upgraded guns with the same number of rifles as well as a better reload, it is mostly a better choice to stay with the stock guns rather than spend credits and experience on the upgrade.Optimal Configuration
Upgrades
The recommended upgrades for Conqueror are as follows:
- Slot 1: Main Armaments Modification 1
 *
*
- Slot 2: Damage Control System Modification 1

- Slot 3: Aiming Systems Modification 1
 *
*
- Slot 4: Damage Control System Modification 2

- Slot 5: Concealment System Modification 1

- Slot 6: Main Battery Modification 3
 *
*
Upgrade Slot 1 provides a useful alternative to Main Armaments Modification 1. For players who wish to specialize for anti-aircraft duties, Auxiliary Armaments Modification 1 ![]() should be mounted.
should be mounted.
Upgrade Slot 3 provides options with different benefits. Aiming Systems Modification 1 is typically recommended for increased accuracy in long range gunnery. For increased turret traverse in a brawl, Main Battery Modification 2 ![]() is a useful upgrade. For specialization in anti-aircraft duties, AA Guns Modification 1
is a useful upgrade. For specialization in anti-aircraft duties, AA Guns Modification 1 ![]() should be mounted.
should be mounted.
Upgrade Slot 6 provides two useful options for specialization in different roles. Main Battery Modification 3 reduces reload time, but there is a trade-off of increased turret traverse time. This upgrade is recommended for players who wish to specialize in gunnery. AA Guns Modification 2 (![]() ) increases the damage output of AA guns, and is the useful option for anti-aircraft duties.
) increases the damage output of AA guns, and is the useful option for anti-aircraft duties.
Commander Skills
As with most battleships, commander skill points for Conqueror are best invested into skills that will keep her alive. Level 1's Priority Target, Level 2's High Alert, Level 3's Basics of Survivability, and Level 4's Fire Prevention all earn a recommendation on this basis. Other key skills include: Concealment Expert to maximize stealth; Advanced Firing Training to intensify AA gunfire; and Adrenaline Rush to get the most out of her main battery, particularly given how soft she is. Expert Loader at Level 1 is also a good place to consider investing a single point, given how attractive her HE shells are.
| Recommended Commander Skills | ||||||||
|---|---|---|---|---|---|---|---|---|
| Cost (points) |
Endurance | Attack | Support | Versatility | ||||
| 1 |
★★★ |
★ |
★★ |
|
|
|
|
|
| 2 |
★★★ |
★★ |
★★★ |
|
|
|
★★★ |
|
| 3 |
★★★ |
|
|
|
★★ |
★★★ |
|
★★ |
| 4 |
|
★★★ |
|
|
★★★ |
|
★ |
★★★ |
| Key: ★★★ - Extremely Useful ★★ - Frequently Useful ★ - Occasionally Useful No stars - Meh Χ - Not recommended | ||||||||
Consumables
Conqueror can equip the following consumables:
- Slot 1: Damage Control Party

- Slot 2: Repair Party
Conqueror’s key strength is access to its powerful Repair Party ![]() consumable. The premium version of this consumable — Repair Party II (
consumable. The premium version of this consumable — Repair Party II (![]() ) — should be mounted, paired with the commander skill Superintendent in order to gain two additional charges with reduced cooldown time. Damage Control Party II (
) — should be mounted, paired with the commander skill Superintendent in order to gain two additional charges with reduced cooldown time. Damage Control Party II (![]() ) should likewise be mounted to reduce cooldown time between uses.
) should likewise be mounted to reduce cooldown time between uses.
Camouflage
Type 1, 2, or 5 camouflage can be equipped for credits; Types 2 or 5 are recommended at a minimum to reduce the accuracy of incoming shells.
Players who wish to spend doubloons can equip Conqueror with Type 20 camouflage that lowers her detection radius, reduces the accuracy of incoming shells, reduces her repair costs, and increases the amount of experience she earns.
Signals
Critically important signal flags for Conqueror include: India Delta (![]() ), India Yankee (
), India Yankee (![]() ), and Juliet Yankee Bissotwo (
), and Juliet Yankee Bissotwo (![]() ). Players are also encouraged to equip November Echo Setteseven (
). Players are also encouraged to equip November Echo Setteseven (![]() ) to maximize Conqueror’s AA bubble and India Bravo Terrathree (🚫) to keep her operational costs more manageable.
) to maximize Conqueror’s AA bubble and India Bravo Terrathree (🚫) to keep her operational costs more manageable.
Recommended Signal Flags 
| |||||
|---|---|---|---|---|---|
| Combat | |||||
 ★★ |
 ★★★ |
 ★★★ |
 ★ |
 ★ |
 ★ |

|
 ★★ |
 ★★ |
 ★★ |
 ★★ |
 ★★★ |

|

| ||||
Note: Use of the Juliet Charlie signal makes detonation impossible.
Gallery
Conqueror sails the open ocean while sporting the stock gun configuration.
Conqueror aims at a new target with her upgraded guns.
View from the bridge overlooking the bow and forward turrets.
View overlooking the stern and rear turrets.
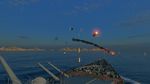
Conqueror's formidable anti-aircraft armament repels Aichi B7A2 torpedo bombers.
Conqueror fires a salvo at an enemy Friedrich der Große.
Conqueror burns Friedrich der Große with fires set by her HE shells.
Conqueror sails in formation with a friendly Neptune.
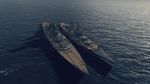
Conqueror sizes up with Großer Kurfürst.


Historical Info