Drake
| Revision as of 17:37, 11 February 2020 Forgot to add camouflage and consumables | Revision as of 23:28, 4 August 2020 {{Specialized Repair Teams}} | |||
3 intermediate revisions by 2 users not shown | ||||
| Line 18: | Line 18: | |||
| ''{{#var:ship_name}}'' is the Tier IX British heavy cruiser for the Tech Tree, being the link between the Tier VIII ''[[Albemarle]]'' and the end of the line, TX ''[[Goliath]]''. | ''{{#var:ship_name}}'' is the Tier IX British heavy cruiser for the Tech Tree, being the link between the Tier VIII ''[[Albemarle]]'' and the end of the line, TX ''[[Goliath]]''. | |||
| ? | Over her predecessor ''{{#var:ship_name}}'' offers an improved main battery, with an increase in caliber and hitting power while at the same time trading reload speed. With 18.5s stock reload time, ''{{#var:ship_name}}'' is on par with the same tier | + | Over her predecessor ''{{#var:ship_name}}'' offers an improved main battery, with an increase in caliber and hitting power while at the same time trading reload speed. With 18.5s stock reload time, ''{{#var:ship_name}}'' is on par with the same tier super cruiser ''[[Kronshtadt]]'' in terms of loading speed. However, while the fire rate may seem like a burden, the shells themselves are among the best at the tier. High Alpha damage and high fire chance on her HE shells, coupled with improved penetration capabilities that let her penetrate up to 58mm of armor, give ''{{#var:ship_name}}'' a nasty tooth that no other surface ship type wants to be hit with. Furthermore, her AP penetration is among the highest of tech tree cruisers at that tier, making those shells a valid choice against any target at a lot of ranges, should they choose to show ''{{#var:ship_name}}'' their side. | |
| ? | With an improved | + | With an improved repair ability and not taking over the odd citadel shape of her predecessor, ''{{#var:ship_name}}'' can withstand incoming AP shells better than ''Albemarle''. However, this requires her to be at an angle when being shot at by battleship caliber guns.It should be noted that despite the more advantageous shape, the citadel still raises well above the waterline while extending over a significant length of the ship, so showing broadside can turn into an instant trip back to port. | |
| ? | With ''{{#var:ship_name}}'s'' excellent concealment figures and her impressive healing skills, ''{{#var:ship_name}}'' should be played in the open water, keeping an eye on her surroundings to not receive flanking shots while mercilessly wittling down opponents with her hard hitting shells. If there is the need to, the player can disengage quickly to regenerate | + | With ''{{#var:ship_name}}'s'' excellent concealment figures and her impressive healing skills, ''{{#var:ship_name}}'' should be played in the open water, keeping an eye on her surroundings to not receive flanking shots while mercilessly wittling down opponents with her hard hitting shells. If there is the need to, the player can disengage quickly to regenerate hit points and relocate. Aircraft carriers, while loosing parts of their strike wave in the process, can and will pose a threat to ''{{#var:ship_name}}''. Investing into AA skills can mitigate this, but that will cost points that could be invested elsewhere. Priority targets should always be destroyers, as the hard hitting HE shells will cause tremendous damage to both their hit points and their modules. | |
| |Pros=<!-- write list of positive points below. use * as in ordinary wiki-list. --> | |Pros=<!-- write list of positive points below. use * as in ordinary wiki-list. --> | |||
| Line 32: | Line 32: | |||
| |Cons=<!-- write list of negative points below. use * as in ordinary wiki-list. --> | |Cons=<!-- write list of negative points below. use * as in ordinary wiki-list. --> | |||
| * Main battery range of 15.9km leaves something to be desired | * Main battery range of 15.9km leaves something to be desired | |||
| ? | * Citadel extends | + | * Citadel extends noticeably above the waterline and runs from the A turret back to the C turret | |
| * Poor firing angles, especially with her C turret | * Poor firing angles, especially with her C turret | |||
| * Very long reload | * Very long reload | |||
| Line 39: | Line 39: | |||
| Availability of researchable upgrades for ''{{#var:ship_name}}'' is as follows: | Availability of researchable upgrades for ''{{#var:ship_name}}'' is as follows: | |||
| ? | * '''Hull:''' Upgrade to Hull (B) for 6,700 | + | * '''Hull:''' Upgrade to Hull (B) for 6,700 hit points, improved AA defenses and a reduction of rudder shift time of nearly six seconds. Research of this module unlocks progression to ''[[Goliath]]''. | |
| * '''Gun Fire Control System:''' Upgrade to Mk.IX Mod.2 for an extra 10% range on the main battery. | * '''Gun Fire Control System:''' Upgrade to Mk.IX Mod.2 for an extra 10% range on the main battery. | |||
| The priority of research should depend on the Modules equipped. If the player has decided to equip {{Gun Fire Control System Modification 2}}, then the improved range from the Gun Fire Control System upgrade is not as crucial as the improved maneuverability that the B hull will provide. If however the player decided to instead go for reload speed, then upgrading the Gun Fire Control System should be the highest priority. | The priority of research should depend on the Modules equipped. If the player has decided to equip {{Gun Fire Control System Modification 2}}, then the improved range from the Gun Fire Control System upgrade is not as crucial as the improved maneuverability that the B hull will provide. If however the player decided to instead go for reload speed, then upgrading the Gun Fire Control System should be the highest priority. | |||
| ? | ||||
| ? | ||||
| ? | ||||
| |OptimalConfiguration=<!-- write some general text about selection of optimal configuration below (optional)--> | |OptimalConfiguration=<!-- write some general text about selection of optimal configuration below (optional)--> | |||
| Line 53: | Line 50: | |||
| The recommended upgrades for ''{{#var:ship_name}}'' are as follows: | The recommended upgrades for ''{{#var:ship_name}}'' are as follows: | |||
| * '''Slot 1''': {{Main Armaments Modification 1}} | * '''Slot 1''': {{Main Armaments Modification 1}} | |||
| ? | * '''Slot 2''': {{ | + | * '''Slot 2''': {{Engine Room Protection}} <nowiki>*</nowiki> | |
| * '''Slot 3''': {{Aiming Systems Modification 1}} | * '''Slot 3''': {{Aiming Systems Modification 1}} | |||
| * '''Slot 4''': {{Steering Gears Modification 2}} | * '''Slot 4''': {{Steering Gears Modification 2}} | |||
| * '''Slot 5''': {{Concealment System Modification 1}} | * '''Slot 5''': {{Concealment System Modification 1}} | |||
| ? | * '''Slot 6''': {{Gun Fire Control System Modification 2}} | + | * '''Slot 6''': {{Gun Fire Control System Modification 2}} <nowiki>*</nowiki> | |
| Alternatively, Slot 6 can be filled with {{Main Battery Modification 3}}, if a player wishes to improve ''{{#var:ship_name}}'s'' slow reload. However, this will leave her rather short ranged. | Alternatively, Slot 6 can be filled with {{Main Battery Modification 3}}, if a player wishes to improve ''{{#var:ship_name}}'s'' slow reload. However, this will leave her rather short ranged. | |||
| Line 94: | Line 91: | |||
| | rating41 = <!-- Manual Fire Control for Secondary Armament --> | | rating41 = <!-- Manual Fire Control for Secondary Armament --> | |||
| | rating42 = <!-- Fire Prevention --> | | rating42 = <!-- Fire Prevention --> | |||
| ? | | rating43 = | + | | rating43 = <!-- Inertia Fuse for HE Shells --> | |
| | rating44 = 0 <!-- Sight Stabilization --> | | rating44 = 0 <!-- Sight Stabilization --> | |||
| | rating45 = <!-- Advanced Firing Training --> | | rating45 = <!-- Advanced Firing Training --> | |||
| Line 105: | Line 102: | |||
| ''{{#var:ship_name}}'' can equip the following consumables: | ''{{#var:ship_name}}'' can equip the following consumables: | |||
| * {{Damage Control Party}} | * {{Damage Control Party}} | |||
| ? | * {{Repair | + | * {{Specialized Repair Teams}} | |
| * {{Defensive AA Fire}} '''or''' {{Hydroacoustic Search}} | * {{Defensive AA Fire}} '''or''' {{Hydroacoustic Search}} | |||
| * {{Spotting Aircraft}} | * {{Spotting Aircraft}} | |||
| ? | ||||
| ? | ||||
| |Camouflage=<!-- write text about useful camouflage below --> | |Camouflage=<!-- write text about useful camouflage below --> | |||
| Line 121: | Line 116: | |||
| Players who wish to spend doubloons can equip ''{{#var:ship_name}}'' with [[Ship:Camouflage#Permanent_Camouflage|Type 19 camouflage]] that lowers her detection radius, reduces the accuracy of incoming shells, reduces her repair costs, and increases the amount of experience she earns. | Players who wish to spend doubloons can equip ''{{#var:ship_name}}'' with [[Ship:Camouflage#Permanent_Camouflage|Type 19 camouflage]] that lowers her detection radius, reduces the accuracy of incoming shells, reduces her repair costs, and increases the amount of experience she earns. | |||
| ? | ||||
| ? | ||||
| ? | ||||
| ? | ||||
| |Signals=<!-- write text about best set of signals below --> | |Signals=<!-- write text about best set of signals below --> | |||
Revision as of 23:28, 4 August 2020

| Research price176000 exp |
| Purchase price13,800,000 |
| Hit Points40,100 |
| 234 mm/50 Mk.XII in a turret3 х 3 pcs. |
| Rate of Fire3.33 shots/min. |
| Reload Time18 sec. |
| Rotation Speed10 deg./sec. |
| 180 Degree Turn Time18 sec. |
| Firing Range14.45 km. |
| Maximum Dispersion142 m. |
| HE Shell234 mm HE 6 CRH |
| Maximum HE Shell Damage3,850 |
| Chance of Fire on Target Caused by HE Shell24 % |
| Initial HE Shell Velocity841 m./s. |
| HE Shell Weight185.3 kg. |
| AP Shell234 mm AP 6 CRH |
| Maximum AP Shell Damage5,750 |
| Initial AP Shell Velocity841 m./s. |
| AP Shell Weight185.3 kg. |
| 113 mm/45 QF Mk.IV on an RP10 Mk.IV mount6 х 2 pcs. |
| Firing Range6.95 km. |
| Rate of Fire12 shots/min. |
| Reload Time5 sec. |
| HE Shell113 mm HE Mk XVI |
| Maximum HE Shell Damage1,600 |
| Initial HE Shell Velocity746 m./s. |
| Chance of Fire on Target Caused by HE Shell7 % |
| 533 mm QR Mk IV2 х 4 pcs. |
| Rate of Fire0.63 shots/min. |
| Reload Time96 sec. |
| Rotation Speed25 deg./sec. |
| 180 Degree Turn Time7.2 sec. |
| Torpedo533 mm Mk IXM |
| Maximum Damage16,767 |
| Torpedo Speed62 knot |
| Torpedo Range9.99 km. |
| 113 mm/45 QF Mk.IV on an RP10 Mk.IV mount6 х 2 pcs. |
| . . . Average Damage per Second89.4 |
| . . . Firing Range5.01 km. |
| 40 mm/39 Vickers QF Mk.VIII on a Mk.VII mount4 х 4 pcs. |
| . . . Average Damage per Second51.6 |
| . . . Firing Range2.49 km. |
| 20 mm Oerlikon Mk.I on a Mk.IIA mount12 х 1 pcs. |
| . . . Average Damage per Second43.2 |
| . . . Firing Range2.01 km. |
| 40 mm/39 Vickers QF Mk.VIII on a Mk.VI mount4 х 8 pcs. |
| . . . Average Damage per Second79.2 |
| . . . Firing Range2.49 km. |
| Maximum Speed33.3 knot |
| Turning Circle Radius760 m. |
| Rudder Shift Time15.5 sec. |
| Surface Detectability Range12.8 km. |
| Air Detectability Range8.74 km. |

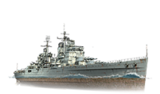
Drake — British Tier IX cruiser.
After the start of World War II, W. Churchill ordered the development of a new heavy cruiser armed with 234 mm guns. A design for a 21,500-ton cruiser featuring three triple-gun turrets was proposed. As Britain was in need of many ships, albeit inferior ones in terms of their combat qualities, the project's implementation was postponed.
Modules
 |
Rate of Fire (shots/min) | 180° Turn Time (sec) | Maximum Dispersion (m) | Maximum HE Shell Damage (HP) | Chance of Fire on Target Caused by HE Shell (%) | Maximum AP Shell Damage (HP) |
Research price (exp) |
Purchase price ( | |
|---|---|---|---|---|---|---|---|---|---|
| 234 mm/50 Mk.XII in a turret | 3.3 | 18 | 142 | 3,850 | 24 | 5,750 | 0 | 1,000,000 |
 |
Hit Points (HP) | Armor (mm) | Armor (mm) | Main Turrets (pcs.) | Secondary Gun Turrets (pcs.) | AA Mounts (pcs.) | Torpedo Tubes (pcs.) | Hangar Capacity (pcs.) |
Research price (exp) |
Purchase price ( | |
|---|---|---|---|---|---|---|---|---|---|---|---|
| Drake (A) | 40,100 | 16 | 229 | 3 | 6 | 12/4/4/6 | 2 | 0 | 1,300,000 | ||
| Drake (B) | 46,800 | 16 | 229 | 3 | 6 | 12/4/4/6 | 2 | 48,000 | 3,400,000 |
 |
Rate of Fire (shots/min) | Torpedo Tubes Reload Time (sec) | 180° Turn Time (sec) | Maximum Damage (HP) | Torpedo Speed (knot) | Torpedo Range (km) |
Research price (exp) |
Purchase price ( | |
|---|---|---|---|---|---|---|---|---|---|
| 533 mm Mk IXM | 0.6 | 96 | 7.2 | 16,766 | 62 | 10 | 0 | 1,000,000 |
 |
IDS_SHIP_PARAM_SUO_INCREASE_DIST (%) | Maximum Firing Range (km) |
Research price (exp) |
Purchase price ( | |
|---|---|---|---|---|---|
| Mk IX mod. 1 | 0 | 0 | 1,000,000 | ||
| Mk IX mod. 2 | 0 | 30,000 | 2,400,000 |
 |
Maximum Speed (knot) |
Research price (exp) |
Purchase price ( | |
|---|---|---|---|---|
| Propulsion: 102,000 hp | 33.3 | 0 | 1,000,000 |
Compatible Upgrades
| Slot 1 |
|||||
|---|---|---|---|---|---|
| Slot 2 |
|||||
| Slot 3 |
|||||
| Slot 4 |
|||||
| Slot 5 |
|||||
| Slot 6 |
Player Opinion
Performance
Drake is the Tier IX British heavy cruiser for the Tech Tree, being the link between the Tier VIII Albemarle and the end of the line, TX Goliath.
Over her predecessor Drake offers an improved main battery, with an increase in caliber and hitting power while at the same time trading reload speed. With 18.5s stock reload time, Drake is on par with the same tier super cruiser Kronshtadt in terms of loading speed. However, while the fire rate may seem like a burden, the shells themselves are among the best at the tier. High Alpha damage and high fire chance on her HE shells, coupled with improved penetration capabilities that let her penetrate up to 58mm of armor, give Drake a nasty tooth that no other surface ship type wants to be hit with. Furthermore, her AP penetration is among the highest of tech tree cruisers at that tier, making those shells a valid choice against any target at a lot of ranges, should they choose to show Drake their side.
With an improved repair ability and not taking over the odd citadel shape of her predecessor, Drake can withstand incoming AP shells better than Albemarle. However, this requires her to be at an angle when being shot at by battleship caliber guns.It should be noted that despite the more advantageous shape, the citadel still raises well above the waterline while extending over a significant length of the ship, so showing broadside can turn into an instant trip back to port.
With Drake's excellent concealment figures and her impressive healing skills, Drake should be played in the open water, keeping an eye on her surroundings to not receive flanking shots while mercilessly wittling down opponents with her hard hitting shells. If there is the need to, the player can disengage quickly to regenerate hit points and relocate. Aircraft carriers, while loosing parts of their strike wave in the process, can and will pose a threat to Drake. Investing into AA skills can mitigate this, but that will cost points that could be invested elsewhere. Priority targets should always be destroyers, as the hard hitting HE shells will cause tremendous damage to both their hit points and their modules.Pros:
- Good concealment with 10.4km when applying Captain Skills, Modules and Camouflage
- Hard hitting HE shells with high penetration and fire chance
- AP shells have high penetration values
- Decent AA protection
Cons:
- Main battery range of 15.9km leaves something to be desired
- Citadel extends noticeably above the waterline and runs from the A turret back to the C turret
- Poor firing angles, especially with her C turret
- Very long reload
Research
Availability of researchable upgrades for Drake is as follows:
- Hull: Upgrade to Hull (B) for 6,700 hit points, improved AA defenses and a reduction of rudder shift time of nearly six seconds. Research of this module unlocks progression to Goliath.
- Gun Fire Control System: Upgrade to Mk.IX Mod.2 for an extra 10% range on the main battery.
Optimal Configuration
Upgrades
The recommended upgrades for Drake are as follows:
- Slot 1: Main Armaments Modification 1

- Slot 2: Engine Room Protection
 *
*
- Slot 3: Aiming Systems Modification 1

- Slot 4: Steering Gears Modification 2

- Slot 5: Concealment System Modification 1

- Slot 6: Gun Fire Control System Modification 2
 *
*
Alternatively, Slot 6 can be filled with Main Battery Modification 3 ![]() , if a player wishes to improve Drake's slow reload. However, this will leave her rather short ranged.
, if a player wishes to improve Drake's slow reload. However, this will leave her rather short ranged.
Commander Skills
| Recommended Commander Skills | ||||||||
|---|---|---|---|---|---|---|---|---|
| Cost (points) |
Endurance | Attack | Support | Versatility | ||||
| 1 |
★★★ |
★★ |
★ |
Χ |
Χ |
Χ |
|
Χ |
| 2 |
|
★★ |
★★★ |
|
|
Χ |
★★★ |
★ |
| 3 |
|
|
|
Χ |
★ |
★★★ |
★★ |
★ |
| 4 |
|
|
|
Χ |
|
|
|
★★★ |
| Key: ★★★ - Extremely Useful ★★ - Frequently Useful ★ - Occasionally Useful No stars - Meh Χ - Not recommended | ||||||||
Consumables
Drake can equip the following consumables:
- Damage Control Party

- Specialized Repair Teams

- Defensive AA Fire
 or Hydroacoustic Search
- Spotting Aircraft

Camouflage
Players who wish to spend doubloons can equip Drake with Type 19 camouflage that lowers her detection radius, reduces the accuracy of incoming shells, reduces her repair costs, and increases the amount of experience she earns.
Signals
Recommended Signal Flags 
| |||||
|---|---|---|---|---|---|
| Combat | |||||

|

|

|

|
 ★★ |
 ★★ |

|

|
 ★ |
 ★★★ |
 ★★★ |
 ★★ |

|

| ||||
Note: Use of the Juliet Charlie signal makes detonation impossible.
Gallery
Historical Gallery