Fletcher
| Revision as of 04:48, 24 January 2017 Updated Commander Skills for 0.6.0. | Revision as of 10:34, 18 July 2019 Fixed commander skill names | |||
21 intermediate revisions by 6 users not shown | ||||
| Line 3: | Line 3: | |||
| |Anno=<!-- you can write below short description for the ship. it will replace default once. --> | |Anno=<!-- you can write below short description for the ship. it will replace default once. --> | |||
| ? | ''Fletcher'' was the lead ship of the most numerous series of destroyers ever produced. They proved to be highly successful ships, combining high speed with efficient AA defenses, quick-firing artillery, and powerful torpedo armament.<br><br>Four of the class are preserved as military museum ships: [https://www.nps.gov/bost/learn/historyculture/usscassinyoung.htm USS ''Cassin Young''] in Boston, Massachusetts; [https://www.usskidd.com/ USS ''Kidd''] in Baton Rouge, Louisiana; [https://buffalonavalpark.org/exhibits/ships/ USS ''The Sullivans''] in Buffalo, New York; and HNS ''Velos'' (ex-USS ''Charrette'') in Athens, Greece. | + | ''Fletcher'' was the lead ship of the most numerous series of destroyers ever produced. They proved to be highly successful ships, combining high speed with efficient AA defenses, quick-firing artillery, and powerful torpedo armament.<br><br>Four of the class are preserved as military museum ships: [https://www.nps.gov/bost/learn/historyculture/usscassinyoung.htm USS ''Cassin Young''] in Boston, Massachusetts; [https://www.usskidd.com/ USS ''Kidd''] in Baton Rouge, Louisiana; [https://buffalonavalpark.org/exhibits/ships/ USS ''The Sullivans''] in Buffalo, New York; and HNS ''Velos'' (ex-USS ''Charrette'') in Athens, Greece.<br><br>{{Model3DViewer|9bf778923cce4ee59bfa2fa1bcc8448e}} | |
| |Performance=<!-- write text about performance in battles below --> | |Performance=<!-- write text about performance in battles below --> | |||
| ? | ''Fletcher''-class ships were workhorses of the United States Navy during World War II, and their legacy transfers well into World of Warships. ''Fletcher'' herself is, without question, the most flexible destroyer in the game. She can be tailored — via Commander Skills and Upgrades — to be a torpedo boat with good guns, or to be a murderous gunboat with above average torpedoes. She is one of a handful of destroyers in the game with decent anti-aircraft armament in her top configuration | + | ''Fletcher''-class ships were workhorses of the United States Navy during World War II, and their legacy transfers well into World of Warships. ''Fletcher'' herself is, without question, the most flexible destroyer in the game. She can be tailored — via Commander Skills and Upgrades — to be a torpedo boat with good guns, or to be a murderous gunboat with above average torpedoes. She is also one of a handful of destroyers in the game with decent anti-aircraft armament in her top configuration. | |
| ? | + | ''Fletcher'' retains the same main battery as ''[[Benson]]'', but while ''Benson'' has to choose between the fifth gun and the option to equip {{Defensive AA Fire}}, ''Fletcher'' does not. As with ''[[Benson]]'', the ballistics of her guns make landing shells reliably on destroyers beyond 7 or 8 km problematic, but in close-quarters combat their sheer rate of fire will overwhelm most other destroyers. | ||
| ? | There are only a handful of categories where ''Fletcher'' does not improve upon ''Benson'', and they | + | The primary upgrade, however, are to her torpedoes. They are faster-reloading and longer-ranged than the stock torpedoes carried over from ''Benson'', and have the highest damage in the line. Most importantly, they gain a massive speed boost of 11 knots, putting them at just 1 knot below comparable Japanese torpedoes. The torpedoes are also still very stealthy, making them a massive threat to not only battleships but cruisers and other destroyers as well. | |
| + | ||||
| + | In addition, ''Fletcher'' gains access to [[Ship:Upgrades#Tier_IX.2B_Equipment_.28Slot_6.29|Upgrade Slot 6]], allowing her captain to tailor her to a torpedo-centric build (via {{Torpedo Tubes Modification 3}} and [[Ship:Commander#Torpedo Armament Expertise|Torpedo Armament Expertise]]) or a gun-centric build (with {{Main Battery Modification 3}} and [[Ship:Commander#Basic Firing Training|Basic Firing Training]]) with relative ease. | |||
| + | ||||
| + | There are only a handful of categories where ''Fletcher'' does not improve upon ''Benson'', and they are relatively minor things (such as air detection radius). Without {{Defensive AA Fire}} equipped she's still very vulnerable to enemy planes, and she's noticeably slower than ''Benson'' as well. Still, she's a significant upgrade from Tier VIII and a true joy to play... so much so that many players simply stop playing the line at ''Fletcher'' and never move on to ''[[Gearing]]''. | |||
| |Pros=<!-- write list of positive points below. use * as in ordinary wiki-list. --> | |Pros=<!-- write list of positive points below. use * as in ordinary wiki-list. --> | |||
| Line 16: | Line 20: | |||
| * Punishing main battery reload speed; ''Fletcher'' is capable of putting a lot of shells on target in a short amount of time. | * Punishing main battery reload speed; ''Fletcher'' is capable of putting a lot of shells on target in a short amount of time. | |||
| * Very fast turret rotation speed. | * Very fast turret rotation speed. | |||
| ? | * | + | * Fast and stealthy torpedoes deal more damage and reload faster than even Tier X ''[[Gearing]]''. | |
| ? | * Can equip the | + | * Can equip the {{Defensive AA Fire}} consumable without giving up any of her main battery guns. | |
| |Cons=<!-- write list of negative points below. use * as in ordinary wiki-list. --> | |Cons=<!-- write list of negative points below. use * as in ordinary wiki-list. --> | |||
| * Still fragile; engaging Russian destroyers beyond 6km range is inadvisable, and ''Fletcher'' remains vulnerable to cruisers of all tiers she will face. | * Still fragile; engaging Russian destroyers beyond 6km range is inadvisable, and ''Fletcher'' remains vulnerable to cruisers of all tiers she will face. | |||
| ? | * As good as her torpedoes are, ''[[Yūgumo]]''’s still pack more punch | + | * As good as her torpedoes are, ''[[Yūgumo]]''’s are still faster and pack more punch per hit. | |
| * Slower than ''[[Benson]]''. | * Slower than ''[[Benson]]''. | |||
| * Upgraded torpedo range is still 6km shorter than ''[[Gearing]]''’s. | * Upgraded torpedo range is still 6km shorter than ''[[Gearing]]''’s. | |||
| ? | * While her anti-aircraft suite is better than most destroyers, it will struggle to shoot down high tier planes. | + | * While her anti-aircraft suite is a fair bit better than most destroyers, it will struggle to shoot down high tier planes. | |
| |Research=<!-- write text about priority sequence of research below --> | |Research=<!-- write text about priority sequence of research below --> | |||
| ? | ''Fletcher'' is likely to spend most of her time in close-combat with enemy destroyers, making Hull (B) the best upgrade to invest in first (for the extra hit points). The Mk16 mod. 1 | + | Availability of researchable upgrades for ''{{#var:ship_name}}'' is as follows: | |
| + | * '''Hull:''' Upgrade to Hull (B) for additional health, a stouter AA suite, and improved rudder shift time. Research of this module unlocks progression to ''[[Gearing]]''. | |||
| + | * '''Torpedoes:''' Not only do the Mk16 mod. 1 torpedoes hit harder and travel faster and farther, but they reload quicker. Hull (B) must be equipped before they can be installed. | |||
| + | * '''Gun Fire Control System:''' Upgrade to Mk9 mod. 2 for an extra 10% range on the main battery. | |||
| + | ||||
| + | ''Fletcher'' is likely to spend most of her time in close-combat with enemy destroyers, making Hull (B) the best upgrade to invest in first (for the extra hit points). The Mk16 mod. 1 torpedo upgrade should come next, as it is a drastic upgrade to her torpedo armament. The Fire Control System upgrade should be saved for last or skipped entirely. | |||
| |OptimalConfiguration=<!-- write some general text about selection of optimal configuration below (optional)--> | |OptimalConfiguration=<!-- write some general text about selection of optimal configuration below (optional)--> | |||
| Line 33: | Line 42: | |||
| |Upgrades=<!-- write text about best upgrades below --> | |Upgrades=<!-- write text about best upgrades below --> | |||
| ? | + | The recommended upgrades for ''{{#var:ship_name}}'' are as follows: | ||
| + | * '''Slot 1''': {{Main Armaments Modification 1}} | |||
| + | * '''Slot 2''': {{Propulsion Modification 1}}<nowiki>*</nowiki> | |||
| + | * '''Slot 3''': {{Aiming Systems Modification 1}}<nowiki>*</nowiki> | |||
| + | * '''Slot 4''': {{Propulsion Modification 2}} | |||
| + | * '''Slot 5''': {{Concealment System Modification 1}} | |||
| + | * '''Slot 6''': See below. | |||
| ? | ''' | + | Upgrade recommendations for '''Slots 1, 4''', and '''5''' are fairly easy to make. Some captains will opt to embrace their role as an anti-aircraft escort and install {{AA Guns Modification 1}} into '''Slot 3''' and/or {{Defensive AA Fire Modification 1}} into '''Slot 2'''. Ultimately, however, the upgrade chosen for '''Slot 6''' — and the corresponding commander skills — will separate one ''Fletcher'' from another. | |
| ? | ''' | + | '''Torpedo Build:''' Captains wishing to focus their ''Fletcher'' as a torpedo boat will opt for {{Torpedo Tubes Modification 3}} in Slot 6. This lowers her torpedo reload to only 90 seconds. If her commander invests in the Level 3 commander skill [[Ship:Commander#Torpedo Armament Expertise|Torpedo Armament Expertise]], the reload time drops to a scant 81 seconds. Given how hard her torpedoes hit and how fast they travel, this configuration of ''Fletcher'' can give even the vaunted Japanese destroyers a run for their money in the torpedo damage category. | |
| ? | '''Main Battery (Maximum Range) Build:''' Some captains prefer to maximize the range of ''Fletcher''’s main battery guns utilizing Gun Fire Control System Modification 2 in the | + | '''Main Battery (Maximum Rate of Fire) Build:''' Another solid choice for ''Fletcher'' in Slot 6 is {{Main Battery Modification 3}}. When coupled with Level 3 commander skill [[Ship:Commander#Basic Firing Training|Basic Firing Training]], her rate of fire increases significantly. In this configuration, the reload time on her main battery guns drops to 2.6 seconds (from a base of 3.3 seconds). | |
| + | ||||
| + | '''Main Battery (Maximum Range) Build:''' Some captains prefer to maximize the range of ''Fletcher''’s main battery guns utilizing {{Gun Fire Control System Modification 2}} in the final upgrade slot. While this pushes her main battery range out to 15.0 km, landing shells on all but the slowest, largest ships at such range is incredibly difficult. | |||
| + | ||||
| + | {{block|!!|content=The historical maximum firing range of the 5-inch/38 caliber guns aboard ''Fletcher'' was approximately 16.0 km. Captains opting for a max range build should equip either '''Gun Fire Control System Modification 2''' OR take the [[Ship:Commander#Advanced Firing Training|Advanced Firing Training]] commander skill. Ordinarily these two would stack to give ''Fletcher''’s guns a range approaching 18.0 km; however, the historical max range of her guns is correctly capped in-game and cannot be pushed past 16.3 km.}} | |||
| |CommanderSkills=<!-- write text about best set of Commander Skills below --> | |CommanderSkills=<!-- write text about best set of Commander Skills below --> | |||
| ? | Regardless of other choices, ''Fletcher'' commanders | + | Regardless of other choices, ''Fletcher'' commanders are strongly encouraged invest in either Priority Target or Preventative Maintenance at Level 1, Last Stand at Level 2, Survivability Expert at Level 3, and Concealment Expert at Level 4. Where points go after that depends on how captains wish to play the ship. | |
| A '''Torpedo Build''' ''Fletcher'' will want to invest in Torpedo Armament Expertise at Level 3, whereas a '''Main Battery Build''' ''Fletcher'' will want to pick up Basic Firing Training — and probably Demolition Expert — instead. Captains concerned about enemy aircraft could opt for Advanced Firing Training or Manual Fire Control for AA Armament. The latter is the better option, as ''Fletcher'' will run most of the time with her anti-aircraft guns disabled in order to avoid detection (making the additional AA range less valuable). | A '''Torpedo Build''' ''Fletcher'' will want to invest in Torpedo Armament Expertise at Level 3, whereas a '''Main Battery Build''' ''Fletcher'' will want to pick up Basic Firing Training — and probably Demolition Expert — instead. Captains concerned about enemy aircraft could opt for Advanced Firing Training or Manual Fire Control for AA Armament. The latter is the better option, as ''Fletcher'' will run most of the time with her anti-aircraft guns disabled in order to avoid detection (making the additional AA range less valuable). | |||
| {{Commander Skills | {{Commander Skills | |||
| ? | | Priority Target = | + | | Priority Target = 2 | |
| ? | | Preventative Maintenance = | + | | Preventative Maintenance = 2 | |
| ? | | Expert Loader = | + | | Expert Loader = | |
| ? | | | + | | Air Supremacy = | |
| ? | | Direction Center for | + | | Direction Center for Fighters = | |
| ? | | | + | | Improved Engine Boost = | |
| | Incoming Fire Alert = | | Incoming Fire Alert = | |||
| ? | | | + | | Last Gasp = | |
| | High Alert = 2 | | High Alert = 2 | |||
| | Jack of All Trades = 1 | | Jack of All Trades = 1 | |||
| | Expert Marksman = | | Expert Marksman = | |||
| ? | | Torpedo Acceleration = | + | | Torpedo Acceleration = 1 | |
| | Smoke Screen Expert = 1 | | Smoke Screen Expert = 1 | |||
| ? | | | + | | Improved Engines = | |
| ? | | Adrenaline Rush = | + | | Adrenaline Rush = 3 | |
| | Last Stand = 3 | | Last Stand = 3 | |||
| ? | ||||
| | Basics of Survivability = | | Basics of Survivability = | |||
| + | | Survivability Expert = 3 | |||
| | Torpedo Armament Expertise = 2 | | Torpedo Armament Expertise = 2 | |||
| ? | | | + | | Aircraft Armor = | |
| | Basic Firing Training = 2 | | Basic Firing Training = 2 | |||
| | Superintendent = 2 | | Superintendent = 2 | |||
| Line 77: | Line 96: | |||
| | Fire Prevention = | | Fire Prevention = | |||
| | Inertia Fuse for HE Shells = 1 | | Inertia Fuse for HE Shells = 1 | |||
| ? | | | + | | Sight Stabilization = | |
| | Advanced Firing Training = 1 | | Advanced Firing Training = 1 | |||
| | Manual Fire Control for AA Armament = 1 | | Manual Fire Control for AA Armament = 1 | |||
| ? | | Radio Position Finding = | + | | Radio Position Finding = 2 | |
| | Concealment Expert = 3 | | Concealment Expert = 3 | |||
| }} | }} | |||
| |Consumables=<!-- write text about selection of Consumables below --> | |Consumables=<!-- write text about selection of Consumables below --> | |||
| ? | + | ''{{#var:ship_name}}'' can equip the following consumables: | ||
| + | * '''Slot 1:''' {{Damage Control Party}} | |||
| + | * '''Slot 2:''' {{Smoke Generator}} | |||
| + | * '''Slot 3:''' {{Engine Boost}} '''or''' {{Defensive AA Fire}} | |||
| ? | Beyond that, | + | Even if her captain doesn't sink any commander skill points or upgrades into improving her anti-aircraft suite, {{Defensive AA Fire}} is recommended over {{Engine Boost}} due to the extreme threat that enemy aircraft pose to ''Fletcher''. Simply having it equipped and demonstrating to an enemy aircraft carrier that it is available is frequently a deterrent to them swarming ''Fletcher'' with bombers or assigning a fighter squadron to keep her spotted. | |
| + | ||||
| + | Beyond that, {{Damage Control Party II}} is worth the credits (or doubloons) for the shortened cooldown on repairing broken modules. The improved cooldowns on {{Smoke Generator II}} and {{Defensive AA Fire II}} make them worthwhile investments as well. | |||
| |Camouflage=<!-- write text about useful camouflage below --> | |Camouflage=<!-- write text about useful camouflage below --> | |||
| [[Ship:Camouflage#Standard Camouflage|Type 1, 2, or 5 camouflage]] can be equipped for credits; Types 1 or 5 are recommended at a minimum to reduce detectibility range. | [[Ship:Camouflage#Standard Camouflage|Type 1, 2, or 5 camouflage]] can be equipped for credits; Types 1 or 5 are recommended at a minimum to reduce detectibility range. | |||
| ? | Players who wish to spend doubloons can equip '' | + | Players who wish to spend doubloons can equip ''{{#var:ship_name}}'' with [[Ship:Camouflage#Permanent_Camouflage|Type 19 camouflage]] that lowers her detection radius, reduces the accuracy of incoming shells, reduces her repair costs, and increases the amount of experience she earns. | |
| |Signals=<!-- write text about best set of signals below --> | |Signals=<!-- write text about best set of signals below --> | |||
| ? | Captains who have opted for a '''Torpedo Build''' ''Fletcher'' will want to equip a Juliet Whiskey Unaone [[Ship:Flags#Signals|signal]] in order to maximize potential damage from torpedo hits. Throwing on a Sierra Mike signal is an excellent way to help make up for her loss of speed from ''[[Benson]]''. November Foxtrot and Juliet Charlie are also highly recommended, if available. '''Main Battery Build''' ''Fletcher'' captains should also consider Victor Lima and India X-Ray signals to | + | Captains who have opted for a '''Torpedo Build''' ''Fletcher'' will want to equip a Juliet Whiskey Unaone ({{Juliet Whiskey Unaone|Size=18px}}) [[Ship:Flags#Signals|signal]] in order to maximize potential damage from torpedo hits. Throwing on a Sierra Mike ({{Sierra Mike|Size=18px}}) signal is an excellent way to help make up for her loss of speed from ''[[Benson]]''. November Foxtrot ({{November Foxtrot|Size=18px}}) and Juliet Charlie ({{Juliet Charlie|Size=18px}}) are also highly recommended, if available. '''Main Battery Build''' ''Fletcher'' captains should also consider Victor Lima ({{Victor Lima|Size=18px}}) and India X-Ray ({{India X-Ray|Size=18px}}) signals to maximize the fire chance of her main battery shells. | |
| + | ||||
| + | {{Signal Flags | |||
| + | | November Echo Setteseven = 1 | |||
| + | | Mike Yankee Soxisix = | |||
| + | | India X-Ray = 2 | |||
| + | | Juliet Whiskey Unaone = 2 | |||
| + | | Victor Lima = 2 | |||
| + | | Hotel Yankee = 1 | |||
| + | ||||
| + | | November Foxtrot = 3 | |||
| + | | Sierra Mike = 3 | |||
| + | | India Delta = | |||
| + | | Juliet Yankee Bissotwo = | |||
| + | | India Yankee = | |||
| + | | Juliet Charlie = 3 | |||
| + | ||||
| + | | Zulu = 1 | |||
| + | | India Bravo Terrathree = 2 | |||
| + | | Equal Speed Charlie London = 3 | |||
| + | | Zulu Hotel = 2 | |||
| + | | Papa Papa = 1 | |||
| + | ||||
| + | | Wyvern = | |||
| + | | Red Dragon = 2 | |||
| + | | Dragon Flag = 1 | |||
| + | | Ouroboros = | |||
| + | | Hydra = | |||
| + | }} | |||
| |Gallery=<!-- write below list of files without tags. description (if necessary) for each should be separated by | --><gallery> | |Gallery=<!-- write below list of files without tags. description (if necessary) for each should be separated by | --><gallery> | |||
| Line 103: | Line 155: | |||
| |History=<!-- write text below --> | |History=<!-- write text below --> | |||
| <div class="thumb tright"> | <div class="thumb tright"> | |||
| ? | {{AnnoWiki|content=< | + | {{AnnoWiki|content= | |
| ? | :Federal Shipbuilding and Drydock Company; Kearny, New Jersey | + | <h2>USS ''{{#var:ship_name}}'', 1944</h2> | |
| + | ===Construction=== | |||
| + | :Builder: Federal Shipbuilding and Drydock Company;<br> Kearny, New Jersey, United States | |||
| :Laid down: 2 October 1941 | :Laid down: 2 October 1941 | |||
| :Launched: 3 May 1942 | :Launched: 3 May 1942 | |||
| Line 127: | Line 181: | |||
| =====Torpedoes===== | =====Torpedoes===== | |||
| :Ten (2x5) 533mm torpedo tubes | :Ten (2x5) 533mm torpedo tubes | |||
| + | =====Anti-Aircraft Guns===== | |||
| + | :Two (2x1) 40mm Bofors cannons | |||
| + | :Four (4x1) 20mm Oerlikon cannons | |||
| }}</div> | }}</div> | |||
| ? | ||||
| {{VideoYT|55YaONbA3FI}} | {{VideoYT|55YaONbA3FI}} | |||
| ===History=== | ===History=== | |||
| ====Design==== | ====Design==== | |||
| ? | ||||
| ? | + | As the first class of destroyers produced by a wartime United States, the ''Fletcher''-class was seen as a logical progression from the pre-war designs. The design firm of Gibbs and Cox took their experience in designing the previous ''[[Benson]]'' and ''Gleaves'' classes and sought to rectify the deficiencies in both designs. Coming in above 1,500 tons, the previous designs failed to meet the armament requirement of five (5) 5-inch guns and ten (10) torpedo tubes; they were seen as too small and top heavy. History would prove their third creation to be a war-winner; the mettle and venerability of the ''Fletchers'' were displayed regularly during the grueling combat of the Pacific campaign in World War II. | ||
| ? | + | The ''Fletcher''-class ships were the first destroyers in the US Navy to exceed 2,000 tons displacement. In a change from previous design practice, ''Fletchers'' had flush decks as opposed to the raised forecastle design seen on the ''Benson class''. This increased her length but decreased her freeboard and improved her handling; overall, this was considered a very structurally sound and seaworthy design. An interesting design choice to note, early built ''Fletchers'' have the taller rounded-tower superstructure design – as seen in game – whereas late build ''Fletchers'' had a superstructure that was lower in height with a flat-faced bridge. | ||
| ? | + | In order to maintain the 38 knot speed despite the increase in tonnage, new propulsion machinery was utilized: boilers that were 20-30% more efficient and turbines that were 20% more powerful than predecessors were installed. Ultimately, a third of the internal space was consumed by propulsion machinery in a unique configuration. The forward boiler and turbine room were separated from the rear boiler and engine room via watertight bulkheads. Each individual segment ran the port and starboard propulsion screws, respectively. This configuration resulted in greater machine survivability from combat damage. | ||
| ? | + | As required by US Navy specifications, each ''Fletcher'' class ship was able to mount five (5) 5-inch guns in single, enclosed dual-purpose mounts; two guns forward, two guns rear, and one amidships. All turrets were controlled by Mark 37 and Mark 22 Fire Directors. Feeding information to the gun computer, the main battery could all be remotely controlled if required. Furthermore, the class got to implement SG surface radar and "Variable-Time" proximity fuses — both novelties to the Navy — that allowed effective engagement of both surface and air threats. | ||
| + | ||||
| + | Learning from the experience of Pearl Harbor, the Navy decided to invest in heavier anti-aircraft armament. After seeing their effectiveness during the Spanish Civil War, the Navy's Bureau of Ordnance (BuOrd) arranged manufacturing licences for Oerlikon 20mm and Bofors 40mm cannons. Anti-aircraft armament was constantly being changed throughout the war; for instance, the average ''Fletcher''-class destroyer was armed with seven (7) 20mm and ten (10) 40mm AA guns for most of their time in the Pacific. | |||
| + | ||||
| + | Finally, the class was able to mount ten (10) torpedoes in two quintuple-tube launchers amidships, the heaviest torpedo broadside of any U.S. Navy destroyer at the time. By also carrying depth charge launchers in conjunction with anti-submarine sonar, ''Fletchers'' were well-equipped to conduct anti-submarine operations as well. Overall, the class was armed with a plethora of tools to combat a myriad of threats. | |||
| + | ||||
| + | In light of the mounting ferocity and desperation of Japanese kamikaze attacks against US carrier strike groups late into the Pacific campaign, the Navy saw it fit to increase anti-aircraft potency in picket ships however possible. In 1945, about 55 ''Fletcher''-class destroyers – such as USS ''[[Kidd]]'' – had their forward torpedo tubes removed to install an anti-aircraft platform mounting two quad-barrel 40mm. In addition to the three existing dual-barrel 40mm emplacements, the total was brought up to fourteen (14) 40mm AA guns. Furthermore, the seven (7) single-barrel 20mm were replaced with six dual-barrel emplacements, bringing the total up to twelve (12) 20mm AA guns. | |||
| + | ||||
| + | In the end, 175 ''Fletchers'' were produced from 11 different shipyards throughout the United States. USS ''Fletcher'' (DD-445) was the lead ship of her class, built by Federal Shipbuilding and Dry Dock Co. in Kearny, New Jersey. Laid down on 2 October 1941, she was launched 3 May 1942, and commissioned 30 June 1942. | |||
| ====Service==== | ====Service==== | |||
| Line 146: | Line 209: | |||
| With the outbreak of the Korean War many were returned to active duty. During this time 39 were refitted, reducing their overall main armament and the number of torpedo tubes to accommodate other weapons. A new ahead-throwing weapon called Weapon Alpha was installed in many of the ships. Others carried trainable Hedgehogs. Eighteen ships were redesignated as escort destroyers (DDE), optimized for anti-submarine warfare. | With the outbreak of the Korean War many were returned to active duty. During this time 39 were refitted, reducing their overall main armament and the number of torpedo tubes to accommodate other weapons. A new ahead-throwing weapon called Weapon Alpha was installed in many of the ships. Others carried trainable Hedgehogs. Eighteen ships were redesignated as escort destroyers (DDE), optimized for anti-submarine warfare. | |||
| + | ||||
| + | ===Historical Inaccuracies=== | |||
| + | * ''Fletcher'' uses the historical camouflage of sister ship USS ''La Vallette'' (DD-448) which she wore in 1942. Both ships were in Measure 12 (modified) camouflage, but the pattern on ''Fletcher'' was painted differently. | |||
| + | * Measure 12 (modified) included painted turrets, but in the game they remain unpainted. | |||
| + | * ''Fletcher'''s Measure 32/2C camouflage is also missing. She wore this scheme in 1944. | |||
| |HistoricalGallery=<!-- write below list of files without tags. description (if necessary) for each should be separated by | --><gallery> | |HistoricalGallery=<!-- write below list of files without tags. description (if necessary) for each should be separated by | --><gallery> | |||
Revision as of 10:34, 18 July 2019

| Research price158000 exp |
| Purchase price12,850,000 |
| Hit Points13,900 |
| 127 mm/38 Mk.12 on a Mk.30 mod.0 mount5 х 1 pcs. |
| Rate of Fire17.96 shots/min. |
| Reload Time3.34 sec. |
| Rotation Speed34 deg./sec. |
| 180 Degree Turn Time5.29 sec. |
| Firing Range11.77 km. |
| Maximum Dispersion103 m. |
| HE Shell127 mm HE Mk32 |
| Maximum HE Shell Damage1,800 |
| Chance of Fire on Target Caused by HE Shell5 % |
| Initial HE Shell Velocity792 m./s. |
| HE Shell Weight24.5 kg. |
| AP Shell127 mm AP/SC Mk38 |
| Maximum AP Shell Damage2,100 |
| Initial AP Shell Velocity792 m./s. |
| AP Shell Weight25 kg. |
| 533 mm Mk152 х 5 pcs. |
| Rate of Fire0.49 shots/min. |
| Reload Time122 sec. |
| Rotation Speed25 deg./sec. |
| 180 Degree Turn Time7.2 sec. |
| TorpedoMk15 mod. 3 |
| Maximum Damage16,633 |
| Torpedo Speed55 knot |
| Torpedo Range9.15 km. |
| 127 mm/38 Mk.12 on a Mk.30 mod.0 mount5 х 1 pcs. |
| . . . Average Damage per Second53.5 |
| . . . Firing Range5.01 km. |
| 40 mm/56 Bofors on a Mk.1 mount3 х 2 pcs. |
| . . . Average Damage per Second33.9 |
| . . . Firing Range3.51 km. |
| 20 mm Oerlikon on a Mk.4 mount9 х 1 pcs. |
| . . . Average Damage per Second32.4 |
| . . . Firing Range2.01 km. |
| Maximum Speed36.5 knot |
| Turning Circle Radius560 m. |
| Rudder Shift Time4.5 sec. |
| Surface Detectability Range7.16 km. |
| Air Detectability Range3.24 km. |

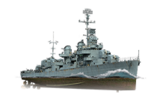
Fletcher — American Tier IX destroyer.
Fletcher was the lead ship of the most numerous series of destroyers ever produced. They proved to be highly successful ships, combining high speed with efficient AA defenses, quick-firing artillery, and powerful torpedo armament.
Four of the class are preserved as military museum ships: USS Cassin Young in Boston, Massachusetts; USS Kidd in Baton Rouge, Louisiana; USS The Sullivans in Buffalo, New York; and HNS Velos (ex-USS Charrette) in Athens, Greece.
Modules
 |
Rate of Fire (shots/min) | 180° Turn Time (sec) | Maximum Dispersion (m) | Maximum HE Shell Damage (HP) | Chance of Fire on Target Caused by HE Shell (%) | Maximum AP Shell Damage (HP) |
Research price (exp) |
Purchase price ( | |
|---|---|---|---|---|---|---|---|---|---|
| 127 mm/38 Mk.12 on a Mk.30 mod.0 mount | 18 | 5.3 | 103 | 1,800 | 5 | 2,100 | 0 | 1,050,000 |
 |
Hit Points (HP) | Armor (mm) | Armor (mm) | Main Turrets (pcs.) | Secondary Gun Turrets (pcs.) | AA Mounts (pcs.) | Torpedo Tubes (pcs.) | Hangar Capacity (pcs.) |
Research price (exp) |
Purchase price ( | |
|---|---|---|---|---|---|---|---|---|---|---|---|
| Fletcher (A) | 13,900 | 13 | 20 | 5 | 9/3/5 | 2 | 0 | 1,400,000 | |||
| Fletcher (B) | 17,100 | 13 | 20 | 5 | 7/5 | 2 | 36,000 | 3,250,000 |
 |
Rate of Fire (shots/min) | Torpedo Tubes Reload Time (sec) | 180° Turn Time (sec) | Maximum Damage (HP) | Torpedo Speed (knot) | Torpedo Range (km) |
Research price (exp) |
Purchase price ( | |
|---|---|---|---|---|---|---|---|---|---|
| Mk15 mod. 3 | 0.5 | 122 | 7.2 | 16,633 | 55 | 9.2 | 0 | 1,470,000 | |
| Mk16 mod. 1 | 0.6 | 106 | 7.2 | 19,033 | 66 | 10.5 | 34,500 | 2,400,000 |
 |
IDS_SHIP_PARAM_SUO_INCREASE_DIST (%) | Maximum Firing Range (km) |
Research price (exp) |
Purchase price ( | |
|---|---|---|---|---|---|
| Mk9 mod. 1 | 0 | 0 | 880,000 | ||
| Mk9 mod. 2 | 0 | 22,500 | 1,850,000 |
 |
Maximum Speed (knot) |
Research price (exp) |
Purchase price ( | |
|---|---|---|---|---|
| Propulsion: 60,000 hp | 36.5 | 0 | 1,100,000 |
Compatible Upgrades
| Slot 1 |
|||||
|---|---|---|---|---|---|
| Slot 2 |
|||||
| Slot 3 |
|||||
| Slot 4 |
|||||
| Slot 5 |
|||||
| Slot 6 |
Player Opinion
Performance
Fletcher-class ships were workhorses of the United States Navy during World War II, and their legacy transfers well into World of Warships. Fletcher herself is, without question, the most flexible destroyer in the game. She can be tailored — via Commander Skills and Upgrades — to be a torpedo boat with good guns, or to be a murderous gunboat with above average torpedoes. She is also one of a handful of destroyers in the game with decent anti-aircraft armament in her top configuration.
Fletcher retains the same main battery as Benson, but while Benson has to choose between the fifth gun and the option to equip Defensive AA Fire ![]() , Fletcher does not. As with Benson, the ballistics of her guns make landing shells reliably on destroyers beyond 7 or 8 km problematic, but in close-quarters combat their sheer rate of fire will overwhelm most other destroyers.
, Fletcher does not. As with Benson, the ballistics of her guns make landing shells reliably on destroyers beyond 7 or 8 km problematic, but in close-quarters combat their sheer rate of fire will overwhelm most other destroyers.
The primary upgrade, however, are to her torpedoes. They are faster-reloading and longer-ranged than the stock torpedoes carried over from Benson, and have the highest damage in the line. Most importantly, they gain a massive speed boost of 11 knots, putting them at just 1 knot below comparable Japanese torpedoes. The torpedoes are also still very stealthy, making them a massive threat to not only battleships but cruisers and other destroyers as well.
In addition, Fletcher gains access to Upgrade Slot 6, allowing her captain to tailor her to a torpedo-centric build (via Torpedo Tubes Modification 2 (![]() )
)
and Torpedo Armament Expertise) or a gun-centric build (with Main Battery Modification 3There are only a handful of categories where Fletcher does not improve upon Benson, and they are relatively minor things (such as air detection radius). Without Defensive AA Fireand Basic Firing Training) with relative ease.
Pros:
- Excellent concealment.
- Punishing main battery reload speed; Fletcher is capable of putting a lot of shells on target in a short amount of time.
- Very fast turret rotation speed.
- Fast and stealthy torpedoes deal more damage and reload faster than even Tier X Gearing.
- Can equip the Defensive AA Fire
 consumable without giving up any of her main battery guns.
Cons:
- Still fragile; engaging Russian destroyers beyond 6km range is inadvisable, and Fletcher remains vulnerable to cruisers of all tiers she will face.
- As good as her torpedoes are, Yūgumo’s are still faster and pack more punch per hit.
- Slower than Benson.
- Upgraded torpedo range is still 6km shorter than Gearing’s.
- While her anti-aircraft suite is a fair bit better than most destroyers, it will struggle to shoot down high tier planes.
Research
Availability of researchable upgrades for Fletcher is as follows:
- Hull: Upgrade to Hull (B) for additional health, a stouter AA suite, and improved rudder shift time. Research of this module unlocks progression to Gearing.
- Torpedoes: Not only do the Mk16 mod. 1 torpedoes hit harder and travel faster and farther, but they reload quicker. Hull (B) must be equipped before they can be installed.
- Gun Fire Control System: Upgrade to Mk9 mod. 2 for an extra 10% range on the main battery.
Optimal Configuration
Fletcher is a highly flexible destroyer capable of being tailored in a variety of different ways. Most captains, however, will choose to focus on improving one of her main armaments to the maximum extent possible.
Upgrades
The recommended upgrades for Fletcher are as follows:
- Slot 1: Main Armaments Modification 1

- Slot 2: Propulsion Modification 1
 *
*
- Slot 3: Aiming Systems Modification 1
 *
*
- Slot 4: Propulsion Modification 1 (
 )
)
- Slot 5: Concealment System Modification 1

- Slot 6: See below.
Upgrade recommendations for Slots 1, 4, and 5 are fairly easy to make. Some captains will opt to embrace their role as an anti-aircraft escort and install AA Guns Modification 1 ![]() into Slot 3 and/or Defensive AA Fire Modification 1
into Slot 3 and/or Defensive AA Fire Modification 1 ![]() into Slot 2. Ultimately, however, the upgrade chosen for Slot 6 — and the corresponding commander skills — will separate one Fletcher from another.
into Slot 2. Ultimately, however, the upgrade chosen for Slot 6 — and the corresponding commander skills — will separate one Fletcher from another.
Torpedo Build: Captains wishing to focus their Fletcher as a torpedo boat will opt for Torpedo Tubes Modification 2 (![]() )
)
in Slot 6. This lowers her torpedo reload to only 90 seconds. If her commander invests in the Level 3 commander skill Torpedo Armament Expertise, the reload time drops to a scant 81 seconds. Given how hard her torpedoes hit and how fast they travel, this configuration of Fletcher can give even the vaunted Japanese destroyers a run for their money in the torpedo damage category.
Main Battery (Maximum Rate of Fire) Build: Another solid choice for Fletcher in Slot 6 is Main Battery Modification 3 ![]() . When coupled with Level 3 commander skill Basic Firing Training, her rate of fire increases significantly. In this configuration, the reload time on her main battery guns drops to 2.6 seconds (from a base of 3.3 seconds).
. When coupled with Level 3 commander skill Basic Firing Training, her rate of fire increases significantly. In this configuration, the reload time on her main battery guns drops to 2.6 seconds (from a base of 3.3 seconds).
Main Battery (Maximum Range) Build: Some captains prefer to maximize the range of Fletcher’s main battery guns utilizing Gun Fire Control System Modification 2 ![]() in the final upgrade slot. While this pushes her main battery range out to 15.0 km, landing shells on all but the slowest, largest ships at such range is incredibly difficult.
in the final upgrade slot. While this pushes her main battery range out to 15.0 km, landing shells on all but the slowest, largest ships at such range is incredibly difficult.
The historical maximum firing range of the 5-inch/38 caliber guns aboard Fletcher was approximately 16.0 km. Captains opting for a max range build should equip either Gun Fire Control System Modification 2 OR take the Advanced Firing Training commander skill. Ordinarily these two would stack to give Fletcher’s guns a range approaching 18.0 km; however, the historical max range of her guns is correctly capped in-game and cannot be pushed past 16.3 km.
Commander Skills
Regardless of other choices, Fletcher commanders are strongly encouraged invest in either Priority Target or Preventative Maintenance at Level 1, Last Stand at Level 2, Survivability Expert at Level 3, and Concealment Expert at Level 4. Where points go after that depends on how captains wish to play the ship.
A Torpedo Build Fletcher will want to invest in Torpedo Armament Expertise at Level 3, whereas a Main Battery Build Fletcher will want to pick up Basic Firing Training — and probably Demolition Expert — instead. Captains concerned about enemy aircraft could opt for Advanced Firing Training or Manual Fire Control for AA Armament. The latter is the better option, as Fletcher will run most of the time with her anti-aircraft guns disabled in order to avoid detection (making the additional AA range less valuable).
| Recommended Commander Skills | ||||||||
|---|---|---|---|---|---|---|---|---|
| Cost (points) |
Endurance | Attack | Support | Versatility | ||||
| 1 |
★★ |
★★ |
|
|
|
|
|
|
| 2 |
★★ |
★ |
|
★ |
★ |
|
★★★ |
★★★ |
| 3 |
|
★★★ |
★★ |
|
★★ |
★★ |
★★ |
★ |
| 4 |
|
|
★ |
|
★ |
|
★★ |
★★★ |
| Key: ★★★ - Extremely Useful ★★ - Frequently Useful ★ - Occasionally Useful No stars - Meh Χ - Not recommended | ||||||||
Consumables
Fletcher can equip the following consumables:
- Slot 1: Damage Control Party

- Slot 2: Smoke Generator

- Slot 3: Engine Boost
 or Defensive AA Fire
Even if her captain doesn't sink any commander skill points or upgrades into improving her anti-aircraft suite, Defensive AA Fire ![]() is recommended over Engine Boost
is recommended over Engine Boost ![]() due to the extreme threat that enemy aircraft pose to Fletcher. Simply having it equipped and demonstrating to an enemy aircraft carrier that it is available is frequently a deterrent to them swarming Fletcher with bombers or assigning a fighter squadron to keep her spotted.
due to the extreme threat that enemy aircraft pose to Fletcher. Simply having it equipped and demonstrating to an enemy aircraft carrier that it is available is frequently a deterrent to them swarming Fletcher with bombers or assigning a fighter squadron to keep her spotted.
Beyond that, Damage Control Party II (![]() ) is worth the credits (or doubloons) for the shortened cooldown on repairing broken modules. The improved cooldowns on Smoke Generator II (
) is worth the credits (or doubloons) for the shortened cooldown on repairing broken modules. The improved cooldowns on Smoke Generator II (![]() ) and Defensive AA Fire II (
) and Defensive AA Fire II (![]() ) make them worthwhile investments as well.
) make them worthwhile investments as well.
Camouflage
Type 1, 2, or 5 camouflage can be equipped for credits; Types 1 or 5 are recommended at a minimum to reduce detectibility range.
Players who wish to spend doubloons can equip Fletcher with Type 19 camouflage that lowers her detection radius, reduces the accuracy of incoming shells, reduces her repair costs, and increases the amount of experience she earns.
Signals
Captains who have opted for a Torpedo Build Fletcher will want to equip a Juliet Whiskey Unaone (![]() ) signal in order to maximize potential damage from torpedo hits. Throwing on a Sierra Mike (
) signal in order to maximize potential damage from torpedo hits. Throwing on a Sierra Mike (![]() ) signal is an excellent way to help make up for her loss of speed from Benson. November Foxtrot (
) signal is an excellent way to help make up for her loss of speed from Benson. November Foxtrot (![]() ) and Juliet Charlie (
) and Juliet Charlie (![]() ) are also highly recommended, if available. Main Battery Build Fletcher captains should also consider Victor Lima (
) are also highly recommended, if available. Main Battery Build Fletcher captains should also consider Victor Lima (![]() ) and India X-Ray (
) and India X-Ray (![]() ) signals to maximize the fire chance of her main battery shells.
) signals to maximize the fire chance of her main battery shells.
Recommended Signal Flags 
| |||||
|---|---|---|---|---|---|
| Combat | |||||
 ★★★ |

|

|
 ★ |
 ★★ |
 ★★ |
 ★★ |

|
 ★ |
 ★★★ |
 ★★★ |

|

|

| ||||
Note: Use of the Juliet Charlie signal makes detonation impossible.
Gallery
Historical Info
Historical Gallery


_at_Pearl_harbor,_1964.jpg)


