Furutaka
| Revision as of 22:13, 28 December 2016 | Revision as of 10:28, 23 January 2017 | |||
| Line 13: | Line 13: | |||
| Due to patches, the Furutaka's Hull C upgrade has changed quite drastically to reflect its historical renovation. Aside from increasing the AA suite's armament, the upgrade now rearranges the cruiser's six guns into three dual-gun turrets, two superfiring turrets on the front and one on the rear, the same configuration that [[Ship:Aoba|Aoba]] carries. This basically doubles the Furutaka's forward armament compared to its Hull B, allowing it to chase and track targets far more effectively with its forward guns, and carry out evasive maneuvers while firing. Moreover, the upgrade allows for some of the more awkwardly positioned central turrets to be placed into more effective positions. | Due to patches, the Furutaka's Hull C upgrade has changed quite drastically to reflect its historical renovation. Aside from increasing the AA suite's armament, the upgrade now rearranges the cruiser's six guns into three dual-gun turrets, two superfiring turrets on the front and one on the rear, the same configuration that [[Ship:Aoba|Aoba]] carries. This basically doubles the Furutaka's forward armament compared to its Hull B, allowing it to chase and track targets far more effectively with its forward guns, and carry out evasive maneuvers while firing. Moreover, the upgrade allows for some of the more awkwardly positioned central turrets to be placed into more effective positions. | |||
| ? | ||||
| ? | ||||
| ? | ||||
| ? | ||||
| ? | ||||
| ? | ||||
| ? | ||||
| ? | ||||
| |Pros=<!-- write list of positive points below. use * as in ordinary wiki-list. --> | |Pros=<!-- write list of positive points below. use * as in ordinary wiki-list. --> | |||
| Line 41: | Line 33: | |||
| *Her AA suite is very weak; carriers hellbent on killing her will practically be like shooting fish in a barrel | *Her AA suite is very weak; carriers hellbent on killing her will practically be like shooting fish in a barrel | |||
| *Her catapult fighter helps reduce her vulnerability to aircraft, but is ineffective against fully concentrated torpedo assault by multiple squadrons | *Her catapult fighter helps reduce her vulnerability to aircraft, but is ineffective against fully concentrated torpedo assault by multiple squadrons | |||
| + | ||||
| + | |Research=<!-- write text about priority sequence of research below --> | |||
| + | Get the Type B or Second Hull first, Then get the Fire Control system upgrade for a little added range. If you are able to afford it after upgrading the Fire Control, get the Refitted guns for +200 extra AP damage and increased rate of fire. Lastly Upgrade the hull to Type C. Try to get this ASAP because the dual mounted turrets do make a noticeable difference in increasing the Furutaka's forward firepower. This upgrade also upgrades her torpedo launchers into quadruple torpedo mounts and marginally improves her AA firepower. If you wish to improve your torpedoes as this heavy cruiser can perform torpedo runs to a degree, upgrade the torpedoes. | |||
| + | <nowiki> </nowiki> | |||
| + | ||||
| + | Furutaka should have the Main Armaments Modification 1 and the Steering Gears Modification 1 installed, because both her guns and torpedoes as well as her steering are vulnerable to being knocked out. Fitting the Aiming Systems Modification 1 will also reduce her already quite accurate shell spread. | |||
| + | ||||
| + | |OptimalConfiguration=<!-- write some general text about selection of optimal configuration below (optional)--> | |||
| + | ||||
| + | |CommanderSkills=<!-- write text about best set of Commander Skills below --> | |||
| + | ||||
| + | {{Commander Skills | |||
| + | | Priority Target = 3 | |||
| + | | Preventative Maintenance = 2 | |||
| + | | Expert Loader = 1 | |||
| + | | Aircraft Servicing Expert = | |||
| + | | Direction Center for Catapult Aircraft = 2 | |||
| + | | Dogfighting Expert = | |||
| + | | Incoming Fire Alert =1 | |||
| + | | Evasive Maneuver = | |||
| + | ||||
| + | | High Alert = 1 | |||
| + | | Jack of All Trades = 1 | |||
| + | | Expert Marksman = 3 | |||
| + | | Torpedo Acceleration = 1 | |||
| + | | Smoke Screen Expert = | |||
| + | | Expert Rear Gunner = | |||
| + | | Adrenaline Rush = 2 | |||
| + | | Last Stand = 2 | |||
| + | ||||
| + | | Survivability Expert = 1 | |||
| + | | Basics of Survivability = 2 | |||
| + | | Torpedo Armament Expertise = 2 | |||
| + | | Emergency Takeoff = | |||
| + | | Basic Firing Training = 1 | |||
| + | | Superintendent = 2 | |||
| + | | Demolition Expert = 3 | |||
| + | | Vigilance = 2 | |||
| + | ||||
| + | | Manual Fire Control for Secondary Armament = | |||
| + | | Fire Prevention = | |||
| + | | Inertia Fuse for HE Shells = 1 | |||
| + | | Air Supremacy = | |||
| + | | Advanced Firing Training = 1 | |||
| + | | Manual Fire Control for AA Armament = 1 | |||
| + | | Radio Position Finding = 2 | |||
| + | | Concealment Expert = 3 | |||
| + | }} | |||
| + | ||||
| |Gallery=<!-- write below list of files without tags. description (if necessary) for each should be separated with template {{!}} --><gallery> | |Gallery=<!-- write below list of files without tags. description (if necessary) for each should be separated with template {{!}} --><gallery> | |||
Revision as of 10:28, 23 January 2017

| Research price11500 exp |
| Purchase price1,370,000 |
| Hit Points28,300 |
| IDS_PJGM144_200MM50_TYPE_E_RF3 х 2 pcs. |
| Rate of Fire2.73 shots/min. |
| Reload Time22 sec. |
| Rotation Speed6 deg./sec. |
| 180 Degree Turn Time30 sec. |
| Firing Range12.62 km. |
| Maximum Dispersion109 m. |
| HE Shell200 mm HE Common Type4 |
| Maximum HE Shell Damage3,300 |
| Chance of Fire on Target Caused by HE Shell17 % |
| Initial HE Shell Velocity870 m./s. |
| HE Shell Weight110 kg. |
| AP Shell200 mm AP Type5 |
| Maximum AP Shell Damage4,500 |
| Initial AP Shell Velocity870 m./s. |
| AP Shell Weight110 kg. |
| 76 mm /40 3rd Year Type on a single mount4 х 1 pcs. |
| Firing Range4.3 km. |
| Rate of Fire17.14 shots/min. |
| Reload Time3.5 sec. |
| HE Shell76 mm HE Mk2 |
| Maximum HE Shell Damage1,300 |
| Initial HE Shell Velocity680 m./s. |
| Chance of Fire on Target Caused by HE Shell5 % |
| 610 mm Quad2 х 4 pcs. |
| Rate of Fire0.67 shots/min. |
| Reload Time90 sec. |
| Rotation Speed25 deg./sec. |
| 180 Degree Turn Time7.2 sec. |
| TorpedoType8 |
| Maximum Damage14,600 |
| Torpedo Speed63 knot |
| Torpedo Range6 km. |
| 76 mm /40 3rd Year Type on a single mount4 х 1 pcs. |
| . . . Average Damage per Second6.4 |
| . . . Firing Range3 km. |
| 13 mm/76 Type 93 on a twin mount4 х 2 pcs. |
| . . . Average Damage per Second8 |
| . . . Firing Range1.2 km. |
| 7.7 mm/80 Type 92 on a single mount2 х 1 pcs. |
| . . . Average Damage per Second3.2 |
| . . . Firing Range0.99 km. |
| Maximum Speed34.5 knot |
| Turning Circle Radius750 m. |
| Rudder Shift Time9.2 sec. |
| Surface Detectability Range11.87 km. |
| Air Detectability Range5.78 km. |

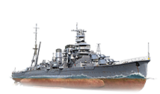
Furutaka — Japanese Tier V cruiser.
The design of a new scout cruiser was based on the British Hawkins-class cruisers, and it incorporated design solutions tested on cruiser Yūbari. The armament consisted of six 200 mm guns. During World War II, Furutaka participated in the operation in the Solomon Islands, as well as in the Battles of the Coral Sea and Savo Island. On October 11, 1942, during the battle of Cape Esperance, Furutaka was hit by about ninety shells, resulting in her torpedoes detonating. The cruiser sank on the morning of October 12.
Modules
 |
Rate of Fire (shots/min) | 180° Turn Time (sec) | Maximum Dispersion (m) | Maximum HE Shell Damage (HP) | Chance of Fire on Target Caused by HE Shell (%) | Maximum AP Shell Damage (HP) |
Research price (exp) |
Purchase price ( | |
|---|---|---|---|---|---|---|---|---|---|
| 200 mm/50 3rd Year Type No 1 in a Model E2 turret | 2.7 | 30 | 109 | 3,300 | 17 | 4,500 | 0 | 130,000 | |
| 203 mm/50 3rd Year Type No 2 in a Model E2 turret | 4 | 30 | 109 | 3,300 | 17 | 4,700 | 3,200 | 320,000 |
 |
Hit Points (HP) | Armor (mm) | Armor (mm) | Main Turrets (pcs.) | Secondary Gun Turrets (pcs.) | AA Mounts (pcs.) | Torpedo Tubes (pcs.) | Hangar Capacity (pcs.) |
Research price (exp) |
Purchase price ( | |
|---|---|---|---|---|---|---|---|---|---|---|---|
| Furutaka (A) | 28,300 | 6 | 105 | 3 | 4 | 2/4/4 | 2 | 0 | 150,000 | ||
| Furutaka (B) | 30,700 | 6 | 105 | 3 | 4 | 2/4/4 | 2 | 6,300 | 480,000 |
 |
Rate of Fire (shots/min) | Torpedo Tubes Reload Time (sec) | 180° Turn Time (sec) | Maximum Damage (HP) | Torpedo Speed (knot) | Torpedo Range (km) |
Research price (exp) |
Purchase price ( | |
|---|---|---|---|---|---|---|---|---|---|
| Type8 | 0.7 | 90 | 7.2 | 14,600 | 63 | 6 | 0 | 120,000 | |
| Type8 mod. 2 | 0.6 | 94 | 7.2 | 16,266 | 59 | 10 | 3,600 | 400,000 |
 |
IDS_SHIP_PARAM_SUO_INCREASE_DIST (%) | Maximum Firing Range (km) |
Research price (exp) |
Purchase price ( | |
|---|---|---|---|---|---|
| Type5 mod. 1 | 0 | 0 | 100,000 | ||
| Type5 mod. 2 | 0 | 2,400 | 260,000 |
 |
Maximum Speed (knot) |
Research price (exp) |
Purchase price ( | |
|---|---|---|---|---|
| Propulsion: 102,000 hp | 34.5 | 0 | 90,000 |
Compatible Upgrades
| Slot 1 |
|||||
|---|---|---|---|---|---|
| Slot 2 |
|||||
| Slot 3 |
Player Opinion
Performance
The first heavy cruiser within Japan's cruiser tree and one of the first heavy cruisers in the game, the Furutaka has a surprisingly powerful complement of six 203mm guns, allowing her to deal with anything it encounters. While slow-firing, their large calibre and accuracy allows the Furutaka to deal large amounts of damage in a single salvo. Fully upgraded, her guns have a range of 13km, while her torpedoes can hit 10km. A common tactic is to fire at the target with her guns, close in and fire off one spread of torpedoes and run away while firing another salvo or spread of torpedoes from the other side when the opportunity arises. While her speed is good, she rapidly loses speed when turning, as such you will be the most vulnerable when turning to run away from the opponent.
If possible, do not draw attention to yourself as your ship has poor armour overall as even destroyers will have no problem making your life miserable. Avoid getting drawn into a close range gunfight at all costs, as the Furutaka will almost always lose - she excels most when firing at unsuspecting targets from a distance (despite having a relatively short range). Except for the poor armour, playing the Furutaka leans more towards behaving like a strike cruiser rather than a typical heavy cruiser. While an experienced player can duel cruisers of equivalent and even of a +1 tier one on one, often the best way to play the cruiser, especially in higher tier battles, is to find a battleship or destroyer to support (and to draw fire).
The Furutaka's weak armor can be compensated by putting the Furutaka in erratic and evasive maneuvers, but be warned, speed will be lost in the turn (which admittedly, can be used to a player's advantage). Moreover, the Furutaka's hull is strong enough so it can be angled against equivalent tier cruisers to improve its survivability and protect its citadel, but Battleship guns will quite easily overmatch such angling. Try to avoid engaging battleships unless supported by other ships.
Due to patches, the Furutaka's Hull C upgrade has changed quite drastically to reflect its historical renovation. Aside from increasing the AA suite's armament, the upgrade now rearranges the cruiser's six guns into three dual-gun turrets, two superfiring turrets on the front and one on the rear, the same configuration that Aoba carries. This basically doubles the Furutaka's forward armament compared to its Hull B, allowing it to chase and track targets far more effectively with its forward guns, and carry out evasive maneuvers while firing. Moreover, the upgrade allows for some of the more awkwardly positioned central turrets to be placed into more effective positions.Pros:
- Powerful, accurate guns at her tier with very large firing arcs on all turrets(which can be a double edged sword)
- Upon upgrade to Hull C, Furutaka can bear the majority of her firepower forwards, allowing the cruiser to pursue and harass fleeing ships with relative ease.
- Fast when going in a straight line, easily keeping up with destroyers
- Low detection range allows her to surprise unsuspecting targets and disengage easily
- Has good broadside potential despite carrying single mount turrets and broadsides become easier to use upon final hull upgrade.
- Potent torpedoes with good range, decent speed, and powerful warheads (very good for killing battleships).
- The hydroacoustic ability, combined with her powerful guns, virtually makes her into a dangerous destroyer killer at her tier.
- Excels at Destroyer screening for Battleships
Cons:
- She has thin armour for a heavy cruiser and large, easy-to-hit citadel
- Loses speed rapidly in turns and rudder shift is sluggish, and has a large turning circle
- Her 13km gun range means you need to get in closer than most cruisers; very underwhelming gun range when bottom-tiered
- She requires a complete change of play style for players who have only played the preceding light cruisers
- Limited ability to fully utilise torpedoes due to mounting only one quadruple-mount on each side and her poor handling
- Long gun reload time and arduously slow turret turning time (situation is improved with the Hull C), which can hamper her destroyer fighting efforts
- Her AA suite is very weak; carriers hellbent on killing her will practically be like shooting fish in a barrel
- Her catapult fighter helps reduce her vulnerability to aircraft, but is ineffective against fully concentrated torpedo assault by multiple squadrons
Research
Get the Type B or Second Hull first, Then get the Fire Control system upgrade for a little added range. If you are able to afford it after upgrading the Fire Control, get the Refitted guns for +200 extra AP damage and increased rate of fire. Lastly Upgrade the hull to Type C. Try to get this ASAP because the dual mounted turrets do make a noticeable difference in increasing the Furutaka's forward firepower. This upgrade also upgrades her torpedo launchers into quadruple torpedo mounts and marginally improves her AA firepower. If you wish to improve your torpedoes as this heavy cruiser can perform torpedo runs to a degree, upgrade the torpedoes.
Furutaka should have the Main Armaments Modification 1 and the Steering Gears Modification 1 installed, because both her guns and torpedoes as well as her steering are vulnerable to being knocked out. Fitting the Aiming Systems Modification 1 will also reduce her already quite accurate shell spread.Optimal Configuration
Commander Skills
| Recommended Commander Skills | ||||||||
|---|---|---|---|---|---|---|---|---|
| Cost (points) |
Endurance | Attack | Support | Versatility | ||||
| 1 |
★★★ |
★★ |
★ |
|
|
|
★ |
|
| 2 |
★ |
★ |
★★★ |
★ |
|
|
★★ |
★★ |
| 3 |
★★ |
★ |
★★ |
|
★ |
★★ |
★★★ |
★★ |
| 4 |
|
|
★ |
|
★ |
|
★★ |
★★★ |
| Key: ★★★ - Extremely Useful ★★ - Frequently Useful ★ - Occasionally Useful No stars - Meh Χ - Not recommended | ||||||||
Gallery
Historical Info
Historical Gallery