Furutaka
| Revision as of 15:38, 4 December 2017 Minor polish to History section. Added Camouflage section. | Revision as of 22:46, 1 June 2021 <references /> | |||
27 intermediate revisions by 13 users not shown | ||||
| Line 6: | Line 6: | |||
| |Anno=<!-- you can write below short description for the ship. it will replace default once. --> | |Anno=<!-- you can write below short description for the ship. it will replace default once. --> | |||
| A powerful scout cruiser employed to carry out reconnaissance operations and to protect battleship fleets from enemy light naval forces. ''Furutaka''’s primary distinction from her predecessors was an enhanced artillery armament featuring a pyramid arrangement of turret mounts. | A powerful scout cruiser employed to carry out reconnaissance operations and to protect battleship fleets from enemy light naval forces. ''Furutaka''’s primary distinction from her predecessors was an enhanced artillery armament featuring a pyramid arrangement of turret mounts. | |||
| ? | + | <!-- <br><br>{{Model3DViewer|2936fdc83bb14081acb249c04c356365}}--> | ||
| |Performance=<!-- write text about performance in battles below --> | |Performance=<!-- write text about performance in battles below --> | |||
| ? | The first heavy cruiser within Japan's cruiser tree and one of the first heavy cruisers in the game, | + | The first heavy cruiser within Japan's cruiser tree and one of the first heavy cruisers in the game, ''Furutaka'' carries a powerful complement of six 203mm guns after upgrading from the 200mm, allowing her to deal with anything she encounters. While slow-firing, their large caliber and accuracy allows ''Furutaka'' captains to deal large amounts of damage in a single salvo. Fully upgraded, her guns have a range of 13.9km, while her torpedoes can hit 10km after researching the improved range. A common tactic is to close in on an isolated target and launch all available torpedoes before turning around to disengage. While she is faster than most cruisers at her tier, she rapidly slows down when turning, as such you will be the most vulnerable when turning to run away from the opponent. | |
| <nowiki> </nowiki> | <nowiki> </nowiki> | |||
| ? | If possible, | + | If possible, captain's are recommended to remain undetected, as ''Furutaka's'' poor armor prevents her from tanking damage effectively. Avoid getting drawn into a close range gunfight at all costs, as ''Furutaka'' will almost always lose. The ship excels most when firing at unsuspecting targets from a distance. Despite her poor armor, playing ''Furutaka'' plays more like a strike cruiser rather than a typical heavy cruiser. Often the best way to play the cruiser, especially in higher tier battles, is to find a battleship or destroyer to support. | |
| ? | + | ''Furutaka's'' weak armor can be compensated for by conducting evasive maneuvers and angling. While her hull can withstand armor piercing shells from other cruisers when angled, most battleships will have little to no problem over-matching most sections of the ship. | ||
| ? | + | ''Furutaka's'' Hull B upgrade changes the look of the ship dramatically. The upgrade rearranges the cruiser's six guns into three dual-gun turrets, two superfiring turrets on the front and one on the rear, the same configuration that [[Ship:Aoba|Aoba]] carries. Torpedo bulges are added in Hull B that helps cover 80% of the citadel that was exposed in hull A, which allows better protection from shells. | ||
| |Pros=<!-- write list of positive points below. use * as in ordinary wiki-list. --> | |Pros=<!-- write list of positive points below. use * as in ordinary wiki-list. --> | |||
| ? | * Powerful, accurate guns | + | * Very thick central deck armor (48 mm): even the biggest AP shells can ricochet. | |
| ? | * | + | * Powerful, accurate guns for her tier with large firing arcs on all turrets. | |
| ? | * | + | * HE shells have a high fire chance, great penetration, and damage. | |
| ? | + | * Superb torpedo bulges that make the citadel rather small. | ||
| ? | + | * Powerful torpedoes with good range, speed, and damage. | ||
| ? | * | + | * Torpedo mounts have excellent firing angles compared to higher tier Japanese cruisers. | |
| ? | * | + | * Fastest turret traverse of all Japanese heavy cruisers. | |
| ? | * | + | * Reasonable fast with a fast rudder shift time. | |
| |Cons=<!-- write list of negative points below. use * as in ordinary wiki-list. --> | |Cons=<!-- write list of negative points below. use * as in ordinary wiki-list. --> | |||
| ? | * | + | * Poor light armor for a heavy cruiser, takes large chunks of damage from anything being fired at her. | |
| ? | * | + | * Due to her larger gun caliber, the ship has a longer reload time than most other cruisers at her tier. | |
| ? | + | * Despite the torpedo protection covering most of the citadel, it still rises well above the waterline. | ||
| ? | * | + | * Poor main battery firing range at 13.9km. | |
| ? | * | + | * Stock guns has the longest reload time of any cruiser in the game at 21 seconds. | |
| ? | * | + | * The ship’s anti-aircraft armament is weak and leaves the ship vulnerable to carrier strikes. | |
| ? | * | + | ||
| ? | + | |||
| |Research=<!-- write text about priority sequence of research below --> | |Research=<!-- write text about priority sequence of research below --> | |||
| ? | + | Captains should first research the second main battery module for the reduction in reload time it provides. Then the B Hull for the reconfigured main battery, two more torpedo tubes, better maneuverability, health pool, and better AA suite. Next either the gun range buff or the much better mod.2 torpedoes, depending on whether you value her guns or torpedoes more highly. | ||
| ? | + | |||
| ? | + | |||
| |OptimalConfiguration=<!-- write some general text about selection of optimal configuration below (optional)--> | |OptimalConfiguration=<!-- write some general text about selection of optimal configuration below (optional)--> | |||
| |Upgrades=<!-- write text about best upgrades below --> | |Upgrades=<!-- write text about best upgrades below --> | |||
| + | The recommended upgrades for ''{{#var:ship_name}}'' are as follows: | |||
| * '''Slot 1''': {{Main Armaments Modification 1}} keeps the guns and torpedo tubes active and firing. | * '''Slot 1''': {{Main Armaments Modification 1}} keeps the guns and torpedo tubes active and firing. | |||
| * '''Slot 2''': {{Damage Control System Modification 1}} makes the ship more resistant to [[Ship:Fire|fires]] and [[Ship:Flooding|flooding]]. | * '''Slot 2''': {{Damage Control System Modification 1}} makes the ship more resistant to [[Ship:Fire|fires]] and [[Ship:Flooding|flooding]]. | |||
| ? | * '''Slot 3''': {{Aiming Systems Modification 1}} gives her guns more accuracy. | + | * '''Slot 3''': {{Main Battery Modification 2}} makes her guns more comfortable and saves a skill point that would otherwise be spent on Grease the Gears to improve her gun handling. {{Aiming Systems Modification 1}} gives her guns more accuracy and is an option. | |
| |CommanderSkills=<!-- write text about best set of Commander Skills below --> | |CommanderSkills=<!-- write text about best set of Commander Skills below --> | |||
| + | The key skills for ''Furutaka'' include Grease the Gears at Level 1, Priority Target at Level 2, Adrenaline Rush at Level 3, and Concealment Expert at Level 4. Captains who use the ship’s torpedoes often may also wish to invest in one or more of the torpedo skills if they have points remaining after investing in her main guns and concealment. The AA skills, particularly Expert AA Marksman, are almost always a good choice for leftover skill points on cruisers. While Pyrotechnician could be taken at Level 2 to improve her shells' fire chances, her rate of fire is too low to properly take advantage of the relative small boost to fire chance per shell. Captains may also with to invest in Top Grade Gunner to improve the slow rate of fire when they find themselves unable to drop off detection using her concealment. | |||
| ? | {{Commander Skills | + | {{Commander Skills 3 CR | |
| ? | + | <!-- Ratings 1,2,3 are legit. Others are ignored.--> | ||
| ? | | | + | | rating11 = 2 <!-- Grease the Gears --> | |
| ? | | | + | | rating12 = 1 <!-- Swift Fish --> | |
| ? | | | + | | rating13 = <!-- Consumables Specialist --> | |
| ? | | | + | | rating14 = 2 <!-- Gun Feeder --> | |
| ? | | | + | | rating15 = <!-- Incoming Fire Alert --> | |
| ? | + | | rating16 = 1 <!-- Last Stand --> | ||
| ? | | | + | ||
| ? | | | + | | rating21 = 2 <!-- Pyrotechnician --> | |
| ? | | | + | | rating22 = 1 <!-- Fill the Tubes --> | |
| ? | | | + | | rating23 = <!-- Consumables Enhancements --> | |
| ? | | | + | | rating24 = 0 <!-- Eye in the Sky --> | |
| ? | | | + | | rating25 = 2 <!-- Priority Target --> | |
| ? | + | | rating26 = 2 <!-- Expert AA Marksman --> | ||
| ? | + | |||
| ? | | | + | ||
| ? | | | + | | rating31 = <!-- Heavy HE and SAP Shells --> | |
| ? | | | + | | rating32 = 1 <!-- Enhanced Torpedo Explosive Charge --> | |
| ? | + | | rating33 = 3 <!-- Adrenaline Rush --> | ||
| ? | | | + | | rating34 = 1 <!-- Heavy AP Shells --> | |
| ? | | | + | | rating35 = 2 <!-- Superintendent --> | |
| ? | | | + | | rating36 = 1 <!-- Survivability Expert --> | |
| ? | | | + | ||
| ? | + | |||
| ? | | | + | | rating41 = 1 <!-- Top Grade Gunner --> | |
| ? | | | + | | rating42 = 2 <!-- Outnumbered --> | |
| ? | | | + | | rating43 = 1 <!-- Radio Location --> | |
| ? | | | + | | rating44 = 0 <!-- Inertial Fuse for HE Shells --> | |
| ? | + | | rating45 = 3 <!-- Concealment Expert --> | ||
| ? | + | | rating46 = 0 <!-- AA Gunner --> | ||
| ? | | | + | ||
| ? | | | + | ||
| }} | }} | |||
| + | ||||
| + | |Consumables=<!-- write text about selection of Consumables below --> | |||
| + | ''{{#var:ship_name}}'' equips the following consumables: | |||
| + | * '''Slot 1:''' {{Damage Control Party}} | |||
| + | * '''Slot 2:''' {{Hydroacoustic Search}} | |||
| + | * '''Slot 3:''' {{Catapult Fighter}} | |||
| |Camouflage=<!-- write text about useful camouflage below --> | |Camouflage=<!-- write text about useful camouflage below --> | |||
| ? | [[Ship:Camouflage#Standard Camouflage|Type 1, 2, or 5 camouflage]] can be equipped for credits; Types 1 or 5 are recommended at a minimum to reduce | + | ''Furutaka'' does not have a purchasable permanent camouflage available to her. Instead, [[Ship:Camouflage#Standard Camouflage|Type 1, 2, or 5 camouflage]] can be equipped for credits; Types 1 or 5 are recommended at a minimum to reduce detectability range. | |
| |Signals=<!-- write text about best set of signals below --> | |Signals=<!-- write text about best set of signals below --> | |||
| + | ''Furutaka'' captains should mount the standard flags to improve the ship's performance in battle. To improve upon the ship's armaments, India X-Ray ({{India X-Ray|Size=18px}}), Victor Lima ({{Victor Lima|Size=18px}}), and Juliet Whiskey Unaone ({{Juliet Whiskey Unaone|Size=18px}}) flags are recommended to increase the fire chance and flooding chances respectively. To improve the ship’s survivability, captains should mount November Foxtrot ({{November Foxtrot|Size=18px}}) and India Yankee ({{India Yankee|Size=18px}}) flags. Sierra Mike ({{Sierra Mike|Size=18px}}) flags are recommended to increase the ship’s already high top speed. Lastly, economic and special signal flags can be mounted to improve the ship’s economic gains per battle. | |||
| + | {{Signal Flags | |||
| + | | November Echo Setteseven = 2 | |||
| + | | Mike Yankee Soxisix = 1 | |||
| + | | India X-Ray = 2 | |||
| + | | Juliet Whiskey Unaone = 1 | |||
| + | | Victor Lima = 3 | |||
| + | | Hotel Yankee = 1 | |||
| ? | + | | November Foxtrot = 2 | ||
| ? | + | | Sierra Mike = 3 | ||
| ? | + | | India Delta = | ||
| ? | + | |||
| ? | + | |||
| ? | + | |||
| ? | + | |||
| ? | + | |||
| ? | | November Foxtrot = | + | ||
| ? | | Sierra Mike = | + | ||
| ? | | India Delta = | + | ||
| | Juliet Yankee Bissotwo = | | Juliet Yankee Bissotwo = | |||
| ? | | India Yankee = | + | | India Yankee = 2 | |
| ? | | Juliet Charlie = | + | | Juliet Charlie = 1 | |
| | Zulu = | | Zulu = | |||
| | India Bravo Terrathree = | | India Bravo Terrathree = | |||
| ? | | Equal Speed Charlie London = | + | | Equal Speed Charlie London = 2 | |
| ? | | Zulu Hotel = | + | | Zulu Hotel = 1 | |
| | Papa Papa = | | Papa Papa = | |||
| | Wyvern = | | Wyvern = | |||
| ? | | Red Dragon = | + | | Red Dragon = 2 | |
| ? | | Dragon Flag = | + | | Dragon Flag = 2 | |
| | Ouroboros = | | Ouroboros = | |||
| ? | | Hydra = | + | | Hydra = 2 | |
| ? | }} | + | }} | |
| ? | + | |||
| ? | + | |||
| |Gallery=<!-- write below list of files without tags. description (if necessary) for each should be separated with template {{!}} --><gallery> | |Gallery=<!-- write below list of files without tags. description (if necessary) for each should be separated with template {{!}} --><gallery> | |||
| Line 131: | Line 126: | |||
| <div class="thumb tright"> | <div class="thumb tright"> | |||
| {{AnnoWiki|content= | {{AnnoWiki|content= | |||
| ? | <h2>''{{#var:ship_name}}'', | + | <h2> ''{{#var:ship_name}}'', 1926</h2> | |
| ? | ===Construction=== | + | ====Construction==== | |
| ? | :Builder: | + | :Builder: Mitsubishi Heavy Industries,<br> Nagasaki, Japan | |
| ? | :Laid down: | + | :Laid down: 5th December 1922 | |
| ? | :Launched: | + | :Launched: 25th February 1925 | |
| ? | :Commissioned: | + | :Commissioned: 31st March 1926 | |
| ---- | ---- | |||
| ? | ===Specifications=== | + | ====Specifications==== | |
| ? | :7,100 tons, standard | + | :7,100 tons displacement, standard | |
| :183.1m length | :183.1m length | |||
| :16.5m beam | :16.5m beam | |||
| Line 145: | Line 140: | |||
| ---- | ---- | |||
| ====Machinery==== | ====Machinery==== | |||
| ? | :10 Kanpon oil-fired boilers | + | :10 Kanpon oil-fired boilers | |
| ? | : | + | :2 Kanpon mixed-firing boilers | |
| + | :4 Parsons geared turbine engines | |||
| + | :1,400 tons of oil, 400 tons of coal | |||
| ---- | ---- | |||
| ====Performance==== | ====Performance==== | |||
| Line 153: | Line 150: | |||
| ---- | ---- | |||
| ====Armor==== | ====Armor==== | |||
| ? | :Main belt: 76mm | + | :Main belt: 76mm | |
| ? | : | + | :Decks: 48mm | |
| ? | :Conning | + | :Conning Tower: 25mm | |
| ? | :Turrets and | + | :Turrets: 25mm | |
| + | :Fore and Aft Plating: 13mm | |||
| + | ---- | |||
| + | ====Armament==== | |||
| + | =====Main===== | |||
| + | :Six (6x1) 20cm/50 3rd Year Type No.1 guns | |||
| + | =====Secondary===== | |||
| + | :Four (4x1) 8cm/50 3rd Year Type High-Angle guns | |||
| + | =====Anti-aircraft===== | |||
| + | :Two (2x1) 7.7mm machine guns | |||
| + | =====Torpedoes===== | |||
| + | :Twelve (6x2) 610mm Type 8 no.2 Torpedoes | |||
| + | ====Aircraft Facilities==== | |||
| + | :1 Kawanishi E7K1 “Alf” floatplane | |||
| + | :1 aircraft catapult | |||
| + | ||||
| + | ---- | |||
| + | ====Complement==== | |||
| + | :616 | |||
| + | }} | |||
| + | {{AnnoWiki|content= | |||
| + | <h2> ''{{#var:ship_name}}'', 1942</h2> | |||
| + | ====Specifications==== | |||
| + | :7,100 tons displacement, standard | |||
| + | :183.1m length | |||
| + | :16.5m beam | |||
| + | :5.6m draft | |||
| + | ---- | |||
| ---- | ---- | |||
| ====Armament==== | ====Armament==== | |||
| =====Main===== | =====Main===== | |||
| :Six (3x2) 20.3cm/50 3rd Year Type No. 2 guns | :Six (3x2) 20.3cm/50 3rd Year Type No. 2 guns | |||
| + | =====Secondary===== | |||
| :Four (4x1) 12cm/45 10th Year Type High-Angle guns | :Four (4x1) 12cm/45 10th Year Type High-Angle guns | |||
| ? | =====Anti- | + | =====Anti-aircraft===== | |
| :Eight (4x2) 25mm Type 96 AA guns | :Eight (4x2) 25mm Type 96 AA guns | |||
| ? | :Four (2x2) 13.2mm Type 93 AA guns | + | :Four (2x2) 13.2mm Type 93 AA guns | |
| =====Torpedoes===== | =====Torpedoes===== | |||
| ? | :Eight (2x4) 61cm | + | :Eight (2x4) 61cm Type 93 mod 2 torpedoes | |
| ? | + | |||
| ====Aircraft Facilities==== | ====Aircraft Facilities==== | |||
| ? | : | + | :2 Aichi E13A “Jake” seaplanes | |
| ? | :1 | + | :1 aircraft catapult | |
| ? | + | |||
| ? | + | |||
| }} | }} | |||
| </div> | </div> | |||
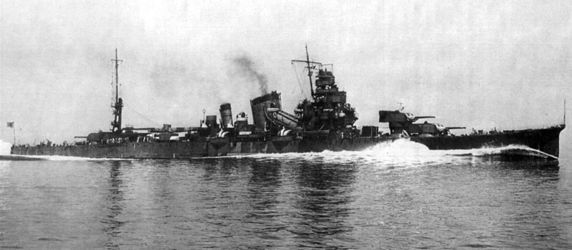
| + | [[File:Furutaka on speed trials 1939.jpg|none|frame|x250px|link=|''Furutaka'' performing sea trials in 1939.]] | |||
| ? | === | + | ===Design=== | |
| ? | + | Following the experimental light Cruiser Yubari, the Furutaka class adapted several of her lessons and was the first heavy Cruiser that entered service in the Imperial Japanese Navy. | ||
| + | ||||
| + | Despite numerous efforts to reduce the displacement of this class, they still overshot their designed displacement by almost 1000 tons, with a standard displacement of 7500 tons. With a length of 185m and a width of 16.5m, these ships were heavier and larger than any preceding Cruiser of their Navy. | |||
| + | ||||
| + | The original armament consisted of six 20cm/50 3rd Year Type guns in single mounts, those were supposed to deliver heavy strikes in night battles before the ship would then disappear into the darkness again. However problems with the ammunition supply meant that the reload of these guns could not go faster than 30 seconds. Dual purpose armament consisted of four single mounted 8 cm/40 3rd Year Type, and two machine guns caliber 7.7mm were her close range AA armament. | |||
| + | ||||
| + | To increase the stability of the ship it was decided to make the Torpedo Tubes fixed into the hull, with three twin 61cm Torpedo launchers on each side of the ship. | |||
| + | ||||
| + | Aviation facilities originally consisted of a flying-off platform on turret 4, but it was deemed as insufficient and replaced with a proper catapult during the later career. | |||
| + | ||||
| + | Her armor was 76mm thick at her main armor belt, with the deck being 35mm strong. The turrets themselves only had a 25mm strong splinter protection, in order to save weight. | |||
| + | ||||
| + | Their machinery allowed for 34.5 knots of speed while having an engine output of 102,000shp, and while going 14 knots they were able to sail for 6000 nautical miles. | |||
| + | ||||
| + | ||||
| + | Modernizations during the career included a rework of the aviation facilities in 1930, during the next years the AA armament was reworked, which included new dual purpose guns with a caliber of 12cm. In 1936/1937, the main armament received a complete overhaul. The single mounts were all replace by three twin turrets, two quadruple Torpedo launchers on the deck replaced the fixed launchers in the hull and the engine got upgraded to modern standards as well. Wider Torpedo bulges were an attempt to increase the stability, however this was not successful. | |||
| |HistoricalGallery=<!-- write below list of files without tags. description (if necessary) for each should be separated with | --><gallery> | |HistoricalGallery=<!-- write below list of files without tags. description (if necessary) for each should be separated with | --><gallery> | |||
| + | File:Furutaka on speed trials 1939.jpg|''Furutaka'' performing sea trials in 1939.]] | |||
| + | ||||
| + | </gallery> | |||
| ? | + | |Video=<!-- put below video clips with using template VideoYT. You can use html-tags for formatting. --> | ||
| |Ref= <!-- write below --> | |Ref= <!-- write below --> | |||
| + | <references /> | |||
| + | # [https://en.wikipedia.org/wiki/Japanese_cruiser_Furutaka Japanese cruiser ''Furutaka'' - Wikipedia] | |||
| + | # [https://en.wikipedia.org/wiki/Furutaka-class_cruiser ''Furutaka''-class cruiser - Wikipedia] | |||
| }}<!-- DO NOT DELETE THIS LINE. DO NOT INSERT ANYTHING BELOW THIS LINE --> | }}<!-- DO NOT DELETE THIS LINE. DO NOT INSERT ANYTHING BELOW THIS LINE --> | |||
Revision as of 22:46, 1 June 2021

| Research price11500 exp |
| Purchase price1,370,000 |
| Hit Points28,300 |
| IDS_PJGM144_200MM50_TYPE_E_RF3 х 2 pcs. |
| Rate of Fire2.73 shots/min. |
| Reload Time22 sec. |
| Rotation Speed6 deg./sec. |
| 180 Degree Turn Time30 sec. |
| Firing Range12.62 km. |
| Maximum Dispersion109 m. |
| HE Shell200 mm HE Common Type4 |
| Maximum HE Shell Damage3,300 |
| Chance of Fire on Target Caused by HE Shell17 % |
| Initial HE Shell Velocity870 m./s. |
| HE Shell Weight110 kg. |
| AP Shell200 mm AP Type5 |
| Maximum AP Shell Damage4,500 |
| Initial AP Shell Velocity870 m./s. |
| AP Shell Weight110 kg. |
| 76 mm /40 3rd Year Type on a single mount4 х 1 pcs. |
| Firing Range4.3 km. |
| Rate of Fire17.14 shots/min. |
| Reload Time3.5 sec. |
| HE Shell76 mm HE Mk2 |
| Maximum HE Shell Damage1,300 |
| Initial HE Shell Velocity680 m./s. |
| Chance of Fire on Target Caused by HE Shell5 % |
| 610 mm Quad2 х 4 pcs. |
| Rate of Fire0.67 shots/min. |
| Reload Time90 sec. |
| Rotation Speed25 deg./sec. |
| 180 Degree Turn Time7.2 sec. |
| TorpedoType8 |
| Maximum Damage14,600 |
| Torpedo Speed63 knot |
| Torpedo Range6 km. |
| 76 mm /40 3rd Year Type on a single mount4 х 1 pcs. |
| . . . Average Damage per Second6.4 |
| . . . Firing Range3 km. |
| 13 mm/76 Type 93 on a twin mount4 х 2 pcs. |
| . . . Average Damage per Second8 |
| . . . Firing Range1.2 km. |
| 7.7 mm/80 Type 92 on a single mount2 х 1 pcs. |
| . . . Average Damage per Second3.2 |
| . . . Firing Range0.99 km. |
| Maximum Speed34.5 knot |
| Turning Circle Radius750 m. |
| Rudder Shift Time9.2 sec. |
| Surface Detectability Range11.87 km. |
| Air Detectability Range5.78 km. |

Furutaka — Japanese Tier V cruiser.
A powerful scout cruiser employed to carry out reconnaissance operations and to protect battleship fleets from enemy light naval forces. Furutaka’s primary distinction from her predecessors was an enhanced artillery armament featuring a pyramid arrangement of turret mounts.
Modules
 |
Rate of Fire (shots/min) | 180° Turn Time (sec) | Maximum Dispersion (m) | Maximum HE Shell Damage (HP) | Chance of Fire on Target Caused by HE Shell (%) | Maximum AP Shell Damage (HP) |
Research price (exp) |
Purchase price ( | |
|---|---|---|---|---|---|---|---|---|---|
| 200 mm/50 3rd Year Type No 1 in a Model E2 turret | 2.7 | 30 | 109 | 3,300 | 17 | 4,500 | 0 | 130,000 | |
| 203 mm/50 3rd Year Type No 2 in a Model E2 turret | 4 | 30 | 109 | 3,300 | 17 | 4,700 | 3,200 | 320,000 |
 |
Hit Points (HP) | Armor (mm) | Armor (mm) | Main Turrets (pcs.) | Secondary Gun Turrets (pcs.) | AA Mounts (pcs.) | Torpedo Tubes (pcs.) | Hangar Capacity (pcs.) |
Research price (exp) |
Purchase price ( | |
|---|---|---|---|---|---|---|---|---|---|---|---|
| Furutaka (A) | 28,300 | 6 | 105 | 3 | 4 | 2/4/4 | 2 | 0 | 150,000 | ||
| Furutaka (B) | 30,700 | 6 | 105 | 3 | 4 | 2/4/4 | 2 | 6,300 | 480,000 |
 |
Rate of Fire (shots/min) | Torpedo Tubes Reload Time (sec) | 180° Turn Time (sec) | Maximum Damage (HP) | Torpedo Speed (knot) | Torpedo Range (km) |
Research price (exp) |
Purchase price ( | |
|---|---|---|---|---|---|---|---|---|---|
| Type8 | 0.7 | 90 | 7.2 | 14,600 | 63 | 6 | 0 | 120,000 | |
| Type8 mod. 2 | 0.6 | 94 | 7.2 | 16,266 | 59 | 10 | 3,600 | 400,000 |
 |
IDS_SHIP_PARAM_SUO_INCREASE_DIST (%) | Maximum Firing Range (km) |
Research price (exp) |
Purchase price ( | |
|---|---|---|---|---|---|
| Type5 mod. 1 | 0 | 0 | 100,000 | ||
| Type5 mod. 2 | 0 | 2,400 | 260,000 |
 |
Maximum Speed (knot) |
Research price (exp) |
Purchase price ( | |
|---|---|---|---|---|
| Propulsion: 102,000 hp | 34.5 | 0 | 90,000 |
Compatible Upgrades
| Slot 1 |
|||||
|---|---|---|---|---|---|
| Slot 2 |
|||||
| Slot 3 |
Player Opinion
Performance
The first heavy cruiser within Japan's cruiser tree and one of the first heavy cruisers in the game, Furutaka carries a powerful complement of six 203mm guns after upgrading from the 200mm, allowing her to deal with anything she encounters. While slow-firing, their large caliber and accuracy allows Furutaka captains to deal large amounts of damage in a single salvo. Fully upgraded, her guns have a range of 13.9km, while her torpedoes can hit 10km after researching the improved range. A common tactic is to close in on an isolated target and launch all available torpedoes before turning around to disengage. While she is faster than most cruisers at her tier, she rapidly slows down when turning, as such you will be the most vulnerable when turning to run away from the opponent.
If possible, captain's are recommended to remain undetected, as Furutaka's poor armor prevents her from tanking damage effectively. Avoid getting drawn into a close range gunfight at all costs, as Furutaka will almost always lose. The ship excels most when firing at unsuspecting targets from a distance. Despite her poor armor, playing Furutaka plays more like a strike cruiser rather than a typical heavy cruiser. Often the best way to play the cruiser, especially in higher tier battles, is to find a battleship or destroyer to support.
Furutaka's weak armor can be compensated for by conducting evasive maneuvers and angling. While her hull can withstand armor piercing shells from other cruisers when angled, most battleships will have little to no problem over-matching most sections of the ship.
Furutaka's Hull B upgrade changes the look of the ship dramatically. The upgrade rearranges the cruiser's six guns into three dual-gun turrets, two superfiring turrets on the front and one on the rear, the same configuration that Aoba carries. Torpedo bulges are added in Hull B that helps cover 80% of the citadel that was exposed in hull A, which allows better protection from shells.Pros:
- Very thick central deck armor (48 mm): even the biggest AP shells can ricochet.
- Powerful, accurate guns for her tier with large firing arcs on all turrets.
- HE shells have a high fire chance, great penetration, and damage.
- Superb torpedo bulges that make the citadel rather small.
- Powerful torpedoes with good range, speed, and damage.
- Torpedo mounts have excellent firing angles compared to higher tier Japanese cruisers.
- Fastest turret traverse of all Japanese heavy cruisers.
- Reasonable fast with a fast rudder shift time.
Cons:
- Poor light armor for a heavy cruiser, takes large chunks of damage from anything being fired at her.
- Due to her larger gun caliber, the ship has a longer reload time than most other cruisers at her tier.
- Despite the torpedo protection covering most of the citadel, it still rises well above the waterline.
- Poor main battery firing range at 13.9km.
- Stock guns has the longest reload time of any cruiser in the game at 21 seconds.
- The ship’s anti-aircraft armament is weak and leaves the ship vulnerable to carrier strikes.
Research
Optimal Configuration
Upgrades
The recommended upgrades for Furutaka are as follows:
- Slot 1: Main Armaments Modification 1
 keeps the guns and torpedo tubes active and firing.
- Slot 2: Damage Control System Modification 1
 makes the ship more resistant to fires and flooding.
- Slot 3: Main Battery Modification 2
 makes her guns more comfortable and saves a skill point that would otherwise be spent on Grease the Gears to improve her gun handling. Aiming Systems Modification 1
  gives her guns more accuracy and is an option.
Commander Skills
The key skills for Furutaka include Grease the Gears at Level 1, Priority Target at Level 2, Adrenaline Rush at Level 3, and Concealment Expert at Level 4. Captains who use the ship’s torpedoes often may also wish to invest in one or more of the torpedo skills if they have points remaining after investing in her main guns and concealment. The AA skills, particularly Expert AA Marksman, are almost always a good choice for leftover skill points on cruisers. While Pyrotechnician could be taken at Level 2 to improve her shells' fire chances, her rate of fire is too low to properly take advantage of the relative small boost to fire chance per shell. Captains may also with to invest in Top Grade Gunner to improve the slow rate of fire when they find themselves unable to drop off detection using her concealment.
| Recommended Commander Skills | ||||||
|---|---|---|---|---|---|---|
| Cost (points) |
Attack | Defense | ||||
| 1 |
★★ |
★ |
|
★★ |
|
★ |
| 2 |
★★ |
★ |
|
|
★★ |
★★ |
| 3 |
|
★ |
★★★ |
★ |
★★ |
★ |
| 4 |
★ |
★★ |
★ |
|
★★★ |
|
| Key: ★★★ - Extremely Useful ★★ - Frequently Useful ★ - Occasionally Useful No stars - Not Useful | ||||||
Consumables
Furutaka equips the following consumables:
- Slot 1: Damage Control Party

- Slot 2: Hydroacoustic Search

- Slot 3: Catapult Fighter

Camouflage
Furutaka does not have a purchasable permanent camouflage available to her. Instead, Type 1, 2, or 5 camouflage can be equipped for credits; Types 1 or 5 are recommended at a minimum to reduce detectability range.
Signals
Furutaka captains should mount the standard flags to improve the ship's performance in battle. To improve upon the ship's armaments, India X-Ray (![]() ), Victor Lima (
), Victor Lima (![]() ), and Juliet Whiskey Unaone (
), and Juliet Whiskey Unaone (![]() ) flags are recommended to increase the fire chance and flooding chances respectively. To improve the ship’s survivability, captains should mount November Foxtrot (
) flags are recommended to increase the fire chance and flooding chances respectively. To improve the ship’s survivability, captains should mount November Foxtrot (![]() ) and India Yankee (
) and India Yankee (![]() ) flags. Sierra Mike (
) flags. Sierra Mike (![]() ) flags are recommended to increase the ship’s already high top speed. Lastly, economic and special signal flags can be mounted to improve the ship’s economic gains per battle.
) flags are recommended to increase the ship’s already high top speed. Lastly, economic and special signal flags can be mounted to improve the ship’s economic gains per battle.
Recommended Signal Flags 
| |||||
|---|---|---|---|---|---|
| Combat | |||||
 ★ |

|
 ★★ |
 ★ |
 ★★★ |
 ★★ |
 ★ |
 ★ |
 ★★ |
 ★★★ |
 ★★ |

|

|

| ||||
Note: Use of the Juliet Charlie signal makes detonation impossible.