Gneisenau

| Research price80500 exp |
| Purchase price6,700,000 |
| Hit Points50,900 |
| 380 mm/52 SK C/34 on a Drh LC/34 mount3 х 2 pcs. |
| Rate of Fire2.31 shots/min. |
| Reload Time26 sec. |
| Rotation Speed5 deg./sec. |
| 180 Degree Turn Time36 sec. |
| Firing Range17.77 km. |
| Maximum Dispersion255 m. |
| HE Shell380 mm Spr.Gr. L/4.6 |
| Maximum HE Shell Damage4,400 |
| Chance of Fire on Target Caused by HE Shell34 % |
| Initial HE Shell Velocity820 m./s. |
| HE Shell Weight800 kg. |
| AP Shell380 mm P.Spr.Gr. L/4.4 |
| Maximum AP Shell Damage11,600 |
| Initial AP Shell Velocity820 m./s. |
| AP Shell Weight800 kg. |
| 105 mm/65 SK C/33 on a Dop. L. C/31 mount7 х 2 pcs. |
| Firing Range6.3 km. |
| Rate of Fire17.91 shots/min. |
| Reload Time3.35 sec. |
| HE Shell105 mm Spr.Gr. Kz. |
| Maximum HE Shell Damage1,200 |
| Initial HE Shell Velocity900 m./s. |
| Chance of Fire on Target Caused by HE Shell5 % |
| 150 mm/55 SK C/28 on a Dop. L. C/34 mount4 х 2 pcs. |
| Firing Range6.3 km. |
| Rate of Fire8 shots/min. |
| Reload Time7.5 sec. |
| HE Shell150 mm Spr.Gr. L/4.5 |
| Maximum HE Shell Damage1,700 |
| Initial HE Shell Velocity875 m./s. |
| Chance of Fire on Target Caused by HE Shell8 % |
| 150 mm/55 SK C/28 on an MPL/35 mount4 х 1 pcs. |
| Firing Range6.3 km. |
| Rate of Fire8 shots/min. |
| Reload Time7.5 sec. |
| HE Shell150 mm Spr.Gr. L/4.5 |
| Maximum HE Shell Damage1,700 |
| Initial HE Shell Velocity875 m./s. |
| Chance of Fire on Target Caused by HE Shell8 % |
| 533 mm Drilling2 х 3 pcs. |
| Rate of Fire0.88 shots/min. |
| Reload Time68 sec. |
| Rotation Speed25 deg./sec. |
| 180 Degree Turn Time7.2 sec. |
| TorpedoG7a T1 |
| Maximum Damage13,700 |
| Torpedo Speed64 knot |
| Torpedo Range6 km. |
| 105 mm/65 SK C/33 on a Dop. L. C/31 mount7 х 2 pcs. |
| . . . Average Damage per Second116.2 |
| . . . Firing Range4.5 km. |
| 20 mm/65 C/38 on a Flak 35 Vierling L/38 mount7 х 4 pcs. |
| . . . Average Damage per Second42 |
| . . . Firing Range2.01 km. |
| 20 mm/65 C/38 on a twin mount14 х 2 pcs. |
| . . . Average Damage per Second58.8 |
| . . . Firing Range2.01 km. |
| 37 mm/83 SK C/30 on a Dopp LC/30 mount8 х 2 pcs. |
| . . . Average Damage per Second20.8 |
| . . . Firing Range3.51 km. |
| Maximum Speed28.8 knot |
| Turning Circle Radius830 m. |
| Rudder Shift Time20.6 sec. |
| Surface Detectability Range15.19 km. |
| Air Detectability Range10.39 km. |

Gneisenau — German Tier VII battleship.
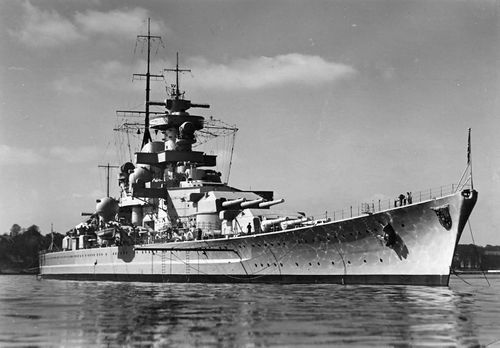
In 1933, Germany set out to design ships that would exceed the limits stipulated by the Versailles Treaty. To counter French ships with 330 mm guns, the design received reinforced armor and a third turret. The new battleship, Gneisenau, participated in Operations Weserübung and Berlin and in the breakthrough across the English Channel. In 1942, Gneisenau was hit by a bomb dropped by British bombers. The guns demounted from the battleship were repurposed for coastal defense needs in Norway. On March 27, 1945, Gneisenau was scuttled due to the Red Army offensive.
Modules
 |
Rate of Fire (shots/min) | 180° Turn Time (sec) | Maximum Dispersion (m) | Maximum HE Shell Damage (HP) | Chance of Fire on Target Caused by HE Shell (%) | Maximum AP Shell Damage (HP) |
Research price (exp) |
Purchase price ( | |
|---|---|---|---|---|---|---|---|---|---|
| 380 mm/52 SK C/34 on a Drh LC/34 mount | 2.3 | 36 | 255 | 4,400 | 34 | 11,600 | 0 | 520,000 |
 |
Hit Points (HP) | Armor (mm) | Armor (mm) | Main Turrets (pcs.) | Secondary Gun Turrets (pcs.) | AA Mounts (pcs.) | Torpedo Tubes (pcs.) | Hangar Capacity (pcs.) |
Research price (exp) |
Purchase price ( | |
|---|---|---|---|---|---|---|---|---|---|---|---|
| Gneisenau (A) | 50,900 | 16 | 360 | 3 | 7/4/4 | 14/7/8/7 | 2 | 0 | 620,000 | ||
| Gneisenau (B) | 58,200 | 16 | 360 | 3 | 11 | 12/6/11 | 2 | 24,000 | 1,350,000 |
 |
Rate of Fire (shots/min) | Torpedo Tubes Reload Time (sec) | 180° Turn Time (sec) | Maximum Damage (HP) | Torpedo Speed (knot) | Torpedo Range (km) |
Research price (exp) |
Purchase price ( | |
|---|---|---|---|---|---|---|---|---|---|
| G7a T1 | 0.9 | 68 | 7.2 | 13,700 | 64 | 6 | 0 | 260,000 |
 |
IDS_SHIP_PARAM_SUO_INCREASE_DIST (%) | Maximum Firing Range (km) |
Research price (exp) |
Purchase price ( | |
|---|---|---|---|---|---|
| FKS Typ 7 Mod. 1 | 0 | 0 | 360,000 | ||
| FKS Typ 7 Mod. 2 | 0 | 12,000 | 800,000 |
 |
Maximum Speed (knot) |
Research price (exp) |
Purchase price ( | |
|---|---|---|---|---|
| Propulsion: 125,000 hp | 28.8 | 0 | 300,000 | |
| Propulsion: 160,000 hp | 32 | 8,000 | 650,000 |
Compatible Upgrades
| Slot 1 |
|||||
|---|---|---|---|---|---|
| Slot 2 |
|||||
| Slot 3 |
|||||
| Slot 4 |
Player Opinion
Performance
Hailing as the first post-World War I battleship design in the German battleship line at Tier VII, Gneisenau dramatically shifts from the bulky, slow-to-react dreadnoughts that are more dangerous when they get close into a post-dreadnought battleship which can do many of the same things (to a certain degree) while remaining one of the most versatile battleships at her tier.
Playing Gneisenau is decidedly different from playing her American and Japanese counterparts at Tier VII (Colorado and Nagato, respectively). While Gneisenau may appear slender and lightly armored, don't be fooled: she is deceptively durable in the hands of a captain who knows how to handle her. Her 15-inch guns give her the capability of fighting on the same level as her peers, though she does have two fewer barrels. From a handling perspective, she's the fastest battleship out of the German line, and has no trouble keeping up with cruisers as needed.
Her speed is arguably Gneisenau’s greatest asset. It allows her to close the gap with enemy battleships and force them into close range where her main battery, secondary guns, and torpedoes can deliver the killing blow. While most battleships tend to join a battle line, Gneisenau can instead join up with fast cruisers and blitz the enemy by appearing quickly from an unexpected location. She is capable of operating solo, but extra caution is needed when doing so; her main battery dispersion is frequently frustrating, making long-range combat decidedly not her strong suit. Gneisenau is most comfortable at medium-to-close range — even point-blank range — where she can make every shell and torpedo count.
Gneisenau is unique in the game as the only regular tech tree battleship to have torpedoes available; the only other battleships with torpedo tubes are her premium sister Scharnhorst and the premium version of her successor, Tirpitz. Her rakish looks hide a brutal array of secondary batteries that unload at an impressive rate of fire, and are more than capable of shredding destroyers of equal and lower tiers (higher tier destroyers are likely to have concealment values that make closing with them suicidal).
Gneisenau — like Scharnhorst — is a ship that is equally at ease diving into a melee or holding back from one. Learning when to dive in and put her secondaries and torpedoes to work (and when not to) is half the fun of learning how to play her well.
LittleWhiteMouse in the Gneisenau from the NA forums. Tested in patch 0.5.9Pros:
- Highly versatile battleship; her armament allows her to play as a typical battleship, while her speed lets her behave as a battlecruiser at need.
- Excellent 15-inch guns, same as those on Bismarck and Tirpitz.
- First-rate speed for a battleship (32 knots); the fastest battleship in the German battleship tree. With a Sierra Mike flag, she is as fast as Iowa.
- Solid secondary battery guns, comparable to Japanese counterpart Nagato.
- Good range at her tier.
- Has one triple-tube torpedo launcher on each side.
- Outstanding armor belt combined with German turtleback armor scheme makes her deceptively durable.
- Reasonable concealment rating; with a captain that has Concealment Expert, her surface detection range goes down to an astounding 13.1km (comparable to the equal tier Japanese cruiser Myoko).
- Good anti-aircraft suite; when fully built for anti-air duties, she is deadly to enemy planes.
- Very nasty AP potential especially against cruisers and BB broadsides plus decks.
- High velocity on her rounds. They will make it down range at a decent speed.
Cons:
- Short torpedo range of 6km.
- 15-inch guns have trouble with angled enemy battleships (use HE against the superstructure or choose a different target).
- Easily set on fire.
- She is nearly impossible to citadel, but will take a lot of full penetration damage.
- AB-X layout of dual mount turrets may feel lacking.
- Dispersion can be infuriating.
- Deck armor can potentially be penetrated by bigger guns.
- Rather bad turning radius.
Research
Optimal Configuration
Gneisenau doesn't mind brawling at close range; her commander skills and upgrades can be tailored to such tactics, or focused more on anti-aircraft defense to increase her survivability.
Upgrades
Anti-Aircraft Build: One possible build is to maximize Gneisenau’s AA suite; it is similar to the Secondary Battery Build below, but uses AA Guns Modification 2 in Upgrade Slot 2.
Secondary Battery Build: Another possible build for Gneisenau will maximize her secondary battery by equipping Secondary Battery Mod 2, along with the usual suspects for battleships: Main Armaments Mod 1 and Damage Control Mod 1. Upgrade Slot 5 offers an interesting choice between Steering Gears Mod 2 and Damage Control Mod 2 that is left to individual captains.
Even if choosing to focus on her secondary battery, Auxiliary Armaments Mod 1 is not recommended; improving the survivability of Gneisenau’s main battery with Main Armaments Mod 1 is still a better choice.
Commander Skills
Secondary Battery Build: Basics of Survivability at Tier 1, Expert Marskman at Tier 2, Superintendent at Tier 3, Advanced Firing Training at Tier 4. These skills increase Gneisenau’s survivability while buffing her secondary battery range.
Anti-Aircraft Build: Basic Firing Training at Tier 1, Expert Marksman at Tier 2, Superintendent at Tier 3, Manual Fire Control for AA Armament at Tier 4. Additional points should be put into Advanced Firing Training when available. Gneisenau is a deathtrap for enemy planes in this configuration, with an AA bubble that can extend out as far as 7.5km (with AA Gun Modification 2 in Upgrade Slot 2) and dispensing a punishing amount of damage from her 128mm dual-purpose guns.
| Recommended Commander Skills | ||||||||
|---|---|---|---|---|---|---|---|---|
| Cost (points) |
Endurance | Attack | Support | Versatility | ||||
| 1 |
★★ |
★★ |
★ |
|
|
|
★ |
|
| 2 |
★ |
★★ |
★★★ |
★ |
|
|
★ |
|
| 3 |
★★ |
★ |
★ |
|
★★ |
★★★ |
★ |
★★ |
| 4 |
★★★ |
★★ |
★ |
|
★★★ |
|
★ |
★★ |
| Key: ★★★ - Extremely Useful ★★ - Frequently Useful ★ - Occasionally Useful No stars - Meh Χ - Not recommended | ||||||||
Consumables
Both Damage Control Party II and Repair Party II are recommended for the quicker cooldowns, especially for captains who have opted for the Secondary Battery Build.
Camouflage
Type 1, 2, or 5 camouflage can be equipped for credits; Types 2 or 5 are recommended at a minimum to reduce the accuracy of incoming shells.
Players who wish to spend doubloons can equip Gneisenau with Type 17 camouflage that lowers her detection radius, reduces the accuracy of incoming shells, reduces her repair costs, and increases the amount of experience she earns.
Signals
Players who have followed the Secondary Battery Build above will want to equip Mike Yankee Soxisix and India Delta signals in order to further boost the effectiveness of their secondaries and Repair Party consumable, respectively.
Players following the Anti-Aircraft Build may wish to equip November Echo Setteseven for the bonus to AA gun damage.
Recommended Signal Flags 
| |||||
|---|---|---|---|---|---|
| Combat | |||||
 ★ |
 ★★ |
 ★★★ |

|

|

|
 ★ |
 ★★ |
 ★★ |
 ★ |
 ★★ |
 ★★★ |

|

| ||||
Note: Use of the Juliet Charlie signal makes detonation impossible.
Historical Info
Historical Gallery


