Gunnery & Armor Penetration
Contents
Armor and Compartmentalization
Armor
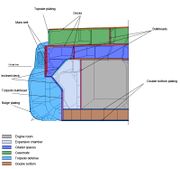
Armor in World of Warships is not just a uniform barrier to be pierced (like in WoT), but rather a kind of multi-layered “cake” that covers a number of construction elements and mechanisms, each having specific armoring. A projectile that enters the ship can encounter up to four or five layers of armor and may be stopped or ricochet at each layer. In this regard the developers attempted to adhere to historical realism and simulate all significant layers of armor. The armor tends to be very heavy: on a typical battleship it takes up around 40% of the total displacement of the vessel. Therefore, battleship designers tried to save some of that weight by placing heavy armor only around the vital parts of the ship: the ammunition and propellant magazines, the propulsion plant, the fire-control, command and communications sections. Most of the other compartments are almost completely unarmored. This approach of providing either total or negligible protection is referred to as "all or nothing". In effect, the scheme accepts vulnerability to medium-caliber and high-explosive shells striking the unarmored sections of the hull, in order to improve resistance against the heaviest armor-piercing shells, while at the same time being able to carry a powerful armament and retain useful speed and endurance.
The ship's vital parts are protected by a citadel, which can be visualized as an open-bottomed (closed top) rectangular armored raft with sloped sides sitting within the hull of the ship. Although it was desirable for the citadel to be as small as possible, the space enclosed was an important source of reserve buoyancy, and helped prevent the ship from foundering when other compartments had flooded. In game, taking the citadel's HP to zero would effectively destroy the ship, even if none of the other compartments were affected.
From the citadel box box, shafts known as barbettes lead upwards to the ship's main gun turrets and conning tower. The ship's magazines are located in or around the turret barbettes, and contain the main caliber shells, as well as the gunpowder charges. Penetrating the citadel armor around the magazine often results in a spectacular one-shot kill.
How can a player know where these important compartments are when he or she fires into the side of an unfamiliar ship? Short of looking up ship's blueprint, an educated guess will have to suffice. The citadel is normally located in the middle of the ship, and is roughly half the ship's length. As a rule-of-thumb, when you have a clear shot at the side of the ship, aim in the middle of the ship (just below the smokestacks), and close to the waterline. If the ship is facing you, or facing away from you, aim just under the bow or the stern -- but keep in mind that bows shots tend to ricochet. The magazines are normally located just under the main caliber turrets.
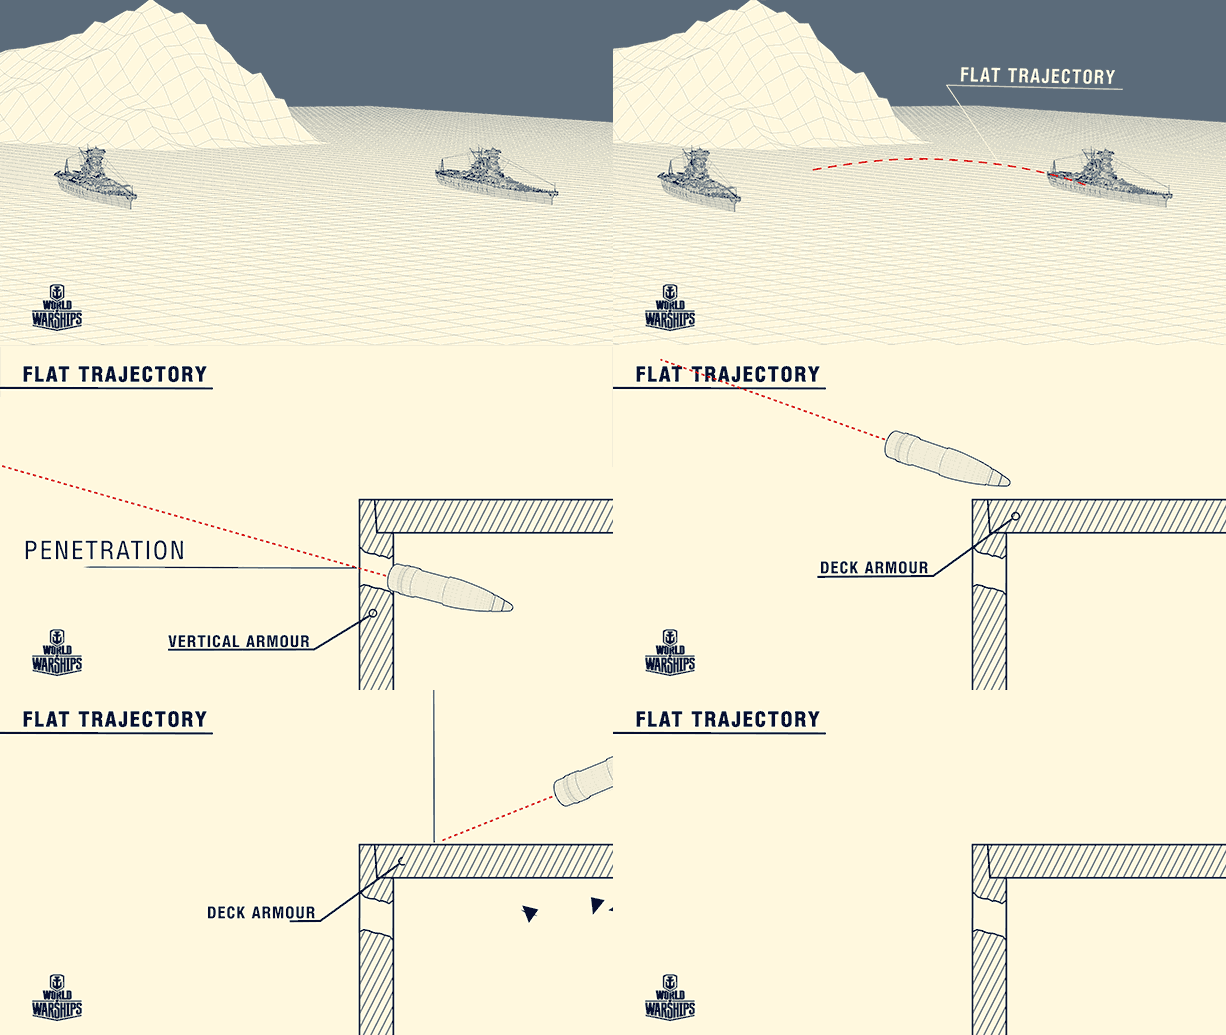
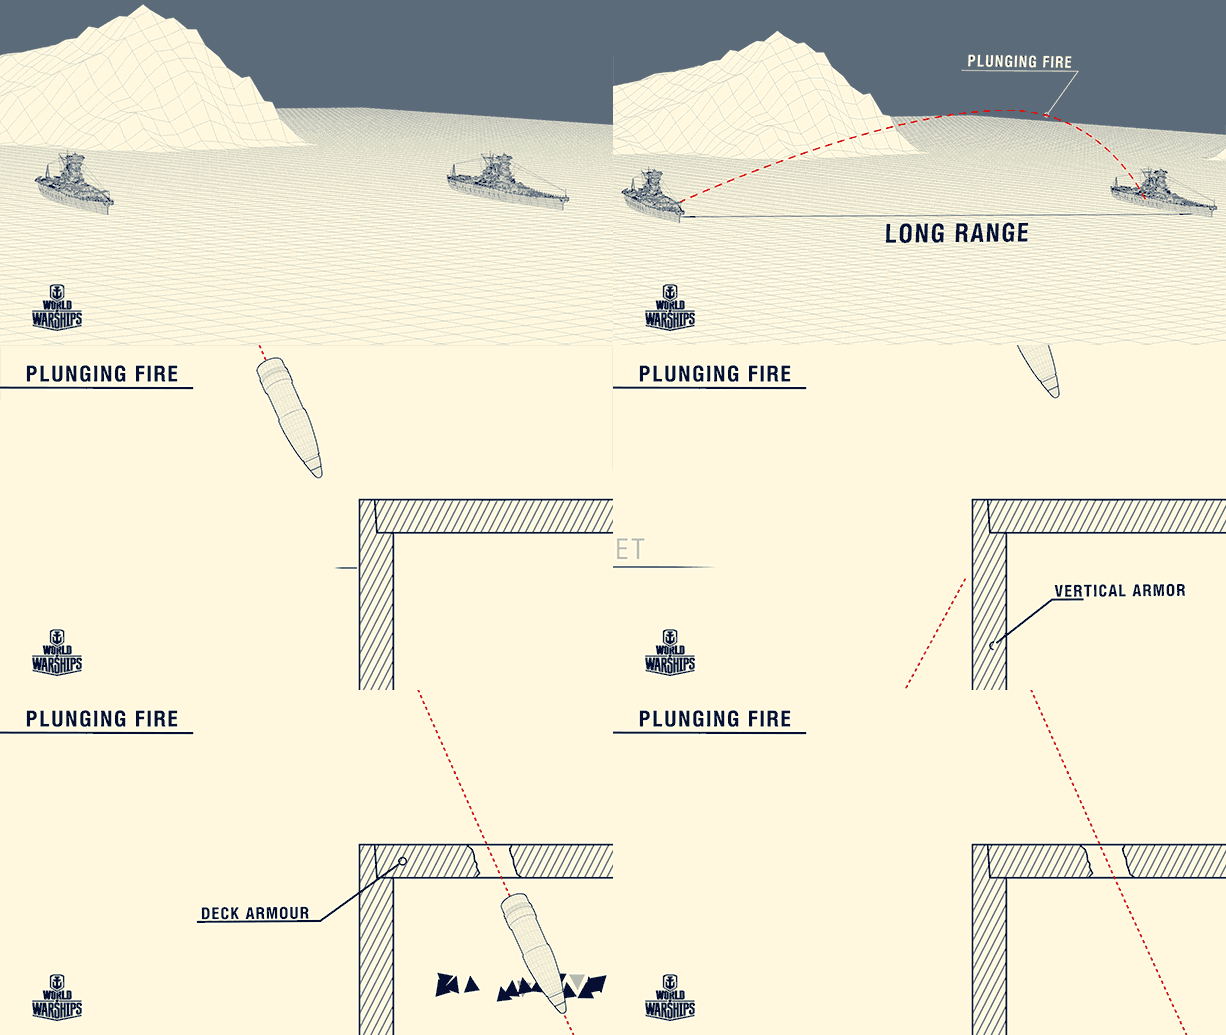
In addition to belt armor, which protects battleships from direct fire, they also have deck armor that protects them from plunging fire -- shells at extreme engagement ranges tend to hit the top of the ship. However, due to to a large area that would have to be protected, battleships' deck armor is much thinner than the belt armor. As such, shells fired to strike the deck may be able to defeat the armor while those same shells may be incapable of penetrating the side armor of the target vessel.
Compartmentalization
A ship has to be both a military base and a combat vehicle, since it is designed for long autonomous operations. Therefore a significant portion of the ship's interior space is needed for the every-day activities, but has no direct effect on ship's fighting capacity in the critical moments of the battle. A shell that destroyed the ship's laundry room or the galley in an artillery duel would have much less of an effect on combat capability than a shell that hit the magazine or the engine compartment.
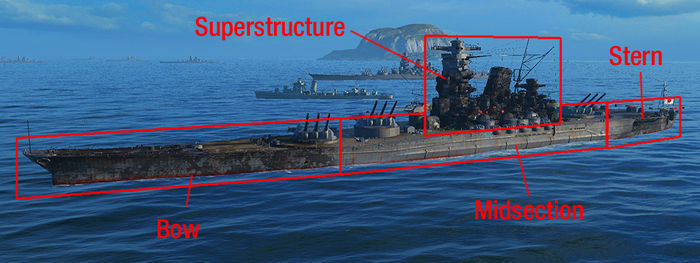
That is why, unlike the vehicles of World of Tanks, ships in World of Warships are divided into multiple compartments, each with a different value of hit points (HP). Roughly, the compartments are as follows: bow, stern, citadel, casemate (center part minus the citadel), and the superstructure. The total value of HP for all the compartments is roughly twice the ship's total hit point value ( fighting efficiency): in real life, the ship would be out of battle long before every last portion of it is destroyed.
Each section (except the citadel) has two thresholds, where after each one is reached the damage it receives is reduced. The threshold levels for each section of each ship varies.
- In the initial state, the ship will receive damage normally (x0.33 for shell penetration). The section starts off clean and gets darker as it takes more damage.
- After the first threshold is reached, the damage received is halved (x0.165 dmg for shell penetration). At this stage, the section of the ship is visually blackened.
- Finally, once the second threshold is reached the section stops receiving damage. There is no visual difference to the first threshold, you'll only notice that your shells stop doing damage to the section.
- Regardless of the state of the section, over-penetration will always deal x0.1 dmg and citadel hits will always deal x1.0 damage, even after the section's HP pool is completely depleted.
- If the midsection's second threshold has been reached, all other sections will take damage as if it had passed the first threshold even if it hasn't taken any damage yet. Damage from fire, flooding, over-penetration and citadel hits will not reduce any section's HP pool (but they will still reduce the ship's total HP as normal). A section with no HP left may still burn or flood normally and continue dealing damage to the ship.
Modules
There are multiple modules in-game: engine, propeller, anti-air emplacements, torpedo tubes, main caliber turrets, etc. The modules have three states: functioning, damaged, and destroyed. A damaged module loses function until it is repaired, a destroyed module cannot regain function. Some modules can only be damaged but not destroyed (e.g. propeller), other modules can only be destroyed but not damaged (e.g. AA emplacements).
Each module has a certain amount of HP. Every time that module is damaged, the game calculates a probability of it being damaged (that probability can be lowered by 34% with a tier 5 commander skill). The probability of a critical hit that leads to damage increases for lower module HP values. Once the module reaches zero HP, it is destroyed.
Shell Types
World of Warships currently has two types of shells:
- High-explosive (HE)
- Armor-piercing (AP)
The ballistic models for AP and HE shells are identical. Shell's in-game tracer may not coincide with the actual trajectory, in order to better visualize the shooting process.
High-Explosive
These shells have an instant fuze, and burst immediately upon hitting a target. As a rule-of-thumb, HE shells do about 1/3 of the max damage that is displayed in-port. Although they have a certain armor penetration capability, equal to about 1/6 of shell's diameter as of patch 0.4, one shouldn't try to penetrate heavy armor with these shells (naturally, hitting citadels of certain lightly armored cruisers and carriers with HE is fair game). Instead, HE shells are best used for knocking out modules, such as anti-aircraft emplacements, and starting fires. A ship can be set on fire on each section, for a maximum of 4 simultaneous fires. A single fire causes the ship to lose 0.3% of fighting capability per second for battleships, cruisers and destroyers, and 0.4% of fighting capability per second for carriers.
Chance to set fire for a single HE shell hitting a section is calculated by the following formula:
[Ship's base anti-fire coefficient] x (1 - [Damage Control Mod 1] - [Fire Prevention]) x ([Shell's base chance to set fire] + [Demolition Expert])
- Ship's base anti-fire coefficient is equal to roughly 1 at tier 2-3, and roughly 0.5 at tier ten. The exact values haven't been disclosed by WG; the only value currently known is for Fuso -- 0.76 stock, 0.7 fully upgraded.
- Damage Control Mod 1 is 0.05 if the appropriate equipment is installed, and zero otherwise.
- Fire Prevention is 0.07 if the appropriate skill has been acquired, and zero otherwise.
- Shell's base chance to set fire is displayed by the HE shell toolpic in-port
- Demolition Expert is 0.03 if the appropriate skill has been acquired, and zero otherwise.
If one does the math, it's obvious that the Demolition Expert skill is very useful, especially for USN destroyers, in which it increases the fire chance per shell by 60-75% for mid-tier and high tier ships. Fire Prevention skill, on the other hand, is somewhat lackluster, since it lowers the fire chance per shell by 6-9% at best.
Armor-Piercing
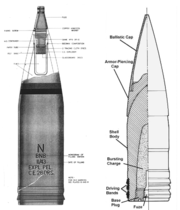
Unlike HE, the AP shell does damage only if it penetrates the armor. The fuze of the AP shell is initiated after it passes through armor, and historically the fuze times were calculated in a way that would allow the shell to explode after traveling about ten or so meters after passing through the armor; that way the shell exploded around the middle of the battleship. That means that when AP shells are fired at lightly armored and relatively small target, they might over-penetrate -- explode once they passed through the entire ship, or not even explode, if the shell doesn't encounter enough armor to activate the fuze. Let's illustrate the fuzing concept with the Iowa's AP Mark 8 16 inch projectile. Its Mark 21 Base Detonating Fuze (BDF) had a delay of 0.033 seconds. Fuze activation requires a resistance equal to 1.5 inches (3.8 cm) of armor at 0 degrees obliquity or 0.375 inches (1 cm) at 65 degrees obliquity. The muzzle velocity for a new gun and a full charge is 762 meters per second. Therefore, if the shell were to immediately hit an armor plate 1.5 inches thick after exiting the barrel, it would explode 762*0.033 = 25 meters after passing through that armor plate. Most AP shells in game have a fuzing time of 0.033 seconds, but there are shells with as much as 0.1 second fuzing time. As of patch 0.3.1, the armor thickness necessary for AP shell fuzing was as follows (caliber - armor): 410mm - 68mm, 356mm - 59mm, 203mm - 34mm, 155mm - 26mm.
Non-penetrations (bounce/ricochet) will always deal 0 damage, regardless of AP or HE (however, HE shells still has a chance to start fires or break modules with its splash damage). Penetrations deal x0.33 of the shell's listed damage. Whether AP or HE, it must penetrate the armor and detonate inside the ship. Over-penetrations deal x0.10 of the shell's listed damage. Over-penetration is when a shell penetrates the ship through-and-through, before it has a chance to detonate inside the ship. Theoretically HE will never over-penetrate due to its low detonator threshold and shorter fuze. Citadel hits will always deal x1.0 of the shell's listed damage. This is only achieved if the shell penetrates the armor and the citadel. It is impossible to get a citadel hit on a destroyer, as they no longer have them per se (it was removed in 0.2.4/0.3.0). Prior to 0.4.1, penetrations on a destroyer's midsection will deal x0.5 of the shell's listed damage (in lieu of the absence of citadels), however this is no longer the case and penetrations to it will deal the standard x0.33 of the shell's listed damage.
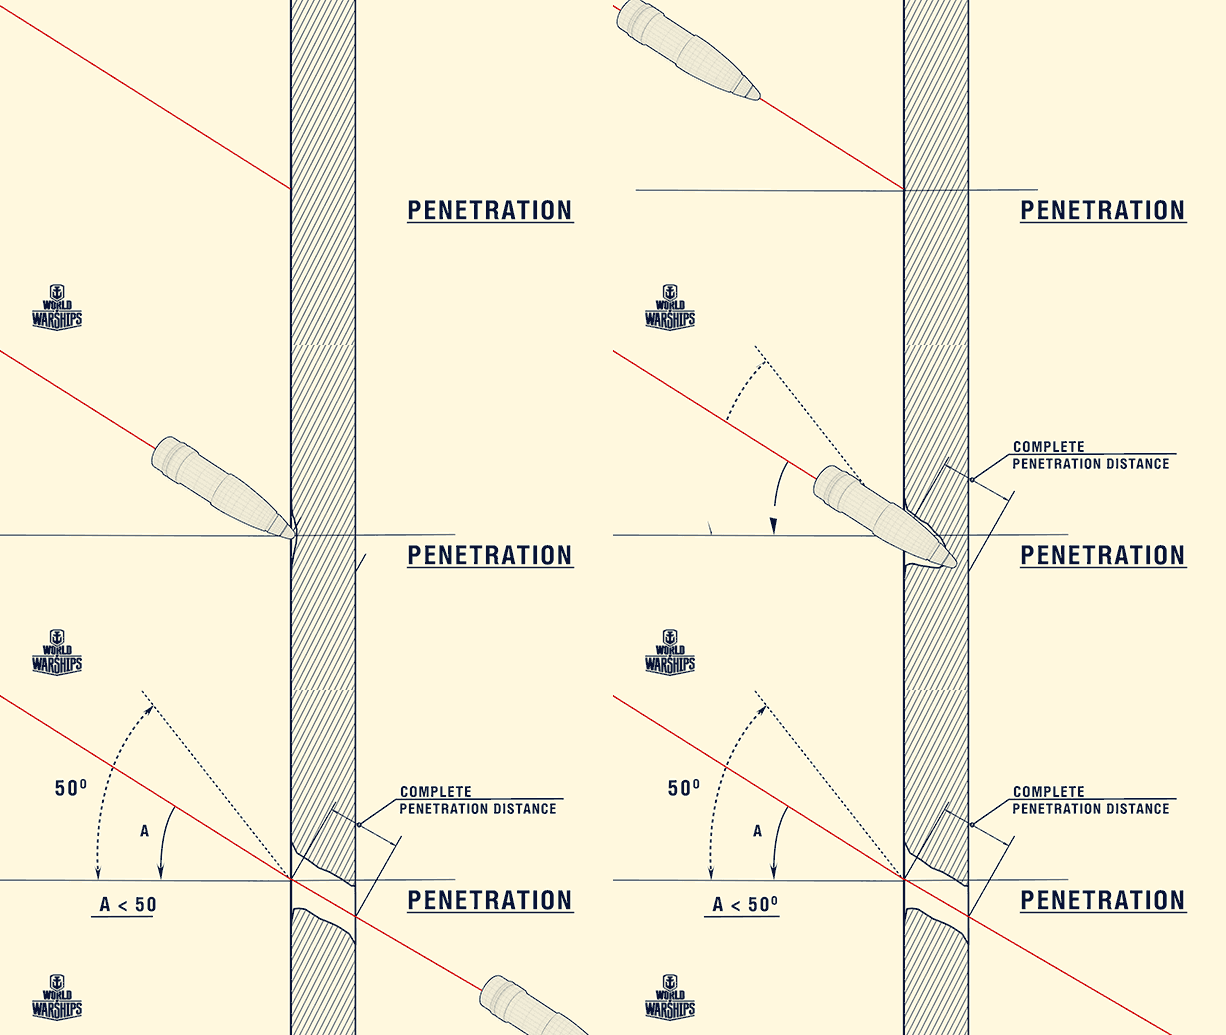
Properly angling the ship matters a great deal when the enemy is shooting AP shells: when an AP shell encounters armor at an angle, it has to pass a greater amount of armor for penetration. Additionally, at certain critical angle (below ~20-40°), the shell will simply ricochet, even if it might have ad enough armor penetration. A shell may still cause damage after the ricochet, but only to the same ship. If the armor thickness is less than 1/20 of shell's caliber, a ricochet does not occur regardless of armor encounter angle.
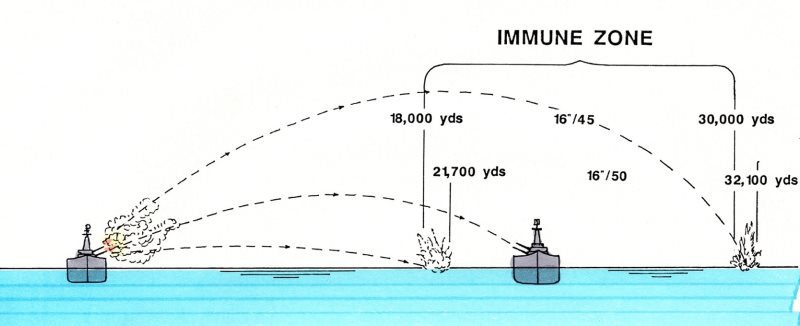
There are certain engagement ranges when AP shells will encounter both the belt and the deck armor at fairly large angles, and will have a high probability of either non-penetration or ricochets. The distance at which both plunging fire and direct enemy fire is less effective is called the immunity zone (IZ). Despite the absolutist nature of its name, the immunity zone concept does not imply any sort of invulnerability. A ship fighting within its IZ will still probably suffer when hit, but it is theoretically proof against singularly catastrophic hits to the citadel.
AP shells can penetrate ship's armor even below the waterline, after traveling through water. The illustration to the right depicts a typical underwater trajectory of an AP shell: (1) - shell enters the water and is fuzed due to rapid deceleration (2) - trajectory angle changed (this happens every time an AP shell hits water) (3) - after a short delay, the fuze explodes the shell. The image also demonstrates two outcomes of an underwater hit: armor penetration, and a ricochet. As of 0.4.1 the underwater hits do not cause flooding.
Secondary Guns
As a general rule, the secondary guns with caliber below 140mm have HE ammo, while secondaries with caliber above 140mm have AP shells. Secondaries fire only when an entire enemy ship is visible; if the enemy is partially obscured by an island the secondaries will not fire.
Choosing Between AP and HE Shells
Some general guidelines for each of the three ship classes:
Battleships
Shooting other battleships with AP is most effective with direct fire at point-black and medium ranges, roughly up to ~10-12 kilometers. The enemy battleship shouldn't be at too great of an angle; ideally, it should be perpendicular to your line of fire. You might also get some citadel hits with plunging fire at maximum fire ranges. If you aren't positive that you have a good chance of penetrating the citadel, HE shells are a better choice.
AP shells should be used against well-armored cruisers and carriers as well, when you are certain that a volley at the waterline will penetrate the citadel. Since their armor thickness will be nowhere near that of a battleship, angling will affect your AP shells to a lesser degree. It might be a good idea to light a carrier on fire first, though, to prevent it from launching aircraft
Against lightly-armored cruisers and carriers, you should be using HE shells -- they have enough armor penetration to damage citadels. However, some carriers have enough armor to resist HE, and AP should be shot at them. You should also use HE against destroyers -- AP shells would almost always over-penetrate; and besides HE shells will knock out multiple modules on a DD, making it easy prey after a few hits.
One last thing: it's better to use the shell of the wrong type (e.g. AP against a destroyer that suddenly materialized near your ship), then to start a long half-minute reload. Sub-optimal damage is better than no damage at all.
Cruisers
Against battleships your best bet is HE shells. Consistent HE hits and nonstop fires are a bane of many battleship drivers' existence. However, don't try to fight a battleship single-handily; a skilled BB driver can dispatch you in a few well-aimed AP salvos. At point-blank ranges and favorable angles you can also try to penetrate the battleship's citadel with AP shells, though it's generally not a good idea to be that close to a battleship in the first place.
Against other cruisers and carriers use AP shells at close and medium ranges, when you can reliably hit the citadel: a well-aimed salvo remove as much as half of the other cruiser's HP. If the cruiser is far away, or is angling too much, use HE; HE should also be used against the destroyers in practically all situations.
Destroyers
Your main weapon is a torpedo, especially if you're driving an IJN DD. However, HE shells can still be very useful when fighting other destroyers, or providing additional fire against enemy capital ships -- in the latter case, your shells won't be doing much damage, but you can make up for that with the sheer number of shells, and fires. AP shells can sometimes be used against lightly armored enemy cruisers, since you have just enough armor penetration to defeat their citadel armor.
Shell Dispersion
However perfectly a naval gun on a stationary ship may be laying, successive rounds will not impact on a single point but will fall in a pattern scattered both in deflection and in range. This phenomenon is called dispersion and, irrespective of human and constant error, it is caused by multiple inherent factors: minor variations in the weight of the projectile, differences in the rate of ignition of the propellant, variations in the temperature of the bore from round to round, physical limitations of precision in setting values of deflection and quadrant elevation on the respective scales, minor variations in wind, air density or air pressure, and so on.
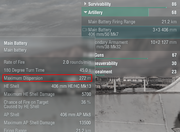
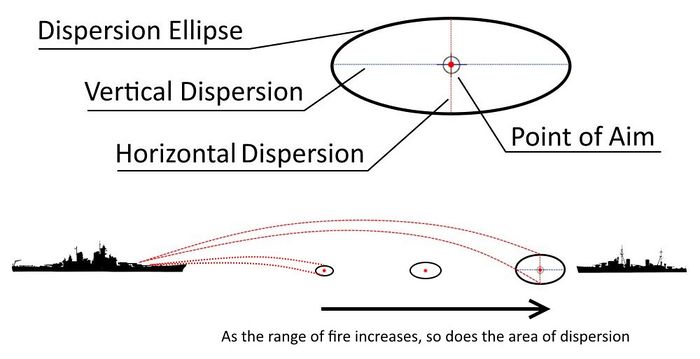
Observing the position of the surface bursts around our point of aim, we find that they fall into a roughly elliptical area in relation to the line of fire. An ellipse constructed around the dispersion area is called the dispersion ellipse. Every time a player orders his main caliber guns to fire, the game engine constructs a 2-D ellipse around the point of aim, and does so independently for each salvo fired. A double-click will fire all guns in one salvo with one dispersion ellipse, sequential fire will construct dispersion ellipse for each turret salvo separately. This ellipse has a certain length and width values, which are dependent on the characteristics of the gun. The dispersion value displayed in port is the horizontal length of the dispersion ellipse at the maximum fire range, i.e. a value that describes the lateral distribution of the shells relative to the player's ship.
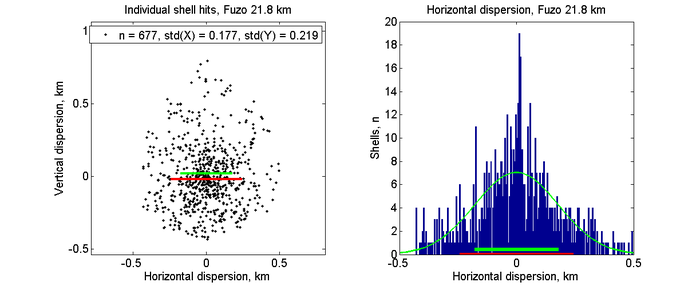
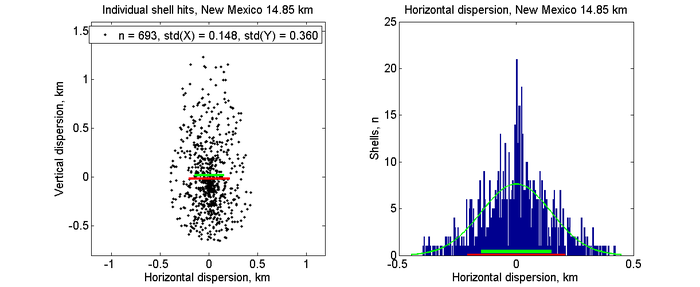
Shell impacts within the dispersion ellipse are not uniformly distributed over the surface, but lie more thickly towards the center of aim. The intensity with which the shells fall in different points of the area of dispersion, can be described by a Gaussian (normal) distribution. The exact relationship between the horizontal length of the dispersion ellipse at the maximum fire range and the value displayed in port is not immediately clear. However, based on experiments conducted by the players, it would seem that the port dispersion value (red bar in the graph below) is the standard deviation (green bar) of shell hits across the horizontal axis of the dispersion ellipse:
That would imply, that for horizontal dispersion at max range around 68% of all shots fired by the players will land within the window that is centered on the point of aim, and with the width of two times the port dispersion value (i.e. μ ± σ). If the shooting distance is below the maximum range, the horizontal dispersion value decreases accordingly. Horizontal dispersion values at distances other than maximum firing range, as well as the vertical dispersion values have not been made public by WarGaming.
Dispersion values are same for HE and AP shells of the same gun. The player's gun dispersion value can be modified by player's equipment and by enemy's camouflage. Gun Fire Control System Modification 2 decreases the area of the shell dispersion ellipse by 7%. Additionally, WarGaming has indicated that not acquiring the target with the X button increases dispersion by an unspecified amount.
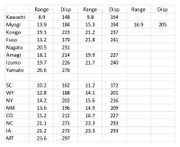
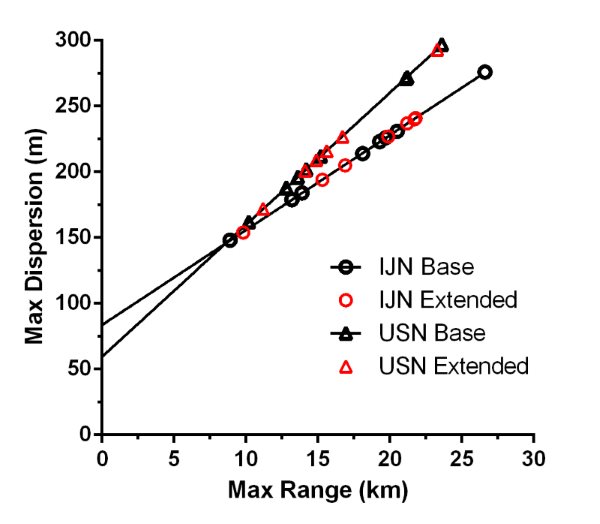
If all base and maximum dispersion values for battleships are plotted, two distinct linear trends emerge: one for IJN, and another for the USN tree:
Curiously, one could hypothesize that battleship dispersion at ranges below maximum also follows this linear pattern. For example, even though WG does not disclose Iowa's dispersion at 10 kilometers, by looking at this graph we can estimate it to be around 150 meters, etc. If that is correct, then all IJN battleships have superior accuracy to their USN brethren at ranges above ~10 kilometers, and vice versa.
For patch 0.4.1, WG has decreased the close-range (i.e. below 4km) dispersion values for all ships.
