Gunnery and Aiming
| Revision as of 23:42, 28 January 2023 | Revision as of 23:48, 28 January 2023 | |||
| Line 157: | Line 157: | |||
| ? | Sigma parameters are mostly uniform for destroyers and cruisers but vary drastically for the battleships. The following tables are as of 0.8.6 | + | Sigma parameters are mostly uniform for destroyers and cruisers but vary drastically for the battleships. The following tables are as of 0.8.6. The cruiser table will only give the default sigma values and then list the exceptions. If a ship is not an exception, it will have the default sigma value (e.g. Mogami is not an exception, and will thus have a 2.0 sigma as a Tier VIII cruiser). | |
| ? | Destroyers | + | Destroyers and submarines of all tiers and nations have a sigma of 2.0. | |
| {|class = "wikitable" | {|class = "wikitable" | |||
Revision as of 23:48, 28 January 2023
Aiming in World of Warships is an essential part of gameplay. As one will notice during their first matches there are numerous things that need to be considered, as shells require time to travel from the gun barrel to their point of impact and that often the shell will not land where one aimed.
Contents
Leading a target
As most targets will be moving when being fired at and due to the time required for the shell to travel, the player has to aim at a point in which ideally both the target and the shell will arrive at the same time to score a hit. This required knowledge on two pieces of information: How long does the shell travel and how fast is the target going?
Shell travel time
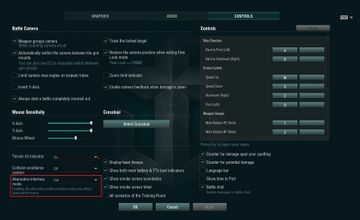
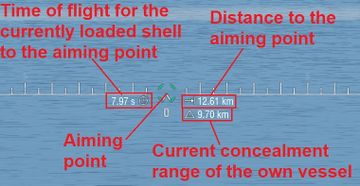
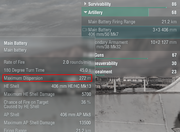
The time required for a shell to travel can be seen beneath the crosshair. When clicking the Alt-key three values will appear beneath the horizontal line of the scope. The value to the left will describe the flight needed by the currently loaded shell after being fired before it impacts at the aiming point. As those values only appear when clicking the Alt-key it is recommended to activate the Full Alternative Battle Interface in the settings as visualized, which will result in the additional information being displayed at all times. Note that shells fired from different guns will require different flight times, and that in some cases the shell flight time is affected by the currently loaded ammunition on a ship (for example the AP shell of Baltimore flies slower than its HE shell).
Target speed
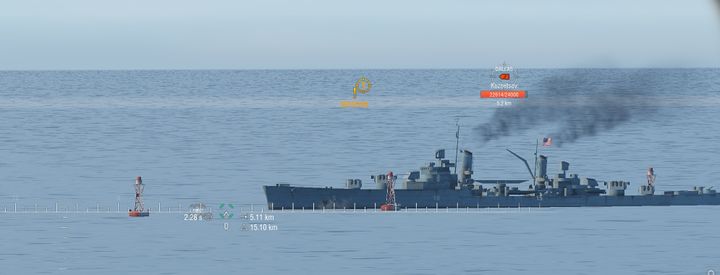
Determining the speed and direction of the target requires the observation of the target. The easiest way is to watch the smokestacks and the way the smoke is leaving the ship. Beneath is an example picture of a Dallas moving in front of the crosshair. As is visible, the smoke from the smokestacks is curved towards the rear of the ship, or from the observer's perspective to the right. From that it can be concluded that the Dallas is moving forward, or from our viewpoint to the left. In order to hit the Dallas the crosshair must be placed in front of the target.
Important to note is that the own speed during firing has no impact on the accuracy or flight of the shells. No matter if the player is currently sitting perfectly still or maneuvering drastically, the aiming procedure does not change.
Crosshair
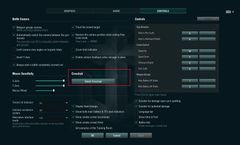
As preferences regarding the crosshair and the dependence on it vary depending on each player, there is a set of crosshairs that a player can choose from at any time. Those can be found in the Settings under Controls, and will open a seperate menu demonstrating each crosshair giving the player a chance to evaluate each one before picking. The types of crosshairs available vary depending on how they are laid out, how they scale and in some cases how many lines they provide for aiming.
Accuracy
However perfectly a naval gun on a stationary ship may be laying, successive rounds will not impact on a single point but will fall in a pattern scattered both in deflection and in range. This phenomenon is called dispersion and, irrespective of human and constant error, it is caused by multiple inherent factors: minor variations in the weight of the projectile, differences in the rate of ignition of the propellant, variations in the temperature of the bore from round to round, physical limitations of precision in setting values of deflection and quadrant elevation on the respective scales, minor variations in wind, air density or air pressure, and so on.
Shell dispersion
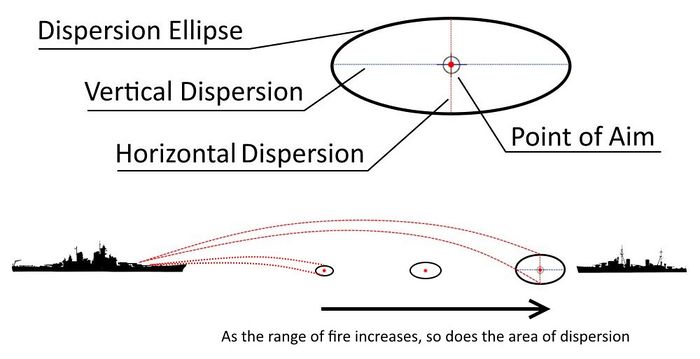
Observing the position of the surface bursts around our point of aim, we find that they fall into a roughly elliptical area in relation to the line of fire. An ellipse constructed around the dispersion area is called the dispersion ellipse. Every time a player orders his main caliber guns to fire, the game engine constructs a 2-D ellipse around the point of aim, and does so independently for each salvo fired. A double-click will fire all guns in one salvo with one dispersion ellipse, sequential fire will construct dispersion ellipse for each turret salvo separately. This ellipse has a certain length and width values, which are dependent on the characteristics of the gun. The dispersion value displayed in port is the horizontal length of the dispersion ellipse at the maximum fire range, i.e. a value that describes the lateral distribution of the shells relative to the player's ship.
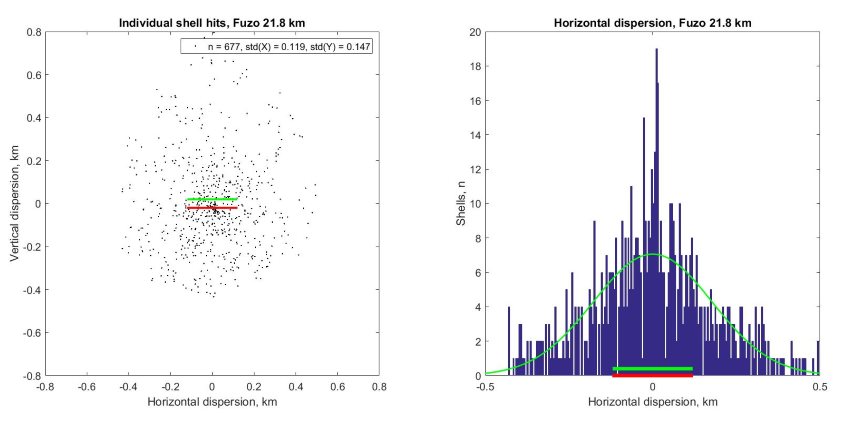
Shell impacts within the dispersion ellipse are not uniformly distributed over the surface, but lie more thickly towards the center of aim. The intensity with which the shells fall in different points of the area of dispersion, can be described by a Gaussian (normal) distribution. The in-port value describes dispersion in terms of one probable error, i.e. it gives a value where 50% of the fired shells will land around the point of aim. This has been confirmed by experiments conducted by the players. Port dispersion value (red bar in the graph below) is the standard deviation (green bar) of shell hits across the horizontal axis of the dispersion ellipse:
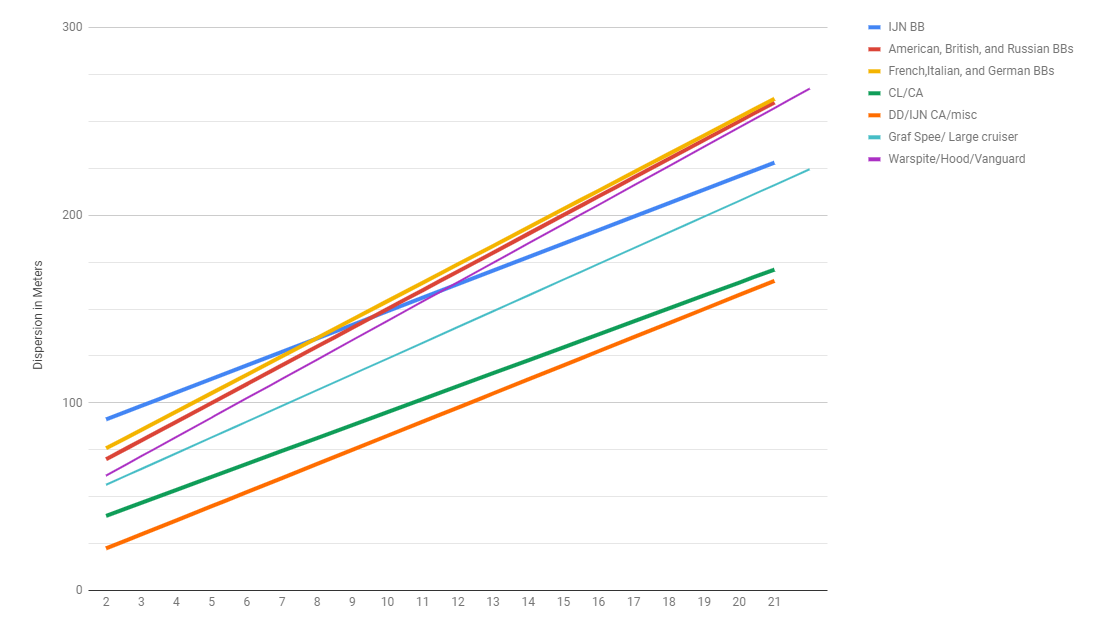
If the shooting distance is below the maximum range, the horizontal dispersion value decreases accordingly. Horizontal dispersion values at distances other than maximum firing range, as well as the vertical dispersion values have not been made public by WarGaming (though they can be seen on third party tools such as WoWs ShipBuilder). However, based on the user collected data we know lines of tech tree ships are tied to specific formulas to determine horizontal dispersion. The graph below shows the dispersion curves for each ship in the game, followed by its table and the formulas used.
| Range in Km | Japanese(IJN) Battleships(BB) | American, British and German BBs | French and Italian BBs | Russian BBs[1] | Heavy/Light Cruisers (CA/CL) | Destroyers, IJN CA, Pan-Am CLs, misc. | Graf Spee, non-IJN Large Cruisers[2] | Queen Elizabeth, Warspite, Hood, Vanguard, Ohio | Mikasa | AL Azuma, Azuma, Yoshino (B), Tallinn[3], Riga[3], Petropavlovsk[3] |
German Spähkreuzers[4] and Submarines | Napoli (B)[5] and Mikoyan[5] | Slava[6] | Shikishima |
|---|---|---|---|---|---|---|---|---|---|---|---|---|---|---|
| 1 | 24 | 22 | 23 | 19 | 15 | 11 | 20 | 21 | 31 | 13 | 7 | 17 | 26 | 23 |
| 2 | 48 | 44 | 46 | 37 | 30 | 23 | 41 | 41 | 61 | 27 | 15 | 34 | 52 | 46 |
| 3 | 72 | 66 | 69 | 56 | 45 | 34 | 61 | 62 | 92 | 40 | 22 | 51 | 78 | 69 |
| 4 | 96 | 88 | 92 | 74 | 61 | 45 | 82 | 92 | 100 | 53 | 29 | 69 | 104 | 92 |
| 5 | 120 | 110 | 115 | 93 | 68 | 53 | 90 | 103 | 108 | 63 | 33 | 78 | 130 | 114 |
| 6 | 127 | 120 | 125 | 104 | 74 | 60 | 98 | 113 | 115 | 72 | 36 | 86 | 135 | 121 |
| 7 | 134 | 130 | 135 | 116 | 81 | 68 | 107 | 123 | 123 | 82 | 40 | 95 | 140 | 127 |
| 8 | 142 | 140 | 144 | 128 | 88 | 75 | 115 | 133 | 131 | 91 | 43 | 104 | 145 | 134 |
| 9 | 149 | 150 | 154 | 140 | 95 | 83 | 124 | 144 | 138 | 101 | 47 | 113 | 150 | 140 |
| 10 | 156 | 160 | 164 | 152 | 102 | 90 | 132 | 154 | 146 | 110 | 50 | 122 | 155 | 146 |
| 11 | 163 | 170 | 174 | 164 | 109 | 98 | 140 | 164 | 154 | 120 | 54 | 131 | 160 | 152 |
| 12 | 170 | 180 | 184 | 176 | 116 | 105 | 149 | 175 | 161 | 129 | 57 | 140 | 165 | 158 |
| 13 | 178 | 190 | 193 | 188 | 123 | 113 | 157 | 185 | 169 | 139 | 61 | 149 | 170 | 165 |
| 14 | 185 | 200 | 203 | 200 | 130 | 120 | 166 | 195 | 177 | 148 | 64 | 158 | 175 | 171 |
| 15 | 192 | 210 | 213 | 212 | 137 | 128 | 174 | 206 | 185 | 158 | 68 | 167 | 180 | 177 |
| 16 | 199 | 220 | 223 | 223 | 143 | 135 | 182 | 216 | 192 | 167 | 71 | 175 | 185 | 183 |
| 17 | 206 | 230 | 233 | 225 | 150 | 143 | 191 | 226 | 200 | 177 | 75 | 184 | 190 | 189 |
| 18 | 214 | 240 | 242 | 247 | 157 | 150 | 199 | 236 | 208 | 186 | 78 | 193 | 195 | 196 |
| 19 | 221 | 250 | 252 | 259 | 164 | 158 | 208 | 247 | 215 | 196 | 82 | 202 | 200 | 202 |
| 20 | 228 | 260 | 262 | 271 | 171 | 165 | 216 | 257 | 223 | 205 | 85 | 211 | 205 | 208 |
| 21 | 235 | 270 | 272 | 283 | 178 | 173 | 224 | 267 | 231 | 215 | 89 | 220 | 210 | 214 |
| Ship(s) | Formulas |
|---|---|
| IJN BBs | Range (R) x 7.2 + 84 |
| American, British and German BBs | R x 10 + 60 |
| French and Italian BBs | R x 9.8 + 66 |
| Russian BBs[1] | R x 11.8 + 35 |
| CA/CL | R x 6.9 + 33 |
| Destroyers, IJN CAs and Pan-Am CLs | R x 7.5 + 15 |
| Graf Spee and non-IJN large cruisers[2] | R x 8.4 + 48 |
| Queen Elizabeth, Warspite, Hood, Vanguard and Ohio | R x 10.3 + 51 |
| Mikasa | R x 7.7 + 69 |
| Azuma, Yoshino (B), Tallinn[3], Riga[3] and Petropavlovsk[3] | R x 9.5 + 15 |
| German Spähkreuzers[4] and Submarines | R X 3.5 + 15 |
| Napoli (B)[5] and Mikoyan[5] | R X 8.9 + 33 |
| Slava[6] | R x 5 + 105 |
| Shikishima | R x 6.2 + 84 |
| *Chikuma, Albany, Aurora, Atlanta, Flint, Smolensk, Colbert | R x 7.5 + 15 |
| *Repulse, Novorossiysk, Florida, Renown '44, Constellation, Champagne, Borodino, Georgia, Sun Yat-Sen, Thunderer, Mecklenburg, Incomparable, the Schlieffen line, and the St. Vincent line |
R x 8.4 + 48 |
| *Mogami mounted with the 155 mm guns | R x 6.9 + 33 |
| *Imperator Nikolai I, Oktyabrskaya Revolutsiya, Poltava, AL Sov. Rossiya, Kronshtadt and Puerto Rico | R x 10 + 60 |
| *Tiger '59 and Ragnar | R X 3.5 + 15 |
| *Siegfried and Sevastopol | R X 6.9 + 33 |
| *Nueve de Julio | R x 6.9 + 33 |
Dispersion values are same for HE and AP shells of the same gun. The player's gun dispersion value can be modified by player's equipment. Aiming Systems Modification 1 decreases the area of the shell dispersion ellipse by 7%. Increasing the firing range of a ship, be it through the Spotter Aircraft consumable, Artillery Plotting Room Modification 1, Gun Fire Control System Modification 2, or Combat Instructions that increase the firing range, decreases the vertical dispersion by a small amount. Additionally, WarGaming has indicated that not acquiring the target with the X button increases dispersion by an unspecified amount.
For patch 0.4.1, WG has decreased the close-range (i.e. at and below 3-5 km) dispersion values for all ships. The dispersion formulas in the above table are for ranges greater than 3 km for Mikasa’s formula, greater than 4 km for the cruiser and destroyer formulas, and greater than 5 km for the battleship formulas.
Sigma
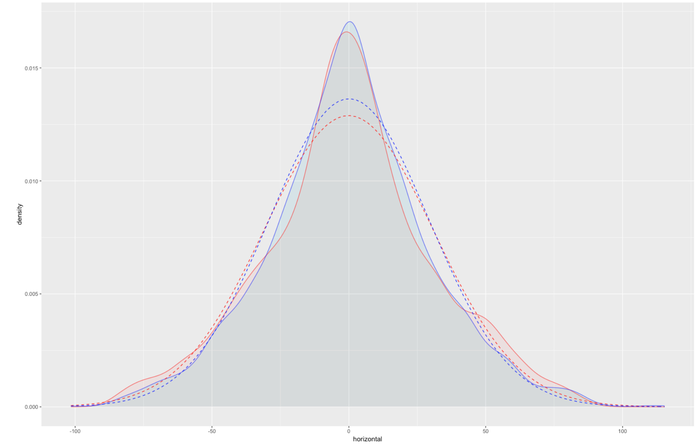
Sigma is one of the parameters for gunnery in World of Warships. It describes the tendency of a shell to land closer towards the center of aim, aka the middle of the dispersion ellipse described by 'vertical dispersion' and 'horizontal dispersion'. The higher the Sigma value, the more likely the shells are to land closer to the center.
The graphic below showcases a high sigma (blue) and an average sigma (red) and their respective distribution of shells on the horizontal axis. The dotted line is the normal distribution generated from these results. Note that those values have been gathered by players in training rooms and are thus not 100% accurate, however, they do demonstrate roughly how sigma works.
Sigma parameters are mostly uniform for destroyers and cruisers but vary drastically for the battleships. The following tables are as of 0.8.6. The cruiser table will only give the default sigma values and then list the exceptions. If a ship is not an exception, it will have the default sigma value (e.g. Mogami is not an exception, and will thus have a 2.0 sigma as a Tier VIII cruiser).
Destroyers and submarines of all tiers and nations have a sigma of 2.0.
| Ship | Sigma |
|---|---|
| Tier I to Tier VIII cruisers | 2.0 |
| Tier IX to Tier XI cruisers | 2.05 |
| Atlanta (B), Flint | 1.7 |
| St. Louis, Charleston, Cherbourg, Brest, Marseille | 1.8 |
| Admiral Graf Spee, HSF Admiral Graf Spee, Toulon | 1.9 |
| Smolensk, Colbert | 2.0 |
| Congress, San Diego, Cheshire, Irian | 2.05 |
| Krasny Krym | 2.1 |
| AL Montpelier, Napoli (B) | 2.15 |
| Puerto Rico | 2.2 |
| Stalingrad | 2.65 |
- ↑ 1.0 1.1 It should be noted that due to the special accuracy formula Russian battleships use, their vertical dispersion becomes significantly worse than their peers past 15 km, and vice versa. Therefore, the actual accuracy will be different than what the table may imply.
- ↑ 2.0 2.1 Refers to Tier VII Toulon, Tier VIII Congress, Cherbourg, Haarlem and Schill, Tier IX Admiral Schröder, Ägir, Alaska, Alaska B, Azuma, AL Azuma, Brest, Carnot, Johan de Witt, Kronshtadt, Michelangelo and Siegfried, and Tier X Defence, Gouden Leeuw, Marseille, Puerto Rico, Sevastopol, Stalingrad, Yoshino and Yoshino B .
- ↑ 3.0 3.1 3.2 3.3 3.4 3.5 It should be noted that due to the special accuracy formula Tallinn, Riga and Petropavlovsk use, their vertical dispersion becomes significantly worse than their peers past 14 km, and vice versa. Therefore, the actual accuracy will be different than what the table may imply.
- ↑ 4.0 4.1 Refers to the German DD line consisting of Z-31, Gustav-Julius Maerker, Felix Schultz, and Elbing.
- ↑ 5.0 5.1 5.2 5.3 It should be noted that due to the special accuracy formula Napoli (B) and Mikoyan use, their vertical dispersion becomes significantly worse than their peers past 12 km, and vice versa. Therefore, the actual accuracy will be different than what the table may imply.
- ↑ 6.0 6.1 Slava also has a unique vertical dispersion formula giving her vastly superior vertical dispersion than her peers across all ranges.
