Hakuryu
| Revision as of 22:44, 6 May 2018 Updated for the 332 layout | Revision as of 15:34, 11 May 2018 Added 3D model. Minor polish. | |||
| Line 3: | Line 3: | |||
| |Anno=<!-- you can write below short description for the ship. it will replace default once. --> | |Anno=<!-- you can write below short description for the ship. it will replace default once. --> | |||
| ? | An aircraft carrier designed to be an enlarged and enhanced version of the ''[[Taiho]]'' class. ''Hakuryu'' was superior to her predecessor in size, armor and artillery power. Owing to an increased hangar, she could carry the largest air group among all Japanese aircraft carriers. | + | An aircraft carrier designed to be an enlarged and enhanced version of the ''[[Taiho]]'' class. ''Hakuryu'' was superior to her predecessor in size, armor and artillery power. Owing to an increased hangar, she could carry the largest air group among all Japanese aircraft carriers.<br><br>{{Model3DViewer|e33ef99142df4e4799e3064591d9a3fb}} | |
| |Performance=<!-- write text about performance in battles below --> | |Performance=<!-- write text about performance in battles below --> | |||
| ? | + | ''Hakuryu'' is a battleship's worst nightmare. She can field a large number of squadrons to destroy any ship in the water, with up to five strike squadrons at her disposal. However, there is a cost of having so many squadrons: each squadron has a smaller number of planes than their American counterparts which means they can be easily destroyed by a solid AA screen or by intercepting fighters. Despite being large as she is, ''Hakuryu'' has a rather reasonable concealment value, better than her American counterpart, ''[[Midway]]. | ||
| + | ||||
| + | |Pros=<!-- write list of positive points below. use * as in ordinary wiki-list. --> | |||
| + | * Can put several squadrons into the air at any given time, especially strike aircraft. | |||
| + | * Excellent concealment. | |||
| + | * Does not catch fire easily. | |||
| + | * 3-3-2 squadron configuration is superior to ''[[Midway]]''’s 2-2-2 config. | |||
| + | * All planes are Tier X (unlike ''Midway'', which has Tier VIII torpedo bombers and Tier IX fighters). | |||
| + | * Flight control module 2 puts more fighters in the air than ''Midway'' (max of 15 with the Air Superiority commander skill). | |||
| + | * Shorter reload time on squadrons helps ''Hakuryu'' have a larger impact in the battle more quickly. | |||
| + | * Tier X dive bombers are great scouts and are fast enough that enemy fighters will have trouble catching them. | |||
| + | ||||
| + | |Cons=<!-- write list of negative points below. use * as in ordinary wiki-list. --> | |||
| + | * Small squadron size which makes it a bit easy to have fighters intercept them. | |||
| + | * Slighty worse AA than ''Midway'', but still plenty to fend off enemy air strikes. | |||
| |Research=<!-- write text about priority sequence of research below --> | |Research=<!-- write text about priority sequence of research below --> | |||
| Line 14: | Line 28: | |||
| # Wakusei dive bombers | # Wakusei dive bombers | |||
| # Type 10 mod. 2 or mod. 3 Flight Control | # Type 10 mod. 2 or mod. 3 Flight Control | |||
| ? | ||||
| Researching the flight control mods is listed last due to the fact that the anti-air at this tier is so powerful and managing multiple squads is the most difficult at this tier. Additionally, the mod. 2 Flight Control only adds one extra dive bomber squadron to the player's loadout, which may not be very helpful at all and will reduce the ratio of allocated torpedo bombers. Additionally, researching mod. 2 or mod. 3 Flight Control depends on the player's preference. | Researching the flight control mods is listed last due to the fact that the anti-air at this tier is so powerful and managing multiple squads is the most difficult at this tier. Additionally, the mod. 2 Flight Control only adds one extra dive bomber squadron to the player's loadout, which may not be very helpful at all and will reduce the ratio of allocated torpedo bombers. Additionally, researching mod. 2 or mod. 3 Flight Control depends on the player's preference. | |||
| ? | ||||
| ? | ||||
| ? | ||||
| ? | ||||
| ? | ||||
| ? | ||||
| ? | ||||
| ? | ||||
| ? | ||||
| ? | ||||
| ? | ||||
| ? | ||||
| ? | ||||
| ? | ||||
| ? | ||||
| ? | ||||
| ? | ||||
| |OptimalConfiguration=<!-- write some general text about selection of optimal configuration below (optional)--> | |OptimalConfiguration=<!-- write some general text about selection of optimal configuration below (optional)--> | |||
| Line 45: | Line 41: | |||
| *'''Slot 6''': {{Air Groups Modification 3}} | *'''Slot 6''': {{Air Groups Modification 3}} | |||
| ? | '''Upgrade Slot 3''' is the 1st main choice of upgrades with ''{{#var:ship_name}}''. For players looking to improve their fighter's capabilities, {{Air Groups Modification 2}} is highly recommended, especially when using the Type 10 mod. 3 flight control system. Otherwise, the {{Flight Control Modification 1}} helps players land and launch ''{{#var:ship_name}}'' | + | '''Upgrade Slot 3''' is the 1st main choice of upgrades with ''{{#var:ship_name}}''. For players looking to improve their fighter's capabilities, {{Air Groups Modification 2}} is highly recommended, especially when using the Type 10 mod. 3 flight control system. Otherwise, the {{Flight Control Modification 1}} helps players land and launch ''{{#var:ship_name}}''’s multiple flight squadrons, as ''{{#var:ship_name}}'' has a staggering eight separate plane squadrons to manage. | |
| ? | '''Upgrade Slot 5''' offers players {{Concealment System Modification 1}}, which stacks with [[Ship:Commander#Concealment_Expert|Concealment Expert]] and | + | '''Upgrade Slot 5''' offers players {{Concealment System Modification 1}}, which stacks with [[Ship:Commander#Concealment_Expert|Concealment Expert]] and camouflage to bring ''{{#var:ship_name}}''’s surface detection down to a small range of 11.5 km. | |
| + | ||||
| + | '''Upgrade Slot 6''' is the 2nd main choice of upgrades with ''{{#var:ship_name}}''. Due to the common presence of multiple battleships and cruisers with very high AA power, {{Air Groups Modification 3}} is highly recommended to make sure ''{{#var:ship_name}}''’s planes will survive their trip to and from their target. If survivability isn't the player's foremost preference, {{Flight Control Modification 2}} is viable, increasing the speed gap between ''{{#var:ship_name}}''’s and ''[[Midway]]''’s planes, allowing the smaller Japanese squadrons to outrun their American counterparts. | |||
| ? | ||||
| |CommanderSkills=<!-- write text about best set of Commander Skills below --> | |CommanderSkills=<!-- write text about best set of Commander Skills below --> | |||
| ? | ''{{#var:ship_name}}'' uses the standard | + | ''{{#var:ship_name}}'' uses the standard Japanese carrier captain skill setup. Emphasis should be on skills that boost fighter and bomber effectiveness and AA protection. [[Ship:Commander#Aircraft_Servicing_Expert|Aircraft Servicing Expert]], [[Ship:Commander#Torpedo_Acceleration|Torpedo Acceleration]], [[Ship:Commander#Torpedo_Armament_Expertise|Torpedo Armament Expertise]], and [[Ship:Commander#Air_Supremacy|Air Supremacy]] are "must have" skills. [[Ship:Commander#Dogfighting_Expert|Dogfighting Expert]] is still useful despite ''{{#var:ship_name}}''’s planes being top tier as the bonus to ammunition allows her fighters to remain airborne longer before returning to rearm. | |
| ? | For AA defense, ''{{#var:ship_name}}'' has medium-caliber 100mm guns that benefit greatly from Manual Fire Control for AA Armament. [[Ship:Commander#Basic_Firing_Training|Basic Firing Training]] is also a good choice to boost all AA guns' DPS by 20%. And as ''{{#var:ship_name}}'' is a Tier | + | For AA defense, ''{{#var:ship_name}}'' has medium-caliber 100mm guns that benefit greatly from Manual Fire Control for AA Armament. [[Ship:Commander#Basic_Firing_Training|Basic Firing Training]] is also a good choice to boost all AA guns' DPS by 20%. And as ''{{#var:ship_name}}'' is a Tier IX carrier, the player has access to the special Japanese carrier version of {{Defensive AA Fire}}, which lasts for two minutes and increases the ship's AA DPS by a factor of '''1.75'''. Coupled with '''Basic Firing Training''' and [[Ship:Commander#Manual_Fire_Control_for_AA_Armament|Manual Fire Control for AA Armament]], the player can significantly increase the ship's AA DPS to shoot down enemy planes effectively and greatly reduce the damage taken from an enemy carrier's attack. | |
| ? | [[Ship:Commander#Evasive_Maneuver|Evasive Maneuvers]] is recommended as it increases the bombers' survivability when returning to the carrier, and is especially useful when the enemy targets have activated | + | [[Ship:Commander#Evasive_Maneuver|Evasive Maneuvers]] is recommended as it increases the bombers' survivability when returning to the carrier, and is especially useful when the enemy targets have activated {{Defensive AA Fire}}. | |
| Any skills that are related to an enemy vessel firing on your carrier are not useful, as the cost-benefit of investing in survivability skills is not worth the minimal benefit they offer. ''{{#var:ship_name}}'' is large and unarmored, and will not survive an attack by any ship larger than a destroyer. ''{{#var:ship_name}}'' captains must position their ship near friendlies and far back from the enemy fleet. [[Ship:Commander#Concealment_Expert|Concealment Expert]] may be taken to further reduce detection range if the captain so desires. | Any skills that are related to an enemy vessel firing on your carrier are not useful, as the cost-benefit of investing in survivability skills is not worth the minimal benefit they offer. ''{{#var:ship_name}}'' is large and unarmored, and will not survive an attack by any ship larger than a destroyer. ''{{#var:ship_name}}'' captains must position their ship near friendlies and far back from the enemy fleet. [[Ship:Commander#Concealment_Expert|Concealment Expert]] may be taken to further reduce detection range if the captain so desires. | |||
| ? | ||||
| ? | ||||
| {{Commander Skills | {{Commander Skills | |||
| Line 100: | Line 95: | |||
| |Consumables=<!-- write text about selection of Consumables below --> | |Consumables=<!-- write text about selection of Consumables below --> | |||
| ? | + | ''{{#var:ship_name}}'' can equip the following consumables: | ||
| ? | *{{Damage Control Party}} | + | * '''Slot 1:''' {{Damage Control Party}} | |
| ? | *{{Defensive AA Fire}} | + | * '''Slot 2:''' {{Defensive AA Fire}} | |
| ? | + | Premium {{Defensive AA Fire II}} is recommended to counter any enemy carrier's attempts to "snipe" the player (that is, by having all bombers bypass allied ships undetected and attempting to sink the player in one hit). Premium {{Damage Control Party II}} is not recommended as it is only needed in dire moments, or when the player is the last one alive. | ||
| ? | Premium | + | ||
| |Camouflage=<!-- write text about useful camouflage below --> | |Camouflage=<!-- write text about useful camouflage below --> | |||
| [[Ship:Camouflage#Standard Camouflage|Type 1, 2, or 5 camouflage]] can be equipped for credits; Types 1 or 5 are recommended at a minimum to reduce detectability range. | [[Ship:Camouflage#Standard Camouflage|Type 1, 2, or 5 camouflage]] can be equipped for credits; Types 1 or 5 are recommended at a minimum to reduce detectability range. | |||
| ? | Players who wish to spend doubloons | + | Players who wish to spend doubloons can equip ''{{#var:ship_name}}'' with [[Ship:Camouflage#Permanent_Camouflage|Type 20 camouflage]] that lowers her detection radius, reduces the accuracy of incoming shells, reduces cost of post-battle service, and increases the amount of experience she earns. | |
| |Signals=<!-- write text about best set of signals below --> | |Signals=<!-- write text about best set of signals below --> | |||
| ? | As a carrier, ''{{#var:ship_name}}'' can only mount at most four signals at a time and has no risk of detonating. Players should mount | + | As a carrier, ''{{#var:ship_name}}'' can only mount at most four signals at a time and has no risk of detonating. Players should mount Equal Speed Charlie London ({{Equal Speed Charlie London|Size=18px}}), Zulu Hotel ({{Zulu Hotel|Size=18px}}), and, for the last two: November Echo Setteseven ({{November Echo Setteseven|Size=18px}}) and Juliet Whiskey Unaone ({{Juliet Whiskey Unaone|Size=18px}}). | |
| ? | {{ | + | ||
| ? | + | |||
| {{Signal Flags | {{Signal Flags | |||
| Line 153: | Line 145: | |||
| |History=<!-- write text below --> | |History=<!-- write text below --> | |||
| ? | ||||
| The ''Hakuryu'' (白竜, "White Dragon") is based off of Project G15 "Taiho-Kai" which was an attempt by Japanese designers to create a successor to the flawed ''[[Taiho]]'' class. She was to be larger, better armed, better protected, carry a larger airgroup, and would've corrected the numerous flaws found in her predecessor's design. Seven of the class were planned to be laid down between 1944 and 1945 with an expected completion date between 1947 and 1948. However, the project was suspended after the Battle of Midway in order to focus construction efforts on the smaller ''Unryu''-class before finally cancelled in August of 1943 in order to concentrate development on the smaller less expensive G18 class. | The ''Hakuryu'' (白竜, "White Dragon") is based off of Project G15 "Taiho-Kai" which was an attempt by Japanese designers to create a successor to the flawed ''[[Taiho]]'' class. She was to be larger, better armed, better protected, carry a larger airgroup, and would've corrected the numerous flaws found in her predecessor's design. Seven of the class were planned to be laid down between 1944 and 1945 with an expected completion date between 1947 and 1948. However, the project was suspended after the Battle of Midway in order to focus construction efforts on the smaller ''Unryu''-class before finally cancelled in August of 1943 in order to concentrate development on the smaller less expensive G18 class. | |||
Revision as of 15:34, 11 May 2018

| Research price355000 exp |
| Purchase price28,000,000 |
| Hit Points63,100 |
| 100 mm/65 Type 98 on a twin mount12 х 2 pcs. |
| Firing Range5 km. |
| Rate of Fire20.98 shots/min. |
| Reload Time2.86 sec. |
| HE Shell100 mm HE Type98 |
| Maximum HE Shell Damage1,700 |
| Initial HE Shell Velocity1000 m./s. |
| Chance of Fire on Target Caused by HE Shell6 % |
| 100 mm/65 Type 98 on a twin mount12 х 2 pcs. |
| . . . Average Damage per Second249.6 |
| . . . Firing Range5.01 km. |
| 40 mm/60 Type 5 on a twin mount22 х 2 pcs. |
| . . . Average Damage per Second242 |
| . . . Firing Range3.51 km. |
| Maximum Speed34.5 knot |
| Turning Circle Radius1 250 m. |
| Rudder Shift Time17.1 sec. |
| Surface Detectability Range15.19 km. |
| Air Detectability Range11.42 km. |

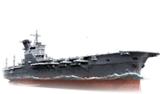
Hakuryū — Japanese Tier X aircraft сarrier.
An aircraft carrier designed to be an enlarged and enhanced version of the Taiho class. Hakuryu was superior to her predecessor in size, armor and artillery power. Owing to an increased hangar, she could carry the largest air group among all Japanese aircraft carriers.
Modules
 |
Hit Points (HP) | Armor (mm) | Armor (mm) | Main Turrets (pcs.) | Secondary Gun Turrets (pcs.) | AA Mounts (pcs.) | Torpedo Tubes (pcs.) | Hangar Capacity (pcs.) |
Research price (exp) |
Purchase price ( | |
|---|---|---|---|---|---|---|---|---|---|---|---|
| Hakuryū | 63,100 | 13 | 130 | 12 | 22/12 | 0 | 3,000,000 |
 |
Speed (knot) | IDS_SHIP_PARAM_SQUADRON_MED_DAMAGE (HP/min) | IDS_SHIP_PARAM_SQUADRON_AMMO_AMOUNT | Hit Points (HP) |
Research price (exp) |
Purchase price ( | |
|---|---|---|---|---|---|---|---|
| A7M Reppū | 156 | 1,450 | 0 | 1,000,000 | |||
| A8M Rikufū | 165 | 1,510 | 38,000 | 2,500,000 |
 |
Maximum Torpedo Damage (HP) | Speed (knot) | Hit Points (HP) |
Research price (exp) |
Purchase price ( | |
|---|---|---|---|---|---|---|
| C6N Saiun | 9,333 | 141 | 1,750 | 0 | 1,000,000 | |
| J5N Tenrai Type 91 mod. 7 | 9,333 | 145 | 1,820 | 38,000 | 2,500,000 |
 |
Maximum Bomb Damage (HP) | Speed (knot) | Hit Points (HP) |
Research price (exp) |
Purchase price ( | |
|---|---|---|---|---|---|---|
| A7M Reppū | 148 | 1,720 | 0 | 1,000,000 | ||
| J5N Tenrai | 152 | 1,790 | 38,000 | 2,500,000 |
 |
Maximum Speed (knot) |
Research price (exp) |
Purchase price ( | |
|---|---|---|---|---|
| Propulsion: 240,000 hp | 34.5 | 0 | 900,000 |
Compatible Upgrades
| Slot 1 |
|||||
|---|---|---|---|---|---|
| Slot 2 |
|||||
| Slot 3 |
|||||
| Slot 4 |
|||||
| Slot 5 |
|||||
| Slot 6 |
Player Opinion
Performance
Pros:
- Can put several squadrons into the air at any given time, especially strike aircraft.
- Excellent concealment.
- Does not catch fire easily.
- 3-3-2 squadron configuration is superior to Midway’s 2-2-2 config.
- All planes are Tier X (unlike Midway, which has Tier VIII torpedo bombers and Tier IX fighters).
- Flight control module 2 puts more fighters in the air than Midway (max of 15 with the Air Superiority commander skill).
- Shorter reload time on squadrons helps Hakuryu have a larger impact in the battle more quickly.
- Tier X dive bombers are great scouts and are fast enough that enemy fighters will have trouble catching them.
Cons:
- Small squadron size which makes it a bit easy to have fighters intercept them.
- Slighty worse AA than Midway, but still plenty to fend off enemy air strikes.
Research
This is a suggested research path:
- Mitsubishi A8M fighters
- Nakajima C6N1-B torpedo bombers
- Wakusei dive bombers
- Type 10 mod. 2 or mod. 3 Flight Control
Optimal Configuration
Upgrades
- Slot 1: Air Groups Modification 1

- Slot 2: Damage Control System Modification 1

- Slot 3: Air Groups Modification 2

- Slot 4: Propulsion Modification 1 (
 )
)
- Slot 5: Concealment System Modification 1

- Slot 6: Air Groups Modification 3

Upgrade Slot 3 is the 1st main choice of upgrades with Hakuryū. For players looking to improve their fighter's capabilities, Air Groups Modification 2 ![]() is highly recommended, especially when using the Type 10 mod. 3 flight control system. Otherwise, the Flight Control Modification 1
is highly recommended, especially when using the Type 10 mod. 3 flight control system. Otherwise, the Flight Control Modification 1 ![]() helps players land and launch Hakuryū’s multiple flight squadrons, as Hakuryū has a staggering eight separate plane squadrons to manage.
helps players land and launch Hakuryū’s multiple flight squadrons, as Hakuryū has a staggering eight separate plane squadrons to manage.
Upgrade Slot 5 offers players Concealment System Modification 1 ![]() , which stacks with Concealment Expert and camouflage to bring Hakuryū’s surface detection down to a small range of 11.5 km.
, which stacks with Concealment Expert and camouflage to bring Hakuryū’s surface detection down to a small range of 11.5 km.
Upgrade Slot 6 is the 2nd main choice of upgrades with Hakuryū. Due to the common presence of multiple battleships and cruisers with very high AA power, Air Groups Modification 3 ![]() is highly recommended to make sure Hakuryū’s planes will survive their trip to and from their target. If survivability isn't the player's foremost preference, Flight Control Modification 2
is highly recommended to make sure Hakuryū’s planes will survive their trip to and from their target. If survivability isn't the player's foremost preference, Flight Control Modification 2 ![]() is viable, increasing the speed gap between Hakuryū’s and Midway’s planes, allowing the smaller Japanese squadrons to outrun their American counterparts.
is viable, increasing the speed gap between Hakuryū’s and Midway’s planes, allowing the smaller Japanese squadrons to outrun their American counterparts.
Commander Skills
Hakuryū uses the standard Japanese carrier captain skill setup. Emphasis should be on skills that boost fighter and bomber effectiveness and AA protection. Aircraft Servicing Expert, Torpedo Acceleration, Torpedo Armament Expertise, and Air Supremacy are "must have" skills. Dogfighting Expert is still useful despite Hakuryū’s planes being top tier as the bonus to ammunition allows her fighters to remain airborne longer before returning to rearm.
For AA defense, Hakuryū has medium-caliber 100mm guns that benefit greatly from Manual Fire Control for AA Armament. Basic Firing Training is also a good choice to boost all AA guns' DPS by 20%. And as Hakuryū is a Tier IX carrier, the player has access to the special Japanese carrier version of Defensive AA Fire ![]() , which lasts for two minutes and increases the ship's AA DPS by a factor of 1.75. Coupled with Basic Firing Training and Manual Fire Control for AA Armament, the player can significantly increase the ship's AA DPS to shoot down enemy planes effectively and greatly reduce the damage taken from an enemy carrier's attack.
, which lasts for two minutes and increases the ship's AA DPS by a factor of 1.75. Coupled with Basic Firing Training and Manual Fire Control for AA Armament, the player can significantly increase the ship's AA DPS to shoot down enemy planes effectively and greatly reduce the damage taken from an enemy carrier's attack.
Evasive Maneuvers is recommended as it increases the bombers' survivability when returning to the carrier, and is especially useful when the enemy targets have activated Defensive AA Fire ![]() .
.
Any skills that are related to an enemy vessel firing on your carrier are not useful, as the cost-benefit of investing in survivability skills is not worth the minimal benefit they offer. Hakuryū is large and unarmored, and will not survive an attack by any ship larger than a destroyer. Hakuryū captains must position their ship near friendlies and far back from the enemy fleet. Concealment Expert may be taken to further reduce detection range if the captain so desires.
| Recommended Commander Skills | ||||||||
|---|---|---|---|---|---|---|---|---|
| Cost (points) |
Endurance | Attack | Support | Versatility | ||||
| 1 |
|
|
|
★★★ |
|
|
|
|
| 2 |
|
|
|
★★★ |
|
|
|
|
| 3 |
|
|
★★★ |
|
★ |
|
|
|
| 4 |
|
|
|
|
★ |
|
|
★★ |
| Key: ★★★ - Extremely Useful ★★ - Frequently Useful ★ - Occasionally Useful No stars - Meh Χ - Not recommended | ||||||||
Consumables
Hakuryū can equip the following consumables:
- Slot 1: Damage Control Party

- Slot 2: Defensive AA Fire

Premium Defensive AA Fire II (![]() ) is recommended to counter any enemy carrier's attempts to "snipe" the player (that is, by having all bombers bypass allied ships undetected and attempting to sink the player in one hit). Premium Damage Control Party II (
) is recommended to counter any enemy carrier's attempts to "snipe" the player (that is, by having all bombers bypass allied ships undetected and attempting to sink the player in one hit). Premium Damage Control Party II (![]() ) is not recommended as it is only needed in dire moments, or when the player is the last one alive.
) is not recommended as it is only needed in dire moments, or when the player is the last one alive.
Camouflage
Type 1, 2, or 5 camouflage can be equipped for credits; Types 1 or 5 are recommended at a minimum to reduce detectability range.
Players who wish to spend doubloons can equip Hakuryū with Type 20 camouflage that lowers her detection radius, reduces the accuracy of incoming shells, reduces cost of post-battle service, and increases the amount of experience she earns.
Signals
As a carrier, Hakuryū can only mount at most four signals at a time and has no risk of detonating. Players should mount Equal Speed Charlie London (🚫), Zulu Hotel (🚫), and, for the last two: November Echo Setteseven (![]() ) and Juliet Whiskey Unaone (
) and Juliet Whiskey Unaone (![]() ).
).
Recommended Signal Flags 
| |||||
|---|---|---|---|---|---|
| Combat | |||||

|

|

|

|

|

|
 ★★★ |

|
 ★★★ |
 ★ |

|

|

|

| ||||
Note: Use of the Juliet Charlie signal makes detonation impossible.
Gallery
Frontal view of Hakuryū
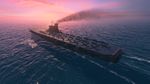
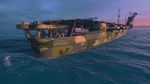
Hakuryū sailing into battle
.jpg)
.jpg)
.jpg)
.jpg)
Historical Info
Historical Gallery


| Japan | IV Hōshō • VI Ryūjō • VIII Shōkaku • VIII Kaga |
| U.K. | IV Hermes • VI Furious • VI Ark Royal |
| France | VI Béarn |
| U.S.S.R. | IV Komsomolets • VI Serov • VIII Pobeda • VIII Chkalov |
| U.S.A. | IV Langley • VI Independence • VI Ranger • VIII Yorktown • VIII Lexington • VIII Enterprise |
| Germany | IV Rhein • VI Weser • VI Erich Loewenhardt |
| Pan-Asia | VIII Sanzang |
| Spain | |
| Europe | |
| Netherlands | |
| Italy | VIII Aquila |
| Commonwealth | |
| Pan-America |