Hakuryu

| Research price355000 exp |
| Purchase price28,000,000 |
| Hit Points63,100 |
| 100 mm/65 Type 98 on a twin mount12 х 2 pcs. |
| Firing Range5 km. |
| Rate of Fire20.98 shots/min. |
| Reload Time2.86 sec. |
| HE Shell100 mm HE Type98 |
| Maximum HE Shell Damage1,700 |
| Initial HE Shell Velocity1000 m./s. |
| Chance of Fire on Target Caused by HE Shell6 % |
| 100 mm/65 Type 98 on a twin mount12 х 2 pcs. |
| . . . Average Damage per Second249.6 |
| . . . Firing Range5.01 km. |
| 40 mm/60 Type 5 on a twin mount22 х 2 pcs. |
| . . . Average Damage per Second242 |
| . . . Firing Range3.51 km. |
| Maximum Speed34.5 knot |
| Turning Circle Radius1 250 m. |
| Rudder Shift Time17.1 sec. |
| Surface Detectability Range15.19 km. |
| Air Detectability Range11.42 km. |

Hakuryū — Japanese Tier X aircraft сarrier.
An aircraft carrier designed to be an enlarged and enhanced version of the Taiho class. Hakuryu was superior to her predecessor in size, armor and artillery power. Owing to an increased hangar, she can carry a massive air group that would be the largest of all Japanese aircraft carriers.
Modules
 |
Hit Points (HP) | Armor (mm) | Armor (mm) | Main Turrets (pcs.) | Secondary Gun Turrets (pcs.) | AA Mounts (pcs.) | Torpedo Tubes (pcs.) | Hangar Capacity (pcs.) |
Research price (exp) |
Purchase price ( | |
|---|---|---|---|---|---|---|---|---|---|---|---|
| Hakuryū | 63,100 | 13 | 130 | 12 | 22/12 | 0 | 3,000,000 |
 |
Speed (knot) | IDS_SHIP_PARAM_SQUADRON_MED_DAMAGE (HP/min) | IDS_SHIP_PARAM_SQUADRON_AMMO_AMOUNT | Hit Points (HP) |
Research price (exp) |
Purchase price ( | |
|---|---|---|---|---|---|---|---|
| A7M Reppū | 156 | 1,450 | 0 | 1,000,000 | |||
| A8M Rikufū | 165 | 1,510 | 38,000 | 2,500,000 |
 |
Maximum Torpedo Damage (HP) | Speed (knot) | Hit Points (HP) |
Research price (exp) |
Purchase price ( | |
|---|---|---|---|---|---|---|
| C6N Saiun | 9,333 | 141 | 1,750 | 0 | 1,000,000 | |
| J5N Tenrai Type 91 mod. 7 | 9,333 | 145 | 1,820 | 38,000 | 2,500,000 |
 |
Maximum Bomb Damage (HP) | Speed (knot) | Hit Points (HP) |
Research price (exp) |
Purchase price ( | |
|---|---|---|---|---|---|---|
| A7M Reppū | 148 | 1,720 | 0 | 1,000,000 | ||
| J5N Tenrai | 152 | 1,790 | 38,000 | 2,500,000 |
 |
Maximum Speed (knot) |
Research price (exp) |
Purchase price ( | |
|---|---|---|---|---|
| Propulsion: 240,000 hp | 34.5 | 0 | 900,000 |
Compatible Upgrades
| Slot 1 |
|||||
|---|---|---|---|---|---|
| Slot 2 |
|||||
| Slot 3 |
|||||
| Slot 4 |
|||||
| Slot 5 |
|||||
| Slot 6 |
Player Opinion
Performance
Hakuryu, is a seasoned carrier that shines in competitive battles with perhaps the highest skill ceiling among all tier 10 aircraft carriers. With her fast plane speed and large air groups, she is capable of dealing massive damage, the majority of which cannot be healed back, in a short amount of time. In game modes like ranked and clan battles she can make a handful of good plays to secure victories.
Attack Aircraft:
While Hakuryu’s attack aircraft are the weakest of her air wing, they still have their uses as an intermediate damage source against all ship types while her other squad types are recovering. Each squad consists of 9 aircraft divided into 3 strikes of 3 aircraft each, firing 6 rockets per aircraft. While only 18 rockets are fired per strike, their individual damage of 3,150 is rather high. Combined with its 30mm of penetration, Hakuryu’s rockets are capable of taking decent chunks off of most cruisers should most of them land home. Its capacity to start fires should not be underestimated either; with a 14% fire chance per rocket, they can often be relied upon to light fires after a target uses up its damage control party on a flood from a strike from Hakuryu’s torpedo bombers. While they can do serious damage against destroyers as well, their rather long machine gun period can make aiming difficult, especially if the destroyer in question is not being actively spotted by your own team.
Torpedo Bombers:
The bread and butter of Hakuryu’s air wing, equipped with fast, hard hitting torpedoes with a large squadron size. Each squadron consists of 12 aircraft divided into 6 strikes of 2 aircraft each, dropping 1 torpedo per aircraft. Despite only 2 torpedoes being dropped for each strike, Hakuryu’s torpedoes are the hardest hitting carrier torpedoes in the game, dealing 9,333 damage each with a rather brisk speed of 50 knots. Their high top speed of 185 knots makes them excellent for getting them where they need to be on the map quickly and their maneuverability allows them to quickly change direction both for dodging flak and for quickly setting up follow-up strikes on enemy vessels. Like other Japanese torpedo bombers, Hakuryu’s come with an improved concealment radius of 7.5 km, allowing them to quickly pounce on enemy vessels and giving them little time to react to the first strike. In addition, the torpedo bombers come equipped with an improved In-flight Repair ![]() consumable that has one additional charge compared to other tier 10 aircraft carriers and with an improved cooldown, giving Hakuryu’s torpedo bombers excellent survivability even against ships with high AA. Their primary targets should be battleships and cruisers, the slower the better, though particularly skilled carrier players may find it possible to get good drops against distracted destroyers.
consumable that has one additional charge compared to other tier 10 aircraft carriers and with an improved cooldown, giving Hakuryu’s torpedo bombers excellent survivability even against ships with high AA. Their primary targets should be battleships and cruisers, the slower the better, though particularly skilled carrier players may find it possible to get good drops against distracted destroyers.
Dive Bombers:
Hakuryu’s dive bomber squadrons consist of 12 aircraft divided into 4 strikes of 3 aircraft each, dropping 1 bomb per aircraft. Like all Japanese dive bombers, Hakuryu’s dive bombers drop AP bombs. These bombers, and in truth all Japanese AP dive bombers, are some of the most difficult to aim in the game, requiring the player to keep the reticle as still as possible as it slowly tightens, with any movement widening the reticle. The rather unique manner in which the reticle also moves, where it first moves before remaining almost absolutely still for several seconds before moving again, requires complete confidence from the player in how much lead should be taken long before the drop point. However, once one becomes familiar with these quirks, the results can be absolutely devastating. With an individual damage of 6,800 per bomb and high accuracy, the dive bombers are capable of consistently scoring citadel hits against most battleships and cruisers, with the famed 20,800 alpha damage not being too rare when dropping under optimal circumstances. Because of how long it takes for the reticle to properly tighten and the high bloom penalty on the drop reticle, it is recommended to use the bombs against targets that are stationary or near stationary near islands where they may be pinned down by your team.
While just about any ship can be hit hard by citadels from Hakuryu’s dive bombers, battleships with multiple layers of horizontal protection and dedicated "bomb decks" can be rather difficult to citadel and thus should be low priority targets, such as British and French battleships. The long aiming time and their armor-piercing properties also make them near useless against destroyers where they are almost guaranteed to simply overpenetrate their thinly armored hulls.
Tips:
- The torpedo bombers are an excellent way to goad enemies into turning in specific directions. A kiting cruiser or battleship can oftentimes be coaxed into turning flat broadside in front of your team's battleships after repeated attacks from your torpedo bombers.
- While the raw penetration of the AP bombs cannot be changed, dropping the bombs at different altitudes can influence their impact angle. Against targets with high armor protection, such as battleships, a high altitude drop is favorable to flatten the impact angle as much as possible, while a more oblique impact angle from a lower altitude drop can reduce the likelihood of an overpenetration on thinly armored targets.
- Dropping torpedoes on destroyers is oftentimes difficult, though can be viable against larger destroyers with sluggish handling, such as Harugumo or Elbing. Even a single torpedo hit against a destroyer can cause significant damage, so it doesn't hurt to try if the opportunity presents itself.Pros:
- Fast and hard hitting torpedoes
- Fast plane speed and solid speed & health to AA damage ratio
- Accurate AP bombs with high damage, effective against most cruisers and battleships
- Large hangar making it difficult for Hakuryu to get deplaned
- Good individual rocket damage and fire chance
- Well armored flight deck which makes it highly resistant to long range fire when angled and immune to most HE munitions
Cons:
- Attack aircraft that can only pen 30mm
- Cannot defend herself in a brawl due to vulnerable sides and citadel along with inaccurate short-ranged secondaries
- Dive bomber reticle very difficult to aim, especially against actively maneuvering targets
- Only 2 torpedoes per drop can make them easy to dodge if aimed incorrectly or against more nimble targets
- Long arming distance on the torpedoes
Research
Optimal Configuration
The Hakuryu should be built one of two ways. One as a burst focused striker which is more specialized for random battles and the other as a burst focused supporter which is a mix between burst damage playstyle and fighter support for clan battles/ranked.
Upgrades
The recommended upgrades are:
Standard Build
Burst Focused Striker build
- Slot 1: Air Groups Modification 1

- Slot 2: Aircraft Engines Modification 1

- Slot 3: Aerial Torpedoes Modification 1

- Slot 4: Torpedo Bombers Modification 2

- Slot 5: Flight Control Modification 1

- Slot 6: Fuel Injection System (
 )
)
Competitive Build
Burst Focused Support build
- Slot 1: Air Groups Modification 1
- Slot 2: Aircraft Engines Modification 1
- Slot 3: Aerial Torpedoes Modification 1
- Slot 4: Torpedo Bombers Modification 2
- Slot 5: Squadron Consumables Modification 1
![: +50% action time [CVs only].](https://wiki.wgcdn.co/images/thumb/9/9a/Icon_modernization_PCM073_AbilityWorktimeBoostCV_Mod_I.png/20px-Icon_modernization_PCM073_AbilityWorktimeBoostCV_Mod_I.png)
- Slot 6: Fuel Injection System ()
Commander Skills
It is recommended to use Takeo or Raizo Suzuki for improved Survivability Expert.
- Note: Hidden Menace states that your planes reach safe altitude at 50% lower height which is not true because your planes are still vulnerable to flak, therefore the skill is bugged and not recommended.
Standard Build
| Recommended Commander Skills | ||||||
|---|---|---|---|---|---|---|
| Cost (points) |
Attack | Defense | Support | |||
| 1 |
|
★★★ |
|
|
|
|
| 2 |
★★ |
|
★★★ |
★★ |
|
|
| 3 |
|
|
|
★★★ |
★★★ |
|
| 4 |
|
★★ |
|
★ |
|
|
| Key: ★★★ - Extremely Useful ★★ - Frequently Useful ★ - Occasionally Useful No stars - Not Useful | ||||||
Competitive Build
| Recommended Commander Skills | ||||||
|---|---|---|---|---|---|---|
| Cost (points) |
Attack | Defense | Support | |||
| 1 |
|
|
|
|
|
★★★ |
| 2 |
★★ |
|
★★★ |
★ |
|
|
| 3 |
|
|
|
★★★ |
★★★ |
|
| 4 |
|
★★ |
|
|
|
★★ |
| Key: ★★★ - Extremely Useful ★★ - Frequently Useful ★ - Occasionally Useful No stars - Not Useful | ||||||
Consumables
Hakuryū equips the following consumables:
- Slot 1: Damage Control Party

- Slot 2: CAP Fighter

All aircraft carrier consumables are automatically activated.
Attack Aircraft:
- Slot 1: Engine Cooling

- Slot 2: Patrol Fighter

Torpedo Bombers:
- Slot 1: Engine Cooling
- Slot 2: Patrol Fighter
- Slot 3: In-flight Repair

Bombers:
- Slot 1: Engine Cooling
- Slot 2: Patrol Fighter
Camouflage
Type 1, 2, or 5 camouflage can be equipped for credits; Types 1 or 5 are recommended at a minimum to reduce detectability range.
Players who wish to spend doubloons can equip Hakuryū with Type 20 camouflage that lowers her detection radius, reduces the accuracy of incoming shells, halves her post-battle service cost, and doubles the amount of experience she earns.
Signals
As a carrier, Hakuryū has no risk of detonating.
- Note: Carriers burn at 1% health per a second while all other ships burn at 0.3% a second. So even though Carriers burn for only 5 seconds for each fire, if caught off of DCP, multiple fires can be set over and over again making a carrier lose more health to fires than any surface ship within a short duration. Also, Tier X carriers have tier 6 fire reduction coefficient which makes them 30% more likely to be caught on fire than tier X surface ships.
Recommended Signal Flags 
| |||||
|---|---|---|---|---|---|
| Combat | |||||

|
 ★★ |
 ★★ |
 ★ |
 ★★★ |
 ★★★ |
 ★★★ |
 ★ |
 ★★★ |
 ★★★ |

|
 ★★★ |

|

| ||||
Note: Use of the Juliet Charlie signal makes detonation impossible.
Gallery
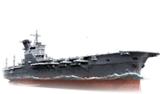
Frontal view of Hakuryū
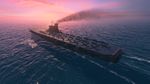
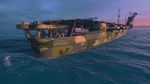
Hakuryū sailing into battle
.jpg)
.jpg)
.jpg)
.jpg)
Historical Info
Historical Gallery


| Japan | IV Hōshō • VI Ryūjō • VIII Shōkaku • VIII Kaga |
| U.K. | IV Hermes • VI Furious • VI Ark Royal |
| France | VI Béarn |
| U.S.S.R. | IV Komsomolets • VI Serov • VIII Pobeda • VIII Chkalov |
| U.S.A. | IV Langley • VI Independence • VI Ranger • VIII Yorktown • VIII Lexington • VIII Enterprise |
| Germany | IV Rhein • VI Weser • VI Erich Loewenhardt |
| Pan-Asia | VIII Sanzang |
| Spain | |
| Europe | |
| Netherlands | |
| Italy | VIII Aquila |
| Commonwealth | |
| Pan-America |