Harugumo

| Research price223000 exp |
| Purchase price19,500,000 |
| Hit Points25,600 |
| 100 mm/65 Type 98 on a Model A mount5 х 2 pcs. |
| Rate of Fire20 shots/min. |
| Reload Time3 sec. |
| Rotation Speed16 deg./sec. |
| 180 Degree Turn Time11.25 sec. |
| Firing Range12.55 km. |
| Maximum Dispersion109 m. |
| HE Shell100 mm HE Type98 |
| Maximum HE Shell Damage1,200 |
| Chance of Fire on Target Caused by HE Shell5 % |
| Initial HE Shell Velocity1000 m./s. |
| HE Shell Weight13 kg. |
| AP Shell100 mm AP Type98 |
| Maximum AP Shell Damage1,700 |
| Initial AP Shell Velocity1000 m./s. |
| AP Shell Weight13 kg. |
| 610 mm Sextuple1 х 6 pcs. |
| Rate of Fire0.35 shots/min. |
| Reload Time171 sec. |
| Rotation Speed25 deg./sec. |
| 180 Degree Turn Time7.2 sec. |
| TorpedoType93 mod. 3 |
| Maximum Damage23,767 |
| Torpedo Speed67 knot |
| Torpedo Range12 km. |
| 100 mm/65 Type 98 on a Model A mount5 х 2 pcs. |
| . . . Average Damage per Second104 |
| . . . Firing Range5.01 km. |
| 25 mm/60 Type 96 on a single mount16 х 1 pcs. |
| . . . Average Damage per Second28.8 |
| . . . Firing Range2.49 km. |
| 40 mm/60 Type 5 on a twin mount6 х 2 pcs. |
| . . . Average Damage per Second66 |
| . . . Firing Range3.51 km. |
| Maximum Speed35.7 knot |
| Turning Circle Radius830 m. |
| Rudder Shift Time5.5 sec. |
| Surface Detectability Range7.68 km. |
| Air Detectability Range4.18 km. |

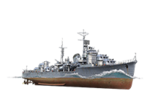
Harugumo — Japanese Tier X destroyer.
A further development of the Akizuki-class destroyers. This ship features larger dimensions and ten dual-purpose 100 mm guns arranged in five turrets to serve as the ship's primary armament.
Modules
 |
Rate of Fire (shots/min) | 180° Turn Time (sec) | Maximum Dispersion (m) | Maximum HE Shell Damage (HP) | Chance of Fire on Target Caused by HE Shell (%) | Maximum AP Shell Damage (HP) |
Research price (exp) |
Purchase price ( | |
|---|---|---|---|---|---|---|---|---|---|
| 100 mm/65 Type 98 on a Model A mount | 20 | 11.3 | 109 | 1,200 | 5 | 1,700 | 0 | 1,700,000 |
 |
Hit Points (HP) | Armor (mm) | Armor (mm) | Main Turrets (pcs.) | Secondary Gun Turrets (pcs.) | AA Mounts (pcs.) | Torpedo Tubes (pcs.) | Hangar Capacity (pcs.) |
Research price (exp) |
Purchase price ( | |
|---|---|---|---|---|---|---|---|---|---|---|---|
| Harugumo | 25,600 | 13 | 20 | 5 | 16/6/5 | 1 | 0 | 2,000,000 |
 |
Rate of Fire (shots/min) | Torpedo Tubes Reload Time (sec) | 180° Turn Time (sec) | Maximum Damage (HP) | Torpedo Speed (knot) | Torpedo Range (km) |
Research price (exp) |
Purchase price ( | |
|---|---|---|---|---|---|---|---|---|---|
| Type F3 | 0.4 | 157 | 7.2 | 21,366 | 76 | 8 | 30,000 | 2,500,000 | |
| Type93 mod. 3 | 0.4 | 171 | 7.2 | 23,766 | 67 | 12 | 0 | 2,500,000 |
 |
IDS_SHIP_PARAM_SUO_INCREASE_DIST (%) | Maximum Firing Range (km) |
Research price (exp) |
Purchase price ( | |
|---|---|---|---|---|---|
| Type10 mod. 1 | 0 | 0 | 1,100,000 |
 |
Maximum Speed (knot) |
Research price (exp) |
Purchase price ( | |
|---|---|---|---|---|
| Propulsion: 79,240 hp | 35.7 | 0 | 1,650,000 |
Compatible Upgrades
| Slot 1 |
|||||
|---|---|---|---|---|---|
| Slot 2 |
|||||
| Slot 3 |
|||||
| Slot 4 |
|||||
| Slot 5 |
|||||
| Slot 6 |
Player Opinion
Pros:
- Highest DPM of all Tier X Destroyers.
- Largest base health pool of all Destroyers.
- Powerful torpedo armament.
- 1/4 penetration for her main battery results in no need for Inertia Fuse for High Explosive shells skill.
- Using IFHE anyway results in the ability to penetrate 32 mm of armor with her HE.
- Low-caliber Armor Piercing is effective at engaging enemy destroyers when given broadside.
- Torpedo Reload Booster consumable allows her to put 12 torpedoes in the water every few minutes.
Cons:
- Tied for worst concealment among Tier X Destroyers (with Khabarovsk).
- Worst turning radius among all destroyers; is larger than that of many cruisers.
- Huge size makes her an easy target; battleship AP has no issues getting full penetrations against her.
- Only one set of torpedoes with a long reload.
- Lack of a Repair Party consumable results in her having less "effective" HP than the two Tier 10 Soviet Destroyers.
- Lack of Defensive Fire consumable and large turning radius makes her an easy target for Aircraft Carriers.
Research
- Torpedoes: Type F3 Torpedoes.
Optimal Configuration
Upgrades
The recommended upgrades for Harugumo are as follows:
- Slot 1: Main Armaments Modification 1
 *
*
- Slot 2: Propulsion Modification 1

- Slot 3: Template:Aiming Systems Modification 2
- Slot 4: Propulsion Modification 1 (
 )
)
- Slot 5: Concealment System Modification 1

- Slot 6: Main Battery Modification 3
 or Gun Fire Control System Modification 2
  **
**
- For captains who are afraid of detonating, Magazine Modification 1
 can be equipped instead.
- Either option is good. If a captain decides to not use Advanced Firing Training, opting for the extended main battery range is a good choice. If both Gun Fire Control System Modification 2 and Advanced Firing Training are used in concert, Harugumo can reach a whopping 17.47 km of range. It should be noted that that is not recommended, as engaging all but a stationary battleship at that range is nearly impossible.
Commander Skills
Key skills for Harugumo commanders include the standard "gunboat" destroyer skills. Captains who want a pure gunboat build should pick up both Basic Firing Training and Advanced Firing Training. Despite now having 1/4 HE penetration, taking Inertia Fuse for HE Shells is still recommended, as it now allows the Japanese 100 mm gun to penetrate 32 mm plating.
| Recommended Commander Skills | ||||||||
|---|---|---|---|---|---|---|---|---|
| Cost (points) |
Endurance | Attack | Support | Versatility | ||||
| 1 |
★★ |
★★ |
|
|
|
|
★ |
|
| 2 |
★ |
★★ |
|
★ |
★ |
|
★★ |
★★★ |
| 3 |
★ |
★★★ |
★ |
|
★★ |
★★ |
★★ |
★ |
| 4 |
|
|
★★★ |
|
★★ |
|
★★ |
★★★ |
| Key: ★★★ - Extremely Useful ★★ - Frequently Useful ★ - Occasionally Useful No stars - Meh Χ - Not recommended | ||||||||
Consumables
Harugumo can equip the following consumables:
- Slot 1: Damage Control Party

- Slot 2: Smoke Generator

- Slot 3: Engine Boost

- Slot 4: Torpedo Reload Booster

Premium variants of the consumables can be used to increase her performance in battle.
Camouflage
Type 1, 2, or 5 camouflage can be equipped for credits; Types 1 or 5 are recommended at a minimum to reduce detectibility range.
Players who wish to spend doubloons can equip Harugumo with Type XX camouflage that lowers her detection radius, reduces the accuracy of incoming shells, reduces her repair costs, and increases the amount of experience she earns.
Signals
Recommended Signal Flags 
| |||||
|---|---|---|---|---|---|
| Combat | |||||
 ★★★ |

|
 ★★ |

|
 ★★★ |
 ★★★ |
 ★★ |

|
 ★ |
 ★★ |
 ★★★ |

|

|

| ||||
Note: Use of the Juliet Charlie signal makes detonation impossible.
Gallery


Historical Info