Hiryu
| Revision as of 08:18, 30 July 2016 | Revision as of 00:57, 10 October 2020 | |||
26 intermediate revisions by 9 users not shown | ||||
| Line 3: | Line 3: | |||
| |Anno=<!-- you can write below short description for the ship. it will replace default once. --> | |Anno=<!-- you can write below short description for the ship. it will replace default once. --> | |||
| + | An aircraft carrier that had a prominent effect on the development of this type of ship in the Imperial Japanese Navy. It was a highly successful project that featured a high speed, reasonably good AA defense and a sizable air group. Poor armor protection reduced the aircraft carrier's resistance to damage.<br><br>{{Model3DViewer|855b9ae245b545fca00a0fe0df2d5d74}} | |||
| |Performance=<!-- write text about performance in battles below --> | |Performance=<!-- write text about performance in battles below --> | |||
| ? | + | The first standard-sized (or "fleet") aircraft carrier in the Japanese carrier line, carrier players will surely fall in love with ''Hiryu''. With a total complement of 72 planes, she is far less likely to run out of planes than her predecessors, if captains execute their attacks correctly that is. However, one must be aware that the torpedo planes she carries are the same as Tier V's ''[[Zuiho]]''. This means they incredibly vulnerable when facing warships above Tier VII. | ||
| ? | However, one must be aware that the torpedo planes | + | ||
| ? | + | |||
| ? | + | Captains must plan their attacks very carefully when using ''Hiryu''’s air squadrons. Never stay in one place, use auto-pilot mode, continue sailing (even at 1/4 speed), and always keep distance from the enemy. | ||
| ? | + | |||
| ? | + | |||
| |Pros=<!-- write list of positive points below. use * as in ordinary wiki-list. --> | |Pros=<!-- write list of positive points below. use * as in ordinary wiki-list. --> | |||
| ? | * | + | * Larger hangar provides a total complement of 72 planes and full reserves on all squadrons. | |
| ? | * Top speed of 34 knots means | + | * Top speed of 34 knots means she can re-position to any area of the map quicker. | |
| ? | * Upgraded fighter groups can match with | + | * Upgraded fighter groups can match with American fighters (if used well). | |
| ? | * | + | * Very well-rounded and is consistent in general when using the balanced loadout. | |
| ? | + | * Good anti-aircraft defense. | ||
| ? | * | + | ||
| |Cons=<!-- write list of negative points below. use * as in ordinary wiki-list. --> | |Cons=<!-- write list of negative points below. use * as in ordinary wiki-list. --> | |||
| ? | + | * Tier VI torpedo bombers are easily shredded by ships Tier VII and above. | ||
| ? | + | * Alpha damage against equal or higher tier capital ships can be lacking due to lower tier torpedo bombers. | ||
| ? | * Tier VI torpedo bombers are easily | + | * Performance against DDs may be short of what is expected due to inferior torpedo bombers. | |
| ? | * | + | ||
| ? | + | |Research=<!-- write text about priority sequence of research below --> | ||
| ? | * | + | This is a suggested research path: | |
| ? | + | # Type 7 mod. 2 Flight Control | ||
| + | # Mitsubishi A6M5c fighters | |||
| + | # Aichi D3A2 dive bombers | |||
| + | # Hull (B) | |||
| + | ||||
| + | Once the second hull is researched, captains are free to decide if they want to spend experience on the air superiority modification or move on to ''[[Shokaku]]''. | |||
| + | ||||
| + | |OptimalConfiguration=<!-- write some general text about selection of optimal configuration below (optional)--> | |||
| + | ||||
| + | |Upgrades=<!-- write text about best upgrades below --> | |||
| + | The recommended upgrades for ''{{#var:ship_name}}'' are as follows: | |||
| + | *'''Slot 1''': {{Air Groups Modification 1}} | |||
| + | *'''Slot 2''': {{Damage Control System Modification 1}} | |||
| + | *'''Slot 3''': {{Air Groups Modification 2}} | |||
| + | *'''Slot 4''': {{Propulsion Modification 1}} | |||
| + | ||||
| + | '''Upgrade Slot 3''' is the main choice of upgrades with ''{{#var:ship_name}}''. For players looking to improve their fighter's capabilities, {{Air Groups Modification 2}} is highly recommended, especially when using the Type 7 mod. 3 flight control system. Otherwise, the {{Flight Control Modification 1}} helps players land and launch ''{{#var:ship_name}}''’s multiple flight squadrons, as ''{{#var:ship_name}}'' has six separate plane squadrons to manage. | |||
| + | ||||
| + | |CommanderSkills=<!-- write text about best set of Commander Skills below --> | |||
| + | ''{{#var:ship_name}}'' uses the standard Japanese carrier captain skill setup. Emphasis should be on skills that boost fighter and bomber effectiveness and AA protection. [[Ship:Commander#Aircraft_Servicing_Expert|Aircraft Servicing Expert]], [[Ship:Commander#Torpedo_Acceleration|Torpedo Acceleration]], [[Ship:Commander#Torpedo_Armament_Expertise|Torpedo Armament Expertise]], and [[Ship:Commander#Air_Supremacy|Air Supremacy]] are "must have" skills. [[Ship:Commander#Dogfighting_Expert|Dogfighting Expert]] is also useful if ''{{#var:ship_name}}'' faces a higher tier carrier, and the bonus to ammunition allows her fighters to remain airborne longer before returning to rearm. | |||
| + | ||||
| + | For AA defense, ''{{#var:ship_name}}'' has large-caliber 127mm guns that benefit greatly from [[Ship:Commander#Manual_Fire_Control_for_AA_Armament|Manual Fire Control for AA Armament]]. [[Ship:Commander#Basic_Firing_Training|Basic Firing Training]] is also a good choice to boost all AA guns' DPS by 20%. While ''{{#var:ship_name}}''’s AA DPS output is not sufficient to wipe out entire squadrons, it can knock out a few planes and, in combination with maneuvering, can help avoid taking serious damage. | |||
| + | ||||
| + | [[Ship:Commander#Evasive_Maneuver|Evasive Maneuvers]] is recommended as it increases the bombers' survivability when returning to the carrier, and is especially useful when the enemy targets have activated {{Defensive AA Fire}}. | |||
| + | ||||
| + | Any skills that are related to an enemy vessel firing on your carrier are not useful, as the cost-benefit of investing in survivability skills is not worth the minimal benefit they offer. ''{{#var:ship_name}}'' has a low HP pool and is large and unarmored, and will not survive an attack by any ship larger than a destroyer. ''{{#var:ship_name}}'' captains must position their ship near friendlies and far back from the enemy fleet. [[Ship:Commander#Concealment_Expert|Concealment Expert]] may be taken to further reduce detection range if the captain so desires. | |||
| + | ||||
| + | {{Commander Skills 2 | |||
| + | <!-- This version enables a '0' rating. Use it for skills that have no effect (e.g. Improved Engines on a non-CV) or are detrimental to the ship. They should mirror what appears in the game client. --> | |||
| + | | rating11 = <!-- Priority Target --> | |||
| + | | rating12 = <!-- Preventive Maint --> | |||
| + | | rating13 = 0 <!-- Expert Loader --> | |||
| + | | rating14 = <!-- Air Supremacy --> | |||
| + | | rating15 = <!-- Direction Center for Fighters --> | |||
| + | | rating16 = <!-- Improved Engine Boost --> | |||
| + | | rating17 = <!-- Incoming Fire Alert --> | |||
| + | | rating18 = <!-- Last Gasp --> | |||
| + | ||||
| + | | rating21 = <!-- High Alert --> | |||
| + | | rating22 = <!-- Jack of All Trades --> | |||
| + | | rating23 = 0 <!-- Expert Marksman --> | |||
| + | | rating24 = 0 <!-- Torpedo Acceleration --> | |||
| + | | rating25 = 0 <!-- Smoke Screen Expert --> | |||
| + | | rating26 = <!-- Improved Engines --> | |||
| + | | rating27 = <!-- Adrenaline Rush --> | |||
| + | | rating28 = <!-- Last Stand --> | |||
| + | ||||
| + | | rating31 = <!-- Basics of Survivability --> | |||
| + | | rating32 = <!-- Survivability Expert--> | |||
| + | | rating33 = 0 <!-- Torpedo Armament Expertise--> | |||
| + | | rating34 = <!-- Aircraft Armor --> | |||
| + | | rating35 = <!-- Basic Firing Training --> | |||
| + | | rating36 = <!-- Superintendent --> | |||
| + | | rating37 = <!-- Demolition Expert --> | |||
| + | | rating38 = <!-- Vigilance --> | |||
| + | ||||
| + | | rating41 = <!-- Manual Fire Control for Secondary Armament --> | |||
| + | | rating42 = <!-- Fire Prevention --> | |||
| + | | rating43 = <!-- Inertia Fuse for HE Shells --> | |||
| + | | rating44 = <!-- Sight Stabilization --> | |||
| + | | rating45 = <!-- Advanced Firing Training --> | |||
| + | | rating46 = <!-- Massive AA Fire --> | |||
| + | | rating47 = <!-- Radio Position Finding --> | |||
| + | | rating48 = <!-- Concealment Expert --> | |||
| + | }} | |||
| + | ||||
| + | |Consumables=<!-- write text about selection of Consumables below --> | |||
| + | ''{{#var:ship_name}}'' can equip the following consumables: | |||
| + | * '''Slot 1:''' {{Damage Control Party}} | |||
| + | ||||
| + | |Camouflage=<!-- write text about useful camouflage below --> | |||
| + | [[Ship:Camouflage#Standard Camouflage|Type 1, 2, or 5 camouflage]] can be equipped for credits; Types 1 or 5 are recommended at a minimum to reduce detectibility range. | |||
| + | ||||
| + | Players who wish to spend doubloons can equip ''{{#var:ship_name}}'' with [[Ship:Camouflage#Permanent_Camouflage|Type 17 camouflage]] that lowers her detection radius, reduces the accuracy of incoming shells, reduces her repair costs, and increases the amount of experience she earns. | |||
| + | ||||
| + | |Signals=<!-- write text about best set of signals below --> | |||
| + | As a carrier, ''{{#var:ship_name}}'' can only mount at most four signals at a time and has no risk of detonating. Players should mount Equal Speed Charlie London ({{Equal Speed Charlie London|Size=18px}}), Zulu Hotel ({{Zulu Hotel|Size=18px}}), and, for the last two: November Echo Setteseven ({{November Echo Setteseven|Size=18px}}) and Juliet Whiskey Unaone ({{Juliet Whiskey Unaone|Size=18px}}). | |||
| + | ||||
| + | {{Signal Flags | |||
| + | | November Echo Setteseven = 3 | |||
| + | | Mike Yankee Soxisix = | |||
| + | | India X-Ray = | |||
| + | | Juliet Yankee Bissotwo = | |||
| + | | Victor Lima = | |||
| + | | Hotel Yankee = | |||
| + | ||||
| + | | November Foxtrot = | |||
| + | | Sierra Mike = 1 | |||
| + | | India Delta = | |||
| + | | Juliet Whiskey Unaone = 3 | |||
| + | | India Yankee = | |||
| + | | Juliet Charlie = | |||
| + | ||||
| + | | Zulu = 1 | |||
| + | | India Bravo Terrathree = | |||
| + | | Equal Speed Charlie London = 3 | |||
| + | | Zulu Hotel = 3 | |||
| + | | Papa Papa = | |||
| + | ||||
| + | | Wyvern = 1 | |||
| + | | Red Dragon = 1 | |||
| + | | Dragon Flag = 1 | |||
| + | | Ouroboros = | |||
| + | | Hydra = 1 | |||
| + | }} | |||
| + | ||||
| + | |Gallery=<!-- write below list of files without tags. description (if necessary) for each should be separated with | --><gallery> | |||
| + | File:Hiryu (8).jpg | |||
| + | File:Hiryu (9).jpg | |||
| + | File:Hiryu (10).jpg | |||
| + | File:Hiryu (11).jpg|''Hiryū''’s bombers preparing for takeoff. | |||
| + | File:Hiryu (12).jpg|One of ''Hiryū''’s squadrons taking off. | |||
| + | File:Hiryu (13).jpg | |||
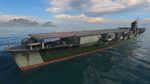
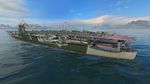
| + | File:Hiryu (14).jpg|Overhead view of ''Hiryū''. | |||
| + | File:Hiryu (15).jpg | |||
| + | </gallery> | |||
| + | ||||
| + | |History=<!-- write text below --> | |||
| + | ''Hiryū'' (飛龍?, "Flying Dragon") was an aircraft carrier built for the Imperial Japanese Navy (IJN) during the 1930s. The only ship of her class, she was built to a modified ''Sōryū'' design. Her aircraft supported the Japanese invasion of French Indochina in mid-1940. During the first month of the Pacific War, she took part in the attack on Pearl Harbor and the Battle of Wake Island. The ship supported the conquest of the Dutch East Indies in January 1942. The following month, her aircraft bombed Darwin, Australia, and continued to assist in the Dutch East Indies campaign. In April, ''Hiryū''’s aircraft helped sink two British heavy cruisers and several merchant ships during the Indian Ocean raid. | |||
| + | ||||
| + | After a brief refit, ''Hiryū'' and three other fleet carriers of the First Air Fleet (Kido Butai) participated in the Battle of Midway in June 1942. After bombarding American forces on the atoll, the carriers were attacked by aircraft from Midway and the carriers USS Enterprise, Hornet, and Yorktown. Dive bombers from Yorktown and Enterprise crippled ''Hiryū'' and set her afire. She was scuttled the following day after it became clear that she could not be salvaged. The loss of ''Hiryū'' and three other IJN carriers at Midway was a crucial strategic defeat for Japan and contributed significantly to the Allies' ultimate victory in the Pacific. | |||
| ? | + | ===Historical Inaccuracies=== | ||
| + | * Production of the D3A2 and A6M5c began in August 1942 and September 1944 respectively; ''Hiryū'' was sunk in June 1942. | |||
| + | * ''Hiryū''’s overall dark gray camouflage is missing. | |||
| + | * Light and dark green camouflage was only applied to aircraft carriers beginning in mid-1944; ''Hiryū'' was sunk in June 1942. | |||
| + | * The camouflaged flight deck pattern was actually applied to ''Zuikaku'', a ''Shōkaku''-class aircraft carrier. ''Hiryū''’s flight deck was never camouflaged and the only changes prior to her sinking was the addition of a ''hinomaru'' with white border, which is currently missing. | |||
| ? | + | |HistoricalGallery=<!-- write below list of files without tags. description (if necessary) for each should be separated with | --><gallery> | ||
| ? | Hiryū | + | File:Japanese aircraft carrier Hiryu 1939.jpg|''Hiryū'' at anchor in Yokosuka, shortly after completion in 1939. | |
| ? | + | File:Japanese aircraft carrier hiryu.jpg|''Hiryū'' running her speed trials, 28 April 1939. | ||
| ? | + | File:Hiryu Midway 01.jpg|''Hiryū'' circling to avoid a B-17 attack on the morning of 4 June. | ||
| + | File:Hiryu burning.jpg|''Hiryū'' abandoned, but still afloat, after a scuttling attempt after the Battle of Midway. | |||
| + | File:HiryuBurning.jpg|The abandoned and burning ''Hiryū'' photographed by an airplane from ''[[Hōshō]]''. | |||
| ? | + | </gallery> | ||
| ? | + | |||
| ? | + | |||
| ? | + | |||
| ? | + | |||
| ? | + | |||
| ? | + | |Video=<!-- put below video clips with using template VideoYT. You can use html-tags for formatting. --> | ||
| |Ref= <!-- write below --> | |Ref= <!-- write below --> | |||
| }}<!-- DO NOT DELETE THIS LINE. DO NOT INSERT ANYTHING BELOW THIS LINE --> | }}<!-- DO NOT DELETE THIS LINE. DO NOT INSERT ANYTHING BELOW THIS LINE --> | |||
Revision as of 00:57, 10 October 2020
[[File:<value_unset_error>_icon_small.png|<value_unset_error>|link=Ship:<value_unset_error>]] [[File:<value_unset_error>_icon_small.png|<value_unset_error>|link=Ship:<value_unset_error>]] [[File:<value_unset_error>_icon_small.png|<value_unset_error>|link=Ship:<value_unset_error>]] |
| File:icon small.png |
[[File:<value_unset_error>_icon_small.png|<value_unset_error>|link=Ship:<value_unset_error>]] [[File:<value_unset_error>_icon_small.png|<value_unset_error>|link=Ship:<value_unset_error>]] [[File:<value_unset_error>_icon_small.png|<value_unset_error>|link=Ship:<value_unset_error>]] |
| Research pricelevel;mark_id;mark;shortmark_id;shortMark;description_id;description;price_credit;price_gold;nation;icon;name;aa_caliber_0;aa_caliber_1;aa_caliber_2;aa_caliber_3;aa_damage;aa_defense;aa_maxDist;aaMaxdist;aa_maxDist_0;aaMaxdist0;aa_maxDist_1;aaMaxdist1;aa_maxDist_2;aaMaxdist2;aa_maxDist_3;aaMaxdist3;aa_name_0;aaName0;aa_name_1;aaName1;aa_name_2;aaName2;aa_name_3;aaName3;aa_numBarrels_0;aaNumbarrels0;aa_numBarrels_1;aaNumbarrels1;aa_numBarrels_2;aaNumbarrels2;aa_numBarrels_3;aaNumbarrels3;aa_numGuns_0;aaNumguns0;aa_numGuns_1;aaNumguns1;aa_numGuns_2;aaNumguns2;aa_numGuns_3;aaNumguns3;air_support;air_support_bombDamage_depthcharge;air_support_bombName_depthcharge;air_support_maxDist_depthcharge;air_support_numBombsOnPlane_depthcharge;air_support_numPlanesInCharge_depthcharge;air_support_numSquadrons_depthcharge;air_support_planeMaxHealth_depthcharge;air_support_planeName_depthcharge;air_support_reloadTime_depthcharge;armour_casMax;armourCasmax;armour_casMin;armourCasmin;armour_citMax;armourCitmax;armour_citMin;armourCitmin;armour_deckMax;armourDeckmax;armour_deckMin;armourDeckmin;armour_extremitiesMax;armourExtremitiesmax;armour_extremitiesMin;armourExtremitiesmin;armour_rangeMax;armourRangemax;armour_rangeMin;armourRangemin;artillery_weaponry;atba_bulletMassHE_0;atba_bulletMassHE_1;atba_bulletSpeedHE_0;atba_bulletSpeedHE_1;atba_burnProbHE_0;atba_burnProbHE_1;atba_caliber_0;atba_caliber_1;atba_damageHE_0;atba_damageHE_1;atba_maxDist;atbaMaxdist;atba_nameHE_0;atba_nameHE_1;atba_name_0;atbaName0;atba_name_1;atbaName1;atba_numBarrels_0;atba_numBarrels_1;atba_numGuns_0;atba_numGuns_1;atba_piercingHE_0;atba_piercingHE_1;atba_shotDelay_0;atba_shotDelay_1;atba_shotSpeed;atba_shotSpeed_0;atba_shotSpeed_1;battleLevelRangeMax;battleLevelRangeMin;durability;floodDamage;health;mobility;mobility_maxSpeed;mobilityMaxspeed;mobility_rudderTime;mobilityRuddertime;mobility_turningRadius;mobilityTurningradius;planes_aviation;planes_bomber_forsageRestore;planes_bomber_forsageTime;planes_bomber_hangarVolume;planes_bomber_level;planes_bomber_maxSpeed;planes_bomber_name;planes_bomber_numAttackers;planes_bomber_numInSquadron;planes_bomber_numSquadrons;planesBomberNumsquadrons;planes_bomber_planesRestoreTime;planes_bomber_speed;planes_bomber_torpedo_maxDamage;planes_bomber_torpedo_maxDist;planes_bomber_torpedo_name;planes_bomber_torpedo_speed;planes_bomber_visibility;planes_bomber_vitality;planes_dive_bomb_bulletMassHE_alt;planes_dive_bomb_bulletMass_alt;planes_dive_bomb_bulletSpeedHE_alt;planes_dive_bomb_bulletSpeed_alt;planes_dive_bomb_burnProbHE_alt;planes_dive_bomb_burnProb_alt;planes_dive_bomb_damageHE_alt;planes_dive_bomb_nameHE_alt;planes_dive_bomb_numBombsHE_alt;planes_dive_forsageRestore_alt;planes_dive_forsageTime_alt;planes_dive_hangarVolume_alt;planes_dive_level_alt;planes_dive_maxSpeed_alt;planes_dive_name_alt;planes_dive_numAttackers_alt;planes_dive_numInSquadron_alt;planes_dive_numSquadrons_alt;planes_dive_planesRestoreTime_alt;planes_dive_speed_alt;planes_dive_visibility_alt;planes_dive_vitality_alt;planes_fighter_forsageRestore_alt;planes_fighter_forsageTime_alt;planes_fighter_hangarVolume_alt;planes_fighter_level_alt;planes_fighter_maxSpeed_alt;planes_fighter_name_alt;planes_fighter_numAttackers_alt;planes_fighter_numInSquadron_alt;planes_fighter_numSquadrons_alt;planes_fighter_planesRestoreTime_alt;planes_fighter_rocket_bulletMassHE_alt;planes_fighter_rocket_bulletSpeedHE_alt;planes_fighter_rocket_burnProbHE_alt;planes_fighter_rocket_damageHE_alt;planes_fighter_rocket_nameHE_alt;planes_fighter_rocket_numBombsHE_alt;planes_fighter_speed_alt;planes_fighter_visibility_alt;planes_fighter_vitality_alt;slotsNum;visibility_detection;visibility_distByPlane;visibilityDistbyplane;visibility_distByPlane_fire;visibility_distByPlane_mg;visibility_distByShip;visibilityDistbyship;visibility_distByShip_fire;visibility_distByShip_mg;visibility_distByShip_smoke;visibility_distBySubmarine exp |
| Purchase priceSpecial |
| Maximum SpeedExpression error: Unexpected * operator. knot |
[[Ship:|]] — N/A special premium Tier N/A.
An aircraft carrier that had a prominent effect on the development of this type of ship in the Imperial Japanese Navy. It was a highly successful project that featured a high speed, reasonably good AA defense and a sizable air group. Poor armor protection reduced the aircraft carrier's resistance to damage.
Modules
Compatible Upgrades
| Slot 1 |
||||||||||||||||||||||||||||
|---|---|---|---|---|---|---|---|---|---|---|---|---|---|---|---|---|---|---|---|---|---|---|---|---|---|---|---|---|
| Slot 2 |
Damage Control System Modification 3 | |||||||||||||||||||||||||||
| Slot 3 |
||||||||||||||||||||||||||||
| Slot 4 |
||||||||||||||||||||||||||||
| Slot 5 |
Torpedo Tubes Modification 3 |
Reinforced Bulkheads | ||||||||||||||||||||||||||
| Slot 6 |
Player Opinion
Performance
The first standard-sized (or "fleet") aircraft carrier in the Japanese carrier line, carrier players will surely fall in love with Hiryu. With a total complement of 72 planes, she is far less likely to run out of planes than her predecessors, if captains execute their attacks correctly that is. However, one must be aware that the torpedo planes she carries are the same as Tier V's Zuiho. This means they incredibly vulnerable when facing warships above Tier VII.
Captains must plan their attacks very carefully when using Hiryu’s air squadrons. Never stay in one place, use auto-pilot mode, continue sailing (even at 1/4 speed), and always keep distance from the enemy.Pros:
- Larger hangar provides a total complement of 72 planes and full reserves on all squadrons.
- Top speed of 34 knots means she can re-position to any area of the map quicker.
- Upgraded fighter groups can match with American fighters (if used well).
- Very well-rounded and is consistent in general when using the balanced loadout.
- Good anti-aircraft defense.
Cons:
- Tier VI torpedo bombers are easily shredded by ships Tier VII and above.
- Alpha damage against equal or higher tier capital ships can be lacking due to lower tier torpedo bombers.
- Performance against DDs may be short of what is expected due to inferior torpedo bombers.
Research
This is a suggested research path:
- Type 7 mod. 2 Flight Control
- Mitsubishi A6M5c fighters
- Aichi D3A2 dive bombers
- Hull (B)
Optimal Configuration
Upgrades
The recommended upgrades for ' are as follows:
- Slot 1: Air Groups Modification 1

- Slot 2: Damage Control System Modification 1

- Slot 3: Air Groups Modification 2

- Slot 4: Propulsion Modification 1

Upgrade Slot 3 is the main choice of upgrades with '. For players looking to improve their fighter's capabilities, Air Groups Modification 2 ![]() is highly recommended, especially when using the Type 7 mod. 3 flight control system. Otherwise, the Flight Control Modification 1
is highly recommended, especially when using the Type 7 mod. 3 flight control system. Otherwise, the Flight Control Modification 1 ![]() helps players land and launch '’s multiple flight squadrons, as ' has six separate plane squadrons to manage.
helps players land and launch '’s multiple flight squadrons, as ' has six separate plane squadrons to manage.
Commander Skills
' uses the standard Japanese carrier captain skill setup. Emphasis should be on skills that boost fighter and bomber effectiveness and AA protection. Aircraft Servicing Expert, Torpedo Acceleration, Torpedo Armament Expertise, and Air Supremacy are "must have" skills. Dogfighting Expert is also useful if ' faces a higher tier carrier, and the bonus to ammunition allows her fighters to remain airborne longer before returning to rearm.
For AA defense, ' has large-caliber 127mm guns that benefit greatly from Manual Fire Control for AA Armament. Basic Firing Training is also a good choice to boost all AA guns' DPS by 20%. While '’s AA DPS output is not sufficient to wipe out entire squadrons, it can knock out a few planes and, in combination with maneuvering, can help avoid taking serious damage.
Evasive Maneuvers is recommended as it increases the bombers' survivability when returning to the carrier, and is especially useful when the enemy targets have activated Defensive AA Fire ![]() .
.
Any skills that are related to an enemy vessel firing on your carrier are not useful, as the cost-benefit of investing in survivability skills is not worth the minimal benefit they offer. ' has a low HP pool and is large and unarmored, and will not survive an attack by any ship larger than a destroyer. ' captains must position their ship near friendlies and far back from the enemy fleet. Concealment Expert may be taken to further reduce detection range if the captain so desires.
| Recommended Commander Skills | ||||||||
|---|---|---|---|---|---|---|---|---|
| Cost (points) |
Endurance | Attack | Support | Versatility | ||||
| 1 |
|
|
Χ |
|
|
|
|
|
| 2 |
|
|
Χ |
Χ |
Χ |
|
|
|
| 3 |
|
|
Χ |
|
|
|
|
|
| 4 |
|
|
|
|
|
|
|
|
| Key: ★★★ - Extremely Useful ★★ - Frequently Useful ★ - Occasionally Useful No stars - Meh Χ - Not recommended | ||||||||
Consumables
' can equip the following consumables:
- Slot 1: Damage Control Party

Camouflage
Type 1, 2, or 5 camouflage can be equipped for credits; Types 1 or 5 are recommended at a minimum to reduce detectibility range.
Players who wish to spend doubloons can equip ' with Type 17 camouflage that lowers her detection radius, reduces the accuracy of incoming shells, reduces her repair costs, and increases the amount of experience she earns.
Signals
As a carrier, ' can only mount at most four signals at a time and has no risk of detonating. Players should mount Equal Speed Charlie London (🚫), Zulu Hotel (🚫), and, for the last two: November Echo Setteseven (![]() ) and Juliet Whiskey Unaone (
) and Juliet Whiskey Unaone (![]() ).
).
Recommended Signal Flags 
| |||||
|---|---|---|---|---|---|
| Combat | |||||

|

|

|

|

|

|
 ★★★ |

|
 ★★★ |
 ★ |

|

|

|

| ||||
Note: Use of the Juliet Charlie signal makes detonation impossible.
Gallery
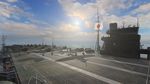
Hiryū’s bombers preparing for takeoff.
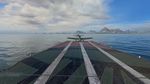
One of Hiryū’s squadrons taking off.
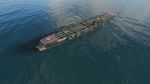
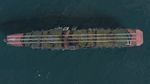
Overhead view of Hiryū.
.jpg)
.jpg)
.jpg)
.jpg)
.jpg)
.jpg)
.jpg)
.jpg)
Historical Info
Historical Gallery


| Destroyers | |
| Cruisers | |
| Battleships | |
| Aircraft Carriers |
| Japan | |
| U.K. | |
| France | |
| U.S.S.R. | |
| U.S.A. | |
| Germany | |
| Pan-Asia | |
| Spain | |
| Europe | |
| Netherlands | |
| Italy | |
| Commonwealth | |
| Pan-America |