Hood
| Revision as of 13:36, 20 February 2018 | Revision as of 15:10, 20 February 2018 Updated Upgrades per 0.6.14. | |||
| Line 41: | Line 41: | |||
| |Upgrades=<!-- write text about best upgrades below --> | |Upgrades=<!-- write text about best upgrades below --> | |||
| The recommended upgrades for ''{{#var:ship_name}}'' are as follows: | The recommended upgrades for ''{{#var:ship_name}}'' are as follows: | |||
| ? | * '''Slot 1:''' | + | * '''Slot 1:''' {{Auxiliary Armaments Modification 1}}, in order to improve the AA rockets' survivability. The rocket batteries are vital to ''Hood's'' AA defense against air strikes and the main batteries already have very good survivability. | |
| ? | * '''Slot 2:''' | + | * '''Slot 2:''' {{Damage Control System Modification 1}} is the top pick of the bunch, in order to reduce fire and flooding chance on the ship (as ''Hood'' has poor torpedo protection for her tier). | |
| ? | + | * '''Slot 3:''' {{Aiming Systems Modification 1}} for captains focused on the main batteries and increasing their accuracy, or {{AA Guns Modification 2}} for captains wishing to boost the range of ''Hood''’s anti-aircraft bubbles (the big winner in this case would be her rocket batteries). | ||
| ? | * '''Slot 4:''' | + | * '''Slot 4:''' {{Steering Gears Modification 2}} will further improve her good rudder shift time, or {{Damage Control System Modification 2}} will make ''Hood'' more resistant to fire and flooding damage. | |
| ? | + | |||
| |CommanderSkills=<!-- write text about best set of Commander Skills below --> | |CommanderSkills=<!-- write text about best set of Commander Skills below --> | |||
| Line 92: | Line 91: | |||
| * '''Slot 2:''' {{Repair Party}} | * '''Slot 2:''' {{Repair Party}} | |||
| * '''Slot 3:''' {{Defensive AA Fire}} | * '''Slot 3:''' {{Defensive AA Fire}} | |||
| ? | ||||
| Priority for use of premium consumables should be {{Damage Control Party II}}, {{Repair Party II}}, and {{Defensive AA Fire II}}, in that order. | Priority for use of premium consumables should be {{Damage Control Party II}}, {{Repair Party II}}, and {{Defensive AA Fire II}}, in that order. | |||
| Line 136: | Line 134: | |||
| <div class="thumb tright"> | <div class="thumb tright"> | |||
| {{AnnoWiki|content= | {{AnnoWiki|content= | |||
| ? | <h2>HMS ''{{#var:ship_name}}'', | + | <h2>HMS ''{{#var:ship_name}}'', 1941</h2> | |
| <h3>Construction</h3> | <h3>Construction</h3> | |||
| :Builder: John Brown & Co.; Clydebank, Scotland | :Builder: John Brown & Co.; Clydebank, Scotland | |||
| Line 194: | Line 192: | |||
| ''Hood''’s main battery was comprised of the staple of Royal Navy capital ships of the era: eight (8) 15-inch Mark I rifles in four twin-gun Mark II turrets, arranged in super-firing pairs fore and aft. The Mark II turrets were an improved mount; they could elevate the barrels up to +30° in order to increase range. The 15-inch Mark I rifles themselves were a direct enlargement of the earlier 13.5-inch Mark V guns. The change in armament reflected a change in priority: the 15-inch guns traded shell velocity for shell weight, under the belief that penetration would not be compromised due to increased hitting power. | ''Hood''’s main battery was comprised of the staple of Royal Navy capital ships of the era: eight (8) 15-inch Mark I rifles in four twin-gun Mark II turrets, arranged in super-firing pairs fore and aft. The Mark II turrets were an improved mount; they could elevate the barrels up to +30° in order to increase range. The 15-inch Mark I rifles themselves were a direct enlargement of the earlier 13.5-inch Mark V guns. The change in armament reflected a change in priority: the 15-inch guns traded shell velocity for shell weight, under the belief that penetration would not be compromised due to increased hitting power. | |||
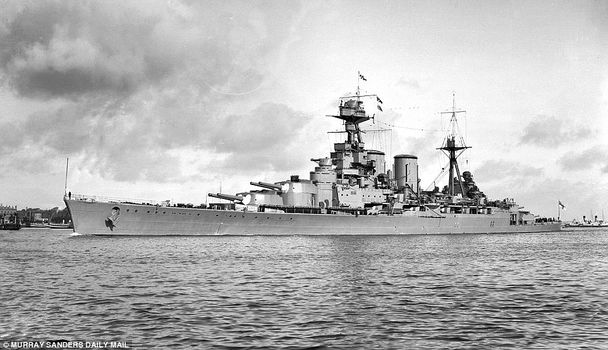
| ? | HMS ''Hood'', the lead – and only – ship of the ''Admiral''-class battlecruisers was laid down 1 September 1916 at John Brown & Co. Shipyards in Clydebank, Scotland. She was originally laid down on | + | HMS ''Hood'', the lead – and only – ship of the ''Admiral''-class battlecruisers was laid down 1 September 1916 at John Brown & Co. Shipyards in Clydebank, Scotland. (She was originally laid down on 31 May 1916, but the Battle of Jutland that same day saw her construction suspended as the design for the battlecruisers was up-armored.) She was launched 22 August 1918, and commissioned into the Royal Navy on 15 May 1920. What was revealed was a beautiful amalgamation of old and new: she still retained a tripod mast and hand-operated secondary guns, but also incorporated novelties like a fully enclosed bridge, and fire-control from elevated directors. She also brought back the clipper-bow, something not seen on Royal Navy ships since the 1860s. | |
| ====Service==== | ====Service==== | |||
| Line 210: | Line 208: | |||
| ===Historical Inaccuracies=== | ===Historical Inaccuracies=== | |||
| ? | * ''Hood'' is represented in game by her mid 1941 self, as sunk. Not represented are her earlier pre- | + | * ''Hood'' is represented in game by her mid-1941 self, as sunk. Not represented are her earlier pre-WWII conditions, armed with 5.5-inch (140 mm) secondary guns. | |
| ? | * ''Hood'' was officially classified as a | + | * ''Hood'' was officially classified as a battlecruiser, though her specifications are closer to those of battleships. | |
| ? | * ''Hood'' had a top speed of 32.07kn normally, but | + | * ''Hood'' had a top speed of 32.07kn normally, but by 1941, this was only 28.8kn as her engines were in dire need of an overhaul. | |
| * The unrotated projectiles (UP) were unreliable and ineffective in operation; aircraft could avoid the wires and winds could blow the projectiles back onto the ship which fired them. There are no records of UPs shooting down any aircraft. | * The unrotated projectiles (UP) were unreliable and ineffective in operation; aircraft could avoid the wires and winds could blow the projectiles back onto the ship which fired them. There are no records of UPs shooting down any aircraft. | |||
| ? | * The Mk.II turret for the 15"/42 Mk.I gun had a traverse rate of | + | * The Mk.II turret for the 15"/42 Mk.I gun had a traverse rate of 2 degrees per second, but in game this is buffed to 5 degrees per second. | |
| ? | * ''Hood'' | + | * ''Hood''’s premium camouflage color scheme is a two-tone grey; she was actually painted in overall dark grey for most of her career. The two-tone scheme she wears in-game is a variant of that worn by HMS ''Repulse''. | |
| |HistoricalGallery=<!-- write below list of files with description (if necessary) separated with | --><gallery> | |HistoricalGallery=<!-- write below list of files with description (if necessary) separated with | --><gallery> | |||
| Line 240: | Line 238: | |||
| File:Hood Explosion.jpg|The explosion aboard ''Hood'' as photographed from ''[[Prinz Eugen]]''. ''Hood'' is right-center, horizon. ''Prince of Wales'' is left-center, horizon. | File:Hood Explosion.jpg|The explosion aboard ''Hood'' as photographed from ''[[Prinz Eugen]]''. ''Hood'' is right-center, horizon. ''Prince of Wales'' is left-center, horizon. | |||
| File:Hood Explosion1.jpg|Immediately after the explosion aboard ''Hood'', again photographed from ''Prinz Eugen''. The large cloud of smoke right-center horizon is from ''Hood'', the dense cloud left-center horizon is from ''Prince of Wales''. | File:Hood Explosion1.jpg|Immediately after the explosion aboard ''Hood'', again photographed from ''Prinz Eugen''. The large cloud of smoke right-center horizon is from ''Hood'', the dense cloud left-center horizon is from ''Prince of Wales''. | |||
| ? | ||||
| File:HMS Hood vs HMS Renown propeller nugget.jpg|Privately owned propeller fragment from the wreckage of HMS ''Hood''. | File:HMS Hood vs HMS Renown propeller nugget.jpg|Privately owned propeller fragment from the wreckage of HMS ''Hood''. | |||
| </gallery> | </gallery> | |||
Revision as of 15:10, 20 February 2018

| Purchase priceSpecial |
| Hit Points67,700 |
| IDS_PBGM048_15IN42_MK24 х 2 pcs. |
| Rate of Fire2 shots/min. |
| Reload Time30 sec. |
| Rotation Speed5 deg./sec. |
| 180 Degree Turn Time36 sec. |
| Firing Range18.57 km. |
| Maximum Dispersion242 m. |
| HE Shell381 mm HE Mk VIIIb |
| Maximum HE Shell Damage5,300 |
| Chance of Fire on Target Caused by HE Shell34 % |
| Initial HE Shell Velocity731.5 m./s. |
| HE Shell Weight879 kg. |
| AP Shell381 mm AP Mk XIIIa |
| Maximum AP Shell Damage11,400 |
| Initial AP Shell Velocity731.5 m./s. |
| AP Shell Weight879 kg. |
| 102 mm/45 QF Mk.XVI on a Mk.XIX mount7 х 2 pcs. |
| Firing Range5.6 km. |
| Rate of Fire20 shots/min. |
| Reload Time3 sec. |
| HE Shell102 mm HE 35 lb |
| Maximum HE Shell Damage1,500 |
| Initial HE Shell Velocity811 m./s. |
| Chance of Fire on Target Caused by HE Shell6 % |
| 102 mm/45 QF Mk.XVI on a Mk.XIX mount7 х 2 pcs. |
| . . . Average Damage per Second65.8 |
| . . . Firing Range5.01 km. |
| 12.7 mm Mk.III4 х 4 pcs. |
| . . . Average Damage per Second8.4 |
| . . . Firing Range1.2 km. |
| UP AA Rocket Mk.I5 х 20 pcs. |
| . . . Average Damage per Second50 |
| . . . Firing Range1.5 km. |
| 40 mm/39 Vickers QF Mk.VIII on a Mk.VI mount3 х 8 pcs. |
| . . . Average Damage per Second59.4 |
| . . . Firing Range2.49 km. |
| Maximum Speed32 knot |
| Turning Circle Radius910 m. |
| Rudder Shift Time13.4 sec. |
| Surface Detectability Range15.71 km. |
| Air Detectability Range11.09 km. |

Hood — British special premium Tier VII battleship.
A fast battle cruiser that had long remained the largest and one of the most powerful ships in the Royal Navy. The ship was built based on the experience gained during World War I. Unlike later period battleships, she had weak horizontal armor protection. In the beginning of World War II, the ship's outdated secondary armament was demounted and replaced by enhanced AA guns.
Hood first went on sale on 18 May 2017 on the NA servers, and on 19 May 2017 on the EU servers.
Modules
 |
Rate of Fire (shots/min) | 180° Turn Time (sec) | Maximum Dispersion (m) | Maximum HE Shell Damage (HP) | Chance of Fire on Target Caused by HE Shell (%) | Maximum AP Shell Damage (HP) |
Research price (exp) |
Purchase price ( | |
|---|---|---|---|---|---|---|---|---|---|
| 381 mm/42 Mk.I on a Mk.II mount | 2 | 36 | 242 | 5,300 | 34 | 11,400 | 0 | 0 |
 |
Hit Points (HP) | Armor (mm) | Armor (mm) | Main Turrets (pcs.) | Secondary Gun Turrets (pcs.) | AA Mounts (pcs.) | Torpedo Tubes (pcs.) | Hangar Capacity (pcs.) |
Research price (exp) |
Purchase price ( | |
|---|---|---|---|---|---|---|---|---|---|---|---|
| Hood | 67,700 | 13 | 381 | 4 | 7 | 4/3/5/7 | 0 | 0 |
 |
IDS_SHIP_PARAM_SUO_INCREASE_DIST (%) | Maximum Firing Range (km) |
Research price (exp) |
Purchase price ( | |
|---|---|---|---|---|---|
| Mk VII mod. 1 | 0 | 0 | 0 |
 |
Maximum Speed (knot) |
Research price (exp) |
Purchase price ( | |
|---|---|---|---|---|
| Propulsion: 144,000 hp | 32 | 0 | 0 |
Compatible Upgrades
| Slot 1 |
||||
|---|---|---|---|---|
| Slot 2 |
||||
| Slot 3 |
||||
| Slot 4 |
Player Opinion
Performance
Hood is a Tier VII British battleship that features high speed, accurate guns, and a unique consumable.
Armament-wise, Hood has the same 15-inch/42 caliber guns as Warspite has, with slightly faster turret traverse and higher range. Unfortunately for Hood, these particular guns — while potent at Tier VI — start to feel a bit underwhelming at Tier VII as other ships gain larger and/or faster-firing main battery armaments. The weak penetration values of her armor piercing rounds means captains must be careful with their aim or Hood’s shells will easily bounce off of the belt armor of opposing battleships. Her armor scheme is notably lacking compared to her contemporaries at Tier VII as well, but her speed allows her to dictate the terms of an engagement against most any other battleship she is likely to face.
As a battlecruiser, Hood is significantly faster than many of the better-armored battleships at her tier and has a decent rudder shift speed, granting her the ability to dart around the battlefield with relative ease. Unique among battleships, Hood also has access to the Defensive AA Fire ![]() consumable. Unlike the version available to cruisers and destroyers, however, the version available to Hood only affects her rocket launchers: her innermost AA bubble. The upside is that it multiplies their AA damage per second by x25 (rather than the standard x3). This means that the low range area of the rockets’ AA field becomes an instant death zone for enemy planes, but is not useful to defend teammates. Enemy torpedo bombers may also drop outside of the effective range of the rockets as well.
consumable. Unlike the version available to cruisers and destroyers, however, the version available to Hood only affects her rocket launchers: her innermost AA bubble. The upside is that it multiplies their AA damage per second by x25 (rather than the standard x3). This means that the low range area of the rockets’ AA field becomes an instant death zone for enemy planes, but is not useful to defend teammates. Enemy torpedo bombers may also drop outside of the effective range of the rockets as well.
Hood is a solid Tier VII battleship for captains who prefer to flex their ship's speed and maneuverability to set the terms of an engagement rather than slug it out at close range.
Pros:
- Comparable turret traverse speed for a battleship of her tier (same as Gneisenau).
- Outstanding top speed.
- Largest amount of hit points among Tier VII battleships.
- Murderous close-range AA.
- Hard hitting guns at medium and close range.
- Guns are very accurate.
- Low slung citadel is very hard to hit at medium and close range.
- Decent secondary armament.
Cons:
- Weak armor protection.
- Penetration values of armor piercing rounds drops off sharply past medium range.
- AA range is too short to guard other ships.
- Colossal turning circle combined with best-in-tier rudder shift time gives average maneuverability.
Research
Optimal Configuration
Upgrades
The recommended upgrades for Hood are as follows:
- Slot 1: Auxiliary Armaments Modification 1
 , in order to improve the AA rockets' survivability. The rocket batteries are vital to Hood's AA defense against air strikes and the main batteries already have very good survivability.
- Slot 2: Damage Control System Modification 1
 is the top pick of the bunch, in order to reduce fire and flooding chance on the ship (as Hood has poor torpedo protection for her tier).
- Slot 3: Aiming Systems Modification 1
 for captains focused on the main batteries and increasing their accuracy, or AA Guns Modification 2 (
 ) for captains wishing to boost the range of Hood’s anti-aircraft bubbles (the big winner in this case would be her rocket batteries).
- Slot 4: Steering Gears Modification 2
 will further improve her good rudder shift time, or Damage Control System Modification 2
  will make Hood more resistant to fire and flooding damage.
Commander Skills
| Recommended Commander Skills | ||||||||
|---|---|---|---|---|---|---|---|---|
| Cost (points) |
Endurance | Attack | Support | Versatility | ||||
| 1 |
★ |
★★★ |
★ |
|
|
|
|
|
| 2 |
★★★ |
★★ |
★★ |
|
|
|
★★★ |
|
| 3 |
★★★ |
|
|
|
★★ |
★★★ |
|
★★ |
| 4 |
|
★★ |
|
|
★★★ |
|
|
★★ |
| Key: ★★★ - Extremely Useful ★★ - Frequently Useful ★ - Occasionally Useful No stars - Meh Χ - Not recommended | ||||||||
Consumables
Hood can equip the following consumables:
- Slot 1: Damage Control Party

- Slot 2: Repair Party

- Slot 3: Defensive AA Fire

Priority for use of premium consumables should be Damage Control Party II (![]() ), Repair Party II (
), Repair Party II (![]() ), and Defensive AA Fire II (
), and Defensive AA Fire II (![]() ), in that order.
), in that order.
Camouflage
As a premium ship, Hood comes included with Type 10 camouflage that lowers her detection radius, reduces the accuracy of incoming shells, and increases the amount of experience she earns.
Signals
Hood is able to mount 8 signal flags simultaneously. India Delta (![]() ) is recommended to improve the ship’s survivability by increasing the amount of health recovered when the repair party consumable is used. India Yankee (
) is recommended to improve the ship’s survivability by increasing the amount of health recovered when the repair party consumable is used. India Yankee (![]() ) and Juliet Yankee Bissotwo (
) and Juliet Yankee Bissotwo (![]() ) also improve survivability by decreasing the time to repair fires and flooding respectively. November Foxtrot (
) also improve survivability by decreasing the time to repair fires and flooding respectively. November Foxtrot (![]() ) is also highly recommended to reduce the cooldown time on the ship’s consumables. Economic flags such as Zulu (🚫), Zulu Hotel (🚫), and Equal Speed Charlie London (🚫) can be used to increase the credit and experience gain per battle. Lastly, Sierra Mike (
) is also highly recommended to reduce the cooldown time on the ship’s consumables. Economic flags such as Zulu (🚫), Zulu Hotel (🚫), and Equal Speed Charlie London (🚫) can be used to increase the credit and experience gain per battle. Lastly, Sierra Mike (![]() ) can be mounted to increase Hood's already fast speed.
) can be mounted to increase Hood's already fast speed.
Recommended Signal Flags 
| |||||
|---|---|---|---|---|---|
| Combat | |||||
 ★ |
 ★ |
 ★★★ |

|

|

|

|

|
 ★★ |
 ★★ |
 ★★★ |
 ★★★ |

|

| ||||
Note: Use of the Juliet Charlie signal makes detonation impossible.
Gallery

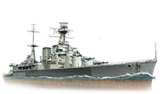
Hood as she appears in port.
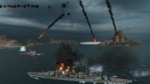
Hood creates a fireworks show.
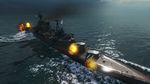
Hood firing her main battery to port off the stern quarter.
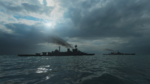
Hood underway.
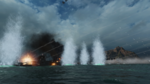
Hood takes a hit while engaging enemy aircraft.


Historical Info
Historical Gallery


_profile_drawing.png)


Video
References
- Taylor, B., Schmid, T. (2005). Battlecruiser HMS Hood: an illustrated biography. London, UK: Chatham Publishing
- Konstam, A., Bryan, T. (2003). British Battlecruisers: 1939-45. Oxford, UK: Osprey Publishing, Ltd.
- Chesneau, R., Gardiner, R. (1980) Conway’s All the World’s Fighting Ships: 1922-1946. Conway Maritime Press.
- https://www.hmshood.com/history/timeline4.htm
- https://www.militaryfactory.com/ships/detail.asp?ship_id=HMS-Hood-51